Replacing the rear axle axle seal on a Chevrolet Niva. A little easier than it seems
Sometimes, it may be necessary to replace the rear axle axle oil seal on a Chevrolet Niva. Such work may be required at any time. Unfortunately, this model has its own problems. Rear axle oil seal leakage is one of these problems. In itself, such a replacement is not difficult. This does not require any special skills. Even a novice driver can cope with such work. Timely replacement will avoid problems with the differential and other axle parts. Therefore, repairs should not be put on the back burner. For greater safety, you should regularly monitor the condition of this element of the car. Replacement of the rear axle axle seal on a Chevrolet Niva is carried out when transmission fluid is visible leaking from the axle. To do this, after parking, pay attention to the condition of the car’s drums. If there are problems with the seals, small leaks will be noticeable on the wheels. If it is not brake fluid, then most likely the problem is in the oil seal and should be replaced. A transmission fluid leak will cause serious problems with axle components.
Replacing the rear axle axle seal on a Chevrolet Niva
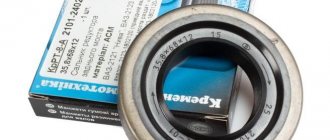
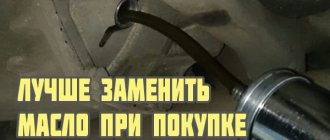
A little about choosing the oil seal itself. Many people on the Internet strongly recommend installing German oil seals, as they are called, I have not found them anywhere, nor have I found the oil seals themselves. From that, replacing the oil seal on a Chevrolet Niva axle shaft I came across in the Lada Detail brand stores, there were “Balakovo” oil seals and “Rezinotekhnika”.
Having turned all these products in my hands, I personally liked “Rezinotekhnika” more, and the oil seals on the Chevrolet Niva axle shaft are the same oil seals on the VAZ front-wheel drive, the landing dimensions are number to number!
Replacing the axle shaft seal of the rear axle Niva 21213
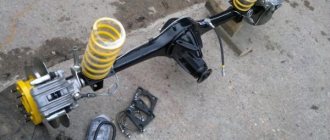
After unscrewing the bolts, the shock absorber will no longer hold the rear axle, and the spring will push it down, causing oil to flow. To avoid this, you need to first adjust the stand by jacking the car higher.
Pay attention to the groovers: If you ignore the loss of the groover and install a new one, the old one will subsequently get between the block and the drum while driving and the wheel will jam. After unscrewing the bolts, with a sharp movement, remove the axle shaft with the bearing from the cage.
If this fails, attach the wheel to the studs with 3 nuts and try to pull it. The last option is to use a special inertial puller for removal.
There is also a popular way: This will lead to problems with work efficiency. If it is necessary to change the type of lubricant, it is recommended to first flush the system.
When removing the axle shaft, oil will begin to flow out.
Therefore, it is better to drain it in advance. If you do not want to change the lubricant, then you need to take measures against its leakage. To do this, simply raise the side of the car from which you are changing the oil seal higher.
This way you will avoid lubricant leakage. But, in any case, there is a risk of lubricant leakage.
Replacing the rear axle axle seal on a Chevrolet Niva. A little easier than it seems
Be sure to add a new portion of oil after all work has been completed. When reinstalling the brake drum, pay attention to its condition. Using a suitable piece of pipe, press in the new oil seal.
If the axle shaft is deformed, its splines are worn out, and of course the bearing is worn out, we replace the axle shaft with a new one complete with bearing and locking ring; it is recommended to replace the bearing yourself with another locking ring. Replacing the oil seal on the Chevrolet Niva axle shaft is recommended.
Install the axle shaft assembly in reverse order. Source Read: At this time, the presented technical center has a special price for work on replacing timing chains, details. Happens when a part is pulled out of its socket. A distinction should be made between transmission oil leakage from the axle seal on either side of the rear beam and from the gearbox shank where the driveshaft is secured. In the second case, greasy stains and dirt cover the rear axle gear housing, located in the middle.
If replacing the oil seal on a Chevrolet Niva axle shaft for various reasons, you need to replace the axle shaft bearing, then at the same time it is worth changing the oil seal.
This will save you from having to disassemble the unit again due to leakage of the old part. The part costs mere pennies, its catalog number for the Chevrolet Niva - the right and left overall dimensions are as follows: The catalog number and dimensions of the O-ring of the Niva VAZ axle shaft are identical.
In addition to the oil seal itself, you will need transmission oil to replenish the amount in the gearbox. Preparation and disassembly To independently remove a leaking rear axle oil seal on a Niva Chevrolet, you will need the following tools: Never neglect gloves when repairing a car: The height of the wooden stand should be enough to support the rear axle with the wheel removed and the shock absorber unscrewed, otherwise oil will leak from it.
What tools are needed to replace the oil seal?
To replace the oil seal yourself, you will need:
- pliers;
- hammer;
- large flat screwdriver;
- a powerful wrench for unscrewing and tightening the nut on the shank;
- standard set of wrenches;
- puller;
- torque wrench;
- a universal wrench or tool that secures the shank flange;
- dynamometer;
- durable elastic cord.
The oil seal cannot be replaced without the part itself, which must first be purchased. The key that holds the shank flange can be replaced with a homemade device. These are two M8 bolts and a knob that securely hold the part and eliminate the possibility of it turning. Bolts are inserted into the flange holes, and a knob is placed between them.
Preparatory activities
Before proceeding with the replacement, the owner of a Niva Chevrolet car needs to prepare a number of tools. In the process you will need:
- box and socket wrenches in a set;
- flat screwdriver;
- wheel wrench;
- hammer;
- jack;
- additional wooden support;
- a piece of pipe equal to the diameter of the gland.
Be sure to wear work gloves - they will not only keep your hands clean, but also protect your fingers from injury.
The stand will need to be such that after removing the wheel and dismantling the shock absorber, the rear axle remains at approximately the same height. Otherwise, you risk losing too much transmission oil.
Installing a New Seal
After removing the axle shaft, the metal shield where the brake pads are attached will remain hanging on the copper pipe with the fluid, so it should be fixed by inserting the 2 upper bolts back into the holes. Then follow the instructions:
- Remove the thick rubber gasket from the rear axle flange.
- Pull out the old oil seal by prying it with a screwdriver or pliers. Clean the seat and wipe with a rag.
- Lightly lubricate the new seal with transmission oil and insert it into the socket of the Niva rear axle as evenly as possible.
- Using a round pipe adapter, press the oil seal into the socket with light blows of a hammer. You can use an old seal as an additional attachment.
The process of replacing the rear axle oil seal
You should first turn off the engine. Further:
- Release the brake (parking) lever if it has been depressed.
- Drain the oil from the bridge and screw the drain plug back on.
Drain the oil from the bridge and screw the plug back on.
Disconnect the cardan from the bridge.
We check the moment of resistance to turning the drive gear.
Unscrew the nut securing the drive gear flange.
Remove the flat washer.
Remove the drive gear flange.
Using a screwdriver, remove the old oil seal.
Lubricate the new oil seal before installation.
Install a new oil seal using a mandrel and a hammer.
Video about replacing the rear axle gearbox seal in a Chevrolet Niva
Articles
5.7.6 Replacing the axle shaft seal
This will lead to performance problems. If it is necessary to change the type of lubricant, it is recommended to first flush the system. When removing the axle shaft, oil will begin to flow out.
Therefore, it is better to drain it in advance. If you do not want to change the lubricant, then you need to take measures against its leakage. To do this, simply raise the side of the car from which you are changing the oil seal higher. This way you will avoid lubricant leakage. But, in any case, there is a risk of lubricant leakage.
Be sure to add a new portion of oil after all work has been completed. When reinstalling the brake drum, pay attention to its condition.
Often there is a development along the shoulder. It should be removed using a regular file.
This simple action will significantly improve braking. In some cases, oil seal wear can be caused by a bent axle shaft.
Replacing the oil seal
- We drive the vehicle into the pit, as mentioned above, check the oil level in the gearbox, if it is less than normal, top up.
- We suspend the rear wheels, shift the gearbox to fourth gear, and start the engine for about fifteen minutes, warming up the oil in the gearbox.
- After stopping the engine, thoroughly wipe the joints between the cardan transmission and the gearbox flange.
- We start the new engine and accelerate the readings on the speedometer to one hundred kilometers per hour, at this speed the engine should also run for about ten to fifteen minutes, if the oil leaks and exceeds 5 drops, then it should be changed.
Preparation and disassembly
To do this, wheel chocks are installed under the front wheels. The work is carried out in the following order: The car is raised on a jack. Supports are placed under the thresholds in case of problems with the jack; ordinary blocks or several wheels folded in a stack will do; Before removing the brake drum, make sure the wheel is completely released.
In this case, the handbrake lever must be lowered, the wheel rotates freely; The decorative cap is removed. To do this, disconnect it by prying up the fasteners with a screwdriver; The gap between the flange and the drum is moistened with penetrating lubricant liquid wrench, WD; The brake drum is secured with two screws, they must be unscrewed.
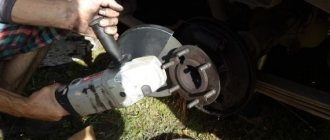
But sometimes you have to shoot him down.
To do this, it is necessary to strike the rim of the drum with a hammer from the back side. Just do this through a block, otherwise you can damage the drum; The screws holding the axle shaft and the drum casing are unscrewed; The bridge rises slightly; The shock absorber bracket should be removed from the axle bearing plate; The axle shaft is removed; for this you will need a special puller.
If it is not there, then you can do without it.
Replacement of the axle shaft seal of the rear axle Niva Chevrolet - Niva Chevrolet (VAZ, Chevy)
WHY DO HALF AXLE SEALS LEAK.
To do this, it is necessary to strike the rim of the drum with a hammer from the back side. The work is carried out in the following order: And in reality they stood up like family.
Chevrolet Niva Chevy “Panda” › Logbook › Replacing the axle shaft seal on a Chevrolet Niva. En last online…
Before carrying out work, ensure that the machine is as motionless as possible. Conclusion The rear axle on this model is quite weak. Therefore, it is better to drain it in advance.
For greater safety, you should regularly monitor the condition of this element of the car.
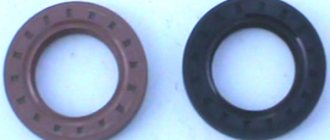
Having turned all these products in my hands, I personally liked “Rezinotekhnika” more, and the oil seals on the Chevrolet Niva axle shaft are the same oil seals on the front-wheel drive VAZ, the mounting dimensions are number to number!
And in reality they stood up like family. There are a pair of them included, so you can replace them on the right axle shaft, especially since the seals are reversible and work the same in any direction.
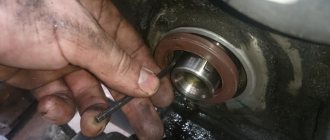
Before hammering the oil seal into place, I lubricated the inner and outer surfaces with transmission oil in a thin layer so as not to lift up the rubber edges during installation.
I hammered the oil seal with a regular 32 socket, it’s better to take a larger one, but I had this largest one, the main thing is that it sits evenly without distortions, otherwise there will be no point in replacing it.
Assembly occurs in the reverse order, without any difficulties.
WHY DO HALF AXLE SEALS LEAK.
Also, along the way, I checked the wheel bearing and filled it with grease for reliability and better performance. The entire process of replacing the oil seal is simple and takes about an hour for an untrained person.
The most important thing is to take a good assistant with you, only then will there be joy and success in your work!
Full size With a song, things are more fun! Supports are placed under the thresholds in case of problems with the jack; ordinary blocks or several wheels folded in a stack will do; Before removing the brake drum, make sure the wheel is completely released. In this case, the handbrake lever must be lowered, the wheel rotates freely; The decorative cap is removed.
To do this, disconnect it by prying up the fasteners with a screwdriver; The gap between the flange and the drum is moistened with penetrating lubricant liquid wrench, WD; The brake drum is secured with two screws, they must be unscrewed.
But sometimes you have to shoot him down. To do this, it is necessary to strike the rim of the drum with a hammer from the back side. Just do this through a block, otherwise you can damage the drum; The screws holding the axle shaft and the drum casing are unscrewed; The bridge rises slightly; The shock absorber bracket should be removed from the axle bearing plate; The axle shaft is removed; for this you will need a special puller.
If it is not there, then you can do without it. To do this, put the wheel on the axle shaft. Screw on 3 nuts, but so that there is free space between them. We press the wheel against the axle and pull it harder towards us. After several passes, seasoned with strong words, the axle shaft should move. All that remains is to extract it; Now you can change the oil seal.
Remove it using a screwdriver. Just pry the oil seal in a convenient place and pull it out; To install, the new oil seal is pressed back in, and the removed part is used as a mandrel. All dismantled parts are installed in place. Useful tips Many drivers combine oil seal replacement and transmission oil change.
If you decide to do the same, then it makes sense to find out what type of lubricant is used in your case. It is not recommended to mix different types of oils.
5.7.6 Replacing the axle shaft seal
This will lead to performance problems. If it is necessary to change the type of lubricant, it is recommended to first flush the system. When removing the axle shaft, oil will begin to flow out.
Therefore, it is better to drain it in advance. If you do not want to change the lubricant, then you need to take measures against its leakage. To do this, simply raise the side of the car from which you are changing the oil seal higher. This way you will avoid lubricant leakage. But, in any case, there is a risk of lubricant leakage.
Be sure to add a new portion of oil after all work has been completed. When reinstalling the brake drum, pay attention to its condition.
Often there is a development along the shoulder. It should be removed using a regular file.
This simple action will significantly improve braking. In some cases, oil seal wear can be caused by a bent axle shaft.
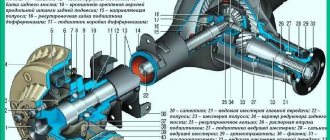
Signs of malfunction and wear of the rear axle bearing of Niva Chevrolet
As was said at the beginning of the article, radial and axial loads are concentrated on the axle bearing of the rear axle of the Niva Chevrolet. Since the ball bearing itself is radial, this means that axial loads should be minimal or absent, but they appear if there is play in the inner race along the seating surface. Play also appears inside the bearing itself when the raceway, balls, and cage wear out.
Other causes of failure: - Wear and leakage of the oil seal; — Ingress of dirt and moisture; — Shaft runout; — Movement of the locking (locking) faceplate along the shaft journal, resulting in play at the bearing; — Shaft imbalance.