Replacement of ball joints for suspension of VAZ 2105, 2107 cars
The front suspension of VAZ 2105, 2107 cars has four ball joints.
Two top and two bottom. Let's look at how to replace failed ball joints yourself. — Puller for ball joints VAZ 2105, 2107 (can be of different designs)
— New ball joints
— Socket wrench “22”
— Two keys for “10” (socket and open-end)
Preparatory work
— Place the car on a level surface, fix the wheels, raise the handbrake lever
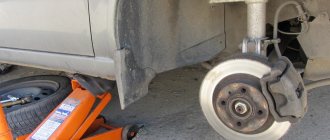
— Jack up and remove the front wheel
— We clean the front suspension elements from dirt
We pay special attention to cleaning the threaded part of the ball pins and the nuts securing them to the steering knuckle.
Consider replacing both the upper and lower ball joints. In practice, if it is determined that only one ball is “knocking”, then we only replace it.
How to replace the upper ball joint of the front suspension of a VAZ 2105, 2107
- Tap the steering knuckle boss with a hammer where the upper ball joint pin is inserted.
In this way, we destroy the oxidation in the connection between the ball pin and the hole in the steering knuckle boss.
- Using a “22” wrench, unscrew the nut securing the ball pin to the steering knuckle
Turn it back 2-3 turns. The nut should remain on the pin.
- We install the device in the spacer between the upper and lower ball pins
The stops of the device must be positioned strictly in the centers of the ball pins.
- Press the upper ball pin out of the steering knuckle
If the pin does not press out, then create tension using a puller and tap the steering knuckle boss where the pin is inserted using a hammer.
- Unscrew the bolts securing the upper ball joint to the suspension arm and remove it
We use two “10” wrenches to loosen the bolts and their nuts.
How to replace the lower ball joint of the front suspension of a VAZ 2105, 2107
- Tap the steering knuckle boss with a hammer where the lower ball joint pin is inserted.
In this way, we destroy the oxidation in the connection between the ball pin and the hole in the steering knuckle boss.
- Using a “22” wrench, unscrew the nut securing the ball pin to the steering knuckle
Turn it back 3-4 turns. The nut should remain on the pin.
- We install the device in the spacer between the upper and lower ball pins
The stops of the device must be positioned strictly in the centers of the ball pins.
- Press the lower ball pin out of the steering knuckle
If the pin does not press out, then create tension using a puller and tap the steering knuckle boss where the pin is inserted using a hammer.
- Unscrew the bolts securing the lower ball joint to the suspension arm and remove it
Install the upper and lower ball joints in the reverse order of removal. Before installation, place a little grease (ShRB-4 or similar) under the protective cover of each ball. The tightening torque of the ball pin fastening nuts is 83.3-102.9 N.m (8.5-10.5 kgf.m).
Notes and additions
— We similarly replace the front suspension ball joints on other VAZ cars of the classic family (2101, 2102, 2103, 2104, 2106 and their modifications) since the design is identical.
More articles on the suspension of VAZ 2105, 2107 cars
How to remove ball lanos
We continue our series of articles on DIY repairs. The need to replace the ball joint arises when the boot ruptures, knocks, squeaks, etc. You can diagnose a ball joint using a mount from a hole by applying force to the place where the support pin is attached; if there is play or extraneous sounds when the fist moves relative to the support pin, the latter should be replaced. Factory balls have a riveted connection to the lever, while repair ones are bolted. Let's give an example of replacing a repair support (the difference from the factory one is in the dismantling method (instead of unscrewing the bolts, you need to drill out the rivets). Let's jack up the car on the side where the sh.o. is to be replaced (first put the car on the handbrake or place stops under the rear wheels). Unscrew and remove the wheel.Photo 1. Unscrew the steering tip nut and use a universal puller to press out the tip finger. Photo 2. Remove the cotter pin of the S.O. finger castle nut (if any) Photos 3 and 4 Unscrew the S.O. finger nut. Photo 5. Use a puller to press out the finger( usually the fit is quite tight, it is advisable to use VD-40 and tap the support pin fastening knuckle with a hammer, without fanaticism).Photo 6. After pressing out the pin, using any lever (mount, etc.), lower the lever down to release the support, and move the steering knuckle to the side to access to the Sh.O. fasteners (be careful not to damage the CV joint ball boot with your finger). Unscrew the three bolts securing the ball joint. Photo7 And pull it out of the lever. Photo8. We replace the bolts as well as the support with new ones. Photo 9. We position the new support by inserting a bolt of suitable diameter into the central hole. Photo 10. We fasten the Sh.O. three bolts, remove the positioning bolt, push the lever down and insert the ball pin into the steering knuckle, clamp and cotter the support pin nut, insert and tighten the steering pin nut, install and tighten the wheel bolts. The final tightening of the wheel bolts is done with the car standing on the ground.
Photo 11 - rupture of the ball joint boot led to creaking and knocking when turning the steering wheel and driving over uneven surfaces.
Tools:
- Wheel chock (shoe)
- Rolling jack
- Supports
- Wheel key
- Pliers
- Straight box spanner 17 mm (2 pcs.)
- Straight box spanner 19 mm
- Ball joint remover
- Electric drill
- Drill set up to 12 mm
Parts and consumables:
- Aerosol lubricant type WD-40
- Front Arm Ball Joint (GM 94788122)
1. Brake the car with the parking brake and install wheel chocks (chocks) under the rear wheels of the Chevrolet Lanos.
2. Jack up the front of the car and securely support it. Remove the front wheel.
Note:
Loosen and tighten wheel bolts only with the vehicle on the ground.
3. Remove the spring retainer from the ball joint pin nut.
4. Unscrew the nut securing the ball joint pin to the suspension arm.
Helpful advice:
If there is play on the ball joint mounts, treat the contaminated areas with aerosol lubricant such as WD-40, this will make it easier to unscrew the ball joint mounts.
5. Install the ball joint remover and press the pin out of the lever.
6. If the ball joint is attached to the arm with rivets (factory installation), drill out three rivets.
Note:
Start drilling out the rivets, starting with a small drill and ending with a 12" drill bit. If everything goes well, then after the last drill there is nothing left of the rivet from below. Then use pliers to remove the remaining rivets from the lever.
Helpful advice:
It is more convenient to drill out rivets on the removed front suspension arm. How to remove the front suspension arm of a Chevrolet Lanos, read the article located here.
7. If the ball joint is bolted on (it has already been replaced), unscrew the three self-locking nuts, holding the bolts from turning with a second wrench.
Note:
Self-locking nuts cannot be reused; replace them with new ones.
8. Remove the rivets (bolts) from the ball joint and arm holes, then remove the support.
9. Install the ball joint in the reverse order of removal. Having lowered the Chevrolet Lanos car to the ground, rock it strongly several times. Tighten the nut securing the ball joint pin and the bolts securing the support to the lever to a torque of 70 Nm, install the spring retainer for the nut of the support pin.
New ball joint for Chevrolet Lanos (GM 94788122).
Note:
When installing, do not damage the protective cover of the ball joint.
Helpful advice:
After replacing the front suspension ball joint, check and, if necessary, adjust the wheel alignment angles. Use the services of workshops with special equipment.
The article is missing:
- Photo of the instrument
- Photos of items and supplies
AutoNews / Reviews / Tests
How to remove a ball joint without a Lanos puller
Removing a ball joint without a puller - is this possible?
- Removing a ball joint without a puller - is this possible?
- What is a ball joint?
- How do you remove a ball joint without a puller?
- The process of removing a ball joint without a puller
The most important part of any car is the suspension. It is necessary to monitor its condition constantly, because failure of even a small part will become a big nuisance. One of these seemingly insignificant parts is the ball joint. Help me choose an outer CV joint for a Lanos ball joint without a puller (like this. It, like all machine parts, needs to be replaced from time to time, and in order to install a new mechanism, you need to remove the old one. Let’s look at the issue of removing the ball joint using means at hand, in other words, without using a special puller.
Self-replacement of VAZ 2107 ball joints (upper and lower)
Today, I bring to your attention step-by-step instructions for replacing ball joints on a VAZ 2107, with a detailed description of the process supported by informative photos. The replacement of ball joints by specialists has been worked out to the point of automation and has changed only slightly over the years thanks to new tools and capabilities.
The VAZ 2107 ball joint is replaced using an inspection pit or a lift in my case. When starting any repair work, take care of your own safety. If you are going to work in an inspection hole, install wheel chocks, tighten the handbrake and engage second gear. Working on a jack alone without the safety measures described above is strictly prohibited.
So, if you are ready, I suggest you start.
Do-it-yourself replacement of a VAZ 2107 ball joint
1. The first step, of course, is to remove the wheel.
2. Next, using a metal brush, clean the ball joint mounts.
3. Treat all connections that will be removed (as shown in the photo) using WD-40 or similar thread penetrating fluid.
4. Take a “22” wrench and unscrew the nuts of the upper and lower ball joints by about one and a half to two turns.
5. Now install the special ball joint remover.
6. As a rule, in one step, it is possible to pull out two ball joints at once: the upper one “shoots off” first, and then the lower one. If for some reason the ball does not give in and remains in place, then using a steel drift and hammer, you can help it come out. The blows must be applied to the protrusion, which is on the steering knuckle.
7. When the ball joints of the VAZ 2107 have been pressed out, unscrew the fastening nut of the upper ball joint and remove the ball joint from the knuckle.
8. If the finger rotates, clamp the lever using a pry bar.
9. Unscrew the fastening of the ball joint to the upper arm.
10. Now you can remove the ball joint.
11. Next, you need to carefully clean the seat of the ball joint on the lever, while carefully looking at the lever to see if there is any damage or cracks on it.
12. Remove the sealing washer from the old ball joint and install it on the new ball joint.
13. Before installing the ball joint, it must be thoroughly lubricated; for this use ShRB-4, Litol-24 lubricant.
14. Install the boot with the washer.
15. Now you can tighten the ball to the lever. Install the ball into the fist and tighten the nut.
16. Unscrew the lower ball nut, almost always the pin starts to rotate, to avoid this, install the mounting between the knuckle and the brake shield, then make a lateral tension in the connection between the pin and the knuckle.
17. If it doesn’t help, install an adjustable wrench in the gap between the lower arm and the fist and use it to keep your finger from turning.
18. The nut is unscrewed, you can raise your fist upward. In the cut between the upper part of the fist and the lower arm, set the key to “22”, this will make further work more convenient.
19. Unscrew the VAZ 2107 ball joint from the lever.
20. Again, carefully inspect the lever and seat, then clean the latter from rust and dirt.
21. Take the new ball joint and check for grease in the lower part. To do this, use the key set to “7” and unscrew the plug with it.
22. If there is no grease, fill the ball with grease using a medical syringe without a needle.
23. Place the ball joint in place at the bottom of the lever and screw it to the knuckle.
That's all! The new ball joints were successfully installed, therefore we can conclude that the independent replacement of the ball joints was a success! All the best to you, keep at it and you will certainly succeed!
Knock in the suspension of a VAZ 2107.
If when driving over bumps you are haunted by an unpleasant sound in the front of the car, then there is no need to bring the matter to a critical moment. To find the cause of the knocking, you need to understand the structure of the suspension, both as a whole and its individual parts. In this article I will talk about one of the causes of knocking and how to replace ball joints on a VAZ 2107.
Ball joint device for VAZ 2107.
The ball joint consists of a pin inserted into the body. Between them there is a plastic liner, which wears out over time. A rubber cover placed on the body and fits tightly to the finger protects against dust getting inside the insert. The ball joint housing has a hole for lubrication and checking the condition of the part. But not all manufacturers do this.
Diagnostics of ball joints of VAZ 2107.
If there is a knocking sound on bumps in the front part of the car and a beating in the steering wheel, as well as increased sensitivity of the car to the ruts, you should check the condition of the suspension and one of the points will be checking the ball joint of the VAZ 2107. How to check the ball joint on the VAZ 2107? Very easy! There are several ways to check ball joints.
If you have an inspection hole or overpass, then we go there and begin inspecting the car. First of all, you should pay attention to the condition of the ball joint boots. From them you can determine the first signs of a malfunction of the ball joint of the VAZ 2107. If they are torn, then most likely this was the reason for the abrasive getting into the body and increased wear of the part. If the boot is intact, and you have a ball with a technological hole in the body, as in the diagram above, then cut a piece of thin straight wire, mark 11.8 mm on it and insert it into this hole. If the tag is immersed in the ball, then it’s time to change it.
If you do not have access to the overpass, simply turn the steering wheel and hang the wheels on the jack one by one. Next, we hold one hand at the junction of the body with the finger, and with the other we shake the wheel. To check the upper ball joint, you should rock the wheel while holding its upper part, and to check the lower ball joint, you should apply force to the very bottom part of the wheel. You can also simply rock the upper and lower parts of the wheel toward and away from you, but this may not give accurate results, since in this case the silent blocks of the levers may still make a sound.
About other manufacturers
As mentioned above, the production of high-quality ball joints requires serious costs. And this cannot but affect the final cost of the product. Therefore, there are only four large manufacturers of supports for the VAZ 2107, and all of them are listed above. Of course, there are smaller companies that offer car enthusiasts ball joints at almost half the price. But any sane person understands: if a ball joint costs half as much, it means that the manufacturer saved on something during its manufacture. Most often, savings are made either on ultrasonic analysis of rod blanks or on heat treatment. Neither the first nor the second bodes well for the buyer of the support.
And if the car owner is of sound mind, then he will not react to a temptingly low price and save on a detail on which his life literally depends. It is for this reason that little-known manufacturers of cheap supports will not be considered in this article.
Here we should mention another unpleasant thing: fakes. Recently, ball joints from well-known brands have begun to appear on the shelves of car dealerships, costing suspiciously cheaply. Upon closer examination, the vast majority of them turn out to be fake, and often the fakes are made so well that only a specialist can recognize them. For an ordinary car enthusiast, the criterion for selecting supports is still the same: price. It should be approximately the same as indicated above. And if a ball joint from a well-known brand costs half as much, then buying such a part is categorically not recommended.
Video: about fake ball joints
Replacement of ball joints of VAZ 2107.
When, during the diagnostics of the suspension, a faulty ball joint was identified, we are faced with the question of how to replace the ball joint on a VAZ 2107? I will answer it for you now. But before repairing, you need to decide on the tool. A long and painful replacement of ball joints on a VAZ 2107 without a puller is possible, because almost no one manages to do this without a puller. Or you can immediately buy a special tool and then I will show you how to use a VAZ 2107 ball joint puller.
We will look at how to dismantle the upper ball joint of a VAZ 2107 without a puller, and I will show how to remove the lower ball joint of a VAZ 2107 in a version with a device designed for this.
Replacing the upper ball joint of a VAZ 2107.
Replacement of VAZ 2107 ball joints occurs with the wheel removed. To remove the upper ball joint, let's say, on the left side without a puller, we must perform the following actions: turn the steering wheel as far as possible to the left, loosen the ball nut, put something under the hub, so that when lowering the car from the jack, the hub fits tightly on this object, take a hammer and point it at the tide on the fist (just below the ball nut) and with a sledgehammer or an ax we hit the hammer sharply, but not too hard. After a few attempts the ball will come out. To make the process go faster, you can pour hot water on the hub in the ball area.
As soon as the pin comes out of the hub, unscrew the 3 bolts and dismantle the part.
But this case does not help in all cases. It happens that the ball simply rusts to the hub and there is no way to remove it except a puller.
Replacing the lower ball joint of a VAZ 2107.
Using a puller, the balls can be pressed out of the hub in less than 5 minutes. To do this, unscrew both ball pin nuts a couple of turns. Next, we insert the puller between the upper and lower ball pins and begin to unscrew the puller bolt as shown in the photo below.
Next, all we have to do is unscrew the bolts securing the balls to the arms and install new balls.
Assembly is carried out in reverse order.
During assembly, it happens that when you tighten the nut onto the ball pin, it begins to rotate. To avoid this situation, wipe the ball pin and its seat in the hub with a dry rag. And after inserting the ball into the hub, lightly but firmly hit the ball with a hammer a couple of times. After these procedures, the finger will not turn when screwing the nut.
Design and purpose of ball joints
The design of the front suspension with ball joints replaced the previously popular pivot mechanism and is the most common. The task of these units is to ensure vertical movement and rotation of the wheel while driving. Ball joints are constantly subject to strong variable loads while the vehicle is moving, and their failure can lead to a serious accident. Therefore, special requirements are placed on the material and quality of manufacture of ball joints. The rapid wear of the balls during operation even forced designers to develop suspension options without this “delicate” unit. But, as mentioned above, most cars (and the entire VAZ line of cars) include ball joints in the front suspension design.
How to determine the malfunction?
There are several ways to determine the condition of the ball joints:
- With an assistant, we rock the car by pressing the front wings one by one. An uncharacteristic sound will come from the side where the balls are worn.
- Jack up the wheel and ask an assistant to press the brake pedal. We grab the wheel and try to swing it to the sides. When the wheel is locked, play is immediately felt.
- On the VAZ 2107 of the last years of production, holes appeared in the ball joints for diagnosing pin wear. To check the lower ball joint, insert the rod of a caliper into the hole as in the diagram below.
Upper and lower ball joint replacement process
First, it is worth noting that the process of replacing the upper and lower ball joints of the VAZ 2107 is identical. Below in the instructions we will describe replacing the upper support.
- Jack up and remove the wheel.
- We turn the steering wheel to its extreme position to make it more convenient to work.
- Spray three ball mounting bolts and one pin bolt with penetrating lubricant.
- Unscrew the nut securing the pin to the knuckle using a twenty-two wrench.
- Unscrew the three nuts securing the ball joint to the lever. Thirteen head nuts.
- We install the puller and press the finger out of the fist.
- We lift the upper lever using a pry bar and completely remove the finger from the fist.
- We remove the worn support from the lever. If it doesn't work, you can hit the ball with a hammer.
- Use a wire brush to clean the seating areas for the new ball joint.
- We install the support and align the mounting holes.
- We insert the bolts, put on the washers and tighten the nuts. New bolts are included with quality supports.
- Raise the lever up and insert your finger into your fist.
- We tighten the pin fastening nut and tighten it slightly.
- We tighten with good force the three nuts securing the ball to the lever. If the bolt turns, hold it by the head with a thirteen wrench.
- Tighten the nut securing the pin to the knuckle with a force of 10 kgf m.
Watch the procedure for replacing ball joints on a VAZ 2107 in this video:
Preparatory operations
Use a metal brush to clean dirt from all threaded connections. This applies to the fastenings of the upper and lower supports to the lever and to the steering knuckle. Dirt trapped under the threads will prevent the nuts from being completely unscrewed; they can turn together with the ball pins and fastening bolts.
Soak them with WD-40 and wait 15 minutes. It is recommended to cover them with a rag soaked in kerosene. It will penetrate under the threads and make it easier to unscrew the nuts. There was no kerosene in our store, we had to use a high pressure fuel oil.
