Create an account
Register a new account in our community. It's very simple!
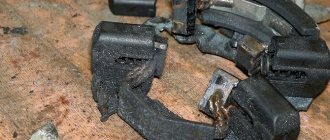
So it’s time for me to look for and weld holes in the body. For almost 30 years, the car went without major body repairs; minor dents and scratches don’t count. I started with what was, in my opinion, the simplest thing - a bathtub under the spare tire. I’ll just say right away that it’s almost impossible to find auto body parts for a penny (only on order and not a fact that they will be delivered). I took the six-wheeler, it’s “almost the same,” but it took half a day to fit it in place. While I took a photo of how I cut out the old one.
cut out with a grinder (welding points are still on the body)
I cleaned up the welding points and found a hole in the wing with a screwdriver...
I had to cut this piece out.
cut it out - made a patch on this piece and already welded it.
We continue the fight against rust and unevenness.
I adjusted and welded the bathtub from 2106 - it’s a little different and doesn’t quite fit, but I inserted it and primed it with filler primer.
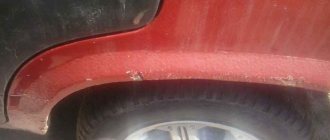
Then I took care of the front fender, there was a dent on the edge.
Here is a dent that is slightly disguised with putty.
and two cm of putty at the junction with the door
Such a thick layer, I was too lazy to straighten it, so I just covered it up. The wing tapped from the inside
Somehow it happened and I welded up the holes from the previously installed additional turn signals
the rib is bent, you need to tap.
a little rusty...
Now I tapped and pulled everything out, all with just a hammer and available tools.
The rib is like new, well almost, taking into account the age of 30 years and a couple of accidents. Then I replaced it with a new one anyway, it’s too difficult to weld repair inserts and adjust crooked iron.
Installation of an electric sunroof on a VAZ 2106
The sliding El was taken as a basis. sunroof from Renault Safrane Task: install an electric sunroof in the roof of a VAZ 2106.
Power steering gearbox (column) for VAZ 2101-2107
Razgon front strut extension for VAZ 2105, 2107
In this article we will write about strengthening the body of VAZ 2101, 2102, 2103, 2104, 2105, 2106, 2107 cars, that is, the so-called VAZ “classics”.
During daily use, any car experiences loads while driving, which over time cannot but affect the geometry of the body. And the older the car, the more noticeable this is. And the once cheerful car suddenly turns into a “loose trough.” Such a “tired” body noticeably reduces the precision of control when turning and gets on your nerves when you hit potholes or other road irregularities. Due to constant pressure on the body, its rapid aging may occur, traces of corrosion may appear, and welds may even come apart. So we have a not very rosy picture. How to be? The answer to our question is precisely the strengthening of the body and chassis of the car.
The possibilities for strengthening the body for classic LADA models in comparison with more modern families of VAZ models, unfortunately, are slightly limited. This is due both to the design features of the models and to the range of products manufactured by the enterprises. Despite this, the Motorring.ru online store offers products that will help you take care of strengthening your car:
- reaction rods;
- front suspension arms;
- rear suspension arms;
- engine support cushion;
- propeller shaft support;
- Of course, everyone’s favorite stretching of the front struts.
In addition, strengthening the body has a number of advantages:
- low cost;
- ease of installation and dismantling;
- increase in body life;
- improving car handling.
If you are still wondering whether you need to strengthen the body, then in our opinion the choice is obvious. Of course it's worth it! Moreover, for many people this must be done.
Professional enhancement
Now about the professional way to strengthen the body. This implies an increase in weld seams. As a rule, on the conveyor, body parts of the “Seven” are connected using point technology. This makes the body weak and not durable enough. From the same spacers, it may not withstand and fall apart.
By welding additional metal-type plates and reinforcements into insufficiently rigid areas of the body, the overall reinforcement can be significantly influenced.
Front end reinforcement
It is advisable to boil the front end first. You can buy a TV consisting of 2 parts and weld them together carefully. Lay the welds, install the front engine support bracket, add a gusset, install strong crabs.
Front reinforcement
It also makes sense to weld the seams of the side members. From the inside, steel linings will have to be installed on the side members to further strengthen them.
You can make a window outside the spar, and then insert a piece of channel and boil it. Or simply cover the entire spar with metal cladding.
Spar reinforcement
Be sure to strengthen the cups. The seams are boiled, a plate is placed on top of the cup, which significantly strengthens the part, preventing it from tearing when driving over bumps. Both front and rear cups are upgraded.
Cup and its reinforcement
The suspension mounting elements are strengthened. The seams of the slopes are boiled and a gusset is added.
Such professional modernization gives the same significant effect as installing a subframe. Only in this case the weight of the car does not increase and ground clearance is not lost. It is more convenient to carry out this work from the pit.
We strengthen the car body with the help of special amplifiers
As practice shows, the stiffer and stronger the body, the better the car’s handling characteristics, as well as the characteristics of its chassis. One of the effective ways to make the body of certain VAZ models is to install a spatial racing frame or a special stretching of the rear supports.
There is also another option to make the car body more rigid, for example, using a special body reinforcement. By the way, according to leading experts, this option is considered the most effective, and at the same time has good compatibility with VAZ brand models.
How to install a body amplifier with your own hands
After installing a body amplifier, the stability of the car when driving on not entirely smooth roads in our country, as well as at high speeds, increases significantly. You can increase the rigidity of the engine mounting bracket using a set of supports - “Sport”. After installing this kit, the movement of the power unit during operation is significantly reduced, the amplitude of engine vibrations is also reduced, this helps improve gear shifting. This kit is recommended for installation on sports cars, as well as models that are in the process of tuning.
The rigidity of the bracket is increased thanks to the extension bracket - the so-called crab. Installing a crab involves the simultaneous installation of serial silent blocks, as well as silent blocks with increased rigidity made of polyurethane.
In order to increase the rigidity of the front suspension mounting points, as well as the suspension arms, an Autoproduct cross member is usually used. Due to this cross member, you can reduce the load on the car body by 25%. Using the Autoproduct cross member allows you to achieve an almost ideal balance between suspension stiffness and ride comfort. This combination is possible thanks to the original design of the silent blocks themselves.
The next option to strengthen the body structure is to install the front support of the power unit. Such a support will improve the dynamic qualities of the power plant suspension, this applies to a greater extent to maximum load conditions.
The box-section design will add rigidity to the bracket. The design of the support is shaped in such a way that the stronger the vibrations, the stiffer the structure itself will be.
To reduce the displacement of the rear suspension mounting cups, as well as the place where the rear beam is attached to the body, a rear strut is used for this. Thanks to this spacer, movement will be reduced by as much as 20%, while the overall torsional rigidity of the entire car body will increase by 5%. The installation of such stiffening struts will have a positive effect on the overall handling, as well as the stability of the car on bends, and therefore will increase safety. The lower strut allows you to reduce the movement of the front suspension arm bracket by more than three times.
DIY reinforcement
The most important indicator of body strengthening is torsional rigidity. It is measured in Nm/deg. And the higher this value, the stiffer the body is considered. In addition, this indicator is also affected by the type of car body. As you know, hatchbacks are much stiffer than 3-volume sedans, which is what our “seven” is.
Note. The number of doors is also important, as is the location of the internal combustion engine, which also greatly affects the rigidity of the body.
The body rigidity of the VAZ 2107 sedan is 7200 Nm/deg. For comparison, the Daewoo Lanos hatchback has the same figure of 10,500 Nm/deg. As for other modern foreign cars in the expensive segment, such as Alfa Romeo or Citroen C5, their body rigidity is equal to 20 thousand Nm/deg.
Spacers and braces
So, what can you do to increase body rigidity? The best method involves installing spacers and guy wires.
Stretches and struts
Installing spacers on the front pillars gives a good effect, although according to some motorists, they did not notice any real improvements. On the contrary, tests carried out more than once prove the opposite - with front struts, cornering and changing lanes on the road are much more confident, regardless of speed.
But most importantly, spacers help reduce the degree of deformation of the body, which will have a beneficial effect on the durability of the metal frame.
On the “seven” you can install stiffer (reinforced) struts, although it is believed that among VAZ models, the suspension on the VAZ 2107 is stiffer. In a general sense, this is still a soft suspension.
It is advisable to purchase spacers only from well-known companies; handmade models do not inspire confidence. Although they can be used, you just have to select them according to the “seven”, otherwise problems and difficulties may arise during installation.
And it makes sense to put spacers on the rear pillars. This will create reinforcement for the entire rear of the 7's metal frame. In principle, the “seven” does not need rear struts as much as, for example, the VAZ 2108 and modifications released later. On VAZ models, initially the rear seat is assigned the role of increasing body rigidity, but on the 2112, for example, the seats fold out, which indicates low rigidity.
What does the rear strut give to the “seven”:
- The movement of the upper geometric points of the body will be reduced
- Overall stiffness will increase
- Vehicle handling will be significantly improved
- The result will have a positive effect on the durability of the body.
In addition, this type of tuning is considered budget-friendly, which is ideal for doing it yourself, and easy to install (no complex work required). In addition, such reinforcement also looks beautiful in appearance.
VAZ 2107 body tuning
Note that installing lower struts can also provide significant assistance in strengthening the body. Only this installation is considered difficult.
Amplifier behind the seat back
There is another method of rear amplification, which involves installing the amplifier directly behind the back of the rear seat. This innovation will help increase body rigidity by 20-25 percent.
Tuning the body of the VAZ 2107
Shield amplifier
To significantly reduce the play of the steering rack housing in the connecting elements, it is recommended to install a shield reinforcement for the front of the car. Such a device not only increases the rigidity of the front of the “seven”, but also reduces the amplitude of movement of the steering rack housing.
Interestingly, the shield reinforcement increases rigidity in the transverse direction twice as effectively as in the longitudinal direction. The transverse rigidity of the front end is increased by 5 times, the longitudinal rigidity by 2 times.
Subframes
Another innovation involves the installation of subframes. They generally increase body rigidity. If you manage to install a subframe model with additional support for the internal combustion engine, then the car’s suspension will also be strengthened.
Subframes tend to be difficult to install, especially on frameless sedans. We'll have to digest some details of the front part of the VAZ 2107.
TKB
TKB (tubular safety cage) is intended for professional and “civilian” use. It is better not to mess with the first ones, since they are suitable for competitions, are expensive and have a complex design. But “civilians” are just our case.
Folk way
Involves filling the holes of the side members and sills with foam. Gives a considerable gain, at least increases rigidity. The method is not expensive, but it has disadvantages: the activation of corrosion increases, since the ventilation is closed. In addition, the risk of fire during welding increases.
Video on how to strengthen the body
Content
VAZ 2107 is a classic of the Soviet automotive industry. The car is really good in many ways. But, unfortunately, it also has a lot of disadvantages, especially for domestic roads. And the main one is the soft suspension. On the one hand, this is good, because it absorbs bumps and the car is comfortable to drive. Plus, you get less stress on your spine. On the other hand, a soft suspension worsens the car's handling during maneuvers. And it is not particularly reliable.
As for the Classic specifically, it has always been and continues to be used as a workhorse. And an additional disadvantage of the soft suspension on this car is that with heavy loads on one of the axles, the car begins to “sag”. It gets to the point where the wheels begin to cling to the arches. When it comes to options for improving the suspension, there are many. If finances allow, you can contact tuning specialists and they will make significant improvements. If your budget is limited, you will have to do everything yourself.
The main points of tuning the VAZ 2107 suspension
The first thing you can do when upgrading the front suspension is to install a spring from a NIVA 2121. The fact is that such a maneuver does not require additional preparation, since the spring fits well into the VAZ 2107 scheme. In addition, this will allow you to obtain greater rigidity. It is worth noting that the same operation can be performed with the rear suspension. Some car enthusiasts cut off one or two turns to reduce ground clearance. Whether to do this or not is up to you. A lower ground clearance has its advantages and we will talk about them in this article. But there are also significant drawbacks.
The next step is to replace the standard shock absorbers. Here everything depends solely on your capabilities. If you want to save money, you can install fairly inexpensive Ikons. Installation of sports type Bilstein will cost more. But the effect will be much greater. The main rule when replacing shock absorbers on a Semerka is that they must be gas-oil. Their advantage is greater elasticity. What is the output? Such modernization will lead to the appearance of large rolls when cornering. To minimize them, they usually install new stabilizers with a higher degree of rigidity (as an option, you can pair a pair of factory ones on both sides).
How to Strengthen the Body of a VAZ 2109
to strengthen
the body of the VAZ 2108 DIY
Despite the fact that the body of the eight is quite strong, but you cannot drive them like a racing car, so I decided to make a frame (note: a normal car means four-wheel drive, a frame and two axles) .
One of the 2108's shortcomings is its weakness in front wheel impacts involving rough surfaces, like a curb or a huge rock. Usually with all this the crabs break.
If you install a good crab, it will pull its application. How to strengthen the body of VAZ 2108,2109,21099,2113,2114 a. If you cook the nuts at 12 and place the nuts at 10, the spikes are no longer strong.
We lifted our VAZ 2108 elevator to the elevator and looked at the side elements and levers for a long time, wondering how / what / where to hit. The main thing that we were interested in was what materials would be needed and how much.
They calculated and purchased 18 meters of steel pipes with a rectangular wall width of 3 mm 80 × 40, 50 × 50 and 60 × 30, 6 meters each.
Looking ahead, I will say that it turned out that the pipe does not fit 80x40 pipes. This took 70 x 40 millimeters. In other words, 80 millimeters will go to the remains of the old spars, but it will be difficult to bend them. And in the end it turns out that if we made pipes with a diameter of 70 millimeters, the hardness would be higher than this. But it's too late to change. The pipes have already been purchased and imported.
>
We started with the wheel arches, the side elements were cut out almost completely. Only the inner parts (right and left) of the main side elements and part of the mouthpiece jars remain. In practice, the left side elements will also act as mud. Later everything was measured and the model was made from cardboard, later it was fixed in place.
READ VAZ 2109 What Oil to Pour into the Engine
Later, a piece of pipe (80x40x3 millimeters) was bent over this model. Refers to an old box and is being reworked.
Later these two parts were combined into one and installed together. Website for tuning VAZ 2108 2109 21099 cars The body of the VAZ-2108, 2109, also reinforced from the inside. This was later boiled and the seams were removed. Two curved pipes came out.
In the driver and passenger foot area, where the outer part of the old side member was already cut off, the inner part was cut out at the top corner, and the vertical part of the box was sledgehammered inside the body. Down to the tin floor and a little bit of crushed stone.
Garage fittings
Careful oh. winnings
rear windows.
How to weld through a “puncture” on a VAZ-2108-99? (auto repair)
I made a short video on how to do this. Surely all car owners know how to look at the old model.
Next, pieces of 60 × 30 pipes were driven into the thresholds. Not for long. sometimes up to half a meter. How to strengthen the body of a VAZ 2108-2115. Tuning VAZ 2109 with your own hands, photo tuning of the interior. These pipes will be pressed against the bent 80×40 pairs .
And from below (even if they are bent inside the sill, but the underside of the sills is cut to their length), the pipes will be welded to them at the knees, which will return to the rear suspension beam mount.
In addition to those curved 80×40 pairs
60x30 pipe wires are welded to the crabs, as can be seen in the photo. More precisely, up to the 5 mm thick corner to which the crab is screwed. This was all due to the front ends of bent pipes in small vertical pieces of 80×40 pipe.
READ How to remove the windshield on a VAZ 2109
After this, these elements were completely welded. In this case, the seams on the transverse arm mountings were slightly reinforced. When all this began to boil, it was necessary to constantly ensure that nothing in the cabin or under the hood was illuminated by contact with the heated iron. I also had to fiddle with the wiring to keep it from getting fried. The engine is not extended. Just little things like the battery and tanks.
Good stands are tied to those pipes that are clogged in the thresholds. Before this, the horizontal was slightly adjusted for them.
Later, 60×30 pipes were welded from below and tied to pipes driven into the sills. In other words, long longitudinal pipes from approximately the rear arches to the front platform under the jack.
They decided not to touch the rear platforms under the jack. The holes in the pipes simply cut through them, yet the strength of these pipes is with a margin.
The front edges of these long pipes were angled (to avoid getting stuck in the stump) and welded, cut out at the back.
The front glasses suspension on this frame is temporarily failing. Strengthen the car body, then find out how to strengthen the body of a VAZ 2108 with your own hands. We were thinking of putting the 60×30 tube close (tight) to the A-pillar. Let the channel on the outside of the mudstone point towards the front of the glass. After that I walked forward obliquely. down to go around the platform on the left under the battery and on the right under the washer tanks.
It appears to be a circle around the front suspension. But they did not understand how to catch the wings after that. They are bolted from the back to the body post. This place needs to be completely redone. In general, we decided not to touch it for now.
READ Do-it-yourself VAZ 2109 Engine Repair Video
All boiled ones are coated with an anti-corrosion agent. If possible, the floor was cleaned and almost two cans of aerosol bitumen mastic were poured into it. The design and principle of operation of the VAZ 2108 2109 ignition switch on the ignition switch in the form of a circuit. I wanted to put a heater there, but I couldn't find anything in the stores. On the left, yes. How to buy a heater, I pour another spray on the floor and place the heater on the bitumen.
He then assembled the interior to the south and secured the wings. How to strengthen the body of a VAZ. machintop.ru. It turned out that one person is quite capable of hanging the bumper. Even without lifting.
In general, the process is completed or stopped.
As a result of installing the frame, the car weighs about 5060 kg. The dynamics did not seem to suffer much, nor did they accelerate more slowly.
The center of gravity has dropped a little. the frame is lower and lower. Also, the center of gravity has shifted slightly forward. From the article you will learn how to strengthen the body of a VAZ 2109 with your own hands, how much the body of a VAZ 2109 weighs. But I didn’t feel it.
Body torsional rigidity increased slightly. Now the trunk is no longer so skewed when parking with one wheel on the curb. But still hunting for more rigidity. I'm welding a pipe cross behind the back of the rear seat.
In general, the main reason for what was intended was not rigidity, but strength. That is, nothing happens when you encounter an obstacle. And don't see it that way. From the moment the frame was installed, I was nowhere in the middle.
What else can be replaced in the VAZ 2107 suspension
Tuning the VAZ 2107 suspension should not be limited to work under the car. It is advisable to take care of improving the steering system. As an option - a steering column from Niva. It is possible to install an electric amplifier. But such work is best left to professionals. The point is that the equipment must be connected correctly. Doing this yourself is quite difficult. In addition, experts recommend paying attention to the brake system.
Installing disk drives will significantly improve the car's performance. Finally, all work can be completed by changing the tires and performing a wheel alignment. It is better to choose foreign tires. Both classic and low profile options are available. But it is worth remembering that the latter is good in terms of handling, although it reduces the level of driving comfort.
About the dangers of low clearance
Before you decide to make such drastic changes to your “Seven”, it is impossible not to mention the dangers that may await you on the road. Important information! Before you decide to lower your car's ride height, consider whether it's worth it. There are several points that we recommend paying attention to:
- the possibility of damage to important parts of the car when hitting potholes. At least you will visit the service station much more often;
- If the work is carried out by unqualified specialists, the car will very soon require additional cash injections.
The main options for reducing clearance
The first option, which is considered the most economical, is to shorten the standard springs. You can do this yourself or, if you don’t have the necessary tools and skills, entrust it to a novice specialist. This operation can be performed without removing the spring. It is important to remember that the springs are shortened by a different number of turns (front, for example, by two, and rear by three). This is due to the fact that the weight of the machine must be distributed evenly.
The advantage of this method is low costs. As for the disadvantages, these include the risk of breaking both the spring and the shock absorber. Another option is to purchase and install shortened springs. Such springs are often called sports springs. The main costs here are associated with the purchase of finished parts. The advantages of this method include the fact that you can return everything to its place at any time (after all, the standard springs are not shortened). In addition, you can carry out such an operation yourself. The only thing is, upon completion, you need to contact specialists to perform camber/alignment work.
You can also reduce the ground clearance using a coilover. These are the springs that allow you to adjust the ground clearance. This option is the most convenient, because even if you were not able to achieve the expected result the first time, you can always adjust the desired suspension height without having to buy new parts. The advantages of this method include the versatility of coilovers. They are installed with both sports and conventional shock absorbers. They are adjustable according to your wishes. Finally, they are quite easy to install yourself. As for the minuses, there is only one – the price of the issue.
Air suspension is another option to “pump up” the VAZ 2107. Moreover, this option is only suitable for true fans. The fact is that the cost of the package can reach tens of thousands of rubles. But for this money you will get your hands on a full-fledged tool for working with the suspension. Another disadvantage is the cost of the work. The fact is that such a suspension cannot be made in your garage. And it is also not recommended to entrust the installation of equipment to the first “specialist” you come across. The disadvantages include the fact that such a suspension can quickly fail on domestic roads.
The advantages of this option include the possibility of flexible regulation of ground clearance (in a range of up to five centimeters). If the system is installed correctly, you can adjust the ground clearance at any time at your discretion, depending, for example, on the type of road surface and terrain. Another important advantage is the ability to well support the maximum weight of the car. The machine does not sag even at its maximum load. In general, the ground clearance can be adjusted in the range from two to nine centimeters. You should not do more, as this carries certain risks. During the modification process, it is also recommended to install new boots and rebound buffers. In addition, experts advise changing the support bearings. And one more important point. All work on suspension must be approached responsibly. If you cannot perform some operation yourself, it is better to entrust it to professionals. Saving or doing something carelessly is inappropriate here. Any mistake can significantly affect handling.
How to assemble a “race” for pennies: building a VAZ-2101 for a ring
The trend is that the VAZ “classic”, which has become almost synonymous with the Soviet automobile industry, is now actively mastering motorsports disciplines and tuning. Drift, drag racing, “combat classics”, radical stens, vintage resto and deliberately aged rat-bow - all this has already happened. Today we return to the roots: meet the VAZ-2101, prepared for competition in the Moscow Classic Grand Prix championship. The project was created by an amateur with his own hands in a garage. This is a story about how to build your way into professional motorsport without sponsorship and the experience of racing teams. Only your own personal path of trial and error, unquenchable enthusiasm and desire to get on the “bedside table”. Only hardcore!
The idea to tell about this “penny” has been brewing for a long time, because we have known its owner Dmitry for more than ten years. Once upon a time we had V8s tuned in the spirit of the times: low, loud, hard, but not very fast. They installed those parts that they could afford and which were offered by the assortment of the Moscow car market “Southern Port”. Over the course of several years, his “Rhapsody” colored hatchback has evolved from an 8-valve “vegetable” into a 250-horsepower turbocharger, well prepared for track days on tracks like Myachkovo and the like. Such bright stories do not last long, so after reaching the highest point of development conceived by the owner, the project was dismantled and sold in parts. With the G8, Dima understood the main thing: tuning is a dead end. Visual development and real results are only possible in motorsport.
And the next step in that direction was... no, not a “penny”, but a Toyota Starlet Glanza V. This right-hand drive Oka, equipped with a 135-horsepower turbo-four, repeated the evolution of the previous project, but became the first experience of deep JDM tuning. On it, the owner learned to use argon-arc welding, created his own exhaust manifold for an enlarged turbine, modified the safety cage, and also completely independently transferred the 4E-FTE engine to the domestic control unit “January 5.1” as the most optimal in terms of price and capabilities. However, the “starlet” project has come to its logical conclusion. It is impossible to assemble a car that is competitive for the battle for prizes: in order to “drive”, you need a lot of modifications, which automatically send Toyota to the senior class with all sorts of monsters. In addition, in these competitions the competition takes place in absentia - you need to compete not with the opponents themselves, but with their time. There is no mass and collective start, and with it the spirit of competition, for which we all love racing so much.
During training sessions on the track, the most diverse peloton gathers, in which, in addition to modern models, you can also find “classics” - for example, the 1967 Alfa Romeo Giulia GTV or domestic “Muscovites” and “Volgas”
The conclusion is clear: we need something simple, inexpensive and repairable for professional competitions taking place on “adult” tracks like Moscow Raceway. Based on a combination of factors, “classic” is actually the only adequate option, if you do not take the more specific “Volga” and “Muscovites”. The MCGP championship, which was actively developed several years ago, involves just such cars. The best description of this Grand Prix would be a quote from its official website: “The international open amateur personal-team championship in circuit racing on historical and classic cars has been held since 2012. Domestic rear-wheel drive carburetor cars and foreign-made cars manufactured before 1987 take part in the competition.”
Such a broad formulation allows you to drive either a Zhiguli or an early Porsche 911, so, of course, there is a division into classes.
Such a “classic” always attracts a lot of attention!
You're probably wondering: “How can you even switch from a JDM turbo lighter to a penny lighter? Here I will once again remind you of the goals of an amateur athlete: the official status of the competition, a mass start with head-to-head competition on the track, where all the cars are as close as possible in terms of capabilities due to the regulations, and, therefore, the “arms race” plays a much smaller role than the skill of the pilots. And all this - with the lowest possible budget. In other words, an entry ticket to professional motorsport. Keep this in mind as you read through to the expense amounts.
But such a rational approach was not at all typical for buying a car: in May 2021, blue and white Zhiguli cars went on sale, the future owner still did not really understand whether he was ready for this or not. In addition, the old Toyota had not yet been sold. The decisive factor was the fact that the “penny” was sold by a mutual friend of ours, and in 2016 it had already raced in the MCGP - and therefore was prepared for it. True, in reality this readiness turned out to be very conditional, but more on that later. The purchase amount was 215,000 rubles, which may seem expensive for a 1972 Zhiguli, which has seen more than one race track, but is much cheaper than self-assembly. Welding a safety cage alone costs from 60,000 rubles, but the list of modifications to a roundabout car includes dozens of items.
The roll cage is the basis of the load-bearing structure of most racing cars.
Buy ready-made racing equipment before the start of the season - what could be better? Just buy it in advance to get used to it, eliminate shortcomings, customize it for yourself and... prepare yourself! To participate in “adult” races, you need a full set of equipment that meets safety requirements. It costs more than 100,000 rubles to “dress” a pilot: helmet, fireproof overalls, shoes and underwear, neck protection, gloves. Each stage of the championship also sucks up funds: entry fee, sports fuel, transportation costs - and this is provided that nothing breaks. But this is a Zhiguli, you understand...