Disassembling the top
Let's start disassembling the carburetor before it was removed from the engine, by removing the filter mesh, unscrewing the fuel filter plug with an open-end wrench (19). We put all the parts in order so as not to lose them.
The mesh becomes clogged with fine rust from the tank, making its way through the fuel filter, it needs to be washed or replaced, taken from the repair kit.
Then we will continue disassembling the idle speed sensor. Having unscrewed it with an open-end wrench (12), we will look at the condition of the jet with number 50 and the movable needle under it. We will also check the operation of the sensor itself by connecting the housing to the minus terminal of the battery and the wiring to the positive terminal. When closing, the sensor “clicks” if it is in working condition.
Then we release the spring on the damper rod, as well as the “yellow” telescopic spring, pressing it inward, and disconnect it from the mount.
Unscrew the 5 screws with a Phillips screwdriver and remove the top cover.
We use a hammer to knock out the float mounting stop with a thin wrench and pull out the float along with the needle. If the valve needle is worn out, replace it from the kit and also change the paper gasket.
Then use a screwdriver to unscrew the 2 screws of the starting device and examine the condition of the rubber gasket.
On the back side of the stud, from the mounting of the air filter housing, so that it does not rotate in one place, you can lock it with an additional nut. Wash the upper half of the body with kerosene using a toothbrush and rags.
Dismantling the middle part
Before dismantling the middle part, wash the float chamber with a washing liquid, for example, acetone and wipe with a dry cloth.
Let's look at it in order:
- Using the flat blade of a screwdriver, unscrew the “nozzle” of the accelerator pump nozzle;
- We clean the thin hole of the nozzle with fishing line and blow it with a pump;
- Reassemble the nozzle in reverse order with 2 copper sealing washers and set it aside;
- Remove the small retaining ring securing the throttle valve pneumatic drive rod.
- Use a Phillips screwdriver to remove 2 screws securing the throttle valve pneumatic actuator to the middle body and examine the condition of the gasket; if the gasket is “stuck,” we will replace it;
- Using a Phillips screwdriver, unscrew the 2 screws securing the throttle body;
- Using a Phillips screwdriver, unscrew the bolt of the air damper drive rod;
- Let's separate the middle part of the case from the bottom, placing all its parts carefully to the side;
- Let's separate the thick textolite gasket that holds the two paper gaskets;
- Unscrew the 4 bolts of the accelerator pump cover and set aside the diaphragm with the spring;
- Unscrew 2 air supply jets with both hole diameters (150);
- Using a wooden pencil, draw out 2 cylinders of the air jet, which have many holes for air supply, and blow them through with a pump;
- Let's give fuel nozzles in the float bath, one with a hole diameter (112) from the small injection chamber and another (150) from the large one;
- Unscrew the accelerator pump fuel supply adjusting screw;
- Unscrew the adjusting screw for the composition of the “quality” of the idle mixture;
- We pull out the diffusers of the fuel mixture injection chambers with pliers.
Diffusers are placed with the holes facing the holes, and clamps with a rigid spring are placed on the opposite side to the chamber walls. Diffusers differ in numbers (35) for the primary chamber with a smaller diameter, and for the secondary chamber (45) with a larger diameter.
If it’s difficult to figure it out, contact carburetor specialists...
We need to disassemble all the parts to rinse them well and reassemble them in reverse order.
Working with the bottom
It remains to work with the lower part. Using a Phillips screwdriver, unscrew the 2 bolts that hold the housing with the adjusting screw and the limiting sleeve - the amount of mixture at idle. Let's check its sealing gasket and, if necessary, replace it. Let's unscrew the needle valve and check the condition of the rubber ring and, if there is a lot of wear, replace it.
Everything has been disassembled down to the screw, all that remains is to wash it with a special carburetor cleaner or acetone and reassemble it in the reverse order.
There is nothing complicated in this work, everything will shine on the outside, as well as on the inside.
Choosing a carburetor for a VAZ classic
Classic VAZ models should be understood as cars from 2101 to 2107. Owners of such cars with a carburetor often resort to searching for more effective solutions to improve dynamic performance and/or reduce fuel consumption.
Both acceleration and efficiency directly depend on the model of carburetor under the hood and on the quality of its adjustment. If the owner decides to install a third-party carburetor, then a number of individual features need to be taken into account when choosing.
Standard carburetor models
Various carburetor models are focused on the environment, reducing consumption or maximizing vehicle dynamics. Carburetors were also created for engines of different sizes. Some models of carburetors from one power unit can be easily installed on another, and in some cases modifications will be required.
Carburetor DAAZ/Weber
DAAZ carburetors (Dmitrov Avtoaggregatny Zavod) 2101, 2103 and 2106 were products that were produced thanks to a license from Weber. For this reason, the models are called both the DAAZ carburetor and the Weber carburetor, but they mean the same device. These carburetor models are characterized by maximum simplicity of design and provide excellent acceleration characteristics.
The disadvantages of these models rightly include high fuel consumption at around 10 to 14 liters per hundred kilometers. Another potential difficulty today is the almost complete absence of these models, even used ones in acceptable working condition.
Carburetor Ozone
VAZ 2105-2107 models received improved DAAZ carburetors. This carburetor model is also called Ozone. The Ozone carburetor got its name due to its environmental friendliness. A fully serviceable and tuned Ozone carburetor allows you to reduce consumption from 7 to 10 liters of gasoline per hundred kilometers compared to Weber and is capable of providing good dynamics.
Among the disadvantages of this model is the design of the carburetor. The process of active operation leads to a number of problems with the secondary camera. The opening of the chamber does not occur mechanically, but thanks to a pneumatic valve.
If the Ozone carburetor is contaminated or its adjustments are disrupted, then the 2nd chamber may open with a delay or remain closed completely. This leads to a noticeable loss of output from the power unit, a deterioration in acceleration dynamics, a decrease in maximum speed, and unstable engine operation at speeds above average.
Solex carburetor
No less popular is the DAAZ 21053 carburetor model, which is a licensed product from Solex. The carburetor has proven itself to be an economical and at the same time dynamic solution when installed on classic engines.
The design of this model is very different from previous DAAZ carburetors. The Solex carburetor has a fuel return system (return). Thanks to this solution, excess gasoline goes back into the gas tank.
The return route allows you to save about 400-800 grams of gasoline per hundred kilometers traveled.
We also recommend reading the article about tuning carburetor injection. From this article you can learn about possible modifications to the carburetor to improve its characteristics and performance. Certain versions of this model may have a number of auxiliary electronic systems.
The main solutions include an idle system with regulation by an electric valve, an automatic cold start system, etc. Such innovations were found on export versions of the car.
In the CIS, the Solex carburetor with an electric idle control valve has become widespread.
The system turned out to be problematic in operation. In this type of carburetor, the air and fuel passages are narrow and quickly clog. If the carburetor is not serviced in a timely manner, then the idle system was the first to fail. A Solex carburetor consumes from 6 to 10 liters of fuel in quiet mode. As for dynamics, it is second only to the early development of Weber.
All of the carburetors mentioned above are installed on classic VAZ engines without modifications. The only nuance when choosing is the selection of the carburetor relative to the displacement of your engine. If the existing carburetor is designed for a different volume, then selection and replacement of jets will be required, as well as careful adjustment of the carburetor.
Installing a custom carburetor
Owners of “classics” in some cases resort to installing non-standard carburetor models on their cars. Such an installation will require certain modifications and subsequent configuration. We are talking about the Solex 21073 and Solex 21083 carburetor models.
Model Solex 21073
This model was developed for a 1.7-liter engine and was standardly installed on the power unit of a Niva car. The Solex 21073 carburetor differs from others in its large channels and jets. Installing this model on other VAZ cars with a carburetor allows you to achieve an increase in dynamics, but fuel consumption rises to 9-12 liters per hundred.
Model Solex 21083
Solex 21083 was installed on the VAZ 2108-09. If you install it on “classic” engines, then modifications will be required. The gas distribution systems of engines 01-07 and 08-09 have a number of differences.
Installing such a carburetor without modifications will lead to the fact that at speeds of about 4000 the speed of the supplied air can reach the sound speed, and the engine will not be able to spin up further. To install this model of carburetor, it is necessary to drill out the diffusers of the primary and secondary chambers to expand them.
You also need to install large jets. The refinement process is labor-intensive, but the result allows you to obtain gasoline consumption lower than model 21053, and dynamics exceed those of 21073.
Summarize
Finally, we add that there are single-chamber and two-chamber models of foreign-made carburetors. The disadvantages of this choice include high cost, difficulty in setting up and maintaining, as well as not always better dynamics and efficiency compared to the DAAZ, Solex or Weber carburetor models listed above.
Source: https://KrutiMotor.ru/karbyurator-na-klassiku-vaz/
Types of service
Maintenance of Ozone carburetors can be partial or complete. The first is flushing the unit without removing it from the engine. This is done using special cleaning products such as “Carb Cleaner”. We use the product according to the instructions and continue to operate the car. But the effect of partial maintenance is short-lived and does not always help. Eventually you will have to perform a full service.
Full setup of Ozone carburetors comes down to complete disassembly of the unit, cleaning of the channels, checking the functionality of the mounted units, troubleshooting parts, assembly using spare parts and subsequent adjustment.
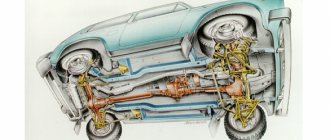
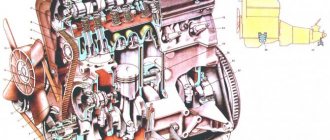
Stable, smooth and economical operation of any gasoline engine can only be achieved if it is provided with a perfectly balanced mixture of air and gasoline. Fuel injection systems were installed on the “Seven” only in the last years of its production. And before that, the VAZ-2107 carburetor was “out of competition”, it prepared, almost without any electronics, according to the “recipe” built into it, gasoline-air power for engines of the entire “VAZ” line. Dosage systems in devices around the world were used in a variety of ways. On the carburetors of VAZ cars, one was chosen in which a float is used to maintain a constant level. Let's look at its design and operation using the example of the DAAZ 2107-1107010 “Ozone” .
How to adjust the carburetor on a VAZ
Adjustment of any modification, including the adjustment of the VAZ-2107 carburetor, is carried out on the basis of calibration parameters, which contain all the necessary data. Experts recommend tuning once every 6 months. In fact, this procedure is routine maintenance for this device.
Setting up the carburetor 2107-1107010 includes the following operations:
cleaning and washing the outside of the product;
monitoring the condition of mechanisms and individual elements;
washing (cleaning) the mesh filter;
washing (cleaning) the float chamber;
flushing (cleaning) of fuel and air jets.
There is no point in describing in detail all the stages of setting up devices of the 2107-1107010 series, since cleaning or washing, as well as disassembling the VAZ-2107 carburetor is identical for all modifications. Therefore, we will consider only the most important points.
Replacing a VAZ 2107 carburetor with your own hands
The VAZ 2107 carburetor is removed to disassemble it or replace it with a new one if it cannot be repaired.
- After loosening the clamp, disconnect the corrugated warm air intake hose from the thermostat pipe.
Remove the filter (see Replacing the air filter element and removing the filter housing).
- Using a size 8 wrench, unscrew the four nuts securing the air filter housing to the carburetor. To avoid accidentally dropping them into the intake manifold, the carburetor can be covered with a clean cloth.
- We remove the plate.
- Loosen the clamp and remove the crankcase ventilation hose from the pipe.
- Remove the air filter housing.
- Using an “8” wrench, loosen the tightening of the bolt securing the sheath of the air damper cable...
- ... use a screwdriver to loosen the cable fastening screw, holding the nut with a “7” wrench, and remove the cable.
- Remove the crankcase gas exhaust hose from the fitting.
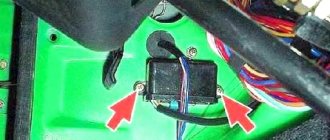
- We disconnect the tips of two wires from the terminals of the microswitch of the EPHH control system.
- Using a screwdriver, remove the rod from the throttle valve drive lever.
- Remove the vacuum ignition timing regulator hose from the fitting.
- Remove the hose of the electromagnetic valve of the EPHH control system from the fitting of the economizer housing.
- Remove the return spring.
- Loosen the clamp and remove the fuel supply hose.
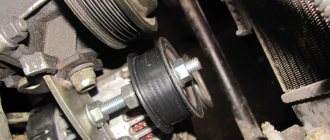
- Using a 13mm wrench, unscrew the four nuts securing the carburetor to the intake manifold.
- Remove the carburetor from the engine.
Install the new carburetor in the reverse order of removal. We replace the gasket under the carburetor with a new one.
Do not use too much force when tightening the carburetor-to-intake manifold nuts (6.6–15.4 N•m [0.7–1.6 kgf•m]).
Signs of malfunction of the VAZ 2107 carburetor
The presence of problems in the operation of the carburetor can be judged by the following manifestations:
- “failure” when you press the gas pedal, when the car continues to move at the same speed for some time or slows down;
- “jerk” when you press the gas pedal, when the car starts to accelerate, then slows down and accelerates again;
- series of “jerks” or “failures” when moving;
- sluggish acceleration, loss of power;
- increased fuel consumption;
- difficult engine starting;
- increased or decreased idle speed;
- Rough operation or engine stalling at idle speed.
The VAZ 2107 carburetor circuit is not too complicated, so you can repair and adjust the unit yourself.
Adjusting the throttle drive
If this drive is incorrectly configured, the car's engine response drops and acceleration dynamics deteriorate. The setup is done with an assistant.
You will need the following tools: a screwdriver, an 8-mm open-end wrench, a flashlight, a ruler or a caliper.
- Turn down the “choke” (air damper drive) completely.
- Have your assistant press the gas pedal all the way to the floor. The throttle valve will open completely, as shown in the picture below, you can shine a flashlight into the first chamber. When you release the pedal, the damper should completely close the first chamber without any gaps. If there are gaps, then proceed to the next step.
- Next, we measure the length of the rod with a caliper; it should be exactly 8 cm. To adjust the length of the rod to the required size, rotate the tips by unscrewing the lock nuts.
After all these operations have been completed, put the rod in place and repeat the check. Nowadays, rods are made of low-quality plastic, which shrinks over time. Therefore, you need to check the operation of the traction after a week or two.
We looked at all the ways to adjust the carburetor yourself. We hope this article helped you, if you have any questions, ask them in the comments and we will definitely answer.
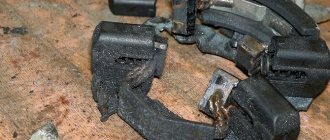
If you disassemble the carburetor to service it, you may notice a dark brown tarry coating on its internal parts, do not be alarmed. This plaque is a natural formation. It is formed as a result of the operation of forced crankcase ventilation.
And the older the engine, it has more wear, and as a result, the amount of these gases that rise in the cavity of the air filter increases, while more contamination of carburetor parts occurs. This is the relationship.
Plaque on carburetor parts and the walls that are located near them must be cleaned. But it is not necessary to clean the deposits on the walls of the neck, the walls of the dampers, and diffusers, since this deposit does not significantly affect the overall operation of the carburetor.
So don't waste your time. Although if you are a pedantic person and you have time, you can clean the carburetor to perfect cleanliness, in any case it won’t make it worse and in the future it will have a better effect on the adjustment of the VAZ 2107 carburetor.
Due to the fact that the secondary chamber of the carburetor is in operation for a short time, its secondary jet and the main air jet do not become very dirty. However, it is still necessary to check the degree of contamination.
It is recommended to do this every time you remove the carburetor cover.
It is recommended to clean the jets with either gasoline or solvent. You can use a thin wire for this.
To ensure that you do not encounter any troubles related to the operation of the carburetor along the way, every 50 - 80 thousand kilometers, check the condition of the mesh filter, which is located in the float chamber of the carburetor at the inlet.
The fact is that thanks to the effective operation of the fuel purification system of the VAZ 2107, this filter rarely becomes clogged. However, if you do not change the fine fuel filter in a timely manner, then there may be problems along the way, since this mesh filter will quickly become clogged.
All parts and cavities of the carburetor must be washed carefully. Let's say the float chamber, where there are resin deposits, it is advisable to wash it with a solvent or other effective means.
But, for example, you should only wash the diaphragms themselves and gaskets with pure gasoline, since all solvents can seriously damage them, and for this they must be washed separately.
How to check the strainer
By pumping gasoline, we fill the float chamber, as a result of which the shut-off valve closes. After this, remove the top cover of the filter, remove the valve, wash it in solvent, and then blow it with compressed air.
If under heavy load conditions you notice disturbances in the operation of the engine, it means that the supply of fuel through the fuel system is disrupted. In addition, this may indicate a broken strainer.
It is strictly forbidden to wipe the bottom of the float chamber with a rag, as this will leave fibers on the bottom of the chamber, which quickly clog the jets. Cleaning is done with a rubber bulb. After this, blow out the channels with compressed air.
As for the tightness of the shut-off needle, it also needs to be checked with a blower, since the pressure of squeezing it with your hands is identical to the pressure of the fuel pump.
This is done as follows. Use manual fuel pumping and fill the float chamber with fuel, after which you will be able to see the shut-off valve close. Then move the top filter cover and remove the valve. It must be thoroughly washed in solvent, then dried using compressed air.
When the engine behaves incorrectly during loads, there are dips or loss of power, or the car “reacts poorly to the pedal,” most likely you have a problem with the fuel supply. In addition, often the cause is a faulty strainer.
The float chamber is cleaned using a rubber bulb and then dried with compressed air.
Checking the tightness of the shut-off needle is carried out using a bulb, since the pressure force that occurs during squeezing is equal to the pressure in the fuel pump. When replacing the carburetor cover, you need to make sure that the floats are in the up position.
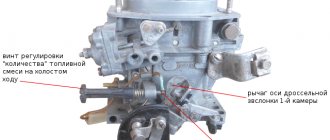
Adjusting the idle speed of the VAZ 2107
Well, the final part of adjusting the carburetor on the Classic is adjusting the XX. We approach the carburetor and look for the “(2) quality” and “(1) quantity” screw on it:
We unscrew the quantity screw by 3 turns, and the quality screw by 4 turns. We start the engine and let it warm up. Carburetor adjustments can only be made with the engine fully warmed up. We are waiting for 90 degrees.
After this, tighten the quality screw so that the speed drops to 700-800 rpm. In winter it can be 900-1000. After this, unscrew or tighten the quality screw so that the speed becomes the maximum possible. Then we lower the quality screw again to 700-800. After this, tighten the quality screw until the motor begins to shake slightly (barely noticeably). This will be the correct carburetor adjustment.
As you can see, the process is not complicated and you can handle it yourself!