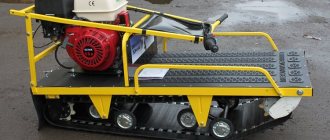
Chainsaw snowmobile
Even this option exists and craftsmen use the saw engine to create snowmobiles. With a minimum of tools and an understanding of the basics of building vehicles, this is not so difficult. True, you will have to work on the frame and propulsion, but everything else is provided by the chainsaw. The power of the chainsaw engine is quite enough to confidently push one or even two adults. After all, the working volume sometimes exceeds the volume of moped engines, and the two-stroke engine increases efficiency.
A snowmobile with a muscle drive or a snowmobile made from a bicycle with your own hands
A snowmobile does not have to have a motor. You can make a great snowmobile out of a bicycle. What it is and how to make it, read our separate article .
In fact, such a snowmobile is an ordinary bike with high cross-country ability.
Homemade snowmobiles make it easy to move around snowy areas, even in the absence of a knurled surface. Sometimes it is enough to spend just a little time and you will receive a magnificent vehicle in which your soul has been invested and of which you will be confident.
Read also: Do-it-yourself gates from a profile pipe photo
Making a snowmobile is very simple if you have the necessary tools and materials. A set of tools for an advanced car enthusiast and simple welding will be enough.
The question always arises: how to make a track for a snowmobile?
Several options are used:
- You take an old tire, cut off its bead and get an endless strip. If you take a truck tire, you'll get a decent sized track.
- A tape is made to which auxiliary corners or profile strips are attached. They act as hooks. They can even be attached to the tape using ordinary bolts.
Then everything is ready. All that remains is to make the frame and the roller system. The gear ratio can be combined from bicycle or motorcycle sprockets. Chains can also be borrowed from these vehicles. Rollers can be welded from large diameter pipes, or you can take ready-made rollers.
The engine is taken ready-made, because it is the most high-tech part of the entire installation. It cannot be done in a garage.
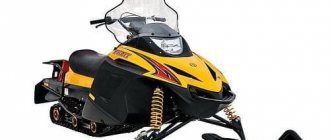
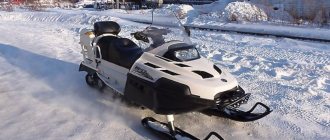
A snowmobile is a good means of transportation in winter. It is capable of reaching speeds of up to 70 km/h, is highly maneuverable and quite economical. Unfortunately, the cost of branded products is quite high, and not everyone can purchase them. However, homemade snowmobiles can be a way out of this situation. They can be made from scrap materials and their price will be relatively low.
DIY children's snowmobile: photo with description
A simple homemade children's snowmobile made from a snow scooter and a cordless screwdriver: photo of the homemade product with a description.
The author decided to pamper his son and make him his own personal real snowmobile. For a child, such a vehicle is a lot of fun, because a snowmobile with a motor drives itself and does not need to be pushed.
To build the homemade product you needed the following materials:
- Children's snow scooter.
- Old Makita cordless screwdriver.
- Bicycle sprockets from wheels and pedals.
- Bicycle chain.
- The handlebars, brake lever and cable are also from a bicycle.
- Bolts, nuts.
- Duralumin pipe D16.
- A pair of 16 mm bearings.
- One bearing per 10 mm.
- Two plastic plugs for plastic pipes with a diameter of 200 mm.
- Aluminum U-shaped profile.
- Profile pipe 20 x 20mm.
Below you will find several photos describing the snowmobile assembly process.
First of all, the author of the homemade product replaced the standard round plastic handlebar on the snow scooter with a bicycle handlebar.
I made a trolley frame from a profile pipe using a welding machine.
Then I made a shaft and drive wheel from plastic pipe plugs and pieces of metal profile.
On one side, a large bicycle chainring is bolted to the wheel.
On the reverse side, we weld a wide washer to the shaft, drill holes and attach the wheel to it with bolts.
The bearing mount is welded from pieces of pipe along the outer diameter of the bearings.
A screwdriver with a small star is attached to the bottom of the cart frame, and a bicycle chain is pulled between the stars.
The speed of the snowmobile is controlled by a handle on the steering wheel; the cable is secured with a bracket near the screwdriver power button.
To power the electric motor, you can use any 12 V battery, for example from a motorcycle. If necessary, the cart can be quickly removed, which is very convenient when transporting a snowmobile in the trunk of a car.
The homemade product is designed for children aged 3 - 6 years; older ones will need a more powerful electric motor. I recommend watching a video showing original homemade snowmobiles made from a screwdriver.
Snowmobile made from scrap materials.
From a screwdriver.
Popular homemade products on our website
- DIY gazebo: photo of construction with description
- DIY solar collector: assembly photo with description
- DIY snowmobile: photo of homemade assembly
- Do-it-yourself snowmobile from a motorcycle: photo, description
- DIY snowmobile made from a chainsaw
- Do-it-yourself snowmobile from a walk-behind tractor
- Homemade heater: photo with description
- Restoring a Java 350 motorcycle: photo with description
- Homemade ATV: (44 photos) assembly with description
- Wind generator from a motor wheel: photo with description
- Homemade motorized trolley: photo of a self-propelled trolley with description
- Homemade 4x4 fracture mini tractor: photo of assembly with...
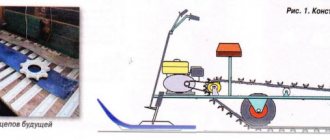
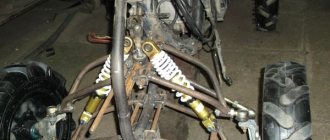
Walk-behind tractor base design
You can make a snowmobile from various equipment, for example, a moped, scooter, trimmer, etc. However, the best choice can be considered a walk-behind tractor. Since this unit remains unclaimed in winter, it can be safely taken as the basis for creating a snow scooter. The snowmobile attachment can be made on wheels and this design is simpler. The most difficult thing is to make a snowmobile with your own hands from a walk-behind tractor on tracks. However, it has higher cross-country ability, which can become the main criterion when choosing the type of structure.
It should be remembered that not every walk-behind tractor can be converted into a snowmobile. It is best to use units equipped with:
- Rear towing device.
- Medium-power air-cooled power plant.
The optimal choice can be considered Neva units. They are attractively priced and their engines are assembled in Japan. The design of a self-assembled motor sleigh can be divided into two main parts - the driving and driven ones.
The first category includes the motor from the walk-behind tractor, drive elements and the supporting frame. The driven part consists of:
- Steering column.
- Shock absorbers.
- The chassis, for example, is tracked.
Before starting work on creating a homemade snowmobile, you need to select all the necessary materials and spare parts.
Frame making
You should first study the drawings well. If you wish, you can make a mini snow scooter of your own design, but many people prefer ready-made solutions. To make the frame, you should use iron pipes. To give them the desired shape in accordance with the drawing, you will need a pipe bender. When this work is completed, it is necessary to connect all the frame elements by welding.
The next step will be to manufacture the main subframe structure in front . This is where the power plant and gearbox, for example from a Zhiguli, will be mounted. To solve this problem, a stand with holes for the motor is welded to the frame. The drive chain is installed in a special slot.
Chassis
One or two skis must be attached to the steering column using a swivel joint. It is better to use ready-made shock absorbers for the front suspension , for example, from a motorcycle. You should also decide whether tracks will be used for movement, or whether you plan to make a mini snowmobile on inner tubes. Each of these drive types has not only advantages, but also disadvantages.
The wheeled unit is more maneuverable, but is inferior to the tracked unit in cross-country ability. Tracks can be made independently from various materials, for example, a conveyor belt.
It is important to remember that they must be light and durable, while ensuring good contact of the tracks with the surface.
Chainsaw unit
Using this tool you can make a children's snow scooter. However, adults can also use a homemade snowmobile using a chainsaw. At the first stage, you need to decide on the type of tool. Its brand is not of fundamental importance if the power plant is working properly. To make a snowmobile from a chainsaw, in addition to the motor, you will need a gearbox.
Read also: How to make a chainsaw pulley for the starter
To make a frame, you can take metal corners and two plates . First, the edges of the sheets are bent at an angle of 90 degrees, and then holes are drilled into them. A caterpillar shaft is mounted in the front part of the structure, and an axle for gear wheels is mounted in the rear part. Also, brackets should be welded to the bottom of the frame, parallel to each other.
An axle for 18 road wheels arranged in a checkerboard pattern is installed in the lower grooves. On the spar it is necessary to install 3 racks made from angle iron. To strengthen the structure, the racks are connected by transverse beams. A second sheet is attached to the front part, on which the intermediate shaft and gearbox will be placed. The next step is to make a subframe from metal pipes.
A flange is installed on the tubular drive shaft. Trunnions are welded at the end of the shaft, and the right one should be longer than the left one. The chain sprocket will then be mounted onto this extension. Since the snow scooter is not capable of reaching high speeds, you can do without a braking system.
Making a homemade snowmobile is quite possible, but you will have to make an effort. However, considering the cost difference with ready-made solutions, it is definitely worth it.
Homemade products from a washing machine engine:
1. How to connect a motor from an old washing machine through a capacitor or without it 2. Homemade emery from a washing machine engine 3. Homemade generator from a washing machine engine 4. Connecting and adjusting the speed of a commutator motor from an automatic washing machine 5. Potter's wheel from a washing machine machines 6. Lathe from an automatic washing machine 7. Wood splitter with an engine from a washing machine 8. Homemade concrete mixer
We make a snowmobile with our own hands - it couldn’t be easier!
I made this snowmobile literally in a couple of weekends in the garage at the dacha. Although its design at first glance looks very simple, nevertheless, in terms of cross-country ability in deep loose or wet snow, it is not inferior to most industrially produced snowmobiles.
Several years ago, I built a snowmobile for my nine-year-old daughter with a homemade track made from conveyor belts and plastic water pipes as lugs. At first I had doubts about the reliability of such a track and how the plastic parts would behave in the cold. But during two years of winter operation, no breakdowns or severe wear of the pipes occurred. This inspired me to create a light snowmobile for myself with the same homemade track.
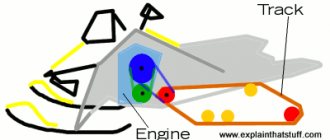
Understanding full well that the smaller the mass of the snowmobile and the larger the supporting area of the caterpillar, the better its cross-country ability in loose and deep snow, I tried to make the design as light as possible. The operating principle of the snowmobile is very simple (Fig. 1). There are four wheels installed inside the caterpillar, which, when moving, roll along a conveyor belt on which lugs are attached. And the caterpillar drive from the motor is carried out by a chain through the driven shaft using special drive sprockets. I took them from the Buran snowmobile.”
With an engine from a conventional walk-behind tractor with an automatic clutch with a power of only 6 hp. you won't accelerate quickly. I planned to ride the snowmobile not on compacted paths, but on loose snow, so I abandoned the soft track suspension and skis to reduce the weight of the snowmobile and simplify the entire design.
First I made the caterpillar. A plastic water pipe with a diameter of 40 mm was cut into blanks for lugs 470 mm long. Then I sawed each piece lengthwise with a circular saw into two equal parts. Using the device shown in Fig. 2, I used a wood circular saw to cut plastic pipes for lugs lengthwise.
I attached the lugs to the conveyor belt with two 6 mm diameter furniture bolts with a large semicircular head. When making a caterpillar, it is very important to maintain the same distance between the lugs, otherwise they will run into the teeth of the drive sprockets and the caterpillar will begin to slip and slide off the rollers.
Read also: Rating of engines for walk-behind tractors by reliability
To drill holes in the conveyor belt for mounting bolts with a diameter of 6 mm, I made a jig. The holes in the tape were drilled using a wood drill with a special sharpening.
Using such a jig, you can drill 6 holes in the conveyor belt at once to attach three caterpillar lugs.
At the store I purchased four inflatable rubber wheels from a garden cart, two drive sprockets from a Buran snowmobile and two sealed bearings No. 205 for the caterpillar drive shaft.
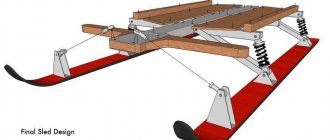
I asked a turner to make the drive shaft of the caterpillar and supports for the bearings. I made the snowmobile frame myself from 25x25 mm square pipes.
Since the axes of the ski and steering hinges are on the same line and in the same plane, you can use a continuous tie rod without ball ends.
Ski turning bushings are easy to make. I welded 3/4″ female plumbing couplers to the front cross member of the frame. I screwed pipes with external threads into them, to which I welded the bipod of the ski steering rack.
I recommend using skis from the Argomak children's snow scooter. They are lighter and more flexible, but they need to be equipped with corners for attaching to the snowmobile's rotating stand and a metal undercut at the bottom - for better control of the snowmobile when moving on crusty or compacted snow.
The chain tension is adjusted by moving the motor.
Driving a snowmobile is very easy. When you increase engine speed with the throttle handle located on the steering wheel, the automatic centrifugal clutch is activated and the snowmobile begins to move. Since the estimated speed of a snowmobile is low (only about 10-15 km/h) and depends on the density of the snow, the snowmobile is not equipped with brakes. It is enough to reduce the engine speed and the snowmobile stops.
I will share a few tips that may be useful when repeating this design.
1. I cut the pipe for the tracks lengthwise using a hand-held circular saw for wood, first on one side, then on the other. This makes it smoother than cutting both walls at once. It is more convenient to process small workpieces. If you immediately cut a long pipe lengthwise, then the plastic will melt and the saw blade will jam.
2. Caterpillars can be made of any width. And each designer has the right to choose what is more convenient for him: to make a wide but short track or a narrow and long one. Just remember that with a large caterpillar the snowmobile will be difficult to control and the engine will be more loaded, and with a small one it may fail in loose deep snow.
3. Some of my photos show that there are plastics installed inside the tracks.” These are guide stops for the slide, which should prevent the caterpillar from sliding off the rollers. But during the operation of the snowmobile, the caterpillar did not slide off the rollers even without slipping, so “barrels” can not be installed, which will reduce the weight of the snowmobile.
4. At the end of winter, I completely disassembled the snowmobile to determine its weight. The weight of its individual components turned out to be as follows: caterpillar - 9 kg; drive shaft assembly - 7 kg; two pairs of wheels with axles - 9 kg; engine and steering wheel - 25 kg; pair of skis - 5 kg; frame - 15 kg; double seat with posts - 6 kg. In total, everything together weighs 76 kg. The weight of some parts can be further reduced. Nevertheless, the weight indicator for a snowmobile with a track of this size is quite satisfactory.
The geometric dimensions of my snowmobile are as follows: snowmobile frame length - 2 m; the distance between the axes of the support wheels (rollers) is 107 cm; The width of the caterpillar is 47 cm. The pitch of the caterpillar lugs depends on the thickness of the conveyor belt and it must be selected experimentally (I got 93 mm). I do not provide exact dimensions and drawings of the snowmobile parts, since anyone who plans to repeat the design will be guided by those parts and components that they can purchase or manufacture on their own.
Sergey KHOMYAKOV, Moscow ([email protected])
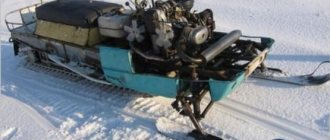
DIY Snowmobile Made from Snow Scooter and Chainsaw
Snowmobile from a chainsaw in artisanal conditions
With the onset of winter, especially snowy ones, challenges arise related to movement. Few people know that from the means at hand you can construct a snowmobile as another means of transportation in winter conditions.
With all this, there is no need to incur severe costs. Moreover, if there is a lot of snow, you won’t be able to travel very far by car, but a snowmobile will allow you to move in similar conditions without any special problems.
Content
Homemade snowmobile from a chainsaw
The assembly of any structure begins with the development of drawings. There, of course, our client only has to arrange the necessary units, then we proceed to the practical implementation of the idea. Therefore, at this phase you should decide on what brand of chainsaw is suitable for realizing your dream.
Choosing a chainsaw
There are several models of chainsaws available in retail outlets. The more popular ones are the Druzhba chainsaw, the Ural chainsaw and the Shtil chainsaw. Before choosing, you should think carefully by comparing their technical properties.
Chainsaw "Friendship"
This is the most common chainsaw, which is possibly used as an engine for a snowmobile.
. The result is a simple design without anything superfluous.
The only drawback is the large weight with relatively low power. And in addition, the structure does not have parts for attaching safety covers. In addition, this design is outdated in all respects.
Technical properties:
- Power – 1 kW;
- Weight – 12 kg;
- Engine (two-stroke);
- Tire length – 45 cm;
- Fuel (gasoline).
Chainsaw "Ural"
This is a special model with enormous reliability, power and light weight in relation to power. This is an environmentally friendly unit capable of operating in extreme conditions.
If you decide to use a Ural chainsaw, then this is a good choice. Its technical properties fully correspond to those declared.
Technical properties.
- Power – 3.68 kW;
- Weight – 11.7 kg;
- Engine (gasoline two-stroke);
- Overall dimensions – 46x88x46 cm;
Chainsaw "Calm"
It is also suitable for creating a snowmobile in artisanal conditions. This is an environmentally friendly device, completely harmless to humans. The main advantage of the chainsaw is its light weight and quiet operation, in comparison with the Ural chainsaw, and of course, if compared with the Druzhba chainsaw.
Scheme for producing a snowmobile from a Ural chainsaw on your own
Schemes for assembling a snowmobile from a Ural chainsaw: 1 – steering wheel; 4 – fuel tank (from the Druzhba chainsaw; 3 – unit (from the Ural chainsaw); 4 – bushing of the control ski stand (pipe with a diameter of 30-2 pcs.); 5 – control ski (3.2 pcs.); 6 – drive gear (nylon, sheet s15, 3.5 pcs.); 7 – caterpillar (from the Buran snowmobile, shortened); 8 – frame; 9 – support roller (from potato sorting, 18 pcs.); 10 – back brace - limiter (pipe ½); 11 – caterpillar tensioner (5 pcs.); 12 – caterpillar tension gear (nylon, sheet s15, 5 pcs.); 13 – bearing No. 80204 in the housing (4 pcs.); 14 – box-trunk bottom-plywood s4, sides board s20); 15 – seat (cover-plywood s4, foam rubber, leatherette); 16 – 1st stage of chain transmission; 17 – 2nd stage of chain transmission; 18 – seat backrest limiter (½ inch pipe); 19 – driven sprocket of the 1st chain drive (large sprocket of the creeper, intermediate shaft); z=38; 20 – drive sprocket of the 2nd stage of the chain drive (small creeper sprocket), z10; 21 – driven sprocket of the 2nd degree of chain transmission (drive sprocket of the track drive shaft), z18; 22 – drive sprocket of the 1st stage of the chain drive (gearbox output shaft sprocket), z12; 23 – steering knuckle lever; 24 – control rod (2.7 pcs.); 25 – control shaft with bipod; 26 – front axle support (pipe with a diameter of 30); 27 – caterpillar drive shaft; 28 – tension axis of the caterpillar.
READ Is it possible to cut composite reinforcement with a chainsaw?
Without creating a diagram and drawing, it is unlikely that you will be able to connect together the main units of the structure, such as:
To simplify the design process, you should take a caterpillar from the Buran all-terrain vehicle. If a children's version is being designed, then skis can also be used.
Racks
Control ski : 1 – runner (nylon, sheet s20, from a children's snow scooter ); 2.4 – spring (normally stretched, from the rear shock absorber of the moped); 3 – spring support; 4 – undercut (duralumin corner 20x20); 5 – spring cover (angle 35x35); 6 – fastening the spring to the cover (M8 bolt with washer); 7 – support lever (pipe 30x30); 8 – spring for fastening the rack-fork to the ski lever (steel, sheet s2); 9 – spring for attaching the support lever to the ski (steel, sheet s2); 10 – axles (M8 bolt, 4.5 pcs.); 11 – steering knuckle stand (bicycle control stand with crown and part of the fork); 12 – control bipod (steel, sheet s4); 13 – mount for control bipod (type M16); 14 – fastening the spring bearing and the lever spring to the ski (M5 bolt with a countersunk head, 7 pcs.); 15 – lever bushing (iron pipe with a diameter of 30 mm); 16 – plain bearing (nylon bushing, 2 pcs.); 17 – rack bushing (iron pipe with a diameter of 30 mm). In the top view, parts 11, 12, 13 of the steering knuckle are not shown.
SNOWKIT with engine from CHAINSAW #1
On the channel you will find extraordinary #experiments with electricity, #experiments and #inventions. Here we share unusual ones.
?Snowmobile from Sanok and Chainsaw?? I didn’t expect such ADRENALINE and speed
Made a snowmobile
from the Friendship saw, and
the snow scooter
. Caterpillar from a transporter and professional pipes, sprocket chain from Izh.
Snowmobile racks are usually made from 3x3 cm corners. They are connected to each other with iron jumpers. For this reason, there is a relatively small portal. To make a platform, you need to take a sheet 5 mm wide and connect it to the portal and the middle of the right side of the vehicle parts. This platform will serve as a mounting location for the chainsaw gearbox and chain drive .
On part of the rear portal and the middle of the snowmobile, a small space should be created for the seat structure.
The front part of the frame and the front axle cross member are connected by means of a beam. An ordinary water pipe with a diameter of 1.5 cm acts as a beam. At the end of this pipe, the bushings of the control skis are attached by welding, and a stand is installed in the center. The stand will serve as a support for the engine subframe.
Particular attention should be paid to the mounting points of the racks. For greater reliability, the attachment points are reinforced with iron gussets, 5 mm wide. The myth approach will strengthen the system and make it more reliable and durable.
READ Carburetor Adjustment for Shtil 260 Chainsaw
Caterpillar
Snowmobile frame with caterpillar block : 1 – rear part of the spar (metal sheet s2, with flanges, 3.5 pcs.); 4 – tension device (4 pcs.); 3 – rear portal (corner 30x30); 4 – middle part of the spar (angle 50x63, 5 pcs.); 5 – bracket-fork for installing the axis of the road wheels (sheet metal s2, 10 pcs.); 6 – middle portal (corner 30x30); 7 – platform for mounting the unit gearbox and the intermediate speed reducer shaft (metal sheet s2); 8 – scarves (metal sheet s2, 4 pcs.); 9 – front portal (corner 30x30); 10 – front component of the spar (metal sheet s2 with flanges); 11 – axis of tension gears; 12 – caterpillar tension gear (5 pcs.); 13 – axis of road wheels (steel, circle 10, 5 pcs.); 14 – axle fastening (M10 nut and spring washer, 20 pcs.); 15 – spacer sleeve (aluminum pipe); 16 – roller (18 pcs.); 17 – bearing unit (4 pcs.); 18 – caterpillar drive gear (4 pcs.); 19 – caterpillar drive shaft; 20 – drive sprocket of the drive shaft (driven sprocket of the 2nd degree of chain transmission), z=18; 21 – steering knuckle bushing for ski control (pipe with a diameter of 30 mm, 5 pcs.); 22 – front axle support (pipe with a diameter of 30 mm); 23 – scarves, 4 pcs.; 24 – engine stand (pipe with a diameter of 30 mm); 25 – roller tire (rubber ring, 18 pcs.).
To assemble a mini-version of a snowmobile, you can take the tracks from an old Buran and modify it, shortening it by almost a whole meter. Gear wheels are made of nylon sheet, 1.5 cm wide.
Drive shaft
Caterpillar drive shaft (tension shaft is the same, only position 4, replaced by position 1) : 1 – left (along the way) tip (steel, cylinder 22); 5 – shaft (iron pipe 0.28x20; 3 – flange for attaching the gear to the shaft (metal sheet s4, 2.7 pcs.); 4 – right (along the way) shaft tip (steel, cylinder 29); 5 – track drive gear (4 pcs.); 6 – frame spar, 2.4 pcs.); 7 – bearing housing cover (steel, 5 pcs.); 8 – bearing 80204 (5 pcs.); 9 – bearing housing (steel, 5 pcs.); 10 – drive shaft sprocket; 11 – fastening the sprocket to the shaft (M12 nut with wide and spring washers); 12 – key (steel 20); 13 – seal (felt, 5 pcs.); 14 – fastening the bearing housing to the spar (M6 bolt, with 4 sets of screwdriver); 15 – fastening the bearing housing to the spar (M6 bolt with spring washer, 4 sets).
The drive shaft is made of a metal pipe with a diameter of 1.4 cm. Special flanges are attached to the shaft, where gears are attached. Trunnion tips are installed at the base of the drive shaft by welding. The axles provide space for installing bearings.
Engine
Such a unit is considered the most important mechanism of a snowmobile. In comparison with other structural elements, such as a tire or chain, the engine must work properly and without it the snowmobile will not even move. Therefore, the long-term performance of the device depends on the reliable and trouble-free operation of the engine. If you want to install an engine from an imported chainsaw, you can always buy a used Shtil.
An additional important design element on which the trouble-free operation of a snowmobile depends is the gearbox.
READ Chainsaw Husqvarna 450e X Torq Video
Asterisks
The fact that the right tip has a keyway for installing and fastening the chain sprocket is immediately apparent. This is where the track shaft sprocket is found, which is firmly attached with a nut. To make fastening possible, a corresponding thread is cut on the tip.
The tip of the tension shaft has the same overall dimensions, and the fastening of the structural parts is carried out similarly to the fastening of the track shaft sprocket.
The first gear stage should have a sprocket with a large gear ratio (number of teeth). The Ural chainsaw engine has 38 teeth.
Steering
On a homemade device, you can install a steering wheel of any design, but it can be as small as a large one. Then, it is of fundamental importance to put manual control of engine speed on the steering wheel. In order not to bother too much, it is better to use a steering wheel from a moped, scooter, etc., which already has a mechanism for controlling the power of the motor. This will make the design more reliable and comfortable to operate.
Brake system
Usually, such a vehicle does not have a brake that allows accounting (software), and it is not inevitable, since a snowmobile does not develop huge speeds, especially a homemade one. Although, if you take this dilemma seriously, there is an option to design a primitive braking device.
Tips for use
It’s worth pointing out right away that a homemade design, no matter what it is, can be registered (legalized) with the relevant authorities. That's why:
- According to the law, a homemade snowmobile does not belong to the category of vehicles. Therefore, its upcoming use, and in addition, responsibility for the consequences falls only on the person who made it. It would be better if it was operated somewhere in the outback and would not even come to the attention of the relevant services.
- A snowmobile and an amphibious all-terrain vehicle are completely different vehicles, although they have certain similarities.
- Because the engine has little power, it is not better to transport cargo with this vehicle. It's better to move around with him alone.
- To travel at night, of course, install lighting (headlights) on your snowmobile. This will increase the functionality of the device and comfort when moving.
Conclusion
Due to the fact that many people do not have the ability to independently produce any structures, they believe that it is quite difficult to assemble a snowmobile on their own. Even if it is possible to construct something similar to a snowmobile, it will go doubtfully, and even if it does go, it will stop very soon. And it will not look like a snowmobile at all, but like a pile of spare parts collected together. Modern ones are not so, and with the proper approach and level of imagination, of course, you can assemble a similar structure from the means at hand, of which there are at least a dime a dozen in every garage. If you have at least some experience with these spare and available materials, then the task becomes completely simpler. Here the principle of desire already begins to operate; if it is not there, then it is unlikely that you will be able to assemble anything at all, we are not talking about a snowmobile.
The fact that the problem is pressing now is not only a statement, but a conviction based on the dilemmas of the present day. Unfortunately, the government is not going to meet with broad layers of consumers, but has set a course for creating only expensive equipment created for sale to consumers with the means.
Source