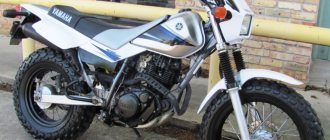
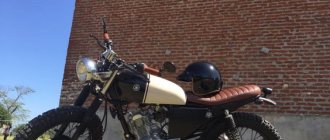
Unfortunately, the road surface of the main transport routes in our country cannot be called ideal. Therefore, when riding for a long time, the motorcycle suspension gradually fails, which leads to a decrease in comfort. If we talk about the fork, then its breakdown causes an increase in the level of danger - the motorcycle may well become uncontrollable, which will lead to a very serious accident. Therefore, when the first signs of a malfunction of the front suspension appear, it is worth doing repairs, so as not to subsequently encounter very serious consequences of its failure. Replacing motorcycle fork seals and performing other repairs requires some skill and skill, but in general these procedures are accessible even to a beginner.
Disassembly
Be careful not to hang up the motorcycle when disassembling it, as otherwise you will not be able to remove the front wheel from it. Having a helper hold your vehicle, loosen the front axle bolts, which are usually located directly on the shock absorber pins. After this, hang the motorcycle, and also remove its front wheel and fender from the fork. Unscrew the nuts securing the stays and remove the springs from the fork - be careful not to damage their attachment points during dismantling. In addition, you will need to unscrew the nuts securing the lower bridge, after which you can begin to remove the stays.
This process can be relatively difficult - first you need to remove the upper boot of the pen by prying it off with a special puller or a regular slotted screwdriver. The retaining ring can be removed using pliers, but you need to be very careful not to bend or break it. Afterwards, the bolt holding the fork in the yoke is loosened, as a result of which it can be removed by hand. To completely disassemble the fork, loosen the bolt securing the shock absorber rod, and then repeat the operation, removing the boot and the retaining ring of the stay at the bottom.
Reassembling the fork is often associated with problems - if the stays do not want to be removed from their attachment points, turn the nut a little in the opposite direction, and also hit it with a wooden mallet. After this, the process will be much easier, and you will be able to remove the feathers without putting in almost any effort. Loosen the locknut and the upper bridge pinch bolt, after which you will be able to remove the headlight, gasket and other components that interfere with further disassembly of the fork.
Prepare two containers of 0.5–0.75 liters each and begin removing the oil seal. The nut located on its body will need to be unscrewed with a spanner of the appropriate size, after which the seals can be removed by hand. Place prepared containers under the fork pipes, as at this moment an oil leak may form. Unscrew the rod axles, after which the liquid will probably flow out of the motorcycle fork. When the oil has completely flowed into the containers you have prepared, all that remains is to remove the supporting and sliding pipe.
After this, you can begin repairing the motorcycle fork, since it will be completely disassembled. Once you are done replacing the worn parts, you will need to reassemble in reverse order. Please note that the bolts can only be tightened after the nuts that are used to secure the fork leg have been completely secured. In this case, you will be able to set the correct position of this unit, ensuring maximum stability of the motorcycle and ease of control.
Minsk motorcycle front fork: repair or replacement
Before you begin repairing or installing a new front fork on Minsk equipment, you will need to remove it correctly. To do this you need to do the following:
- Remove the wheel and front fender of the motorcycle.
- Unscrew the nut that secures the feather and pull out the spring. At this point you may need to remove the steering wheel.
- Release the lower axle pinch bolt by grasping the sliding tube. After this, you can remove the feather from the bridges.
- If you are unable to release the nib, you will need to lightly tighten the nut holding it in place and then lightly hit it with a block of wood. If necessary, you can remove the headlight along with the cover, gasket and cap.
- Remove the oil seal, then unscrew the rod axis and drain the oil.
After this, you can begin repairing the motorcycle fork or installing a new one. Reassemble the fork in reverse order. Note! All bolts need to be fully tightened only after tightening the nuts that secure the feather.
Repair
If you managed to completely disassemble the motorcycle fork, you will need to wash all parts in gasoline, removing any remaining oil and dirt from them. However, you should not use abrasive tools such as a file, sandpaper or even a metal sponge - in doing so, you risk damaging the special coating that protects the fork components from accelerated wear. After washing, thoroughly dry the parts laid out on the table with paper napkins or special rags that do not leave lint on the metal. When disassembling the pen, a problem may arise that is associated with gluing the seal to the surrounding surfaces - it will need to be moistened with gasoline, and after 15 minutes removed with a knife or a screwdriver with a thin straight slot. Be careful not to damage the plug to avoid the cost of purchasing new components.
Each feather will need to be turned over to remove small parts from it - they are also washed, after which you can begin assembling the unit. To ensure that your motorcycle's front fork can perform within the manufacturer's specifications, try to install all components carefully, making sure they fit snugly together. Once the pen is assembled, you will have to close it by installing the parts in the following order:
- Washer;
- Stuffing box;
- Retaining ring;
- Anther.
All that remains is to tighten the bolt located at the bottom of the feather and install the spring on the fork.
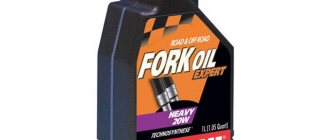
If you had to change the oil seals on your motorcycle fork, you will need to change the oil to ensure the unit is working properly. Most experienced motorcyclists recommend using the fluid recommended by the manufacturer - it will ensure ideal comfort and maximum safety when driving a two-wheeled vehicle. However, if you wish, you can pour oil with a higher or lower viscosity into the motorcycle fork - in this case, you will be able to increase and decrease the rigidity of the front suspension, respectively. Fork oils from the same manufacturer can be mixed to create a combination with unique characteristics. For example, from 10W and 5W oils it will be possible to obtain motorcycle fork fluid with a viscosity level of 7.5W.
Pour oil into the assembled feather - for this it is better to read the motorcycle operating instructions. Now you need to bleed the fork shock absorber. During the pumping process, it will make gurgling, hissing and other strange sounds. Don't be alarmed. Because this indicates the release of air from the closed system and that you have achieved your goal. After the air has escaped from the shock absorber, all that remains is to install the plug, retaining ring and upper boot, and then continue with the final assembly of the motorcycle fork.
Motorcycle fork overhaul (repair).
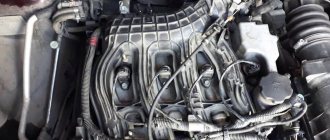
On a previously jacked motorcycle, remove from below: the fender and the front brake caliper.
Next, use a 6mm hex. Loosen the locking bolts of the front wheel axle (2 on each wheel).
Then, using a 22mm spanner, unscrew the bolt of the front wheel axle, while on the other side of the axle we hold it with a bit (or a nail) from turning.
We take out the axle, shaking the wheel for better release of the axle.
To prevent the wheel bushings from falling out and losing parts, insert the axle into the wheel, tighten the bolt and place the wheel to the side.
We take a 22mm spanner and tear off the fork stop bolts.
We free the fork stays from the parts that prevent them from coming out - turn signals, windshield mounts (if present), etc.
6mm hex wrench. loosen the clamps of the upper and lower traverse.
We take out the feather and carefully, laying it with planks, clamp it in a vice. Then use an 8mm hex key. Unscrew the bottom bolt.
Let's look at this operation with a pen in more detail. The fact is that this “lazy” bolt does not always unscrew properly, i.e. sometimes scrolls along with the inner glass of the pen. In my case, the bolt came out on one leg, and on the other it turned with the glass, but it doesn’t matter, in this case you just need an air gun with a long (to reach) hexagon and the bolt will come out.
Next, take the pen out of the vice and turn it upside down and place it in a pre-prepared container under oil, then carefully, holding the persistent bolt that we loosened earlier, unscrew it with the palm of your hand and a dry small rag. You can hold the bolt with your right hand and twist the pen with your left. The most important thing we mean is that there is a spring under the bolt, under the pressure of which the bolt will pop out (and can injure you) if you do not hold it. Turn the feather over from top to bottom, holding the hole with your hand, take out the stop cup and spring and put it in order in a clean place (for example, on cardboard). Meanwhile, the remaining oil that remains in the pen drains off.
After the oil has drained, remove the feather from the bowl with the oil, turn it over, wipe it with a clean rag and carefully pry up the boot with a screwdriver and remove it.
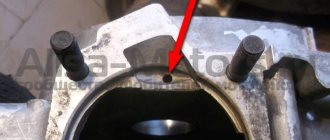
Under the boot we see the seal retaining ring, which can be easily removed with a thin screwdriver.
Now the pen is ready to be separated, for which we take hold of both parts, pull sharply, and carefully (so as not to lose the parts) remove the pen with the seal from the holder and also carefully fold it in the sequence in which we disassemble it, so that later it will be easier to reassemble everything.
We wash (for example, in kerosene) all the parts and wipe them with a dry, clean cloth.
We clamp the pen clip in a vice and tighten the “stubborn” bolt.
Remove the clip from the vice and assemble the pen in the reverse order.
We insert a new oil seal and press it in with a mandrel. As a mandrel, you can use a sewer pipe with a diameter of 50 mm and a length of 50 cm. Attention, do not knock on the pipe, but lightly tap it with a wooden mallet or board (the pipe is very fragile).
After the oil seal rests against the seat bottom, insert the retaining ring.
We insert a new pin and carefully place it in the seat.
Pour fork oil from the top of the pen. Fork oil comes in different viscosities. Look at the manual and buy the oil you need in advance.
Then we insert the thrust bolt and tighten it by hand (then we will finally tighten it on the fork with a 22mm spanner). Now the feather is ready and you can insert it into the fork cross-members and tighten the top and bottom of the cross-arms, after which we tighten the stay bolt with a 22 mm spanner.
We put and tighten all the attachments (on the fork legs) into place and the wheel with the caliper and the front fender.
Source
Major renovation
In some cases, the front fork of a motorcycle becomes so damaged that it has to be completely replaced. It is irrational to disassemble the assembly, since this procedure will not bring you any benefit. Therefore, you can begin disassembly by safely unscrewing the nuts securing the feathers and removing them.
Now you need to remove the coupling bolt of the upper bridge and unscrew the steering wheel, completely dismantling it. Remove the steering column nut and the protective cap under which the bearing is located. Now you have to take out its balls and check whether the fork is detached from the motorcycle frame. If a problem occurs, you may need to slightly straighten the fasteners with a hammer to give them the desired shape.
When disconnecting the fork, try to move it forward slowly, tilting it slightly, so as not to lose the balls of the lower bearing. When installing a new fork, generously lubricate the seats of both bearings with Lithol to make it easier to turn the motorcycle steering wheel. Reassemble in reverse order, being careful to carefully tighten all bolts and nuts. If you need to add oil to the new fork, this can be done by simply unscrewing the nut securing the blade.
Is it worth doing the repairs yourself?
Remember that repairing a motorcycle fork requires some technical skill, as well as care and attention. In addition, you need to avoid getting confused by the many small parts that each need to be installed in the right place to achieve ideal front suspension performance. Therefore, if you are not sure that you can perform all the procedures yourself, following all the recommendations, it is better to contact a specialist. Fork repair at a specialized service station will cost up to 4 thousand rubles for a domestic motorcycle, and up to 10 thousand for an imported one. If we are talking about changing the oil and making adjustments, then you can get by with 1–2 thousand rubles.