Homemade ATV from a scooter
Homemade ATV made from a scooter: photo of production with a description of the homemade product, as well as video testing.
The author decided to accustom his son to technology from a young age; for this, the craftsman assembled an ATV from a scooter with his own hands. To build the homemade product, we bought a broken scooter, wheels from a walk-behind tractor, and some spare parts from a children's ATV.
Below are a few photos of the vehicle assembly.
The front suspension is made, the levers are homemade, the steering knuckles are from a children's quad.
The rear axle with a star is mounted on housing bearings.
The engine with variator remained from the scooter.
The author installed wheels from a walk-behind tractor.
The result is this mini ATV.
The craftsman named his homemade product “Egorushka.”
We recommend watching a video of a homemade ATV.
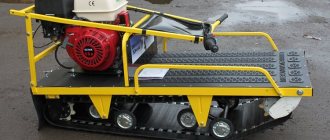
Homemade ATV with an OKI engine | 85 photos of step-by-step assembly
Dear visitors to the “ Samodelkin Friend ” website, today we will look at step-by-step instructions on how to independently assemble an ATV with an engine from an OKA car with your own hands. The author and designer of the presented ATV is Alexey Brazgin. According to Alexey, he had long dreamed of assembling his own ATV, before starting construction of the machine, he looked through many forums, homemade sites, which was pleasantly surprised... Mother Russia is rich in Kulibins)) see the ATV section And began designing, collecting the necessary spare parts, components and assemblies . Basically, all the parts are taken from used domestic cars, for example, the OKA engine, VAZ suspension elements, NIVA-214 satellites, VAZ-2109 grenades. The frame is welded from corrugated pipe with sections: 20x40, 20x25 and pipes of 20 for the manufacture of suspension arms. Ball from the classics, OKA springs, silent blocks, also classic, 24 pieces. Drive shafts from a VAZ 2109, electrical wiring from a scooter, R-15 wheels, Forward Safari 540 tires. The fuel tank is also homemade, welded by Alexey from sheet stainless steel, tank capacity is 18 liters. The front and rear kenguryatniks are also homemade, welded from pipes.
This ATV is quite powerful and easily overcomes any off-road obstacles, holes, ditches, ditches with or without water, steep ascents and descents, deep and loose snow, this beast is no match for anything)
Well, let's move on to looking at step-by-step photos of the assembly of Alexey Brazgin's ATV.
Materials
- OKA engine
- VAZ suspension elements
- professional pipe 20x40 and 20x25
- pipe 20 mm
- OKA springs
- classic shock absorbers
- R-15 wheels
- tires "Forward Safari 540"
- fiberglass and epoxy resin
Tools
- welding inverter
- Angle grinder (grinder)
- drill
- set of wrenches
- spray gun
- roulette
- screwdriver
Step-by-step instructions for assembling an ATV with an engine from an OKA car with your own hands.
First quad bike
Second quad bike.
Having a clear example makes it much easier to create your own equipment, but Alexey’s path faced a difficult task and more than six months of painstaking work.
It all started with the collection of spare parts and other scrap metal from the Domestic automobile industry)
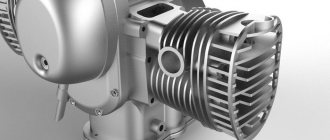
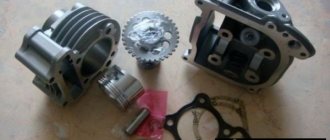
OKA engine.
Gearbox with grenades from VAZ 2109
View from above)
A satellite from NIVA 214, bored out by a turner for a nine-point grenade.
Satellite on a grenade.
The frame is welded from professional pipe 20x40 and 20x25, suspension arms are made from pipe 20 mm.
Before.
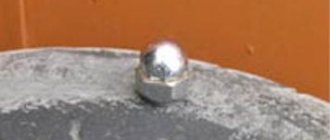
Balls from the classics.
Bottom from VAZ 2109.
Classic silent blocks 24 pcs.
Reworking nine-arm fists and combining them with classics.
The front shock absorbers were created by crossing OKI springs with its rear shock absorbers, and this is what happened.
Bottom mount.
Rear springs from OKI + classic shock absorbers.
Steering. The radiator is located on the frame.
The frame was pre-welded with tacks so that errors in the design could be corrected during the process.
Steering wheel mount.
Shortened drive shafts of VAZ 2109. Rear-wheel drive.
Front wheel drive.
Reworking the exhaust system.
The resonator from the VAZ 2109 was opened and a partition was welded.
Installation of radiator and engine cooling system.
Gearbox lever.
Fastening at the bottom.
Transmission of torque from the gearbox to the gearboxes.
View from the checkpoint.
Original grenade from OKI, drive also from it.
The fuel tank is welded from stainless steel, capacity 18 liters.
Tank neck.
R-15 wheels.
Alexey in the process of construction.
Tires “Forward Safari 540”
Facing, beginning)
Kanguryatnik.
Front kenguryatnik.
Basis for application of fiberglass and impregnation with epoxy resin.
Homemade seat.
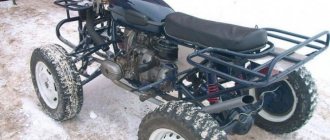
First test ride on an ATV.
Quad rides with the guys)
Frame primer.
Primer for the gearbox.
The frame is painted black.
Gearbox in blue.
Working with fiberglass is very labor-intensive and painstaking.
ATV from a scooter: assembly features
An ATV is a useful household, fashionable and functional appliance. Therefore, scooter owners dream of switching from two-wheeled to four-wheeled motor vehicles. It is quite possible to make an ATV from a scooter with your own hands. To do this, you need to prepare the appropriate components and tools. This is a fascinating process that will result in a universal self-propelled vehicle.
The scooter is a lightweight motorcycle that can easily make an excellent ATV. The engine of this scooter is located under the seat, which is an advantage, since the all-terrain vehicle will have to be driven on rough terrain, rocky or muddy roads. The motor in this design will be reliably protected from dirt and moisture entering the system.
The scooter turns into a lightweight ATV that has all the advantages of popular all-terrain vehicles. The low weight is explained by the absence of a heavy body, which guarantees the maneuverability of the motorcycle, as well as its low inertia. Another advantage of an ATV assembled from a scooter is the fact that even one person can pull it out of a hole or sticky mud. This technique is perfect for both entertainment and simple household tasks. For example, with the help of such an ATV it will be possible to transport small loads. The advantage of motor vehicles assembled from a scooter is low fuel consumption.
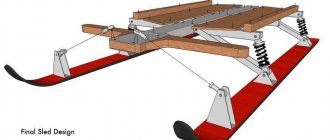
Making a snowmobile from a scooter with your own hands
In good weather, a motorcycle scooter with a small engine capacity has always been in demand not only among young people, but also among adults. Because it was distinguished by its ease of operation, lightness and good speed. But unfortunately, when cold weather sets in, due to the small diameter of the wheels, riding a scooter becomes very uncomfortable, and in snowy weather, even wearing winter tires is completely unrealistic.
Having studied various motorcycle magazines, it was noticed that there are caterpillar movers on sale; they can be installed instead of the rear wheel, which will lead to the transformation of the motorcycle into a snowmobile.
If you have like-minded people in this matter, then it is best to take a track from the Buran snowmobile (photo 1); it will work perfectly, since one track will produce 4 suitable for a scooter. The cost will be 2.5 times cheaper than tracks taken from a motorcycle. But for one scooter it will cost too much.
Soon, after contacting a company that deals with propulsion kits, I received one not very wide track and a plastic ski without fastening.
No changes will be made to the basic design of the scooter, so that in warm weather it is always possible to replace the installed tracks with wheels.
We purchase in the store a driven sprocket from a Buran snowmobile, 2 wheels from a regular scooter for children and 2 small wheels from a cart, with roller bearings. Next, instead of the drive wheel on a scooter, we put a wheel of a much smaller diameter, for example from a sports car, in order to replace the gear ratio. This is done because in a scooter transmission the gear ratio is usually calculated for its operation on excellent roads at an approximate speed of up to 40-60 km/h. Of course, when driving in snow, the load on the engine increases significantly and its power most likely will not be enough, and such a high speed can be dangerous on slippery roads.
We take the drive wheel disk of the moped and cut out the brake drum with splines for the drive shaft, and to attach a disk of smaller diameter, we drill a hole in the drum (photo 2).
To ensure that the caterpillar does not slide off the wheel and does not slip while moving, we make hooks (photo 3) from plastic water pipes, which in turn are inserted into a hole on the caterpillar.
It is necessary to make a bandage of the required diameter from flat roofing metal, attach the hooks to it using furniture bolts (photo 4), they must be at the same distance from each other and at a pitch that will correspond to the location of the caterpillar holes. Using the same bolts, we fasten the wheel, having first put a bandage on it (photo 5). We get a soft driving track sprocket from a regular wheel.
We connect the driving sprocket of the Buran snowmobile with 2 rubber wheels from the trolley with M8 bolts, we get a driven sprocket, and for the axle we take a stud with an M10 thread (photo 6).
To make the frame of a tracked mover, you will need metal corners and square pipes (photo 7). The dimensions of the frame and the parts that go with it will need to be selected independently, depending on the track you choose and the brand of your scooter.
How to make an ATV from a scooter?
To assemble an ATV from a light scooter, you need to prepare a number of tools. Welding equipment and a grinder must be used in the work. You will also need a variety of hand tools, from screwdrivers to wrenches.
The workshop is equipped in a heated, well-ventilated room or outdoors under a canopy in the summer.
To make an ATV from a scooter with your own hands, the design drawings will need to be examined in detail before starting work. It is best to develop the scheme yourself, working out every detail of the future system.
You need to start assembly with the frame, which is taken from the donor scooter. It will need to be modified, additionally boiled and a trunk located in the front or rear made.
Additional material will definitely be needed to assemble the frame. It should be a thin-walled pipe with a round or square cross-section. It should not be heavy, otherwise the weight of the ATV will be large. Because of this, it will lose maneuverability and controllability, and too much load will be placed on the engine. Because of this, it can fail quite quickly.
Wheels
It is better to choose wheel rims from light alloy materials, since otherwise the weight of the vehicle will be significant. You can take wheels from a walk-behind tractor, the tread of which has a rather aggressive pattern. But for a light ATV you should not choose wheels from a car. They are large and heavy, so there will be a high load on the engine.
Do-it-yourself children's snowmobile from a scooter
The design of the scooter does not need to be significantly changed. This will allow, with minimal effort and time, to return the standard equipment of the vehicle to its place at the end of winter and use it again in the warm season.
If you do not have lathes and milling machines to make the necessary parts, you can buy ready-made ones, or use those that are found in your garage or at a car dismantling site. Also, you can make some elements yourself using simple tools and a welding machine.
Motor
An ATV with a scooter engine will not differ in significant power. But when driving off-road, the driver will be able to get his share of drive. Once the frame is assembled, the motor can be mounted on it. This is a painstaking process that requires accuracy from the master. The motor must fit firmly into its seat. Otherwise, it will be subject to strong vibrations.
The motor shaft must be connected to the gearbox on the rear axle. To do this, you need to attach a chain drive to the gear. The transmission is installed immediately after this, bringing all controls, including those from the engine, to the frame. The pedals and control levers are secured to the appropriate seats.
Manufacturing of individual snowmobile elements
The principle of converting a motorcycle, chainsaw and moped is almost the same. If you learn how to make individual elements, it will be much easier.
Suspension
When converting a vehicle into a snowmobile, special attention is paid to the rear suspension. It definitely needs improvement. To make it you need to prepare:
- chassis;
- two levers;
- connecting rails;
- hinges
After preparation, you can begin making the pendant:
- The front arm is connected to the sliding rails on one side and to the chassis on the other using hinges.
- Do the same with the rear lever.
- Position the torsion springs between the sliding rails and the rear torque rod.
- Place the fastening of two power elements between the suspension arms.
To secure the suspension, use tie rods.
Engine
Choosing an engine for a snowmobile is an important step, since the power of the vehicle and its ability to move on snowy roads depend on it.
The optimal engine power for a snowmobile is considered to be in the range of 6-30 hp. With.
Therefore, most often these vehicles are made with a Lifan engine or with a part from a motorcycle or moped.
Snowmobile lift
This device may be needed if your snowmobile is stuck in the snow or needs repairs. It’s not difficult to make a kind of jack:
- Make a channel-type structure from a metal corner 25 mm wide. Height - 19 cm. Make two holes in the middle for attaching the fork.
- Weld a plate to the bottom that will act as a guide. Place a similar part on top, but do not fix it. The distance between them is 14 cm.
- Make holes in these plates through which to pass the jack pipe. Make the top one spring-loaded.
- Next to the top plate, place another part at an angle, which will act as a hook and hold the spring-loaded part.
- Make a fork for the lift. Its length is 12 cm. Fix one side in the channel. Place the second fastening axis at a distance of 67 mm. Insert a piece of pipe into the fork that passes through the second axle. Weld a metal ring to this pipe (you can take a metal plate in which to make additional holes for rubber bands), through which you pass the jack pipe.
- Secure this ring with motorcycle rubber bands to the area under the spring of the top plate. To prevent the elastic bands from slipping, they can be secured with screws.
Wheels
For good cross-country ability, the vehicle is built on inner tubes. Snowmobile wheels must be large in diameter. But it is better to equip the structure with skis. They can be made from plywood and large diameter pipes. If there is such an opportunity, then they can be taken from another snowmobile, including a children’s one. Additionally, it will be necessary to make rotation bushings for them, while the presence of bearings in this system is not necessary.
Homemade tracked snowmobiles perform well. It is possible to make this part yourself. The caterpillar is driven by wheels that are located inside it, for which wheels from garden equipment are suitable. The part itself can be made of plastic pipes, even if two-track snow scooters are made. Pipes with a diameter of 4 cm are suitable. If they are cut, they can serve as caterpillar lugs.
Regardless of what vehicle is being converted to a snowmobile, how extensive the modification is, or who built the design, it is recommended that it be tested in an open area first. If they passed without problems, then you can go to longer distances.
Accessories
It is recommended to use the engine, power and ignition from one scooter so that the entire system functions smoothly. It is advisable to modify some components; for example, it is advisable to equip the ignition system with a battery with characteristics suitable for an ATV. It is better to take the fuel tank from a scooter, as it is large enough for such a system.
The front and rear axles are taken from a cargo scooter, since they are subject to heavy loads. If these system elements are not strong enough, they will quickly deform and fail.
Springs for the shock absorber can be taken from any motorcycle that is large enough. They are fixed on the frame movably, with a configuration resembling the letter “A”. You can purchase shock absorbers separately, as they should provide a smooth ride. New parts perform better than used parts.
Control can be either steering or motorcycle. The choice depends on the taste preferences of the master. The brake lever is connected to the transmission brake, connecting the system to the rear axle sprocket.
How to make a snowmobile
You can make a snowmobile from different vehicles that are in the garage.
From a motorcycle
You can make a snowmobile from a motorcycle using different models. The most popular are IZH and Ural. The advantages of such a rework are that no special changes need to be made. If the product is in good condition, you can even keep the original frame.
The conversion technology is as follows:
- Make a rectangular frame from metal pipes or appropriate corners. Its optimal dimensions are 150*43.5 cm.
- In addition to the IZh motorcycle, it is necessary to make a steering beam. It is made from metal corners. The optimal dimensions are 50*50*5 mm. Additionally, the beam is sheathed with metal plates.
- After this, it can be installed horizontally on the drilling machine. Treat the connection area. Do the same with the frame. In these places you need to make special grooves for reliable fixation. Additionally, attach a corner to the front frame.
- Now you can attach the seat for motorcyclists.
- You need to make holes in the side members.
- A channel must be placed between the front and middle parts of the frame to strengthen the structure.
- Regardless of whether the snowmobile is made from a Ural or another model of motorcycle, it is necessary to select a track sprocket and rubber band in advance. The optimal dimensions are 220*30 cm with a thickness of no more than 1 cm.
- Before installation, it is recommended to cover the track with nylon, which will allow the material not to delaminate during operation.
- Now you can move on to the transmission. It consists of two parts. The first, the front axle, is the drive axle. It is made of a tubular shaft, a track sprocket and a roller. The second is the rear axle. It is made from a caterpillar drum and a tubular shaft.
- You need to complete the snowmobile manufacturing process by welding sheet metal skis.
When converting a motorcycle into a snowmobile, it is important not to change the steering system. In the final product, this part must perform its original functions.
The principles of modification are the same, they do not depend on the vehicle model. But the snowmobile from the Ural motorcycle will be heavier.
From Zhiguli
The design of the car is characterized by simplicity, ease of operation and high maneuverability. To make it you need to follow the instructions:
- Frame assembly. It's better to make it from pipes. The frame consists of front and central beams (steel pipes with a diameter of 5 cm), two lower diagonal elements (bent pipes with a diameter of 3 cm) and a rear strut. Welding is used to fix the elements.
- Installation of steering columns. To do this, you need to place two bushings on the front beam.
- Fixing the axle shaft. It is located on the rear frame; first you need to weld the body under it. It is made from a metal pipe with a diameter of 6 cm. Secure the axle shafts using bushings and electric rivets.
- Installing a car engine. First you need to make the front and rear fastening units on the central beam of the frame. First they need to be placed on the engine itself, and only then welded to the frame.
- In a homemade snowmobile, you can install large diameter wheels or skis made of sheet metal. In the first case, the rear and front wheels need to be connected in pairs with a metal pipe. At the same time, make grooves in the hub for the bearings, which are subsequently secured with spring rings. Additionally, install a spacer between the bearings.
- Install a sprocket on each wheel depending on the expected maximum speed. This snowmobile can be used at any time of the year. For a snowy winter, a design in which the front wheels are replaced with skis is suitable.
- Installation of the steering system. It is taken whole from a car, for example, from a Zaporozhets, or a motorcycle. The choice depends on personal preference. In the first case, gas, clutch and brake pedals are additionally installed. The gearbox is controlled using a lever and a rigid rod.
- Installation of a snowmobile cabin, the role of which is played by the car body.
At the very beginning, I had the idea to use part of a conventional Buranovskaya caterpillar as a tracked engine (photo 1). But I couldn’t find the old track from the Buran snowmobile, and I didn’t buy a new one - it’s expensive to buy a whole one just for one quarter of the track.
I had to contact a specialized company and buy a rubber track from them, and even a plastic ski.
In the pre-thought-out and verified design of the scooter and at the same time the snowmobile, the main thing was that the scooter in warm weather should remain a scooter and only become a snowmobile only in winter. That is, the process of converting a scooter into a snowmobile and back should be very simple - remove the ski and tracks and put the wheels back.
In a store that sells snowmobiles, I bought a drive sprocket, again from a Buran. We also had to buy wheels from a children's scooter, and two wheels with bearings from a garden cart.
In the scooter transmission, the gear ratio allows for movement on asphalt at speeds from 40 to 60 kilometers per hour.
Body kit
Exterior body kits can be made from fiberglass material or old motorcycles or cars. To make the body, it is recommended to glue a “blank” of plastic or wood. When using this technology, it is possible to fit the parts of the body kit to each other as efficiently as possible. Fiberglass is applied to the model, forming the parts of the body kit.
After this, the body needs to be sanded and primed. When the layer dries, special paint is applied. Then the operation of all systems and mechanisms is checked, and appropriate modifications are made if necessary.