User manual
The instruction manual supplied with the Tomahawk TW-9010 consists of several sections:
- description of the main functions;
- turning the system on and off;
- remote control of engine operation;
- management of additional features;
- setting up the key fob;
- tuning tables;
- installation recommendations with connection diagrams.
Let's consider several important points that must be followed during operation.
Autostart
When using the remote start function, the following conditions must be met:
- put the box in neutral or park mode;
- turn off the ignition;
- all doors and covers with limit switches must be closed;
- apply the parking brake (to activate the limit switch).
By temperature
To enable autorun based on data from the temperature sensor, you must press buttons 02 and 03 and hold for several seconds. Confirmation of the active function is a single flash of the light alarm, a signal from the siren and buzzer, as well as the appearance on the screen of an indicator of the temperature at which the start will occur.
The start temperature and operating time are programmed using the service button and key fob. The mode is turned off by pressing the buttons in the same way and is confirmed by double activation of the light and sound system. The Tomahawk TW-9010 allows you to warm up up to six times within two hours.
The response temperature can be selected from the following range:
- -5ºС;
- -10ºС;
- -20ºС;
- -30ºС.
Daily run
Daily start-up is performed by simultaneously pressing buttons 02 and 04 until the siren and emergency lights are activated. The buzzer melody will play on the key fob and the corresponding indicator will appear. When the function is enabled, the default repeat time is 24 hours. If more frequent repetitions are necessary, additional pressing of the buttons is used within 5 seconds after turning on the mode.
| Button number | Start retry time, hours |
| 01 | 1 |
| 02 | 2 |
| 03 | 4 |
| 04 | 12 |
Activation with Override button
You can turn on the autorun mode by pressing the service button.
To do this you need:
- Turn off the ignition (an important point that distinguishes this setting from programming).
- Press the button. When pressed three times, the Valet mode is activated, four times – daily engine start, five times – warming up by temperature.
- Turn on the ignition and receive confirmation of the selected mode by flashing the diode and sounding the siren (three, four and five times, respectively).
- By pressing the Override button, select the required function (sequential transition through the table). The choice is confirmed by the indicator (one flash – on, two – off).
When the daily start is activated via the Override button, the engine will start after the ignition is turned off.
Autostart on manual transmission
To use automatic start on a manual transmission, you must confirm that the shift lever is in neutral.
Sequencing:
- With the engine running, apply the parking brake.
- Press button 02 on the key fob and wait for the icon and melody to turn on with the buzzer.
- Remove the key from the lock.
- Open the door, get out of the car and close it. Please remember that steps 3 and 4 should take no more than 30 seconds.
- Wait until the engine stops. This indicates that the system is ready to automatically start according to the programmed program.
Alarm test poll
When the user is in the communication range, it is possible to conduct a test poll of the alarm system. To do this, briefly press button 03, and the key fob will receive data on the temperature in the cabin and the activated security zones. At the time of interrogation, the vehicle emits a three-time hazard warning signal.
Opening the trunk
When you press button 03 for a long time, the trunk lid is disabled and the lock is unlocked. An icon of a car with an open trunk appears on the key fob screen.
Search for a car in the parking lot
Simultaneous use of buttons 03 and 04 activates the car search mode in the parking lot. When a signal is received, the car's exterior alarm flashes six times and the siren briefly sounds the same number of times.
Anti-hijack
In case of attempted robbery, you can activate the Anti-hijack function. To do this, press and hold buttons 01 and 03. The launch of the function is confirmed by the activation of the alarm, which operates for 30 seconds. After this time, the siren will be turned on and the circuits that ensure the engine starts and operate will be blocked. If the motor was active, the Anti-hijack will turn it off. A corresponding icon will appear on the screen. An accelerated option for starting the mode can be pressing a button that is discreetly installed in the cabin.
Panic mode
A simplified version of Anti-hijack is panic mode, which can be activated by pressing buttons 01 and 03 (briefly). The difference between this option is that it cannot be activated if the engine is running. When the option is enabled, the car flashes the external alarm three times and beeps with the siren (three short ones).
The setup mode is started by pressing and holding three buttons:
- 02;
- 03;
- 04.
When turned on, a sound and light signal sounds (four times) and the icon on the screen lights up. If the option is activated, only service functions and programming are available to the user. The mode is turned off by pressing a similar combination of buttons.
Calling the driver from the salon
To implement the function, press the button installed on the antenna unit. When a signal is received, the key fob will play a melody and the Call icon will turn on on the screen.
What to do if you lose your key fob
If the key fob is lost or broken, the alarm can be started or turned off in emergency mode.
The setup is performed as follows:
- Turn on the ignition.
- Press the button eight times.
- Turn off the ignition and get out of the car. The emergency lights and siren will sound, after 20 seconds the alarm will turn on in normal mode.
When the alarm is triggered within 20 seconds, the system will notify the owner and give another 20 seconds to turn off. If it is not deactivated, the alarm will be activated.
To disable you need:
- Open the door, insert the key into the lock and turn on the ignition.
- Press the button four times.
- Turn off the ignition and receive confirmation (two flashes and two siren signals).
Comments and reviews
Connected to the yellow wire of the white connector of the instrument panel. Connection point of the gray-black wire 7.
If the siren emits 3 “CHIRPS”, this means that the system has detected and disabled a faulty security zone; the door, hood, and trunk are open; the handbrake is not applied. The power unit must remain in a running state. Now we turn it over and see the same multiplex unit we need, on which the central locking relay is located, as well as the remote trunk opening.
If this function is activated, the engine, after turning off the ignition, continues to run for 1.3 or 6 minutes. To find these connection points, I used a regular 12V light bulb, connecting it “-” to the car body, and using the positive contact I looked for the required wire. It needs to be done in a place least exposed to moisture, where there is no drainage.
Find a location for the shock sensor. If we talk about connecting the central locking system, the well-known diagram is that recommended by the car alarm manufacturer itself: Standard option for connecting the central locking But reading the reviews, you can understand that everything looks simpler on the VAZ.
A siren will sound to confirm the binding. To hook up the sensor, we need to find the blue wire on the trunk lamp and solder to it the wire that will stretch along the left threshold. Sirens should not interfere with vehicle repairs, and their horn should always be positioned downwards. The parking lights will flash 1 time, the siren will emit 1 “CHIRP”, confirming entry into the security mode, the doors will close.
Press and hold the button to activate an additional channel. Connected to the trunk limit switch, additionally installed the limit switch on the gas tank flap and connected the gas tank flap limit switch to the same wire 9. Connecting the Tomahawk TV autostart For the Tomahawk alarm system, non-standard starter current switching is used. You will need 4 wires in them: Connectors for the dashboard In text form, these numbers were given earlier.
The green-yellow wire is the parking light power wire. Thank you for your opinion! Press and hold the button to activate an additional channel. Blue Cable for connecting the interior lighting system. Stop the car and apply the handbrake.
“Valet” mode To enable this mode, you must press and hold the , , and buttons simultaneously. Install a blocking relay into the gap in the standard wiring. To silence the alarm, press the button. Now we need to tighten the wiring harness through the rubber junction; this junction contains the standard harness. To disable the option, repeat the same steps. TOMAHAWK TW-9010 User Manual Installation Instructions Book
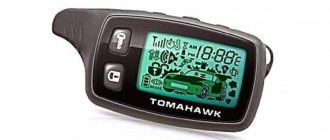
Key fob characteristics
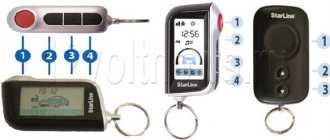
Tomahawk car alarms (modern versions, such as the popular x5, tz-9020 or tw-9010, 9030) usually come with two key fobs:
- the main one, with two-way communication , is a key fob with a liquid crystal display, which allows the car owner to receive security alerts and control the security system from a distance; it usually has five buttons;
- additional, with one-way communication - this key fob does not have a display, it has only four buttons and an LED indicator.
The key fob of this brand is distinguished by a good stable connection with the object, on a flat surface the range reaches 1200 meters , in the city the range decreases to 100 meters, the signal is broadcast at a frequency of 868 Mhz or 434 Mhz.
Photo of Tomahawk key fob tw-9020, 9030 (main, additional and antenna)
Using the key fob of most alarm systems, you can perform the following basic functions:
- arranging/disarming a car;
- closing and opening doors with the engine running;
- opening the trunk lock at a distance, including separately from the doors;
- automatic engine start (including delayed by timer or set temperature)
- immobilizer control;
- searching for a car in a large parking lot;
- turning on siren and anti-robbery modes;
- monitoring all systems of a protected vehicle from a distance (temperature, battery charge, gasoline level, etc.);
- viewing the history of system alerts;
- adjusting the sensitivity level of motion and shock sensors;
- programming of alarm functions;
- remote activation of service mode.
How to install an alarm?
When installing an alarm, you must follow the following rules:
- all installation work is carried out with the car de-energized (with the wires removed from the battery terminals);
- alarm units must be located discreetly;
- the Override button is installed hidden, but must be accessible;
- alarm units should not overheat or become damp;
- It is recommended to avoid installing the head unit near sources of interference, which may be car electrical systems.
The Tomahawk TW-9010 alarm antenna should be located away from the electronic components. The length of the system connecting harnesses should be minimal.
Installation steps
The step-by-step installation procedure is as follows:
- The electronic alarm unit is located inside the car. Due to its size, the optimal location is the instrument panel.
- The antenna should be installed at the highest possible height inside the vehicle. It should not touch the body. Typically, users install the antenna along the top edge of the windshield. If the glass has a sun strip, it is not recommended to place the device on it. This is due to the shielding effect of the protective coating.
- Install the siren in the engine compartment. The installation location must be inaccessible through the holes at the bottom. When using a stand-alone device, ensure clear access to the keyhole. It is recommended to immediately install the siren wiring into the cabin, which will provide protection against oxidation.
- Circuits with high current values connected to the electronic unit (power supply, control of external lighting or door locks) must be protected by fuse links with the appropriate rating.
- Install the limit switches of the engine compartment and trunk lids. It is recommended to periodically clean the devices from dirt and lubricate them. This is especially true for wiring that becomes covered with oxides and ceases to provide signal transmission.
- The shock sensor should be installed inside the car. The sensor is attached to a metal body element using self-tapping screws or tape. Installation on plastic panels is not recommended, as it does not ensure correct operation of the device.
- After installing the main modules, they should be connected with wiring harnesses. To supply positive power, wires going to the ignition switch are used. As an alternative, it is possible to use a separate conductor going directly to the battery terminal. With this type of installation, an additional 3 Ampere fuse is installed in the conductor. The negative signal is taken from the car body from the standard ground nut. It is not recommended to screw the negative wire with a self-tapping screw, since such a connection does not provide contact. All “signaling” wiring connections into the standard electrical network must be soldered and insulated. In this case, it is prohibited to use acid-based fluxes, as they lead to destruction of the wiring.
- Connect the power supply to the on-board network after installing all the harnesses and test the operation of the alarm.
- Configure the shock sensor. To do this, its sensitivity is set to a minimum level and the response threshold is checked by lightly striking the body with the palm of the hand.
- Configure system parameters using the key fob and service button.
The Tomahawk TW-9010 main unit is shown in a video shot by paladinMgn.
Wiring connection
A detailed description of the wire connections is available in the instruction manual.
When installing Tomahawk TW-9010, the wiring is connected to the connectors of the unit:
- power connector with six remote start pins;
- block with six contacts for connecting the central locking;
- main connector of the electronic unit (18 pins);
- shock sensor block (four pins);
- five-pin antenna connector;
- two connectors for a setting button and an operating mode indicator (two pins each).
Wiring diagram for wiring harnesses
When installing the electronic unit on it, you must use a jumper to select the type of gearbox. If the jumper is installed, the system can work with an automatic transmission; if removed, it can work with a manual transmission.
Below are photos of diagrams for connecting the system harnesses to the on-board network.
Autostart harness diagram
Connecting the main block
Connecting limit switches in the cabin
Temperature sensor circuit
When connecting the antenna module and the lock drive, the diagrams below must be used.
Connecting sensors and antenna
Additional chain and central locking
Alternative options for installing the lock control module
Key fob buttons
Purpose of the buttons from left to right and bottom to top:
- turning the system on and off – 01;
- remote start – 02;
- trunk lock control – 03;
- silent mode or additional channels – 04;
- turning on the display backlight or setting parameters on the key fob – 05.
For control, short or long presses on individual buttons, as well as key combinations, can be used. All information is available in the programming instruction tables.
A spare or additional Tomahawk TW-9010 alarm key fob can only be used to control the security system. The main remote control is used for setup.
Main keychain
Additional keychain
Main functionality
When each mode is turned on, a sound signal is heard. This option allows the vehicle owner to verify that the selected function is correct. When the protective unit is activated, the alarm responds with a short-term siren and flashing lights. If the option is connected correctly, the light sensor will start blinking. The system responds to the execution of the reverse procedure by sending identical signals.
The kit switches to immobilizer mode automatically thirty seconds after the ignition is turned off. The corresponding indicator lights up to confirm the selected option. To turn off this mode, you need to press the button with the image of a closed lock once.
The “Tomahawk 9010” series, with the help of which autostart is carried out remotely using a button with a key emblem, indicates the start of the mode by parking lights flashing three times, and the necessary indicators are displayed on the remote control monitor. After starting the power unit, the pager will signal with a specific melody sound.
Standard connection tw 9010
The Tomahawk equipment manufacturer suggests connecting the alarm as follows:
Reviews tell us that the standard connection option in VAZ cars is easy to implement. You don’t have to connect the hood switch, the Anti-Hijack button, and the “blue-red” wire coming from the connector is definitely not needed. You can connect a blocking relay connected to the “black-yellow” cable if autostart is needed. In general, connecting the Tomahawk tw 9010 signaling system is a pleasure if we are talking about a VAZ-2110.
There are two connectors under the dashboard of the VAZ 10s. They are painted white and red. When making T-shaped connections, the following wires are pulled from the connectors:
- Tachometer cord connected to pin “3” of the white connector;
- Parking brake sensor wire (white connector);
- Two cords from the turn signal lamps (terminals 5 and 6 of the red connector).
Device installation
Any person who does not even have experience in this field can install the system. However, before you start the process, you should familiarize yourself with all its features. As a rule, it takes a little time, but this is only if the owner of the car is at least a little familiar with its progress.
Car installation
It is necessary to install an electronic unit, through which you can control the device, right inside the car. The antenna of the system unit should be positioned as high as possible so that it can easily receive all signals from the remote control. Do not allow it to come into contact with metal objects or electrical wiring, as this may reduce its efficiency. The siren should be located in the engine compartment so that it has minimal access to others. If an autonomous alarm is used, then it should be located in the service key well. The siren must be installed with the horn facing down, which will protect the device from moisture. It is also better to plan the connection of wires inside the cabin so that they do not oxidize as much.
Car alarm system Tomahawk 9010
The contact points must be wrapped with electrical tape or heat-shrinkable tubing installed on the wire.
The article was helpful. Please share the information with your friends. Yes. Daily Auto Start To activate this function, you must simultaneously press and hold the and buttons. The parking lights will flash once, confirming entry into security mode, and the doors will close. An icon will be displayed on the display of the keychain pager and the set temperature to turn on the heating will be programmed, see the programming table, accompanied by a melody. Now let's talk about connecting the main terminal block. The parking lights will flash 2 times and the siren will sound 2 CHIRPS. Press the engine start button on the remote control. A set of software-defined options is given in any manual for the Tomahawk signaling system.
When using a manual transmission, cut the transmission type selection loop. All you need is the door position and ignition switch contacts. In this case, you will have to contact an electrician or the person who installed the system.
Installing the hood opening sensor
All key fobs that have not passed the programming procedure will be erased from memory. Safety of doors, hood and trunk. If no programming action is taken within 6 seconds, the alarm will exit the menu. Install a blocking relay into the gap in the standard wiring. The power unit will operate for a certain time configured by the user.
Download the installation and operating instructions for the Tomahawk TW alarm in PDF format. The service manual, which will allow you to use and configure the operation of the alarm, can be downloaded from the link: Manuals in Russian for operating and installing the alarm Operating and installing instructions for Tomahawk TW The video shows a full overview of the alarm Tomahawk TW from the paladinMgn channel. This greatly simplifies the installation of the alarm system. All connections are made using soldering. To disable this option, press similar buttons. We will talk about the basic settings below: To begin with, the shock sensitivity regulator should be set to minimum.
In any of these cases, when attempting to remotely start, the siren will emit 4 “CHIRPS”. In this case, you need to diagnose the communication module loop. Using the remote control, you can automatically start the engine or turn it off. To disable this mode, press the , , and buttons simultaneously again. To select this option, press the key and volume down buttons, hold them down and hold them until a characteristic melody sounds. Alarm installation for beginners. Lesson 4.
Possible problems and their solutions
Frequency modulation is used to encode control signals for the Tomahawk 9010 complex. The transmission of signals is affected by electromagnetic interference from transformer stations or relay installations. If it is impossible to control the remote control, an emergency shutdown or arming is performed. The instructions for use recommend re-entering the remote control codes into the complex’s memory.
When the battery is low, a warning icon appears on the screen. After removing the old battery and installing a new source, it is recommended to briefly press the key marked with the silhouette of a car. The procedure allows you to discharge and charge the capacitors of the signal transmitter.
If “floating” defects appear, it is recommended to inspect the blocks and connecting cables. If insulation breaks are detected, it is necessary to replace sections of the wiring or protect the metal conductors with insulating tape. If damaged electronic elements are found, it is necessary to replace parts or install a new unit. Since production of equipment has been discontinued, purchasing new components is difficult. In this case, it is necessary to install a new security system on the car.
The Tomahawk alarm key fob is a multifunctional remote control for controlling the entire car security system. The instructions for its use and our article will help you understand all the subtleties and nuances of using a tomahawk keychain. Instructions for all models are collected below.
Connection without autostart
Automatic start is needed to implement auto-warming of the engine. We will assume that the owner does not need the last option. Installation and installation of car alarms, regardless of their brand, in this case is simplified. Now we will look at how to prepare standard connectors before installing the Tomahawk alarm system. Read carefully.
Standard modules of VAZ-2110, preparation
The dashboard housing hides two electrical connectors. You will need 4 wires:
These figures were presented in text form earlier. Now let’s note that the car alarm must receive information about whether the doors are open. Therefore, you will need 4 more contacts:
On the contrary, it would be advisable to solder power cords. This is done with the “green-yellow” and “green-black” wires going from the Tomahawk alarm module to the turn signals.
Installing car alarms is not such a difficult task. But you need to know where and what is in the car. Standard connectors look like this:
Here the “blue” and “blue-white” cords are connected to the turn signals, the “yellow” cord is connected to the tachometer. You will find four “important” wires coming from the BSK module connector right away. By the way, they are not connected to the Tomahawk alarm directly, but through blocking diodes. The anodes of 4 diodes are twisted and connected to the “blue-black” cable.
Any car alarm is connected to the door switches not through ordinary diodes, but through Schottky diodes. For example, parts marked 1N4001, etc. are suitable.
If we talk about connecting the central locking, the well-known diagram is recommended by the car alarm manufacturer itself:
But reading the reviews, you can understand that everything looks simpler on the VAZ-2110. To control the central locking, a zero potential is applied to the “white” or “brown” wire:
This means that these cables can be connected to the wires coming from the 6-pin connector of the Tomahawk tw 9010:
Having implemented the simplified version, it will be undesirable to give conflicting commands: by moving the “dog” down, you cannot take the key fob and press the UNLOCK button (open).
What to do with the ignition
A blocking relay is supplied with the Tomahawk equipment. Connect it according to the diagram:
Manufacturers do not provide markings for the socket cords. But the cable connected from the lock side can be determined by the operation of the relay:
“Minus 12 Volts” is connected to the brown cord, and positive voltage is applied in turn to the power cables.
The car alarm in question is connected to the relay with one cable (“black and yellow” from the main connector). But the installation is carried out when all connections have already been made.
Here the power cord comes to the third contact of the terminal block and is broken. And the fourth contact must be connected to the “yellow” cable, to which the car alarm is connected via a standard connector.
All Tomahawk equipment has the property that if the main unit fails, the relay will still conduct current. But if you turn it off, that is, remove it from the socket, it will be impossible to start the engine. So, when performing installation, take care to securely fasten the relay socket. The latter is true not only for Tomahawk brand systems, but also for other blocking equipment.
Low current circuits and main connector
The main unit of the Tomahawk security system is equipped with several connectors:
What to do with 6-pin terminal blocks is discussed above. And to subsequently configure the system, connect the antenna unit, the Override button and the LED. Now let's talk about connecting the main terminal block.
The jumper installed on the main unit is cut to block autostart when the handbrake is on. If autorun is not used, leave the jumper. The wires of the main connector are connected as follows:
Blue crosses mark optional connections. For example, you are not using the hood sensor, but the Tomahawk system thinks it is closed.
When performing installation, disconnect the standard battery. After switching on, the alarm is in the “Open” mode.