Although the number of tuning companies per 1000 cars in Western countries significantly exceeds the Russian average, in terms of the number of home-grown Kulibins we confidently hold the palm. A European or American car owner, if it comes to improving the design of his car, in 95% of cases he will turn to the nearest car service center. Many of our car enthusiasts would prefer to work on modifying their cars themselves. In particular, installing disc brakes instead of outdated drum brakes is a tuning that is very popular. But such a modification will be even more effective if the system is equipped with a hydraulic handbrake. And although these components can be found in car dealerships and equipped with them on almost any model, many car owners prefer to independently manufacture and install this component of the advanced braking system.
How to make and install a hydraulic handbrake.
Why do you need a hydraulic handbrake?
The argument about stretching the cable of a mechanical handbrake is a strong argument, but not the only one or even the main one. This tuning is preferred by lovers of sports driving, since the hydraulic parking brake allows you to brake the rear wheels, and with unequal effectiveness. Under normal conditions, such actions are possible only with remarkable driving skills, and even then not on all cars. Note that with such a radical modification of the car’s brake system, the regulator must be installed between the main brake cylinder and the hydraulic handbrake - only in this case will you be able to redistribute the braking force, which is accentuated on the rear axle shaft, over a fairly large range, while the power of the front brakes will also increase. But remember that, according to the rules for operating vehicles, unauthorized intervention to change the standard design of the brake system is unacceptable if this is not approved by the car manufacturer.
Operating principle of the hydraulic handbrake
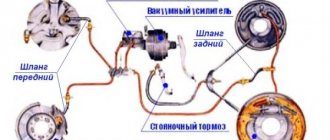
Just two decades ago, a parking brake equipped with a hydraulic drive was a curiosity, but today many models, especially sports ones, are equipped with such a system. A hydraulic handbrake is a fairly simple device, characterized by relatively high reliability (when compared with a conventional mechanical one). The design of the hydraulic parking brake has practically no quickly wearing parts and components (again, remember the cable of the classic handbrake), so this system is compatible with other modern electronic braking systems. The main feature is the absence of a cable, the functions of which are transferred to the hydraulic cylinder. However, some design details (ratchet, locking button) remain unchanged.
Installing a hydraulic handbrake allows you to more finely control the brakes: when braking with a pedal, if the force transmitted to the rear wheels is not enough, you can simultaneously use the handbrake lever - activating it will increase the pressure generated on the rear circuit of the improved braking system. Of course, in the absence of a cable, there is no need to tighten it, and in general, servicing a hydraulic CT is much simpler. It is also worth remembering that the classic handbrake is independent of the operation of the standard brake system; in our case, any malfunction that leads to the inoperability of conventional brakes will also affect the parking brake (for example, when their brake fluid circuit leaks).
The main purpose
You can install and configure a hydraulic handbrake on a VAZ-2109 yourself if you have certain skills and tools. Despite the prohibitions, such designs can be found on sale and can be installed on any make and model of car. It is advisable to carry out all work on an inspection pit or a lift. With the help of a hydraulic handbrake you can greatly increase the efficiency of the braking system. The design provides for a regulator that allows you to distribute the force between the front and rear circuits. The regulator allows you to prevent complete blocking of the rear wheels.
Advantages and disadvantages of GR
We have already noted that usually a hydraulic handbrake is installed when the drum brakes on the rear axle are replaced with disc-type devices. Before we talk about the pros and cons of hydraulic CT, let's talk about what the use of disc brakes gives:
- Drum brakes are subject to high heat, which leads to a decrease in stability over time. Disc mechanisms are cooled much more efficiently, so their characteristics are practically not subject to age-related changes - and this is considered one of the main advantages of brakes of this type;
- the second advantage emerges from the first - this is a reduction in the braking distance due to the higher efficiency of disc mechanisms. And increasing traffic safety is a very powerful argument given the ever-increasing density of traffic flow and speed on suburban highways;
- Structurally, disc brakes are more compact and noticeably lighter than their drum counterparts.
But the slightest distortion during installation of the system - and the uniform distribution of the braking force applied to the rear/front axles or rear wheels will be disrupted. This is the main disadvantage that accompanies the installation of disc brakes. The solution to this problem is to install a dual-circuit system, with each circuit involving the connection of the right and left wheels of both axles. The main thing is that the regulator is located in front of the hydraulic handbrake drive, but after the main TC. Only in this case can the advanced braking system operate optimally.
Now let's look at how important the role of the hydraulic hand brake is in this. In fact, if we limit ourselves to only replacing drum brakes with disc brakes, without installing a hydraulic handbrake and a dual-circuit system, in order for the braking efficiency to be at least as good, additional circuits will need to be connected to the rear suspension. In addition, additional calipers will need to be mounted on both sides of the rear suspension. It is clear that such tuning is very burdensome in terms of money, time and effort spent. However, everything is much simpler if you install a hydraulic handbrake instead. This will allow:
- ideally distribute braking force on the rear axle;
- noticeable effort of rear brake power;
- the same thing will happen with the front brakes, since the lines will be schematically shifted to the vacuum booster.
However, there are also disadvantages. The main one is a noticeable reduction in braking intensity if for some reason the front circuit fails. Most importantly, a complete failure of the brake system will not occur. This is certainly very important.
It is worth noting that the hydraulic parking brake performs its immediate functions almost flawlessly, holding the car in place on slopes with no less gradient than its mechanical counterpart.
Installation of hydraulic handbrake VAZ 2107
After installing Rear Disc Brakes (RDB) on VAZ family cars, the problem of improper distribution of braking forces along the axles arises. How to solve this problem and why it is needed.
There are many reasons for installing an HTD, but I will outline only a few that define them:
- stable characteristics of disc brakes when heated;
- better cooling of brake discs;
- high braking efficiency reduces braking distance;
- smaller weight and size;
- response time is reduced;
- about 70% of the car’s kinetic energy is absorbed by the front brakes; rear disc brakes reduce the load on the front discs;
We can conclude that disc brakes have significant advantages over drum brakes. The main ones are stability of operation, better cooling and cleaning conditions, higher efficiency, lower weight and size.
So, the decision has been made, the front brakes have been modified, the rear discs have been installed, it’s time to make it all work correctly and be sure to install a hydraulic parking brake system in the circuit.
On the website https://www.project-t3.kiev.ua/ you can find many design options for correctly setting up a converted brake system. Throwing aside everything from installing imported and expensive regulators to simply reducing the working surface of the rear pad to 25% or 50%, a 2-axis option was adopted - the “left front - right front” and “left rear - right rear” contours "using a regulator from a VAZ 2101 and a hydraulic handbrake drive based on the clutch master cylinder from a Honda Prelud. The scheme has long been tested and works.
We had a whole week to spare and for now it was decided to slowly “hang around” in traffic jams in order to get used to the behavior of the car when braking and to give the rear brake mechanisms a chance to get used to it. On the appointed day, almost simultaneously, having parked our V8s near the local car market, we bought everything we needed and went to the technical base, which turned out to be outside the city. I won’t describe that other eight, but we were driving very fast. I just tried not to fall behind, diligently “clacking the short box.” Once, before a turn that was unexpected for me, as a result of sharp braking, the car turned sideways and I was once again convinced that my intentions were not in vain and, moreover, very correct, and as if they had read my thoughts, they confirmed this to me again, a little later directly demonstrating, when moving from the asphalt onto the ground, what I was driving for - controlled side slip and the correct operation of the entire braking system.
The regulator is the head of everything
In our scheme, the regulator plays almost the most important role, but subject to proper placement in the NEW brake circuit of the car
Therefore, please note that the REGULATOR MUST BE POSITIONED STRICTLY AFTER THE BRAKE MAIN CYLINDER BUT BEFORE THE HYDRAULIC HANDBRAKE ACTUATOR. Otherwise the brakes will not work properly.
I would like to note that car enthusiasts who do not like the 2-axis version of the braking system may not use it, but for this they will have to significantly complicate the entire braking circuit of the car. Firstly, draw additional contours to the rear wheels, and secondly, hang two calipers on each side on slightly different shaped plates for attaching the rear calipers, i.e. only 4 calipers. I advise you not to look for adventure. Nothing terrible will happen, but you can easily be left without a car for several weeks, and don’t forget about the unsprung masses and their role in the behavior of the car.
I will outline the “pros” and “cons” of the 2-circuit brake option:
How to make a hydraulic handbrake with your own hands
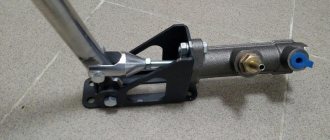
If the car owner decides to improve the brake system by replacing the drum mechanism with a disc one, installing a hydraulic handbrake will avoid many additional costs. But even in this case, there are opportunities for significant savings. We are talking about refusing to purchase a ready-made hydraulic ST kit. Moreover, making it yourself cannot be called a complicated procedure. So, let's list what materials and tools we need:
- a hydraulic cylinder used in the clutch mechanism for a given vehicle model;
- tee used when routing brake line hoses;
- about a dozen washers, preferably copper;
- metal tubes that are an integral part of the brake system (five pieces from VAZ are also suitable);
- rubber brake hose installed temporarily;
- brake fluid recommended by the car manufacturer of this model. The volume will depend on the design features of the machine, but usually four liters is enough;
- stub;
- plastic clamps;
- set of twists;
- equipment used to repair/install a handbrake.
Once the entire list above is ready, you can proceed directly to installation work. Installation of the hydraulic handbrake is carried out in accordance with the following algorithm:
- To provide more comfortable working conditions, you will need to disassemble the interior a little. This will simplify access to the main components of the braking system, including the main and parking brakes, which have structural elements located in the cabin;
- To do this, you will have to study the instructions for your car model (if there is no printed version, you can always find the relevant documentation on the Internet). It is necessary to pay special attention to the design of a specific brake system, in particular where its lines run. If the installation of the hydraulic handbrake was preceded by the installation of disc brakes, then you should already know about this;
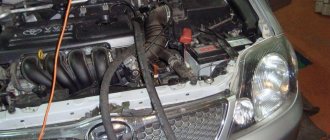
- The first task is to find the brake line of the rear axle shaft of the car - you will have to work with it more closely. Typically, this involves using the holes through which the speedometer cable is mounted. You should work especially carefully in the engine compartment, since a large number of other components and assemblies are concentrated in it;
- To connect the hydraulic handbrake, make sure that all hoses that are part of the brake line are connected to the master cylinder. By twisting, you will need to lengthen the line using a previously prepared metal tube. This is a temporary measure - subsequently a regulator for an improved disc brake system will be installed in its place;
- The previously removed handbrake handle is mounted in its rightful place. Then another tube must be connected to the outlet pipe of the main cooler - it is through it that the cylinders will be filled with brake fluid. Then we connect the outlet pipe of the GC to the rear circuit of the modified brake system using a hose;
- try to find in the rear of the car, closer to the axle shaft, three technological holes used for routing hoses filled with brake fluid. If there are none, you will have to drill them, making sure that the diameter of the holes is no less than the outer diameter of the hoses used;
- When laying the hose through the technical hole, it is important to prevent it from rubbing while the car is moving. This is done by installing a protective ring;
- the rest of the work is done in the pit because you need to gain access to the underside of the car. We connect a tee to the hose stretched through the technical hole. And to it, in turn, we connect the three hoses that we stretched across the entire cabin and pushed into drilled or finished holes. The tee also needs to be strengthened in some reliable way so that it does not dangle. This is best done using plastic clamps;
- The final part of the work is thoroughly sealing the connections, after which you can begin filling the brake system with fluid. It is important to prevent air from entering the circuit as this can cause a noticeable reduction in brake performance.
All that remains is to check how the hand-made hydraulic handbrake works. It is advisable to conduct tests on a fairly spacious and deserted section of the road.