Differences between EUR and power steering
These are completely different units. To understand the main differences, it is enough to study the hydraulic booster. Its main component is a pump driven by the crankshaft, it is integrated with other parts. The operating principle of the hydraulic booster is based on hydraulics.
As for the electric power steering, it is driven by an electric motor. Its design also includes an electronic control unit, a steering shaft with a torsion element and sensors. The EUR works according to a different scheme:
- When the steering wheel rotates, the torsion shaft twists;
- Special sensors record changes in the position of the shaft and send data to the electronic control unit;
- After analyzing the information, the unit sends commands to the electric motor;
- As a result, the unit creates the necessary force or facilitates turning the steering wheel.
The design of the electric power steering wheel
Car enthusiasts often argue which option is preferable for the “ten”. In fact, power steering is an obsolete unit that is being actively removed from modern passenger cars. The electric booster works even when the engine is turned off and weighs less than the power steering. The main advantage over “hydraulics” is reliability - the electric unit requires virtually no maintenance. There is less load on the engine, and as a result, less fuel is also needed. The EUR is also good for our conditions because it functions well at low temperatures.
But the electric booster also has its drawbacks. Its design is more complex than that of “hydraulics”, hence the high price. Sometimes the electronic control unit sends incorrect commands, this was especially felt by the owners of the first generation Kalina. If you drive for a long time on a poor-quality road surface (or lack thereof), the EUR may turn off for several minutes due to overheating.
Power steering pump
The pump of this mechanism deserves a separate discussion. It costs about 3 thousand Russian rubles and is often repaired rather than replaced. But if repairs don’t help, you’ll have to spend money. As for high-quality repairs, you can again do it yourself, thereby saving your money.
Typically, a ZF brand pump is installed on the VAZ 2110 power steering, which is also used on the Audi A6, Volkswagen and other cars. But this pump model is not dismountable and there are no retaining rings or covers on it. This does not mean that it is impossible to restore the operation of such a pump. Below are instructions for removing and disassembling the power steering pump:
- Remove the clamp;
- Disconnect the return hose (do it carefully so as not to spill oil);
- Disconnect the connector;
- Remove the DJ (sensor) from the fitting bolt.
- We disconnect the discharge tube, first removing the union bolt;
- Remove the power steering drive belt;
- Now it's time to start removing the pump itself;
- Loosen the first bolt securing the pump;
- We completely unscrew the second bolt securing the pump;
- Remove the pump assembly.
We clean the pump from dirt and visually inspect it. If a development is found on the inner wall of the housing, resembling steps, then they need to be removed using a special nozzle and a drill.
Lada 2111 › Logbook › Power steering for 2110 8 cells. Part 1
The topic is old and hackneyed, but I still want to share my experience.
I would like to immediately answer frequently asked questions:
Why power steering? After all, the EUR is better/simpler/more reliable/doesn’t take power away from the engine
1. Because the power steering rack has 2.7 turns from lock to lock, and all other 2110/Priora/Kalina racks have 4.2 turns. The only exception is the viburnum sprat rack with 3.1
2. I like it when the steering becomes stronger at speed 3. IMHO, the hydraulic rack dampens impacts on the wheels better and allows you not to feel a pull during acceleration. Again, these are just my feelings 4. In principle, I like the idea of a hydraulic booster better. This can be considered religious beliefs
How expensive?
Within 10-12 sput
How difficult and how long does it take to install?
1 full day, nothing complicated, a minimum set of tools required
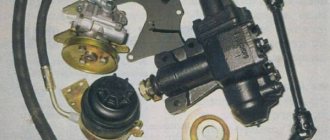
Components
This is what the most complete set of power steering looks like:
If you remove the set of priors with your own hands, then you will not have any problems, you will be able to get everything and see how it stands, but if you assemble it in parts... Particularly difficult to find is the boot installed in the engine shield, at the entry point of the steering slats in the interior:
Catalog 2110-3401165-20. Even his image is difficult to find
And also its pressure plate:
It's easier to find. Catalog 2110-3401208-20
All other parts are either on sale or can be obtained from disassembly.
Special attention should be paid to high pressure hoses. They come in old and new designs. The old ones differ in that their rubber hose can be directly detached from the steel tube, which is screwed with a hollow bolt onto the spool mechanism of the rack. This is more convenient because it allows you to replace a leaking hose without removing the rack.
Marked where it disconnects. Catalogs 2110-3408018-01 and 2110-3408100-01 for two halves
The new model is solid, the hose used in them is from Continental. Replacement requires dismantling the rack. I don't know the benefits.
Catalogs 2110-3408018-20 and 2110-3408100-20
However, there is one big, no, huge problem with the new hoses! They sell fakes everywhere! In my city, I couldn’t find real ones in any store! You can read how to distinguish them in this article. With a fake hose, when turning the steering wheel, at some moments you will feel vibration in the steering mechanism and a hum. In general, everything is described in the article.
Next are the brackets. I installed everything according to the standard scheme and used standard brackets. The power steering pump is mounted on its bracket with three bolts at the front and an additional plate at the rear. If you buy a bracket separately, pay attention to its availability:
The generator moves upstairs, like in 16th grade. engines. Here you need to pay attention to the fact that there are generator brackets for the power steering and for the air conditioner. They are very different in appearance:
Bracket for power steering
Bracket for air conditioner
I chose the power steering one; it is attached at three widely spaced points and generally inspires more confidence.
I can’t say for sure, but it may be necessary to install a new type of engine support bracket, without the ear on top:
The fact is that the power steering bracket of the generator has a casting on top that, as it were, hugs the engine support bracket from above. It will not fit on an old-style bracket without modifications with a file; it is necessary to sharpen about a centimeter of the casting. But besides this, I got the impression that the generator bracket still rests on top of some protrusions and turns out to be turned a little clockwise (within the limits of the bolt stroke). That. The generator itself is not strictly coaxial with the rest of the pulleys. I came to this conclusion after the outer part of the roller was eaten away by a belt. Now I've installed a new sample, and it seems like he's not eating anything anymore.
And lastly, the steering cardan. When installing power steering, it needs to be replaced because the part of the steering rack that extends into the cabin is significantly longer:
I can’t say for sure the difference in length, but something around 35 cm for the long one and 27 cm for the short one. The cardan shafts are solid, like on the 2110, and detachable, like on the Priors. I chose the second option because... much easier to install.
It allows you to separately attach the parts to the column and rail, and then simply screw them together without having to aim anywhere. According to the factory, the long half is attached to the rail, and the short half to the column, but I secured it the other way around because... in this case, access to the bolt connecting them is much more convenient.
This concludes the first part. In the next one I’ll talk about the practical aspects of installation and non-standard parts.
Read further: Power steering for 2110 8 cells. Part 2
Like 21 Subscribe
Installing power steering - step by step instructions
This instruction is intended for VAZ 2110 cars, which do not have power steering at all. Such models were produced a long time ago, but they can still be found on the road today. In this case, the car can be upgraded with your own hands.
Installation of power steering can be done by yourself
, for this you will need a power steering kit - today it can be purchased for about 20 thousand. From the tools, prepare a set of keys and screwdrivers; you should also take care of the amplifier fluid in advance.
- We dismantle the timing case and install the bracket on three bolts. There are already holes in the interior, so there is no need to drill new ones. Now we install the pin on which the roller will later be installed. There are no holes for it, so we make new ones. Let's put on a video.
Here you can see the fasteners that need to be removed. The photo below shows in detail what needs to be sawed off. After this, securely fix the pump on the bracket and cover it with a pillow. The assembled unit should be placed
on the engine, or rather, in the place where the generator was mounted.
You should undertake such work only if you already have experience in servicing the electrical and power plant of the VAZ 2110. Power steering is directly related to safety, so if you lack experience, it is better to turn to the experts.
We install the EUR and power steering on a VAZ 2110 with our own hands
Depending on the year of manufacture, the “ten” can be equipped with a hydraulic booster (power steering) or an electric booster (electric power steering). Of course, the second option is preferable, since it makes driving the car easier and more comfortable. If your power steering is worn out or you just want to replace it, then it is recommended to choose the power steering for the VAZ 2110 as an alternative.
This material contains two instructions:
- Installation of power steering.
- Installation of an electric power steering VAZ 2110 instead of a standard power steering.
Before installation, you need to understand the structure of these units, and also find out how they differ from each other.
Installing power steering - step by step instructions
This instruction is intended for VAZ 2110 cars, which do not have power steering at all. Such models were produced a long time ago, but they can still be found on the road today. In this case, the car can be upgraded with your own hands.
You can install the power steering yourself; for this you will need a power steering kit - today it can be purchased for about 20 thousand. From the tools, prepare a set of keys and screwdrivers; you should also take care of the amplifier fluid in advance.
Power steering for VAZ 2110: replacement, repair and much more
Power steering VAZ 2110
The power steering for the VAZ 2110 is simply a miracle part that will allow you to get the greatest driving comfort. If the modification of the VAZ 2110 has such a power steering, as this part is called briefly, then this is great. In this article we will learn how to replace a VAZ 2110 hydraulic hose or other power steering repairs.
Installation of EUR
Required Tools
Let's say you purchased an EUR kit - it could be from a VAZ 2110 or from another model, for example, from a Priora. Prepare the following tools:
- Drill together with a metal drill.
- Set of screwdrivers, grinder.
- Long ruler.
All is ready? Let's move on to installation.
Step-by-step instruction
- You need to remove the standard terminal from the block and place it in the block on the harness. We find the standard drive, which is attached to the block. A free terminal must be installed in its place. Now the wire can be placed between the fasteners.
Adjustment
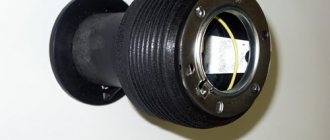
After assembly, you will need to straighten the steering wheel if it is installed crooked. Separately install the sensor that came with the EUR. If the column casing is cracked, it is better to immediately replace it with a good one. There may be gaps between the front panel and the casing - they must be removed.
Disadvantages of modification
Among the disadvantages of installing power steering on a UAZ-469 with your own hands, it is worth noting the poor information content of the steering wheel at speeds of more than 60 kilometers per hour. If without a booster it becomes stiffer, then with power steering it turns just as easily as at 10 km/h.
On the other hand, UAZ is not a car for racing. Therefore, if the budget allows, such a modification is quite acceptable. By installing power steering on a UAZ-469 from a foreign car, you will reduce the load on your hands by three times when crossing off-road terrain or parking in a cramped yard.
Fit
If the installation work of the electric amplifier is carried out by an experienced technician, who may go somewhat beyond the scope of the proposed instructions, then it should be said about how the electric amplifier is adjusted to the VAZ 2110.
After the main actions from the above list have been carried out, the following adjustment can be made:
- Align the steering wheel;
- Eliminate all cracks and gaps between parts;
- Install the LED diagnostic sensor for the electric amplifier;
- Slightly shorten the power cable;
- If necessary, replace damaged parts and damaged parts of the casing.
After this, you should once again carefully inspect the steering system while sitting in the cabin. Eliminate the last defects and rub the panel and steering wheel with polish. Only after this can you begin further operation of the machine. It is the maintenance of cleanliness and order in the car interior that leads to the driver’s concentration behind the wheel.
Bleeding the brakes of a VAZ 2112. How to do it correctly
- Loose fluid supply hoses;
- Microcracks in tubes, fittings or in the cylinder.
- Capacity, preferably a clean bottle of at least 1.5 liters;
- Rubber tube from a medical IV or from a blood transfusion set;
- Clean rags;
- Wrench for 8 and 10, open-end or “bleeder”, which has a special slot;
- Steel brush for cleaning metal surfaces;
- A can of WD-40 to remove traces of dirt and rust;
- New fluid for the system.
- Rear right;
- Front left;
- Rear left;
- Front right;
- *The sequence of processing wheels on VAZ models is determined by their distance from the cylinder, and therefore by the length of the connecting hoses.
AutoFlit.ru
Technological features when dismantling the control mechanism on “tens” with hydraulic booster
Before carrying out the above-described process of replacing the steering rack on a VAZ 2110 equipped with power steering, you should:
- pump out fluid from the amplifier reservoir;
- disconnect the hose from the tank and place the container;
- After hanging the wheels, turn the steering wheel with the engine turned off;
- unscrew the back pressure hose;
- Unscrew the high pressure line.
When assembling the unit in reverse order, it is advisable to replace the hydraulic fluid with a new one. It is imperative to carry out the system bleeding procedure, which consists of the following points:
- fill the tank;
- with the engine not running, move the wheels from their extreme positions 6 times;
- check the fluid level in the power steering reservoir and add, if necessary;
- start the internal combustion engine for 10-15 seconds;
- shut off and check the fluid level.
Changing such an important unit as the steering rack requires high concentration of the performer's attention and confidence in his actions. In terms of complexity, the operation is accessible to almost every car owner
However, preliminary familiarization with the device and the sequence of the assembly and disassembly process of the unit is required.
How to install?
To do this you need to remove the steering wheel. Here you will need not just a set of keys, but a puller. You can't just remove the steering wheel. This puller looks like this:
It will be impossible to remove the wheel with your bare hands - this will only damage the steering column. After removing the steering wheel, the column must also be removed. The universal joint and the nut securing the steering rod bipod are removed. Next, unscrew the three nuts of the steering element. After this, a new set of bipods is installed on the column shaft with power steering. The latter must be connected to the steering rod and secured with cotter pins. When installing a new column “under the power steering,” the old mount will interfere with us. It is cut using a grinder. Next, install a plastic protective casing on the column. The screws for fastening are old ones. Next, a rubber ring, castle nut and washer are put on the casing. The penultimate one is secured with stepladders.
A small driveshaft is installed between the steering mechanism and the column, which will connect both elements and reliably transmit force. Drive a wedge into a wide hole (using a hammer, light blows). Two washers are mounted on the wedge thread - spring and regular. As a result, the length to the hinge should be 300 millimeters. Next, tighten the castle nut and mount the steering wheel. The power steering steering column (UAZ-469 is a tuning object) has been successfully installed. But that is not all. We need to secure the remaining parts of the mechanism.
The roller is able to provide a normal level of tension
Most of these devices cannot work without a generator (see VAZ 2110 generator repair: we do it all ourselves), which, in turn, works well only with sufficient belt tension. It is the roller that can make the tension level of the belt drive optimal.
There are several options for these devices. The most popular of them:
- Roller with offset center. When rotating, the belt is tensioned, the degree of tension is fixed using a bolt.
- The roller is mounted on a movable bracket, the tension is carried out by a bolt.
In any case, you need to check the condition of this part and make repairs if necessary.
Note. Sometimes defects are detected on new machines that have recently rolled off the factory assembly line. This indicates a defect in the production of the car.
Replacing the roller
To replace the roller, do the following:
- immobilize the crankshaft using a pry bar;
- relieve tension from the belt (to do this, loosen the bolt that secures the bracket or roller);
- unscrew the axial bolt and remove the roller;
- attach the new roller and adjust the belt tension.
Note. After installing the video, be sure to check how it works. Then we inspect the part again.
Replacing the belt tensioner
How to replace the alternator belt tensioner yourself? If the car owner notices that the bracket is bent, the only possible remedy is to replace the tensioner. This part is made of monolithic metal and cannot be restored. When replacing the tensioner, do the following:
- disconnect the battery contacts;
- remove the generator belt by loosening the tension on the roller;
- remove the bracket by unscrewing the nuts;
- install a working bracket with a roller;
- install the belt, tensioning it optimally.
Note. To prevent breakdowns in further operation, you must follow the following rules: check whether the crankshaft pulleys and the tensioner pulley are on the same line; Do not tighten the belt too much.
Power steering for VAZ 2112
In urban environments, you often have to perform numerous parking maneuvers. The fairly light steering of the VAZ 2112 in such cases becomes much heavier. It takes more effort to turn the wheels of a car that is standing still. The better their grip on the surface, the more difficult it is to maneuver. Therefore, the VAZ 2112 power steering will come in handy.
Characteristic
At the moment, almost all budget cars are equipped with such an amplifier. However, owners of old cars have a desire to retrofit their car with power steering. This is a very useful option. Even with a large diameter steering wheel, the effort required to control the car will be several times less. This is especially noticeable when parking in densely populated cities. The power steering itself is part of the car's steering system and runs on hydraulic fluid pumped by a pump. This also includes the steering column. The usual factory one does not fit here. There are many advantages of this system.
The first is the comfort of control, because you no longer need to turn the steering wheel as much as before. The second is reliability. The hydraulic booster practically does not fail. The third advantage is ease of maintenance. You will not have any difficulties when operating such a car. Even if the amplifier breaks, you can fix it with your own hands. Moreover, it is quite possible to get to the garage with such a breakdown. The only thing that will happen is that the ease of control will deteriorate. The steering wheel will become “heavy”. By the way, for the first time such an amplifier was installed on Gorky’s “Chaika”. GAZ-13 was the first car with power steering.
( 2 ratings, average 4.5 out of 5 )
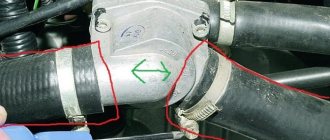
Replacing hoses and oil
Power steering hoses are an important part of it. Therefore, they need an eye and an eye. But what if they still need to be replaced? Should you take your car to a service station? Of course, there is no need, because you can do all this yourself. Usually, hoses are replaced simultaneously with the power steering oil change. And it would be opportune to present joint instructions.
- First you need to lift both front wheels of the car (they should be in the air);
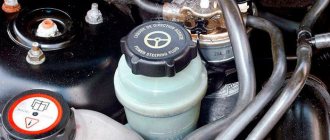
- We find the power steering reservoir from which the oil should be pumped out;
Note. You can pump out oil from the power steering reservoir using a larger glass syringe, which also has an extension in the form of a tube.
- Pump out the oil;
- Turn the steering wheel all the way in any direction (after this oil will appear in the tank again, which needs to be pumped out again);
- Now turn the steering wheel in the other direction and pump out the oil again;
- We remove the hose, which is the oil conductor (through it, the oil comes from the passenger compartment and enters the tank);
- Turn the steering wheel from side to side (oil should come out again);
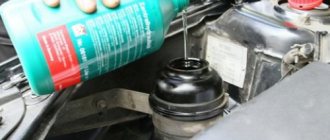
Replacing power steering oil
- We take new power steering oil (usually about 800 ml);
- Fill it into the tank to the maximum level;
- Again, turn the steering wheel from side to side (all the way);
Note. When the steering wheel is rotated, the oil will flow out. You will need to constantly refill it.
- We start the engine for a few seconds, turn it off;
- We turn the steering wheel again;
- Add oil;
- We pump and remove air from the system by turning the steering wheel with the car turned off ten times in each direction (we do the same number of times with the engine running).
When changing the oil, be sure to look at all hoses and pipes. If oil is leaking, this is a sign of a torn or faulty hose that will need to be replaced. Hoses are replaced only after the oil has been completely pumped out. You will need to unscrew the clamps and remove the hoses from the pump. As for installation, new hoses and pipes should be tightened with clamps and not overdo it (hoses easily burst, if anything happens).
Note. Installing new hoses can be difficult, since the location of the power steering itself is inconvenient.