March 29, 2021 Lada.Online 63 523 38
Lada Vesta and Lada XRAY are equipped with an analog instrument panel with arrows from the factory, while many modern foreign cars already use electronic instrument panels. However, several companies are developing digital instrument clusters. Some of them are already on sale, and some are still at the project stage. The Lada.Online website has collected all the information about these instrument panels.
The best digital gauges in a car.
Digital dashboards are surprisingly not new to our high-tech 21st century. In fact, the history of digital meters dates back to the 1980s. Unfortunately, in the early 90s, manufacturers' interest in innovative digital instrument clusters in cars virtually disappeared.
This is due to a number of unsuccessful decisions in this direction, as well as due to the lack of technology at that time. But in the 21st century, digital dashboards have made their comeback in the auto market. And it seems that this time they have come to stay in the auto industry for a long time. Here are the best and most amazing digital instrument clusters in the history of the auto world.
Difficulties of functional tuning
Often, functional tuning is limited only to replacing older or faulty car devices with newer and more modern ones. However, we should not forget that functional tuning also includes the installation of additional vehicle control elements such as an immobilizer, on-board computer or built-in additional devices. The main problem with such modification is not so much the choice of components as their proper installation. Most often, novice tuning enthusiasts who want to carry out such an installation at home will have to face such a problem as difficulties in calibrating devices. Imagine that the speedometer will show an inadequate speed of the car or the fuel gauge will deceive you at the most inopportune moment.
Separately, it is necessary to say about such a point as the legality of modifications. That is, if the design of the car provides for a speedometer or tachometer of the exact model that is installed at the factory, it will be quite difficult to explain its replacement during maintenance. Therefore, it is better to carry out aesthetic tuning of devices that have already been installed on the car, and place additional ones either on top of the dashboard or in those places that are still free. Aesthetic question
When carrying out aesthetic tuning, you need to carefully plan everything, because you will need no less skills than when carrying out a functional improvement of the dashboard, and in addition to it you will also need an excellent sense of taste. If you yourself know what you want, all that remains is to prepare the necessary materials and elements, and we’ll talk about this a little later, but if you don’t have a clear plan, then it’s worth developing it in advance.
First of all, look for inspiration on car forums or ask for advice from motorist friends who have tuned their cars. Naturally, each person has his own taste, but someone’s ready-made improvements may well lead you to an interesting solution that you can later implement. In addition, knowing what you want to achieve with your car, you can easily select the necessary materials and apply certain solutions related to the manufacture of elements necessary for tuning.
McLaren P1
In a racing car, the gauges are more important than the interior and dashboard design. That's why the McLaren P1 and P1 GTR supercars feature a simple digital instrument panel that displays the tachometer horizontally across the entire screen.
Also on the dashboard screen the driver can see a large speedometer and gearbox indication. On the one hand, the tidy turned out to be modern and elegant, and on the other hand, it was very simple. But as they say, genius is in simplicity.
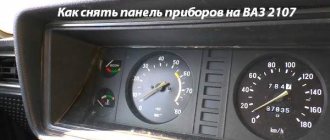
How to change the color of the instrument scale on a VAZ car
You need to take a piece of plastic and scissors. We cut out the contours so that the plastic fits into the main part. We also cut out places for the pointer drives. Next we apply markings for the LEDs. For fuel you need three LEDs, for temperature - four. Then we set the instrument panel numbers for each scale.
Now, guided by the markings, we make holes for the LEDs and resistors. This can be done with a hot awl or a small drill. The top of the LED needs to be ground off, since it has a built-in lens for focusing the beam. It is important not to damage the light element itself. LEDs should be soldered in parallel with each other and in series with a resistance.
Audi R8
Many automakers these days offer combination instrument panels that combine analog and digital clusters. Also, some automakers offer to customize the display style of the digital instrument cluster. But Audi went further.
Their full digital instrument panel in the Audi R8 sports car can not only be customized by the driver to personal preference, but can also display the navigation map in full screen. But the main highlight of the Audi tidy is its ease of setup.
When you look at this dashboard, you get the feeling that we are already in the distant future. We believe that very soon many car manufacturers will follow the same example.
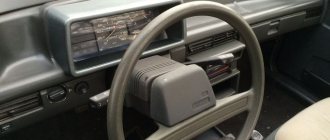
Compatibility of the electronic combination with the on-board network
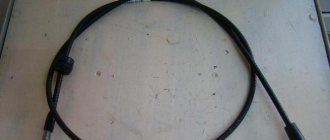
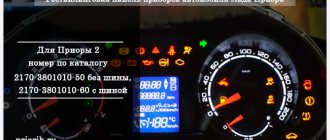
The dashboard described above can be used on VAZ 2107 cars equipped with an injection system of various modifications. To connect the wiring harnesses, the developers used standard connectors that match the factory colors, which greatly simplifies the installation and switching of equipment. The geometric dimensions, shape and location of the mounting brackets are completely identical to the standard panel.
The equipment is adapted to work with electronic engine control units of January 5.1 and BOSCH M1.5.4 models. It is possible to reprogram the instrument cluster using an encoder with the latter connected through a special connector. The electronic europanel is compatible with parking sensors from the same manufacturer, information from which is displayed on the liquid crystal display.
Installation of this equipment on a vehicle using the included components:
- wiring harness;
- specially shaped connector;
- mounting bolts.
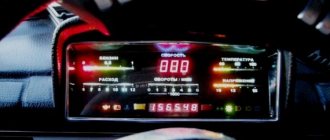
This dashboard was specially developed for the VAZ 2107 car as an electronic version and fits organically into the interior design. Automatic backlight adjustment makes the readings clearly visible and at the same time does not irritate the vision of the driver and passengers.
Lamborghini Reventon
When creating the Lamborghini Reventon sports car, the designers were inspired by high-speed fighter jets. That is why Lamborghini engineers decided to equip the supercar with a digital instrument panel, made in the style of digital aviation clusters that are used in military aircraft.
If the usual display of the cluster did not yet clearly hint at aircraft technology, then with the menu settings, the driver could definitely get the impression that he was driving a fighter jet. And there is no doubt that you will never see such a tidy in any other car.
Adjusting the brightness of the backlight
Most often, to adjust the brightness of the backlight located behind the device, you need to assemble it, but if something does not suit the brightness, the device will need to be disassembled and adjusted again. In order to avoid wasting time on such actions, we advise you to connect the backlight through a variable rheostat, which can be used to control the intensity of the glow by simply turning it up. Naturally, it is best to carry out the adjustment 3 times - during the day, at dusk and at night, to understand whether it is convenient to look at the devices.
Chevrolet Corvette C4
The fourth generation Corvette was designed to take Chevrolet out of its dark days and into a bright future. Of course, in order to attract attention to the new model and count on success, the engineers had to try hard.
This is especially true for the digital instrument panel. Today, the Chevrolet Corvette C4's dashboard may seem too outdated. But don't forget that when the car came out on the market, it was the end of 1984. Can you imagine what a digital instrument panel would be like in a car from the mid-80s? It was fantastic.
Types of decorative tuning
Tuning the dashboard of a car is considered decorative. It makes the device look unique and also allows you to restore a part that has worn out over time. To do this, you can change the appearance of the devices or their lighting, as well as cover the panel itself with various materials or apply finishing or stickers to it.
Upgrading a torpedo is more of an aesthetic nature, but sometimes it also has a practical purpose. For example, if the instrument lighting was too dim, there are ways to fix it. And such work is easy to do with your own hands. These often include installing LEDs, replacing stickers and covering the shield.
Installation of LEDs
Tuning a car panel often involves installing LEDs. It helps make the backlight brighter. In this case, the devices can be illuminated in any color.
LED lighting in the Kia Rio car
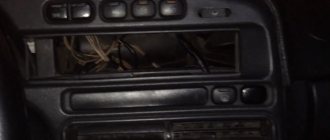
Such changes are simple. To do this, you need to buy one or more LED strips, remove the dashboard and solder the LEDs instead of the standard backlight. All that remains is to connect the new backlight and put the panel back together.
This modification helps increase the brightness of the instrument lighting and gives it an updated look. After all, with the help of LEDs you can create an unusual glow. It can also be two-color or multi-color.
Replacing stickers on an old panel
Instrument markings on the dashboard may be erased. This reduces their visibility. A simple tuning of the dashboard in the car will help fix this problem.
Scales and instrument symbols on the panel are applied on most cars using stickers. Such accessories are sold in auto stores for almost every make and model of car. But when choosing this part, you need to be careful, since stickers even for cars of the same year of manufacture and modification may differ. They can also be made to order. And buying stickers different from the factory ones will help change the image of the devices. True, the driver may have to get used to such a change.
Car dashboard stickers
To change the stickers, you will need to remove the tidy and get to the backing. Remove the old image, wipe and degrease the surface, and then apply a new coating. Next, you will need to assemble the panel and install it in its original place.
Covering the panel with leather
The torpedo may fade. Scratches and other defects appear on it. Simple tuning of the car dashboard helps get rid of this. It can be covered with new leather. Instead, you can use leatherette or cheaper materials such as Alcantara and vinyl films. This will restore the tidy.
To reupholster, you should measure the dashboard and purchase the required amount of material. The removed torpedo is cleaned of dirt and sanded. The cut leather or film is placed on the surface and secured with glue. You can also use threads. Upon completion of the work, the shield is put in place. With some skill, you can do all the work yourself.
Leather covering of car interior
You can not cover the entire shield, but highlight individual parts of it with leather or vinyl. For example, apply a bright finish. Such modernization is less expensive. In addition, it helps to mask minor surface damage.
Honda S2000
During the 90s, the popularity of digital meters plummeted to virtually nothing. Nevertheless, this period of the auto industry has something to brag about.
For example, the digital instrument panel of the Honda S2000, which was made in the style of the dashboards of Formula 1 cars. This style of dashboard display was made by Honda to honor their past successes in motorsports.
It's worth noting that all of the S2000's gauges are incredibly easy to read and understand, despite the lack of digital technology at the time.
It was this dashboard that revolutionized the concept of automotive digital clusters in the auto industry.
And if the popularity of this trend in automotive technology had not fallen in the 90s, the auto world would have seen digital dashboards in all cars much earlier.
What is dashboard tuning like?
Tuning this element of the car can be conditionally classified as either functional improvements or aesthetic ones.
Often, motorists who are thinking about improving their car dashboard have both goals and want to make the panel both more beautiful and more functional. A rather complex but interesting process of tuning the dashboard in detail:
Functional tuning is primarily aimed at either replacing vehicle controls or instruments with more advanced analogues, or simply involves adding additional instruments or controls. The main goal of such tuning is to improve the quality of obtaining information about the condition of the car or about weather or other conditions outside. Aesthetic tuning, in turn, is aimed solely at improving the appearance of the dashboard. Naturally, such improvements can be made even at the expense of functionality, which does not always have a good effect on the car, but if a person wants to do something with his car, it is difficult to stop him.
Lexus LFA
When Lexus launched the LFA sports model, a company spokesman said at a press conference that the digital instrument panel was installed due to the fact that, due to the incredible power of the V10 engine, the analogue instruments were unable to display the increase in speed during acceleration in time.
See also: Automotive LCD screen design will finally go beyond the rectangular style
I wonder if this is another marketing ploy? Maybe, but regardless, the Lexus LFA's dashboard is currently one of the most beautiful in the world in the history of the auto industry. By the way, you can also find this device in the Lexus RC F and GS F.
Installation of LEDs
A DIY LED panel is also quite simple and one of the most common tuning options.
This procedure is carried out as follows:
- First, the PP must be dismantled, all standard light bulbs must be removed.
- Next, you need to determine the places where you will install diode lighting sources - of course, for better visibility they should be placed around the perimeter.
- Decide on the color of the diodes - it should provide comfortable conditions while driving, without disturbing the driver.
- Next, you have two options - either simply replace the light bulbs with diodes, buying the appropriate ones in the store so that they fit the standard sockets, or install diodes in new places. To do this, you will need to drill holes on the PCB where the light source will be installed. Of course, the first option is simpler, there is nothing complicated in its implementation, but we will consider the second method.
- After the holes are drilled, the light sources should be connected to each other using soldering - for the connection you can use a flexible wire, its thickness should be small.
- So that you can subsequently adjust the brightness of the lighting, you can add a variable resistor to the circuit. Depending on the model, an auto rheostat installed during production can be used for this purpose.
- If you use white light sources, then in order to provide a different shade, you can paint the light bulb with varnish or special paper.
- The diode elements should be soldered to the power circuit, and then connected to the PCB; it is important to observe polarity.
- Then the control panel’s performance is diagnosed and its further installation on the car (the author of the video is Lesha Master).
Buick Reatta
When the Buick Reatta first debuted on the car market, all cars were initially equipped with a touchscreen display on the center console. But in 1990, Buick abandoned the touch screen. However, this does not mean that the instrument panel was of poor quality and ugly.
Against. The Buick Reatta's digital gauge cluster was amazing. It’s just that at the beginning of the 90s, public interest in digital technologies in the automotive world virtually disappeared.
It is worth noting that in the history of the auto industry, General Motors' experiment was the last project to equip cars with digital dashboards. The idea of equipping cars with digital devices was only returned to at the beginning of 2010.
Mitsubishi
14. Multimedia instrument panel for Mitsubishi Pajero 2006-2016
If you own the legendary Mitsubishi Pajero from 2006-2016, then you should think about throwing out the old, uninformative instrument panel and replacing it with a modern multimedia touch panel with wide capabilities!
By making such a replacement, you not only retain the ability to monitor the readings of the car’s systems and components, but also get a multimedia combine running Android 9.0! And this is the ability to play audio and video files, use the Internet thanks to the presence of a Wi-Fi module and support for 3G/4G networks, as well as a built-in GPS navigator! A bright, stylish and very informative instrument panel will not leave Mitsubishi Pajero owners indifferent!
Characteristics
The electronic panel is based on a 10.25-inch display with a resolution of 1280 x 480 pixels and a color depth of 24 bits. Behind the screen is the cooling system, and in front of it is the indicator scale module, which displays numerous icons and two histograms. Use on an intuitive level is as clear as possible.
Important to note: Electronic tidy is available only on two trim levels of the Skoda Karoq - Ambition and Style. The base model still uses an analog instrument.
Sketch (firmware) for the Arduino Mega controller
You can download the finished sketch in a file using this link.
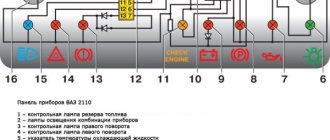
unsigned long micros_sp = 0, micros_th = 0; volatile int tz; volatile int sz; volatile int sp; //speedometer impulses volatile int th; //tachometer pulses int analogInput [15]; //array of analog values int digitalInput[29]; //array of digital values String resultString = ""; //string int i; //cycle counter //************************************************ ************************* void setup() < for(i=0; i digitalInput =0; > for(i=0; i analogInput = 0; > Serial.begin(115200); Serial2.begin(115200); //initializing the com port attachInterrupt(0, speedometr, RISING); //interrupting the speedometer on pulse edges attachInterrupt(1, tahometr, RISING); //interrupting tachometer by pulse edges > //*************************************************** ************************* void loop() < analogInput[0] = analogRead(0); // B13 voltage analogInput[1] = analogRead (1); // B24 fuel analogInput[2] = analogRead(2); // B21 cooling temperature analogInput[3] = analogRead(8); // analogInput[4] = analogRead(7); // analogInput[5 ] = analogRead(3); // analogInput[6] = analogRead(4); // analogInput[7] = analogRead(9); // analogInput[8] = analogRead(10); // analogInput[9] = analogRead(11); // analogInput[10] = analogRead(12); // analogInput[11] = analogRead(13); // analogInput[12] = analogRead(14); // analogInput[13] = analogRead( 15); // analogInput[14] = analogRead(6); //
digitalInput[0] = digitalRead(4); // ignition // digitalInput[1] = digitalRead(5); // //****************************************************** ********************** digitalInput[2] = digitalRead(53) + // digitalRead(51) * 2; // //****************************************************** ********************** digitalInput[3] = digitalRead(5) + // A14 left turn digitalRead(6) * 2; // A13 right turn //*************************************************** ************************ digitalInput[4] = digitalRead(8) + // A18 near digitalRead(9) * 2; // A17 distant //************************************************ ************************* digitalInput[5] = digitalRead(10) + // A16 PTF front digitalRead(11) * 2; // A15 PTF rear //*************************************************** ************************* digitalInput[6] = digitalRead(23); // A23 check digitalInput[7] = !digitalRead(21); // B 9 — level digitalInput[8] = !digitalRead(31); // A19 — handbrake digitalInput[9] = digitalRead(25); // B 3 pad wear digitalInput[10] = !digitalRead(45); // B10 - fuel lamp digitalInput[11] = !digitalRead(51); // B12 — coolant level digitalInput[12] = !digitalRead(47); // A24 - oil pressure digitalInput[13] = digitalRead(27); // A20 fan lamp digitalInput[14] = !digitalRead(29); // A23 charging digitalInput[15] = digitalRead(33); // A 5 abs digitalInput[16] = digitalRead(35); // A20 srs digitalInput[17] = digitalRead(37); // A 3 belt digitalInput[18] = digitalRead(39); //B 1 door digitalInput[19] = 0;//digitalRead(22); // B 2 p digitalInput[20] = 0;//digitalRead(24); // A22 r digitalInput[21] = 0;//digitalRead(26); // A 7 n digitalInput[22] = 0;//digitalRead(28); // B 6 d digitalInput[23] = 0;//digitalRead(30); // B 5 s digitalInput[24] = digitalRead(41); // A 8 reserve digitalInput[25] = 0;//digitalRead(32); // A 9 reserve digitalInput[26] = digitalRead(43); // A10 reserve digitalInput[27] = 0;//digitalRead(34); // A11 reserve digitalInput[28] = digitalRead(49); // B 4 reserve