Instrument panel VAZ-2108
The instrument panel of the basic version of the G8 was popularly nicknamed “low” because of its appearance. It is a large shelf, the surface of which is located below the level of the windshield. Used in the VAZ-2108 until 1997. And then the panel was replaced with a “high” one for cars with index 21083.
On the left half, the instrument panel of the VAZ-2108 rises above it. To the left of the steering wheel there are control handles for the hydraulic leveling of the headlights and the illumination of the instrument panel.
On both sides of the steering column there are combined control levers for electrical appliances. The left one is designed to turn on the turn signals, constant and short-term high beam headlights. The right one controls the windshield and rear window wipers, as well as the washer pump. Also on the right side is the ignition switch and the carburetor choke lever (choke handle).
Above the central tunnel are:
- heating system deflectors;
- control buttons for the main electrical equipment: side lights, low beam headlights, hazard warning lights, fog lights, heated rear window.
- heater control unit;
- space for a radio;
- cigarette lighter
The heating control unit includes:
- four-position fan switch;
- 2 handles that control the direction of air flow inside the panel (passenger and driver side);
- heater valve control lever.
On the right half of the VAZ-2108 instrument panel there is a glove box (glove compartment) with lighting inside and a small shelf under it.
How to remove the instrument panel on a VAZ 2109 high
- Remove the decorative steering wheel trim.
- Unscrew the steering wheel nut so that the end of the nut is flush with the end of the steering column shaft. The steering wheel sits very tightly on the shaft splines, so do not immediately unscrew the wheel fastening nut: in the event of a sharp impact, the steering wheel, jumping off the splines, can cause injury. Mark the position of the steering wheel relative to the shaft.
- Use sharp blows to knock the steering wheel off the steering shaft splines.
- Finally unscrew the nut and remove the steering wheel.
- Remove the six screws securing the lower steering column housing.
- Remove the lower steering column cover and ignition switch trim.
- Remove the upper steering column cowl.
- Loosen the bolt securing the base of the steering column switches.
- Remove the base from the shaft and disconnect the two blocks with wires from the horn contacts.
- Disconnect the connector with wires from the windshield wiper and washer switch lever. When disconnecting terminal blocks with wires, we recommend marking them. This will avoid confusion during assembly and save your time.
- Disconnect the block with wires from the turn signal and headlight switch lever.
- Pull the carburetor choke handle towards you until a draft appears, and remove the handle from it.
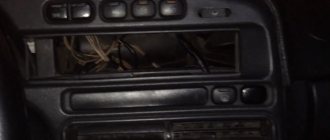
- Remove the two screws securing the instrument panel console trim.
- Remove the trim from the console.
- Remove the cigarette lighter socket from the socket.
- Remove the ashtray from its slot by pressing the cigarette extinguisher plate.
- Remove the heater fan switch handle.
- Remove the three heater control knobs by prying them up with a screwdriver.
- Disconnect the wiring harness from the heater fan switch under the heater control panel.
- Disconnect the two wires from the contacts of the heater control panel illumination lamp.
- Remove the headlight hydraulic adjustment handle by pulling it towards you.
- Remove the instrument cluster light switch handle.
- Unscrew the nut securing the instrument cluster lighting switch.
- Unscrew the nut securing the headlight hydraulic corrector.
- Push the instrument cluster lighting switch and the headlight hydraulic corrector inside the panel.
- Remove the side nozzles on both sides of the instrument panel using a screwdriver.
- Remove one screw securing the trim on both sides of the instrument panel.
- Use a screwdriver to pry the exterior lighting switch out of the panel.
- Disconnect the block with wires from the exterior lighting switch. Push the block inside the instrument panel.
- Using a screwdriver, use a screwdriver to remove the radio socket. If your vehicle is equipped with radio equipment, remove it first.
- Remove the screw securing the instrument panel trim.
- Insert two screwdrivers to pry open the plastic tabs.
- Lift up the instrument panel trim.
- Disconnect the block with wires from the cigarette lighter block.
- Disconnect the block with wires from the cigarette lighter illumination block.
- Disconnect the block with wires from the hazard warning light switch illumination lamp.
- Disconnect the block with wires from the hazard warning switch and finally remove the instrument panel trim.
- Gently press down and remove the speaker trim on the left side of the instrument panel. Be careful - the latches break off easily.
- Disconnect the block with wires from the heated tailgate glass switch.
- Remove the block from the rear fog lamp switch.
- Remove the two screws securing the instrument cluster.
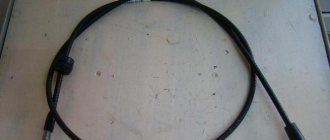
- Remove the instrument cluster from the panel, unscrew the fastening nut and disconnect the cable from the speedometer.
- Disconnect the red block with wires from the instrument cluster.
- Disconnect the block with wires from the on-board control system.
- Disconnect the white block with wires from the instrument cluster.
- Disconnect the ignition switch block with wires from the ignition relay.
- Disconnect the ground wire of the ignition relay.
- Disconnect the block with the wires of the air damper opening warning lamp.
- Unscrew one screw of the lower fastening of the instrument panel on both sides.
- Disconnect the connector with the glove box illumination lamp wires.
- Unscrew the two mounting screws and lower the heater control panel down.
- Remove the two screws securing the air damper guide rod to the instrument panel.
- Remove two screws from the upper mounting of the instrument panel on both sides.
- Use a screwdriver and remove one plug from both sides of the instrument panel. Remove one instrument panel side mounting screw on both sides of the panel.
- Unscrew the screw of the central fastening of the instrument panel.
- Remove the instrument panel.
Installation of a high instrument panel on a VAZ 2109 is carried out in the reverse order of removal.
Instrument cluster VAZ-2108
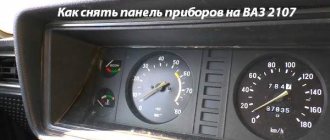
The instrument panel of the VAZ-2108 (low panel) is a combination of the following indicators:
- speedometer;
- mileage counters: daily and total;
- voltmeter, econometer, thermometer;
- fuel level.
In addition to indicators in the instrument cluster there is a set of lamps that indicate:
- insufficient battery charge;
- lack of pressure in the oil supply system;
- carburetor choke position;
- current amount of brake fluid and brake pad wear;
- direction of rotation and activation of the hazard warning lights;
- condition of the parking brake (handbrake);
- state of external lighting (side lights, low beam, high beam or fog lights are on).
Devices 2108 (low panel) allow you to carry out basic diagnostics: brakes, coolant, headlights and taillights. If any element is faulty, its lamp will light up red and the word “STOP” will appear. This indication is advisory in nature and does not prevent the engine from starting.
main technical characteristics of the cars in question:
1. Instrument cluster.2. Ignition switch.3. Instrument panel.4. Central nozzles (control the ventilation and heating systems of the cabin).5. Side nozzles (control the ventilation system and the interior heating system).6. Lid of the box with things.7. Shelf.8. Plug.9. The switch responsible for heating the glass of the rear door.10. The switch responsible for the rear fog lights. 11. Switch responsible for the alarm. 12. Central switch for external lighting.13. A remote control that controls the ventilation and heating system in the cabin.14. Socket for installing radio.15. Lever for changing gear speeds.16. Lever for parking brake.17. Ashtray.18. Cigarette lighter.19. Lever used to switch windshield wipers and washers.20. Accelerator pedal.21. Brake pedal.22. Clutch pedal.23. The handle that covers the carburetor air damper.24. Switch that turns off the sound signal.25. Handle that resets the trip odometer.26. Switch responsible for illuminating objects.27. Headlight hydraulic correction handle.28. The lever that is responsible for the hood lock drive.29. Lever that switches the direction indicators and headlights.
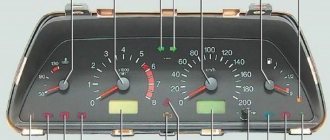
Instrument clusters 1. Speedometer.
2. Temperature indicator. Shows coolant temperature. 3. Voltmeter. 4. Fuel level indicator. Reflects the fuel level in your car. 5. Indicator lamp. Monitors the remaining fuel in reserve. 6. Econometer. 7. Counter. Reflects the daily mileage of the car. 8. Counter. Shows total accumulated mileage. 9. “STOP” indicator lamp. 10. Control lamp. Shows how charged the battery is. 11. Control lamp. Reflects the carburetor choke being closed. 12. Indicator lamp. Reflects the activation of the alarm system in the car. 13. Control lamp. Shows how much the brake fluid level has dropped. 14. Control lamp. Lights up when the parking brake is applied. 15. Control lamp. Lights up when emergency oil pressure needs to be indicated. 16. Indicator lamp. Flashes when the direction indicators are turned on. 17. Indicator lamp. Detects the turning on of the side lights. 18. Control lamp. Reminds you to turn on the rear fog lights. 19. Indicator lamp. Indicates that the high beam headlights are on. 20. Indicator lamp. Indicates when the heated rear door glass is on. The ignition key can be in four positions: 0 – everything is off.
The steering does not lock. I – ignition is on. The steering does not lock. II - ignition and starter are on. For the starter to operate, the key must be held with your hand. After starting the engine, feel free to release the key. There is a lock that prevents the starter from turning on when the engine is running. If the engine stalls, you must return the key to position “0” before starting it again. III - the ignition is turned off, the key can be removed, the steering is locked. To unlock the lock, simply insert the key and swing the steering wheel from side to side, turning it to the “0” position. Positions of the lever that controls the direction indicators: 1 - everything is off, you can turn on the low beam headlights if the central switch is in the second fixed position; 2 — left turn, non-fixed position, for convenience when you turn at a small angle, for example, when overtaking; 3 — left turn, fixed position; 4 — right turn, non-fixed position; 5 — right turn, fixed position; 6 — non-fixed position, for giving a signal with high beam headlights (“blinking”); 7 - fixed position, the high beam headlights turn on, if the central switch is in the second fixed position, the blue lamp in the instrument cluster lights up. Positions of the windshield wiper and washer switch: 1 - all off;
2 — the windshield wiper operating mode is intermittent, the lever is not fixed; 3 - the same, the lever is fixed; 4 — the position is fixed, the windshield wiper operates at low speed; 5 — the windshield wiper operates at high speed; 6 – position is not fixed, the washer and wiper are on; 7 — rear door cleaner is on; 8 – the position is not fixed; in addition, the rear door washer is turned on. When the parking brake is applied, indicator lamp 14 will light red.
The hydrocorrector is designed to correct the headlight beam.
When you pull out the handle 23 to close the air damper, the orange control lamp 11 will light up.
Rear fog lights can only be switched on with low beam headlights. They must work together.
Heated rear door glass consumes a significant portion of power. It is best to turn it on for a few minutes while the engine is running.
The fuel level indicator has a built-in fuel remaining indicator lamp. It lights up orange if there are 4-6 liters of gasoline left in the tank.
The red zone of the antifreeze temperature indicator scale reflects how much the engine has overheated.
When warning lamp 10 lights up while the engine is running, it means that the battery is not charging.
The ecometer can suggest a more economical operating mode for the engine.
If lamp 15 is on, the engine should not run. This is strictly prohibited.
The “STOP” indicator lamp 9 lights up simultaneously with lamps 10, 13, 15. When it lights up, stop immediately and fix the problem.
Dashboard of a VAZ-21083 car
In the early 90s, the interior of front-wheel drive models was completely redesigned and the main change was a new “high” instrument panel with index 21083. It was unsuccessfully copied from the Volkswagen Golf 2 and was installed in cars 21083, 21093, 21099 until 2002-2003. Compared to the instrument panel of the VAZ-2108, the 21083 was more bulky and angular, and some controls were moved. For example:
- The headlight and hazard warning buttons are located on the edges of the instrument cluster.
- The buttons for heating the rear window and fog lights are located to the left of the steering wheel, next to the hydraulic corrector handle.
Space was also added for the on-board computer and power window switches in the central part of the panel. In cars equipped with an injector, the engine control unit is attached to the back of the shelf under the glove compartment.
How to remove a torpedo on a VAZ 2109 low
- Remove the three heater control knobs.
- Remove the heater fan switch handle by pulling it toward you.
- Remove two screws securing the instrument panel console trim on both sides of the console.
- Slide the cover towards you.
- Disconnect the block with wires from the rear fog lamp switch.
- Disconnect two connectors with wires and one wire from the heated rear window switch.
- Disconnect the block with wires from the hazard warning switch.
- Remove the wiring harness from the exterior light switch.
- Disconnect the connector with the cigarette lighter illumination wires.
- Disconnect the connector with the cigarette lighter wires and remove the console trim.
- Remove the four screws securing the heater control panel.
- Remove the two screws securing the instrument cluster visor.
- Remove the instrument cluster visor.
- Compress the spring clips.
- Remove the instrument cluster housing from the panel.
- Unscrew the fastening nut and disconnect the cable from the speedometer.
- Disconnect the white block with wires from the instrument cluster.
- Remove the hose from the econometric fitting.
- Remove the cotter pin.
- Disconnect the trip odometer reset cable from the speedometer.
- Disconnect the red connector from the instrument cluster.
- Remove the handles for the headlight hydraulic adjustment and the instrument cluster lighting switch by pulling them towards you.
- Unscrew the nut securing the instrument cluster lighting switch.
- Unscrew the nut securing the headlight hydraulic corrector socket.
- Remove the steering wheel and steering column switches.
- Turn the ignition key to position “1” to turn off the anti-theft device, and disconnect the ignition switch wiring harness.
- Remove the two bolts and two nuts securing the steering column pipe.
- Remove the steering column pipe along with the ignition switch.
- Pull the carburetor choke handle towards you until a draft appears, and remove the handle from the rod.
- Remove the two screws securing the air damper guide rod to the instrument panel.
- Remove the screw that secures the instrument panel on the left side.
- Unscrew the screw of the lower fastening of the instrument panel on the left side.
- Remove the screw on the side securing the instrument panel on the right side.
- Unscrew the screw of the lower fastening of the instrument panel on the right side.
- Unscrew the screw securing the instrument panel in the glove box.
- Unscrew one screw securing the instrument panel console on both sides and remove the instrument panel.
Installing a low torpedo on a VAZ 2109 is carried out in the reverse order of removal.
If your car has a low dashboard, we recommend installing overlays on the VAZ 2109 panel, they will give the car interior a more modern look and ease of use of the dashboard as a whole.
Instrument cluster VAZ-21083
The instruments of the VAZ-2108 (high panel) have been radically changed:
- Added: tachometer, TEST lamps, Check engine, battery charging, driver and passenger seat belts.
- Removed: voltmeter, econometer; indicators for heated rear window, fog lights and hazard warning lights. The last 3 have been placed to the right of the buttons that enable them.
The structure of the dashboard is as follows:
- on the left is the speedometer;
- in the center at the top edge there is a diagnostic unit;
- in the center of the combination there is a coolant thermometer and a fuel level scale;
- on the right – tachometer;
- all indicator lamps are located along the lower edge of the instrument panel in the form of rectangles.
Description and location of indicators and instruments on the panel
To begin with, we suggest that you familiarize yourself with the description and designations of the icons on the dashboard of the VAZ 21099 and 21093 carburetor or injector:
- A speedometer that allows you to find out at what speed the vehicle is traveling.
- Coolant temperature controller. If the indicator needle enters the red zone, this indicates engine overheating, sometimes this may be due to failure of the sensor itself. Overheating of the power unit can cause serious malfunctions, so it is necessary to diagnose the engine radiator fan.
- One of the features of VAZ cars is that the dashboard diagram involves the use of a voltage sensor in the car’s electrical network. According to the indicators of this controller, it is possible to determine the battery discharge when the indicator arrow is located in the left red zone. If it falls into the right red zone, then this means that an overcharge has been detected in the network. In case of such a problem, the generator device should be diagnosed.
- Gasoline volume sensor in the fuel tank.
- The symbol is in the form of a gas station; its appearance indicates that there are no more than 6.5 liters of fuel left in the tank.
- Another feature of VAZs is a fuel economy sensor. With its help, the driver can determine the optimal ratio of the number of crankshaft revolutions to fuel consumption. If the indicator needle is in the yellow zone, this means that there is excessive consumption of gasoline in the system; if it is in the white zone, then fuel consumption is economical.
- Daily mileage odometer.
- General odometer.
- If the word “STOP” appears on the instrument cluster while driving, the driver is warned to stop driving. Usually its appearance is associated with a decrease in the level of engine fluid pressure in the power unit. It can also appear due to a lack of brake fluid or when the parking brake lever is raised.
- The symbol in the form of a battery always blinks when the power unit starts. If it lights up after the engine has been started, then most likely the drive belt of the generator set has broken or the unit has failed. It also makes sense to check the charging circuit for damage and breaks.
- The choke icon indicates that the air damper is closed.
- An indicator in the form of a triangle indicates that the light alarm is on.
- An exclamation mark icon appears when there is insufficient brake fluid and the volume needs to be replenished.
- This symbol indicates that the vehicle's handbrake has been applied.
- The engine fluid icon informs the driver that the pressure in the engine lubrication system has decreased; first of all, you should check the fluid level and, if necessary, add oil.
- An icon in the form of arrows pointing in different directions indicates that the turning lights are turned on.
- Side light activation symbol.
- Indicator that the rear fog lights are on, if equipped.
- Symbol for activating high beam lights.
- This icon indicates that the rear window heating system is turned on.
Features of high and low shield
Domestic “Nines” have been produced for more than thirty years, during which time AvtoVAZ engineers have made many improvements. Injection versions of cars equipped with power windows and other “tricks” began to appear on sale. The interior of the car has also undergone changes - instead of the traditional low tidy, high panels have been used. They were installed on cars with improved central consoles, which became known as Europanels.
Despite the differences in design, in fact the “stuffing” of icons and sensors in both dashboards remained the same, only the location of the controllers changed. High versions do not have a voltage sensor or econometer.
Instrument panel VAZ-2114 (European panel)
This part was installed only in the VAZ 21099-40 of the last years of production (2000-2002) and the second generation of Lada-Samara: 2113, 2114, 2115. But thanks to the identical interior dimensions and the 2111 engine, this panel can be easily installed in fuel-injected V8s " and "nines".
Panel 2114 has a smoother and more rounded shape compared to 21083. Lighting control buttons are located above the compartment for the on-board computer to the right of the driver. An additional glove compartment compartment has been added: it opens from inside the main one.
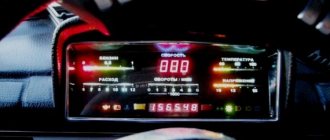
Instrument cluster VAZ-2114
It is equipped with an electronic speedometer, tachometer, fuel level and coolant temperature scales. The express diagnostic unit in the instrument panel 2114 has been simplified: instead of it, there are indicators of the health of the headlight bulbs and brake pads, as well as the “Check Engine” icon. The remaining warning lamps (oil pressure, battery charge, direction of rotation, side lights, low beam, high beam) are located in the lower corners of the device.
Basic faults
Like any other technical device, the VAZ-2108 instrument panel may break down or display information incorrectly. This happens for 3 reasons:
- The lamp or scale has failed.
- The electrical circuit between the indicator and the signal source is damaged: the tracks in the instrument cluster board are burned out, the wire/cable of the mechanical speedometer is broken, poor contact at the terminal connections due to dirt or oxidation, the fuse has melted.
- The signal source is damaged. For example, the float in the gas tank is stuck in the upper position. Then the fuel level scale will show that there is enough fuel.
To find out on your own why the panel instruments in the VAZ-2108 do not work, you will need a multimeter and repair and operating instructions. It contains instructions for checking each element of the circuit
How to remove the visor of a high instrument panel without disassembling the entire panel
- Sometimes there is a need to remove only one visor on the high instrument panel of a VAZ 2109 without removing the entire panel. Often this point is not described in the manuals; the emphasis is on dismantling the entire dashboard and disconnecting it from the car body. At the same time, to access the instrument cluster, for example, to install LEDs for dial illumination instead of standard lamps or install another instrument combination, there is no need to dismantle the entire instrument panel; it is enough to remove only one visor.
- In this article we will look at how you can do this yourself.
- Before starting any work on the vehicle's electrical wiring, it is necessary to disconnect the negative terminal from the battery to avoid possible short circuits in the wires.
- Remove the headlight/low beam switch button from the panel using a screwdriver. The button is tight, you need to be careful not to damage it.
- Disconnect its connector from the button.
- In the same way, remove the emergency button. It will be more difficult to pull it out, we also need to be careful.
- Disconnect its connector.
- Using a Phillips screwdriver, unscrew the two screws securing the tidy console trim, also called the “beard.”
- Having unscrewed the screws, we bend the beard down, holding it from below with another self-tapping screw.
- We take out the radio and disconnect all its connectors, or the standard plug if you do not have a radio in your car.
- There are 3 metal latches (2) on the top of the visor, and 2 plastic tabs (1) on the bottom edges. To remove the visor, you need to press them out one by one and release the instrument panel visor.
- We start with the two top latches, use a screwdriver to press them through the niche for the radio, and slide the visor towards you. Caution is also necessary here as the latches are fragile and can come off.
- Next, use a screwdriver to press out the two lower plastic fasteners of the visor and lift the visor up.
- Raising the visor, unhook the third upper mounting bracket, located on the left. Well, having disconnected the electrical connectors of the cigarette lighter, its illumination and the emergency signal lamp, we release the visor.
- That’s it, access to the instrument cluster is free, just don’t forget that the connectors and speedometer cable are holding it at the back. If you need to remove the instrument panel combination, for example, in order to illuminate the instrument scales from the inside, do not forget to turn off the whole thing.
The interior design of the VAZ-2109 depends on the year of manufacture of the car. In any case, dismantling the panel is a very labor-intensive job that takes a lot of time. Let's figure out how to remove a high or low instrument panel on a VAZ-2109.
Dashboard upgrade
Some car enthusiasts do not like the gray serial instrument panel of the VAZ-2108. Therefore, they strive to make it better and more unique. Many tuning methods have been invented: simple and cheap, expensive and complex.
Method No. 1. Repaint removable panel elements using spray paint: instrument cluster surrounds, heating deflectors, glove compartment lid.
Method No. 2. Cover the front part of the dashboard with stickers. It is not recommended to stick them on the top of the panel, as the stickers are glossy and reflect in the windshield. This makes it difficult to keep your eyes on the road.
Method No. 3. Install an overlay on the instrument panel of the VAZ-2108. Plastic overlays for the dashboard are available for sale, imitating wood or export equipment of the car. It is also possible to install a Euro panel with minor modifications.
Method No. 4. Installing a tablet computer in the central part of the panel instead of the on-board computer and radio. It will add the function of a GPS navigator and multimedia center to the car.
Differences in the design of different panels
The fundamental difference between the variations of the torpedo is the following varieties:
- high panel;
- low panel;
- Europanel for VAZ;
- non-standard panel.
The low panel device is considered the most convenient in location, as it is equipped with a wide shelf, and the air supply system is designed in the best way among all types of linings. This ensures the correct response to temperature changes and instantly prevents the glass from fogging up. This VAZ panel has only a few drawbacks: a simple and unpretentious design and the absence of a tachometer.
The high and euro instrument panels are very similar to each other. The Euro model visually resembles part of the interior of an expensive imported car, so the developers put a lot of effort into its “stuffing”. Because of this, the cost of such a model of the VAZ 2108 instrument panel is significantly higher than the prices of other dashboard options.
There is a misconception that the stove hiding behind the high dashboard of the VAZ 2108 heats worse. But this factor does not depend on the instrument panel, but on the type of stove itself. Particular attention should be paid to the heating system equipment at the time of laying sound insulation. Almost all motorists subject their “steel horses” to this process.
When laying soundproofing materials, it is worth carefully sealing all kinds of cracks through which heat loss can occur. This will provide an additional guarantee of high-quality operation of the stove. In places of contact with the VAZ dashboard, it is necessary to carefully lay it with special materials. This will help avoid squeaks and other noises during operation of the heater.
Peculiarities
Most of all, “chisels” liked the “low” panel due to one significant difference from the “high” one - the well-designed arrangement of air ducts. In 21083, the air forced by the fan from the heater core is lost somewhere inside it. As a result, the interior does not warm up well.
The second feature is the low quality of plastic and poor fit to body parts. At the slightest vibration or pressure, it begins to creak unpleasantly. And when driving on uneven roads, the noise from it is similar to a baby rattle.
Instrument panels with indexes 2108 and 21083 were installed on the first generation of front-wheel drive models; in addition to the cuts, they differ from each other only in the location of the equipment control buttons and differently combined control devices.