04/27/2021 2,030 VAZ 2108
Author: Ivan Baranov
The VAZ 2108 stove fan, like other important parts, is the key to the car’s heating system. Like any other system, this one has its own nuances and can suddenly break down. The solution to some popular problems, even those related to replacing the product, can be found below in the article.
[Hide]
What is a stove fan
A car heater, which is popularly called a stove, is designed to perform a simple and at the same time important function - heating the interior. In addition, the device helps eliminate fogging of windows in cold and damp weather. During normal operation of the heating system, the temperature in the interior of the “nine” should be maintained at +20 ˚С with the same indicators outside, but only with a minus sign. In the legs, with maximum heating mode, the value should be maintained at +25 ˚С. One of the important components of the stove, in addition to the radiator, is the fan. The purpose of this device, its malfunctions and repairs should be considered in more detail.
Purpose of the device
The purpose of the motor is to increase the efficiency of the heating system and air circulation in the car. Its operation is based on air intake from outside and its subsequent supply into the cabin through the radiator. As a result of the air flow passing through the heat exchanger, the air enters the cabin already warmed up.
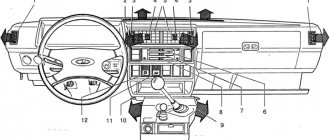
Heater operation diagram: a - VAZ 2108; b - VAZ -2108–01: 1- fan impeller; 2 — air duct for heating the windshield; 3 — windshield heating flap; 4 — damper for heating the driver’s feet; 5 — central nozzle flap; 6 - central nozzle; 7- radiator; 8 — heater control damper; 9 — driver’s foot heating window; 10 - internal ventilation duct
Where is the motor located on the VAZ 2108/09
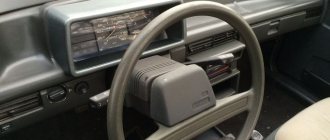
The heater motor on the VAZ 2108/09 is installed in a niche in the engine compartment in front of the windshield, which is radically different from the design of the heater of classic Zhiguli cars, which have a fan installed in the cabin. The unit is an electric motor with an impeller mounted on it, through which air is pumped into the cabin.
The heater motor on the VAZ 2108/09 is installed in a niche in the engine compartment in front of the windshield
Connection diagram
To make it easier to find possible faults with the fan, an installation diagram may sometimes be required, the main components of which are:
- fuse mounting block;
- egnition lock;
- additional resistor;
- fan motor;
- operating mode switch.
The heater motor connection diagram consists of a fuse mounting block, an ignition switch, an additional resistor, a fan motor, and an operating mode switch
Heater fan VAZ 2108/2109
Breakdowns of the stove motor, although not so often, still occur. If this unit fails, the quality of heating is significantly reduced. Depending on the nature of the problem, extraneous noise may appear that distracts the driver's attention. In this situation, repair or replacement of the device is required, for which it must be removed from the car.
Reasons for failure
There are several common reasons that lead to fan problems.
Fuse
One of the likely reasons leading to a malfunction of the motor may be a faulty fuse. The element is located in a mounting block installed in the engine compartment in front of the windshield on the left side. It is worth starting troubleshooting by checking this part. The fuse is marked F7 and has a rating of 30 A.
The stove fuse is located in the mounting block marked F7 and has a rating of 30 A
Poor contact
Over time, contacts may oxidize. The check is not difficult; to do this, just move the block with the harnesses. If the fan starts working during the diagnostic process, then the cause has been found. The malfunction can be eliminated by cleaning the problematic contact in the mounting block.
During oxidation, the contact is usually covered with a green or white coating.
Resistor
The operation of the electric motor may be impaired due to problems with the additional resistor. At maximum speeds, the motor is connected to the power circuit directly, and at the first two speeds - through a resistor. If problems arise with this particular element, the electric motor will only operate in maximum mode. To replace the part located on the left side of the stove body, simply unscrew the fasteners and install a new resistor.
Replacing the heater motor on a VAZ-2108-2109
The fan (motor) of the heater provides airflow to the car and increases the efficiency of the heater. If it malfunctions, the quality of interior heating deteriorates significantly. Extraneous sounds may appear that distract you from the road and are very annoying. The only way out is to repair or replace the failed unit. As a rule, car enthusiasts immediately go to a service station and shell out considerable sums for performing such work. For what? As a rule, changing the heater motor on a VAZ-2108-2109 is a matter of 30-40 minutes.
Basic faults
The first thing to do is figure out the reason. Start the car, switch the heater to different speed settings and listen to the sounds of the motor. If after turning on the blower no action occurs and no sound appears, then the fan simply does not work.
If the motor starts only at third speed, the cause of the malfunction may be the resistor installed in the switch (such a malfunction occurs quite often on VAZ cars).
Let's figure out what could be the reasons for the stove failure. There are several of them:
- The fuse has failed. The first thing you should do is check the integrity of the fuse that powers the heater fan. The cause of the device failure may be a small short circuit. Please note that one fuse link can power not only the motor, but also the clutter lighting, heated mirrors and other devices. Therefore, if the stove fails, check the functionality of other devices.
- Poor contact in the mounting block. This problem is common both in domestic cars and among foreign cars. The problem can be corrected by simply cleaning the contact group or pulling the contact.
- Ignition relay malfunction. The control device tends to stick. In this case, the heating system fan will turn on only when the engine is warm. If the malfunction manifests itself in this way, then it is advisable to immediately check the relay and, if necessary, install a new one.
- The airflow turns on only when you switch to third speed. Here you need to know the design of the device. The bottom line is that the first and second positions involve connecting additional resistance. At the third speed, switching occurs directly. Therefore, the fault can be eliminated by simply replacing the resistor.
- The switch is broken. Often the switch itself can be the cause of problems. To check it, you should use a regular 12-volt light bulb with wires soldered to it. Proceed in the following sequence:
— turn off the central part of the console to gain access to the switch (nothing should stop you from performing the check);
- start the car and connect one of the wires to the negative (car body). Use the second wire to alternately touch the output of the first, second and third speeds.
Now take stock. If the lamp lights up in all cases, then the switch is operational. If the light does not light, then move the wire to the “plus” of the switch. If the lamp does not light up here, we can conclude that there is a break in the motor circuits or a failed fuse;
- fan failure. If the switch is working properly (voltage is supplied) and the motor itself does not show any signs of “life”, then the cause of the problems may be the poor quality of the contact connection at the “minus”. The second option is to flood the motor brush.
Operating principle and causes of malfunction
Let's take a quick look at how the heating system generally works. To adjust the temperature, you open or close the tap of the heating device. After this, well-heated coolant begins to flow into the radiator, which is a source of heat (on a warm engine, the coolant temperature can be 90-95 degrees Celsius).
By switching the speed modes of the fan motor, you can set the speed of its operation. The volume of warm (cold) air entering the cabin directly depends on this. It all depends on the position of the tap - whether it is open or closed. In the future, using panel dampers, you can regulate the air supply and direct it throughout the cabin - to the windshield, legs and into the cabin, and so on.
Features of replacing the stove on a VAZ-2108-2109
So, if strong squeaks, squeals or complete failure of the fan appears, it needs to be replaced. This is done in the following sequence:
- Prepare the necessary tools - a 10mm socket, a Phillips screwdriver and a handle with a ratchet.
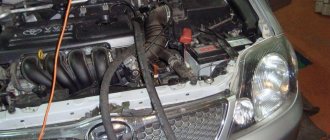
- Open the hood of the car and unscrew the five screws that secure the plastic trim to the windshield. Remove it completely and set it aside.
- Pull out the hood seal (it will also interfere with operation).
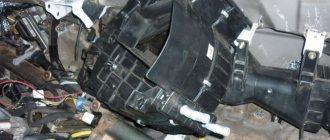
- Pull out the protective casing, behind which the fan motor itself is located.
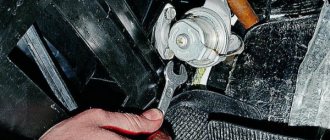
- Unscrew the two mounting bolts that secure the motor to the car body.
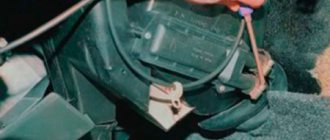
- Get into the passenger compartment and under the instrument panel on the driver's side, find the positive fan wire and discard it. Here you will find the “minus”, which is fixed with a nut - unscrew it using a ratchet handle and a suitable socket on “10”. There is no other way to turn off the voltage from the motor, because the power wires are directly soldered to the device.
- Remove the engine (to do this you will have to twist it a little to choose the optimal position).
- Make repairs if possible. If you don’t have the time and the necessary knowledge, just replace it.
- Install a new motor and return all parts in reverse order.
Conclusion
Thus, if the stove motor fails or unnecessary sounds appear, you should not endure and freeze - take some personal time, carry out a small diagnosis of the malfunction and fix the problem by repair or replacement. Good luck.
Internal structure and principle of operation
The heating system installed on the VAZ-2109 has its own differences and features compared to other cars in the AvtoVAZ line.
The heater consists of a pair of plastic casings (on the right and on the left), which are connected to each other along the entire perimeter with clamping brackets. A special flagellum is placed in the grooves of the casings to seal it well. The fan supplies air flow to the interior of the machine. The VAZ-2109 stove is designed so that the fan can be easily removed independently from the engine compartment.
An electric motor of type 45.37230 is attached to the casing, and a fan is located on its shaft. To obtain its desired rotation speed, additional resistance was provided. It was attached to the left side of the hole in the heater casing using a screw.
Heating system radiator
A radiator is built into the stove body to heat the air flows, which then blow into the cabin. Using three screws, this element of the system is screwed to the right casing and sealed with a polyurethane foam gasket.
The radiator design is a combination of:
- 2 rows of tubes.
- 2 rows of cooling plates.
- 2 plastic tanks.
It has two pairs of pipes, it is connected to the cooling system by rubber pipes, where coolant circulation is ensured using a pump. In the valve casing, on the axis of the supply line, there is a plate valve, which has a hole; it allows the coolant to pass through. The valve lever is connected by a rod to the handle lever, which also controls the process of heating the air flow. If you turn this lever, the hole in the valve will open the line for coolant to enter the radiator.
To ensure uniform heating of the car interior, the stove has two central nozzles, as well as left and right, to which air ducts are connected.
Exhaust ventilation
The car is equipped with exhaust ventilation, which circulates air from the interior to the street. It is located behind the body openings for the side windows.
Air also passes out through the deflectors when the car moves. The ventilation process is carried out due to the vacuum that occurs at the deflectors during movement. Air is sucked out from the rear of the cabin under the deflector trim; for this purpose, the rubber valves are pressed out and the air flow goes out through the deflector hole to the street.
Rubber valves are needed to prevent outside air from entering the car interior.
Repair
The procedure is performed after draining the antifreeze, in this order:
- from the interior side, disconnect 2 tubes leading to the faucet (you will need to loosen the fixing clamps);
- the remaining two are turned off in the engine compartment;
- unscrew the nuts on the faucet itself (from the bottom) and remove it (from the front);
- the rod is dismantled (you will need to disconnect the holder);
- the protective housing of the gearshift lever is removed;
- unscrew the screw in the gearbox tunnel and remove the floor covering;
- the ventilation hose is disconnected from the heater;
- the wires supplying them are removed from the resistor and the stove motor;
- To the right of the heater there are nuts securing it - they are unscrewed and the device itself is dismantled along with the control panel.
A faulty heater should be sent to a service center for repairs, since attempts to repair it on your own will most likely lead to undesirable consequences.
Electrical component of the stove
Below is an electrical diagram for turning on the fan. For it to work, you need a temperature sensor, which is located in the radiator. When the coolant reaches a certain temperature, the sensor gives a signal and the fan turns on automatically.
- Mounting block.
- Ignition.
- Additional resistance (resistor).
- Motor.
- Button that controls the motor.
A – to the terminal with a plus sign “30” of the generator.
Some cars still have an old mounting block installed, in which case the fan is turned on via a relay.
Heating system elements
The stove diagram clearly shows the location of its main functional elements. It should be noted that the design of the stove on the VAZ-2108, 2109 and 21099 models is the same. Many car owners know that the heater in these models is not fully developed. As a result, the interior is not heated properly, so a decision is made to modify the stove with your own hands. Just in this case, it is important to know the design of the heater so as not to confuse anything.
The design of the stove of the VAZ-2109 car, whether it is a high panel or a low one, is absolutely identical. Therefore, the information presented will be useful to owners of this model with any instrument console.
Knowing the main points and what is located where, you can already try to independently deal with the problems that arise and fix the malfunctions that appear, while saving money and time on trips to the service station.
The VAZ 2108 stove fan, like other important parts, is the key to the car’s heating system. Like any other system, this one has its own nuances and can suddenly break down. The solution to some popular problems, even those related to replacing the product, can be found below in the article.
Design of the VAZ-21099 heater
And then everything is simple: the created flow passes through the radiator honeycombs, where heat exchange occurs, as a result, heat is transferred to the air, which then blows into the required zones through the air ducts.
The design of the VAZ-21099 stove includes several main components:
- stove body made of plastic;
- heating system radiator (connected to the cooling system);
- electric fan;
- air ducts;
- heater control mechanism.
This car used heaters of two modifications (old and new), which were slightly different in design, but their components were completely identical.
Housing, radiator, dampers
Thanks to the housing, the required redirection of heating is ensured, since the movement created by the fan motor is immediately fed into it, rather than being dissipated. The body of the VAZ 2109 stove itself consists of two halves, connected to each other with special brackets. To reduce flow losses, a seal is placed between its halves. Partitions are made inside both halves, which provide the correct direction.
There is also a niche inside this case into which the radiator is installed. Initially, the radiator was made of brass, but now it is almost always made of aluminum. The design of the stove radiator 2109 is identical to the main one (consists of two tanks, tubes through which coolant circulates, and plates that form honeycombs), but is significantly smaller in size.
Video: The stove in the VAZ 2108, 2109, 21099, 2110, 2111, 2112, 2113, 2114, 2115 HEATS poorly
Operating principle of the stove
- The liquid is heated to a certain temperature and enters the radiator of the VAZ 2108 stove.
- To ensure constant circulation, rubber tubes are installed between it and the liquid cooling system, fixed for better fastening with clamps.
- Warm air enters the car interior through several openings. The heater motor with its own fan is designed to distribute air evenly.
- The air flows directly to the feet of the driver and passengers, and also exits to the panel. The heat flow is then delayed by the dampers, and therefore the air is cooled. Thus, cool air is supplied to the windshield.
If the operation of the furnace is not satisfactory, it can be modernized. This is done by installing fiberglass.
The action goes like this:
- It is necessary to disassemble the stove, wash all parts and begin assembly. This action can also be used to visually inspect parts for damage. For example, the casing ear often breaks.
- After this, you need to glue all the flaps and fill the seams with sealant. Glue the casing and wait a while until the sealant is stable.
- Assemble the “insides” of the heating system and cover it with fiberglass. Thanks to this, the temperature will increase to 10 degrees.
Replacing the Radiator Heater VAZ 2108 Low Panel
If during a routine inspection of a tank with coolant VAZ 2108 2109 21099 you saw that it became smaller, increased to its usual level, and after a few days the level dropped again. This means that there are some leaks in the cooling system. It is sought through a visual inspection: the attachment points of the hoses, clamps, and the absence of cracks in the hoses are checked. If during the inspection you find that coolant is entering the passenger compartment, this indicates that VAZ 2108 2109 21099 is leaking from the heater radiator. With this malfunction, you begin to drip antifreeze onto the accelerator pedal and connect with it on the driver’s shoes. Antifreeze. corrosive liquid, so you can ruin good shoes. In addition, the antifreeze itself costs money; a liter tube of antifreeze costs about 5. Therefore, since antifreeze begins to leak from the radiators of the VAZ 2109, you need to look for this leak and fix it. What do you need: a replacement heating radiator (stove) for a VAZ 2109 . But it is not easy to approach him. Our client is still in control of the vehicle, saying he needs to disassemble the entire front panel. Of course, without this it will be even more convenient to change the radiator, but it will take you about 3 hours, we are not talking about reassembly. Therefore, the method for replacing the VAZ 2108 2109 21099 heater radiator without removing the front panel is given below. But first you need to drain all the antifreeze from the engine cooling system. Only a VAZ 2109 filled into the cooling system circulates about 8 liters. antifreeze, so prepare tanks where you will pour it in advance. Wear rubber gloves because it is best not to touch antifreeze with bare hands. It will also be useful to have a couple of liters. , because perhaps a little, however, it will shed. Open the coolant reservoir cap and find the cap at the bottom of the radiator.
READ Nissan X Trail Battery Replacement
VAZ 2109, radiator drain plug
Prepare a hose about a meter long and a centimeter across. Insert one end into antifreeze. Remove the radiator cap and push the 2 ends of the hose to the radiator outlet. In a VAZ 2108 2109, the radiator 21099 usually holds about 2 liters. antifreeze. When the antifreeze does not leak out, unscrew the plug. Now you need to drain the antifreeze from the small cooling circuit. The engine has a special limiter for discharging antifreeze. This is the vehicle's lowest cooling point.
Drain plug VAZ 2109 for the cooling system
Prepare several plastic bottles (preferably 5 liters), cut off their necks to make it easier to drain the antifreeze. Open the heater mixer in the cab (closed in the picture) to allow all the antifreeze to flow out of the radiator.
Open the VAZ 2109 heated radiator mixer
Unscrew the plug with a 17 key and again press the hose to the drain hole in the engine. Waiting for all the antifreeze to come into contact with the small cooling circuit. Then insert the plug into the area.
Now you need to remove and loosen the clamps on the heater radiator. Unless, of course, you are a very thin person, remove the passenger seat. There will be more than just maneuvers. If you don't want to take photos, move them as far back as possible. We rise to the place where the heater radiator is attached to the hoses of the heating metering system.
READ Replacement of VAZ 2106 Gearbox Seal
VAZ repair. Plate VAZ 08-099 How to remove the plate assembly.
VAZ 2109 radiator clamp heater
Loosen the clamps and remove the hoses from the radiator. Be prepared for some more antifreeze to pop, so keep a container nearby. Congratulations, the antifreeze has been drained.
We are currently working on replacing VAZ 2108 2109 21099 with a plate. Unscrew the screws to secure the front panel.
Loosen the screws to secure the VAZ 2109 dashboard
We open the glove compartment, take it out, our client remains, and unscrew the screw on the back wall.
Disconnect the self-tapping screw in the VAZ 2109 glove
And unscrew the fastening screw on the panel near the mirror on the passenger side.
Unscrew the screw near the VAZ 2109 mirror
The passenger side dash now moves up and down. Now you need to move the block (about 7 cm thick) between the panel and the frame of the VAZ 2108 2109 21099. Also take several centimeter wide boards if the rod is not thick enough.
Replacing the VAZ 2109 heater radiator without removing the panel. car repair.
READ Replacing the Front Right Brake Tube VAZ 2109
Flexible rods
Next, remove the three screws that secure the cooktop and try to slowly remove it. To do this, it is better for our client to lie down on the passenger mat. If the slab is on a panel, install an additional slab. So, you took out the oven. Of course, everything will be sticky and wet from freezing. Birch and pine needles will also be glued here.
VAZ 2109 heater radiator
Take a rag and clean the area where the stove may come from. We take the last plate, glue it down using the rubber pad that comes with the kit, and set it in place. Screw in and connect the hoses. Then we remove the strips and fix the panel. A new VAZ 2108 2109 21099 plate was installed, but now you need to pour antifreeze into the system. After filling the antifreeze to the correct level, make sure there are no leaks, and then start the engine. After a couple of minutes of its operation, it is clear that the antifreeze level has dropped. This is normal, the water pump has compressed the air. Top up to the required level. And here is the finale, your VAZ 2108 2109 21099 is now equipped with the latest plate.
Source
Typical faults
As with any mechanism, problems can occur in the heating system (video author - Andrey Kuzemsky).
If the VAZ 2108 heater motor is broken, you can understand this by comparing some symptoms:
- If the motor does not work when switching operating modes, the cause of the breakdown may be hidden in the resistor. When repairing, you need to replace the resistor with a new one, because it cannot be repaired.
- If the fuse is blown, you need to check the insulation of the armature located on ground. There may be a short circuit.
- If, when switching modes, the VAZ 2108 heater fan rotates at the same speed, this may be a consequence of contamination or oxidation of the collector. In case of repair, it is worth cleaning the collector and, if nothing has changed and the fan continues to act up, you can replace the bearings.
If the VAZ 2108 stove motor does not even show signs of life, then the reason is not in its design, but in a broken circuit. To find out if this is true, you can use a voltmeter.
DIY repair
To carry out repairs yourself, you need to use the following tools:
- a Phillips head screwdriver;
- 10mm wrench.
When dismantling, you need to remove the plastic trim, which is located on the outside of the windshield. To remove it, you need to open the hood and remove the 5 bolts that secure the trim to the body. Remove the rubber seal from the engine compartment and pry the casing with a screwdriver to get to the motor and oven fan. Now you can remove the motor. It is attached to the body of the VAZ 2108 with two bolts.
When the clamps are disconnected, you can turn off the power and disconnect the positive wire of the furnace under the dashboard. The negative one is attached over a special thread and pressed down with a special nut. You need to unscrew the nut by touch and fold back the negative wire. By disconnecting the wires, you can remove the motor and install a new fan. The entire structure is assembled in reverse order.
It is important to note that breakdowns associated with the stove also depend on which panel is installed on the VAZ - low or high. Both have their downsides. For example, on a high one the central flap does not open completely. It is she who is responsible for supplying cold and hot air to the car interior. To solve this, you need to adjust the damper. And to get to it you need to disassemble the dashboard.
If we talk about the low panel, this is where the thermostat often breaks. Of course, if it wears out, the oven will not work. It is recommended to change it every two or three years. And if replacement does not solve the problems, it is worth replacing the hoses that connect the stove and radiator.
Photo gallery “Stove removal and repairs”
In the photos provided below you can see in more detail how the furnace repair scheme occurs.
Replacement instructions
In most cases, the reason lies precisely in the radiator device, so below we will talk about how to replace the VAZ 2109 heater radiator.
How to change the unit on cars with a high or low panel, read on:
- The device itself is located at the passenger’s feet, under the glove compartment. The replacement procedure will be identical for cars with a high and low panel, only in the first case you will have to remove the passenger seat. After removing the chair, you can see the screws on the right that secure the panel; they need to be unscrewed. The panel itself needs to be slightly pulled towards itself; insert some kind of spacer, for example, a wooden beam, into the gap that appears.
- Fully tighten the tap, and place a rag under possible coolant leaks.
- Then open the engine compartment and unscrew the cap on the radiator unit. The last unit is located between the glove box, as well as the lower shelf below it. The steps you need to follow next must be completed as quickly as possible, otherwise the coolant may spill. The lines that come from the radiator device must be closed; this will require plugs. Reach your hand through the detached center console, disconnect the lower line and plug the hole with a plug as quickly as possible.
- Repeat similar steps with the upper hose.
- The radiator is removed after all consumables have been drained. A new device is being installed.