The multi-steering wheel is an additional option that allows you to control various functions remotely using buttons on the spokes. Depending on the configuration, this can be a head unit, radio, cruise control, smartphone (speakerphone) or any connected equipment. Premium cars are equipped with a multifunction steering wheel at the factory; for others, this option is offered at dealerships. You can make a full-fledged multi-function steering wheel from a standard steering wheel yourself by selecting the necessary set of service buttons for a specific model and an adapter.
Why do you need a multifunction steering wheel?
Control buttons on the steering wheel spokes provide the driver with better control over the road - to switch modes while driving, there is no need to be distracted by the touch display of a multimedia device or standard keys of other devices. At the same time, both hands are constantly on the steering wheel, which plays an important role for safety. In cars with automatic transmission, gear shifting can also be displayed on the multifunction steering wheel. Functional buttons are located on the right and left spokes - to issue any command, just use your thumb.
An example of the layout and purpose of buttons on the left spoke of the multi steering wheel
- Manual mode of automatic transmission - downshift.
- Turn up the volume.
- Search for a radio station back.
- Decrease volume.
- Smartphone (speakerphone).
- Search for a radio station ahead.
- Connecting a microphone, controlling audio system speakers.
An example of the layout and purpose of buttons on the right spoke of the multi steering wheel
- Manual mode of automatic transmission - overdrive.
- Enabling the menu of the head unit (radio, on-board computer).
- Selecting items from the menu.
- Closing the menu.
- Turn off the head unit.
- Selecting a section in the menu.
- Exit/back.
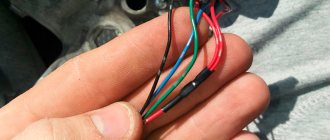
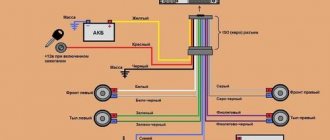
Diagram of contact wires by colors and functions from Nissan X-trail owners
- The blue and purple wires are responsible for adjusting the increase in volume level and switching music tracks or radio stations.
- Orange and green wire - switching stations and tracks. Decrease volume.
- Gray and black - a lot.
- The red wire is voltage.
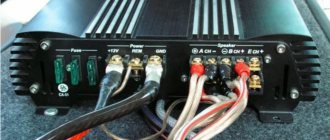
Having achieved the operation of all the buttons on the control wheel, we move on to synchronizing the steering wheel buttons with a non-standard device through an adapter specially purchased for this purpose.
In this case, all operations are performed according to the instructions supplied by the manufacturer, which are completely true.
After completion of the work, a full check of all functions of the radio control from the steering wheel is carried out.
What is needed to connect the multifunction steering wheel to an aftermarket radio?
Steering wheel tuning involves installing ready-made sets of service buttons for a specific car brand - in this case, connecting functions is simple: each set comes with an adapter that is compatible with the main electrical equipment. Non-standard solutions require a special device with a programmer and compliance with the “pinout” of connectors.
Adapter
The adapter type ACV SWI-1 is universal, capable of programming multifunction steering wheel functions and combining any non-standard radio according to a standard scheme. To install it in the control circuit, you will need another ICO adapter.
Attention! Before installation, disconnect the battery by removing the minus terminal.
CarWebGuru
The application's statistics are very good: more than 100 thousand downloads and an overall rating of 4.3 points. The launcher allows you to set your own workspace design, keep track of mileage statistics, use a navigator and music player.
To change the buttons displayed on the screen, tap one of them.
After this, a list will open from which you can select a replacement button. It is worth noting that the functionality of the application is quite large.
The transition to advanced settings is carried out by pressing the button in the form of a “gear”. A page opens where you can specify the name of the car, its model and year of manufacture.
Choosing a car brand
An interesting feature of the launcher is the “Statistics” section. It is possible to view the total mileage, maximum speed, total driving time and the best acceleration time to 100 and 60 km/h.
Music is launched directly from the main menu. It is possible to use various players, or load songs directly from the device directory. To do this, press the pause button, then select the folder in which the desired songs are located.
Selecting a folder with music
In general, this launcher deserves an honorable place in this top. It has a number of flexible settings, the ability to display speed and listen to music.
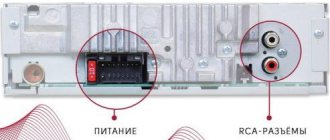
Connection methods
- If the radio comes with a remote control (remote control), then the connection can be made through the minijack connector, activating the multifunction buttons and supplying power using two wires from the device directly: brown and red-blue.
The 3.5 minijack connector is connected to the remote control into a standard socket. - To connect via the CAN bus, the programmable adapter is connected to the radio via an ICO adapter and output to the multifunction steering wheel.
Programming a universal IR remote control for a car radio
Car enthusiasts are well aware of the problems with controlling (turning on, turning off) an audio device in a car.
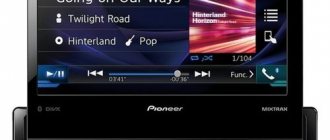
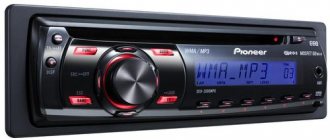
You have to simultaneously keep an eye on the road and look for your favorite tune. This problem is easily solved using a universal wireless IR remote control for the car radio. For example, the Pioneer DVD remote control is ideal for any car radio model. The main thing is that they support remote control.
Such equipment is easy to install on the steering wheel and even easier to configure. It is compatible with radios of almost all well-known brands. To program the IR remote control, you must have the original remote control for your radio model.
Using the remote control mounted on the steering wheel, it is easy and convenient to control all functions of the car radio. Using the standard remote control of your media device, you can learn (that is, copy commands) to the remote control, which is mounted on the steering wheel. The device is capable of receiving and remembering up to 10 commands. The main keys are located on the front panel, and the sound adjustment keys are located on the rear panel. If you need to leave the car, the remote control can be easily removed thanks to special fasteners. The fasteners themselves remain on the steering wheel.
Programming instructions:
- Turn on the learning mode of the remote control by pressing SET. Hold the button until the indicator light comes on.
- Press the key selected for programming on the remote control (the diode will blink).
- Place the native remote control and, for example, a learning remote control for a Pioneer radio opposite each other (no further than 0.5-2 cm) and combine the IR rays, press (and hold) the key selected for programming on the native remote control.
- The indicator will start flashing, and when it turns solid, programming is complete. To remember the command on the learning remote, press SET.
- Perform the same actions for other keys.
- Stop training mode by pressing the SET key once.
Thanks to two powerful multi-directional IR LEDs, a wide range of operation of the remote control is provided. By installing such a device on the steering wheel of your car, you can control the car radio while on the go with one easy movement of your finger.
Source
Step-by-step instruction
- Connect the radio and check its operation manually.
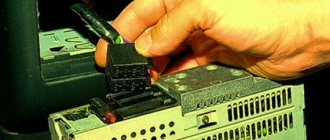
- Connect the multi-steering wheel harness block according to the diagram:
- adapter output “STRG SWA” – blue wire
- adapter output “STRG SWB” – green wire
- black wire “STRG GND” – fasten to ground (to any metal part of the car body)
- Connect the programmer adapter to the radio via the second ICO adapter.
After connection, the adapter enters programming mode:
- As soon as the negative terminal on the battery is secured, power is supplied to the adapter - the LED indicator should blink once.
- On the multifunction steering wheel, fix the volume up button in the maximum position and hold it until the LED indicator turns on.
- Also turn up the volume on the remote control and wait until the LED goes out - the devices have synchronized.
- We activate all service buttons according to the same principle: first on the steering wheel, then similar ones on the remote control of the radio.
Connection errors
Typical malfunctions in the operation of multifunction steering wheel buttons occur for the following reasons:
- Incorrect pinout of connections - connect according to the diagram.
- The contact on any connector is broken, or a wire break has occurred: if you cannot visually find a break, then you need to “ring” sections of the wires with a multimeter in ohmmeter mode and check the connections at the terminals.
- One of the functions of the button does not work - the activation was not complete: reset the multifunction steering wheel settings by disconnecting the adapter, and reprogram the system again.
- Spontaneous failure of operation - short circuit (fuse has blown): replace the fuse in the block, check the connectors for moisture, dirt, inspect the fastening of the ground wire.
During installation, you should take into account the standard connectors of a particular radio - connection diagrams may differ: in such cases, you should adhere to the technical description of the multimedia device.
- Connecting a car radio with your own hands
Even today, in a top-spec car, you can see a boring head unit with a minimal set of functions.
It is quite logical that many car owners, immediately after purchasing a new car, replace the factory radio with advanced infotainment systems running on the popular Android operating system.
There are usually no issues with the installation of such 2-din systems, since they fit neatly into a standard mounting location and are connected according to a standard scheme, but not everyone can handle setting up the controls.
This article is intended to help you understand the designation of the Android radio buttons and their correct configuration for easy use.
Rear View Camera
There is no need to talk about the usefulness of this equipment. The rear view camera is an invaluable assistant for novice car enthusiasts who, as a rule, experience difficulties when performing parking actions.
Depending on the type (location and method) of installation, there are several types of rear view cameras:
- Standard installed cameras. In places strictly specified by the car manufacturer;
- Universal devices. The location is chosen by the driver himself;
- Wired;
- Wireless rear view cameras.
As an example, we use a universal wired camera and a Chinese 2 din radio.
Select the installation location. License plate frame, luggage compartment handle, etc. It is not recommended to place a camera inside the rear window.
We lay the cable connecting the camera and the GO. A five-meter long wire is included with the device.
Connect the camera to power. Any of the reversing lights acts as a source. Be sure to use a fuse in this circuit.
We connect the camera to the player via a tulip (connector). A separate exit is provided for this. If it is absent, the device is connected via the “video” input.
We adjust the picture and camera location.
Multifunctional steering wheel
This name means connecting a Chinese radio to the steering wheel of a car. That is, it is possible to control the standard player directly from the steering wheel.
To make this connection you will need:
- Steering wheel with built-in control buttons or a niche for their placement;
- Car radio;
- Two ISO adapters;
- Adapter devices for the antenna and combining the steering wheel buttons with the radio.
Let’s say right away that the process of connecting a multimedia system and adapting it with a multifunction steering wheel is not a complicated process, but it is painstaking and requires certain skills. This is explained by the fact that very often the pinouts of such connections between the car radio and the steering wheel do not match, although they are specified in the instructions. And therefore, we advise, if possible, to contact a specialized center that deals with this type of installation.
Source
How to translate button labels on an Android car radio
On many head units running on the Android OS, there are several physical or touch buttons and “twists” on the front panel and display.
The most common controls are those with the following designations:
- VOL - “twist” volume control, it is also a button to turn the device on/off (press and hold);
- TUNE - “twist” for switching radio channels, pressing the button opens the equalizer menu;
- SRC - switch to the main menu;
- HOME or “house” icon - return to the main screen;
- GPS - GPS navigation (an additional remote module is required to communicate with the satellite);
- BT - turn on/off Bluetooth mode (used to control Hands-free hands-free communication);
- DVD — switch to disc playback mode;
- MUTE - button to completely mute the sound;
- NAVI — switch to navigator mode;
- BAND — button to turn on the “Radio” mode, also used to switch radio frequencies;
- RST - button to completely reset current settings;
- Eject - CD eject button.
The buttons located on the front panel of the Android radio can be reconfigured (reassigned) independently, giving them new functions. This is not difficult to do.
Car Launcher AGAMA
The application received a good rating on Google Play: as many as 4.2 points out of five possible. The add-on does not take up much space on the device and has several types of settings.
The main screen displays buttons responsible for launching: radio, navigator, music, phone, Internet and applications. It is also possible to activate voice search from Google. This mode will allow you not to take your hands off the steering wheel while driving.
Unfortunately, in the free version of the application you cannot install another theme, but only the existing one. To do this, click on the “gear” icon and go to the “ Theme Editor ” tab.
A panel appears at the top of the display where you can select the work block style (2D, 3D) and color. To save the changes, click the “ Apply ” button, and to return to the original design, click “ Reset ”.
Selecting a workspace style
If you want to change the make of your car, go to settings, then to the “ Your car ” section. A list will open with all car brands, which can be scrolled through by swiping across the screen.
Choosing a car brand
Before listening to music, let's install the player. This is done by long pressing on the interactive block “ Music Player ”. All applications installed on the device appear on the display, from which you need to select a music player.
Selecting a music player
If you allow the radio to access GPS, it is possible to display the air temperature on the operating panel. It is difficult to say how accurate this data will be, but since such a function exists, then this is a plus.
Settings section
Other settings include the ability to adjust brightness, interface animation, units of speed and distance. This launcher is perfect for lovers of simplicity and comfort.
How to set up steering wheel buttons on an Android radio
Setting up the steering wheel buttons on the Android radio is done in the following sequence:
- On the device desktop, go to the “Buttons on the steering wheel” tab;
- Press the “Reset” button so that all factory settings, if any, are reset;
- Then press the volume up button on the steering wheel. Two columns should appear on the screen: “Action on a short press” and “Action on a long press.” In the menu of the first column, select the corresponding item (symbol of the speaker and the “+” icon) and press the “OK” button to accept the action;
- Press the volume down button on the steering wheel, select the appropriate action for it in the left column, accept the settings by pressing the “Ok” button;
- Next, press the track switch button on the steering wheel (>>|) and program it so that when pressed briefly, it switches a musical composition or radio station, and when pressed long, it starts searching for a radio station (select SEEKUP in the right column). Click the “OK” button. We carry out similar actions for the button (|<<);
- Press the MODE button on the steering wheel (switching functions - FM, AUX, SD, USB), select a similar action for it in the left column of the menu on the radio screen. Click OK.
- Click the “Save” button. Ready!
TOP 5 car radio control panels from Aliexpress
We present a selection dedicated to music in the car . When traveling, you want to listen to good music, but you have to switch it often, flipping through the playlist.
Car manufacturers are trying to stuff vehicles with the smartest electronics. So, for example, they install standard radios, which can also be controlled on the steering wheel , which has built-in switch buttons. But there are also cars in which they listen to music the old fashioned way, clicking on the “cassette recorder.”
Car owners have to buy a special gadget themselves - a car radio remote control . These incredibly useful devices will be discussed in our new “five” from Aliexpress.
We advise you to try this remote control in action! After all, nothing should distract the driver from the road.