Connecting a radio in a VAZ 2110 car is not difficult. This process has its own rules, knowing which you can cope with the work quickly and easily. Failure to comply with them is fraught with unpleasant consequences. The device will not function correctly. Mistakes made while connecting the radio can lead to rapid battery drain. This unpleasant phenomenon will cause a lot of trouble for the vehicle owner.
As a rule, standard radios only work when the ignition is on. This version of the device differs in that this condition may not be met. This way you can use it even with the ignition off, which is very convenient.
Radio tape recorder in VAZ 2110
The head unit is connected in different ways. There are quite simple ones and more complex ones. Depending on your abilities, you can choose the one that is most optimal.
The main thing is to follow all installation rules and do the job efficiently.
Choosing the right connector
The head unit has several connectors. And this is not surprising. It is multifunctional and performs different tasks. Each hole serves a different purpose. Before you begin installing the equipment, it is important to determine which connector is needed for this.
They come in two types: simple and international standard or ISO. Each of these connectors can be used to connect a VAZ 2110 radio. But the process is different. If we talk about a simple option, then it is worth using the ISO hole. To replace a standard device with a new one using it, just change the plug.
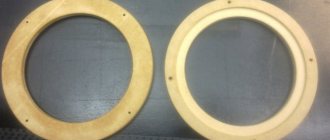
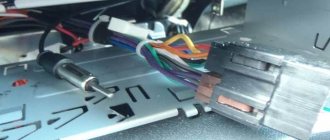
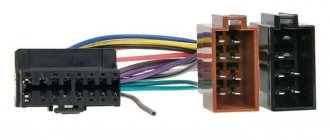
Car and radio ISO pads
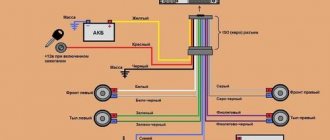
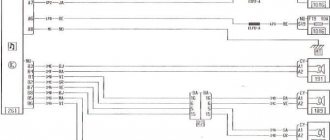
As for other connectors, they are individual. Therefore, working with them will be more difficult. In this case, you will need to additionally purchase an ISO adapter or cut the wiring. In this case, a special circuit is used, which is shown in the photo below.
Radio connection diagram
As practice shows, specialists rarely practice the second option. And this is not surprising. After all, it requires the use of additional elements. For example, heat-shrinkable cambric. In addition, the entire procedure must be performed with extreme caution and in compliance with safety precautions.
How to install
Sequence of actions when installing the radio:
- Remove the cover located under the trip computer and clock.
- Insert the standard metal radio shaft into the rectangular window, which is secured by bending the triangular tabs.
- Connect the power and antenna connectors to the head unit directly or through adapters.
- Install the housing into the mounting channel until the latches engage.
- Check the correct functioning of the equipment and install a decorative plastic frame.
We carry out plus
The positive wire is an important component of the process of connecting the radio to the car. Its installation must be done correctly. It is better to take a wire equipped with an additional fuse for these purposes. However, its size should not be smaller than the connector itself. There are cases when such a wire is installed from the cigarette lighter. This option should not be practiced. It is only suitable for cases where no other installation option can be used.
Connecting a car radio
This wire can be connected according to the following principle:
- Connection wire black;
- Yellow is sent to the battery. This will allow you to get the nutrition you need;
- The red one is connected to the ignition switch. This will ensure the radio works;
- Blue is responsible for the antenna and is intended for connecting it;
- Diodes required. They can be of any type.
Connecting a radio: an easy way
Connecting the VAZ 2110 radio consists of performing several simple steps. They are interrelated and must be carried out sequentially. If everything is done correctly, the device will function efficiently and reliably.
The first thing you need to start with is to submit the positives. We are talking about the red and yellow wire. At the same time, it is worth knowing which of them is responsible for what. So, red controls turning off the device, and yellow controls its memory power.
Radio wires
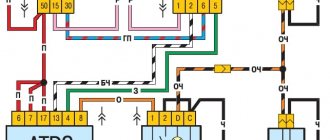
It is normal for the radio to turn off completely when the ignition is turned off. To ensure this, the red wire must be connected correctly. It must go through the lock. The VAZ 2110 car has its own characteristics. The main one is that there is no need to pull the wire to the lock. It can be attached to the pads, or rather to their fifth contact.
This connection has both pros and cons. The disadvantages include the fact that in order to listen to music, you need to keep the key in the ignition. This is very inconvenient if the driver gets out and the passengers remain in the car. Otherwise, the radio will stop working. In addition, keeping the ignition on constantly increases the vehicle's energy consumption.
What is suitable from Priora for VAZ 2110
Continuity of parts from dozens to Priora
AlexMAE
: The question is generally simple, is it possible to move my tuning parts from 2111 to Priora? The list is as follows: 1. As far as I understand, the SS20 shock absorbers in the rear are the same, but in the front, what's the difference? 2. Front strut support 2110 MASTER 3. Rear brake drum Pilenga4. Vacuum brake booster sport 2110 10-inch Lucas (from a 2-liter Shnivy) 5. Ventilated brake disc R14 Brembo MAX with caliper and pads6. Checkpoint7. Body reinforcement 2111, 21128. Front panel reinforcement (steering rack) 2110
dydezzz
: the vacuum seal on the Priora is already a “tuning” strut, according to my information, they are interchangeable but only as an assembly. If the Priora is a barn, then the amplifier should fit, everything else is most likely no different.
admin
: Well, basically dydezzz answered the question, and therefore I’m just specifying something. The front shock absorbers of the Priora have a larger (than other VAZ shock absorbers) recess on the rod, which goes into the support. Thus, no other shock absorber can be secured in the Priora support - there is stupidly nothing to tighten the nut on - NOTHING sticks out from the support body. THOSE. -if we want to install NON-PRIOR shock absorbers on the PRIOR, we also change the support. Shock absorbers 2110 - support 2110. With the rear shock absorbers, as dydezzz already wrote, there are no problems. The rear drums and brake discs with calipers, just like the gearbox, are completely interchangeable (in stock they are absolutely identical in both Desiatyna and Prior). With a ten-inch VU, we get from Priora exactly the same gimmicks as in the tenth family - we need to heat and bend the plastic of the radiator and frill, and also do some magic on the VU tank. Is the extra inch of useful membrane area worth it? Well, everyone decides for themselves. What are the goals? What tasks? What are the requirements. The amplifier of the VAZ 2110 shield fits the Priora with a bang, but... unless the car has power steering (not to be confused with electric power steering). If the Priora has a hydraulic booster, then it is possible to install only the eighth amplifier of the front panel on its rack (to install the amplifier tab 2110, you will have to work hard. And even then, the result is not guaranteed - the tab can only be installed by turning it upside down, and there are no holes there , no free space) The body amplifier is installed in exactly the same accordance as in the tenth family - 2110 for a regular Priora, 2111-2112 for a Priora hatchback and a Priora sedan. Briefly speaking. NOTHING HAS CHANGED MUCH. Except that the Priora has its own stretch. And additional support for it has not yet been invented. I.S.
AlexMAE
: So let's summarize ;D1. Shock absorbers assembly SS20 rear - fit without problems2. Front strut support 2110 MASTER only together with shock absorbers assembly oil SS-20 front 2110 - no problem 3. Rear brake drum Pilenga - no problem 4. Ventilated brake disc R14 Brembo MAX with caliper and pads - no problem 5. Checkpoint - no problem6. Body reinforcement 2111, 2112 - no problem7. Front panel amplifier (steering rack) 2110 — so it was installed upside down because it didn’t fit due to VUT, I think it can be installed, but you’ll have to tinker ; D8. Vacuum brake booster sport 2110 10-inch Lucas (from a 2-liter Shnivy) - there was a problem with installation on the 2110, I had to edit the plastic a little and make a dent in the hood under the VUT reservoir cap. Also because of it there was a problem with installing the amplifier of the front panel, the front extension - it was just installed from the Priora.
Then the question is: how much do they differ: a. Staff VUT Priora.b. VUT Vishnyakova.v. 10-inch Lucas (from a 2-liter Shnivy). There really are a lot of problems with installation and I’m ready to leave the 10-inch in the current car, and for example put a Vishnyakov on a Priora, or maybe I can even leave the factory one?
dydezzz
: according to my data, the Priorovsky VUT differs from the 10th (+1 inch?; the brake pedal is clearly softer than on my barn), personally, I wouldn’t go there unless necessary.
The hard way
Even though the second method is more complicated, it is more correct. Therefore, it is better to choose it for connecting a radio. It consists of connecting the red wire to a button that is previously hung. It is of a standard type and has two positions: on and off.
This connection option will ensure constant operation of the device. If you need to park for a long time, then to turn off the radio, just put the button in the appropriate position. Thus, it will be disconnected from the current supply.
This button can have two switches: constant plus and after ignition. This will allow it to be used in unforeseen situations. When the button is in the on position, the constant plus from the battery will work. Otherwise from the ignition.
Installing a radio
You can also connect the radio using the wiring responsible for the alarm. This scheme is standard for the VAZ 2110 car. It involves supplying a plus and disconnecting from the alarm at the automatic level. In this case, it is worth paying attention to which solenoid is installed in the car. If it is two-wire, then the radio will work according to this principle. It will automatically connect to power when the door is opened.
Since this scheme involves the use of an additional relay, energy consumption will be increased. After all, they will both be constantly in working order. This is an important disadvantage that must be taken into account. You can see how to connect the radio in a VAZ 2110 car in the video below. The whole process is clearly shown here.
VAZ-2110 or VAZ Priora - detailed comparison of characteristics, cost of service and maintenance
VAZ-2110 is a middle-class passenger car produced by a Russian automobile company. The car debuted in 1995 as the successor to the famous Samara, although it was produced until 2015. The car appeared on the domestic market as the VAZ 2110, and only after 2004 was introduced in Russia as the Lada 110.
The Russian sedan Lada Priora (2170) is another hope for success in the domestic market. Even the Russian professional press was not immediately able to accurately determine the differences compared to the previous model. Initially, unofficially, one of the manufacturer’s representatives described the car as “a deep restyling of the 2110, which is very close to the original.” The suspension and braking system were changed, the body received new contours, although the doors remained the same.
