Connection diagram
The procedure for connecting the car radio may differ slightly due to the modification of the car. The audio device sometimes comes with a remote control. It is installed on the steering column or the front of the dashboard. The cable is laid along the length of the electrical harness lines.
The exact wiring diagram may vary due to the number of speakers. Therefore, it is advisable to remember the following information:
- With 2 columns. Two loudspeakers are used exclusively on trucks. Speakers are most often placed in doors under plastic panels. After installation, the radio can be used immediately for its intended purpose. You just need to connect it to the sockets. You can install other speakers in the cabin. Then you will need to lay a separate speaker cable.
- With 4 speakers. In passenger versions, a device with two pairs of speakers is more common. The electrical wiring contains a special harness connected to the rear door speakers. Connection does not require any modifications to the vehicle wiring.
- There are no speakers. The scheme is typical for the basic configuration. The car has connectors for connecting the device and front speakers. Additionally there is an antenna output. When the car radio is connected, you need to disassemble the door trim. This step will help you get the speakers in place.
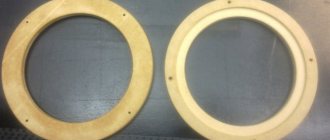
The speakers need to be fixed to the factory points. You can use wooden adapter rings. After installing the parts, the removed elements must be returned to their original place.
Are you a car driver?! Then you can take this simple test and find out. Go to test »
Replacing the standard audio system
All versions of Vesta, with the exception of the basic one, have MMS installed. The minimum configuration of the car is equipped only with an audio system. The main functions of the MMC are playback of audio files from removable media, radio signal reception, navigation, parking assistance with video playback from the rear view camera. The MMC on the Lada Vesta is located in the central upper part of the console and complements the updated modern design. The system is equipped with a good filling with the following characteristics:
- processor CSR S3681 B036BK K609B CPU SiRFatlas VI 800mhz Cortex A9;
- RAM Micron D9PSK 2X 256MB DDR3-1600 Clock Rate 800 MHz MT41K128M16JT-125 IT:K;
- internal memory 2 GB Micron NQ283 NAND FLASH 2gb MT29F2G08ABAEAH4-IT;
- internal memory 8 GB SDMMC 8GB SAMSUNG KLM8G1WEMB-B031;
- bluetooth CSR 8311 Bluetooth v4.1 BlueCore CSR8311 QFN Automotive;
- WI FI CSR 6030 Wi-Fi IEEE 802.11b/g and n;
- digital video decoder AKM8859 DIGITAL VIDEO DECODER PAL/SECAM/NTNC AK8859VN;
- audio AK7757VQ Audio DSP with 24bit 3ch ADC 4ch DAC MIC Amp;
- power controller MPS MP4570 Automotive Power Systems;
- TPS65150 Low Input Voltage, Compact LCD Bias IC With VCOM Buffer;
- TJA1042 high-speed CAN transceiver;
- CAN and K-Line controller Freescale S9S12G96F0CLF;
- controller Fujitsu 32-bit ARMTM CortexTM-M3 based Microcontroller.
The following elements are used to manage and play files:
- seven-inch touch screen;
- “Mode” key – select modes;
- “MUTE” – mutes all sounds;
- Volume control – pressing once turns the device on or off;
- microphone for the ability to talk on the phone without hands - Handsfree;
- “Reset” – button to reboot the device;
- slot for reading a removable SD card;
- connector for reading information from removable USB media and connecting various gadgets;
- AUX connector for connecting headphones or external audio devices.
- 7010B and 7023B. Radio tape recorder made in China. The cheapest option will cost about 3 thousand rubles. Equipped with a 7-inch screen with a resolution of up to 800x480 and 1 GB memory. Runs under Windows CE OS.
- 7021G. Operated by Windows CE 6 OS. Seven-inch screen with a resolution of 800x480, F1C500TM processor. Estimated price – 4-5 thousand rubles.
- RK-A701. Chinese radio, 7-inch screen with a resolution of 1028x600, 4-core RK3188 processor, 1 GB of memory, OS – Android 5. Price – up to 8 thousand rubles.
- AD-UNI707. Manufacturer – China, OS – Android 6, seven-inch touch screen resolution – 1024×600, 2 GB of memory, processor – AllWinner Quad Core T3. Cost – up to 13 thousand rubles.
- Prology DNU-2630. The 6.2-inch screen with a resolution of 800x480 has high operating speed and excellent sound. The average price is no more than 13 thousand rubles.
- MEKEDE MKD. Radio tape recorder on the Android operating system, eight-inch touch screen with a resolution of 1024x600, memory capacity - 2 GB, cost - 16 thousand rubles.
- NaviPilot DROID4. 8-inch touch screen, resolution – 1024x600, memory – 2 GB, cost – 28 thousand rubles.
DVM 2117IQ. Equipped with a solid ARM11 600MHz processor, 8-inch touch screen and Windows operating system. At a price of more than 30 thousand rubles - only 256 MB of memory, screen resolution - 800x400.
To install any radio on the Lada Vesta, you will need an adapter frame for a 2DIN radio. You can buy it at any auto store.
Device installation
Some Lada Largus cars are initially equipped with a standard 1DIN device and a CD player. Basic models are equipped with audio only. It is a mounted plastic plug.
To install the Largus car radio with your own hands you need:
- remove the plastic blank and place special slides with fasteners in the dashboard;
- fix the mounting unit with tabs located around the perimeter;
- Unbend the clamp using a screwdriver so that the installed shaft does not vibrate;
- connect the ISO connectors located on the standard wires to the radio;
- connect the antenna socket to the device socket, and if the sizes and shapes of the sockets do not match, take suitable adapters;
- install the car radio in its seat and push it in until the latches engage, as indicated by a characteristic click;
- take care of the decorative frame located around the device panel.
Dismantling is best done with a hacksaw and pliers. If excess elements remain, they are removed with a knife. Actions must be performed carefully. Otherwise, the standard electrical wiring may be damaged.
At the end, mount the main console to assess the contact density of the parts.
Knowing how to install a radio in Largus, you can perform all the necessary manipulations yourself. On the Internet you can easily find many videos explaining what the Lada Largus speaker system and its installation are.
How to install
Some cars come from the factory with a 1 DIN car radio with CD player. Basic versions are equipped only with audio preparation; a plastic plug is mounted instead of the head unit.
To install the radio on Largus with your own hands, you need to:
- After removing the plug, place guide slides with locks in the instrument panel.
- Secure the mounting assembly using the tabs located around the perimeter of the part. Bending is done with a screwdriver; the installed shaft should not vibrate or make any extraneous sounds.
- Connect the ISO connectors located on the standard wiring to the head unit.
- Connect the antenna plug to the socket on the radio. If the sizes and shapes of connectors and plugs do not match, appropriate adapters are used.
- Insert the audio device into the shaft and push it until it clicks, indicating that the latches engage.
- Install a decorative frame around the radio panel.
Some owners install 2 DIN size radios on their Lada Largus. To place the head unit, it is necessary to replace the front plastic trim on the instrument panel, since it is impossible to accurately modify the original one.
The original panel is secured with latches, which can be removed manually or with a plastic screwdriver inserted into the gap between the parts.
The front panel with an extended window requires modification - it is necessary to install control buttons for additional equipment on it, borrowed from the Renault Logan sedan; original elements from Largus cannot be placed. This is due to the fact that the panel is designed for oval-shaped keys, which were never used on Largus.
New Lada: Buy door sill stickers for Lada Largus (carbon)
At the same time, the mounting sockets for installing mounting clips are being finalized.
In the instrument panel, it is necessary to remove the horizontal jumpers located near the socket of the standard radio and climate control controls. Dismantling is carried out with a hacksaw and wire cutters, the remaining elements are cut off with a construction knife. All manipulations are carried out with caution, since there is a risk of damage to the standard electrical wiring. Then you need to reinstall the center console to assess the contact density of the elements.
Since the original wiring has cables with colored insulation that does not comply with the ISO standard, it will be necessary to compare the assignments of each element on the car and the radio. An adapter is used for connection; wire switching is allowed by twisting the necessary cables. It is recommended to reinforce the joints with tin-lead solder or a metal connecting sleeve. The connection point is covered from above with a heat-shrinkable tube, which provides protection from moisture and short circuits.
Useful tips
Instead of a 1 DIN device, you can install 2 DIN on the Lada Largus. To accommodate it, you need to update the front trim on the dashboard. It is impossible to improve the original one. It won't look neat. In the panel, remove the jumpers located near the connector for the radio and climate control controls.
The front panel with a wide window will require some work. You need to install control keys for additional equipment. They are borrowed from Renault Logan. Elements from Largus cannot be placed. Initially, the panel was designed for oval buttons.
The original wiring has colored insulation. It is not ISO compliant, which means you will need to match the functionality of the items on the machine and on the device.
An adapter is used for switching. You can connect wires by twisting the cables. The junction point should be reinforced with tin and lead solder. A metal sleeve is considered a good alternative. It is better to cover the connection at the top with a heat shrink tube. It protects against moisture, preventing short circuits.
Source
Head unit in Lada Largus
Many people spend a lot of time in their car. This is especially true for residents of megacities, because in order to get to work and back, they often have to sit in traffic jams. The Lada Largus car is equipped with a modern audio system that allows you to brighten up your time on the road. Let's take a closer look at what capabilities the standard radio in Largus has. The radio installed in the car comes with a user manual, so it won’t be difficult to figure out how and what works. Schematically, the instructions indicate two devices: a double-din version and a standard one. The difference between them is mainly in the form of buttons and the inscriptions on them. Four speakers allow you to reproduce clear and high-quality sound.
Instructions
Usually a user manual is included with the radio. There are detailed characteristics of how it is used, what to press and when, and most importantly, why.
According to the diagram in the instructions, two versions of the radio are indicated:
There is nothing complicated about the first category, it’s just the name that is incomprehensible. These two versions differ only in different buttons and what is written on them. The most useful and practical feature is the ability to pair with some wireless devices via Bluetooth, such as connecting to a mobile phone. In this case, the standard radio on the Lada Largus will provide you with the opportunity to talk on the phone even without using your hands, thereby not violating traffic rules. If you think that you will have to talk very loudly or shout so that the interlocutor can hear clearly, then nothing like that. A normal tone of voice will be sufficient.
Radio in action
It is clear that there is no friend for taste and color, as they say. Some people like the standard audio system, but others don't like it at all. Let's figure out what Lada Largus owners actually acquire along with the car.
Visually, the design of the radio tape recorder fits perfectly into the interior of the cabin. Its buttons and controls are quite convenient, and the symbols are intuitive. No loosening, backlash or failures are observed. Everything is adjusted very clearly.
Music in Lada Largus via Bluetooth:
As for playback, any genre of music will sound great. If you want to listen to radio stations, then an excellent antenna allows you to catch the signal even where it is too weak. It is possible to save certain radio stations in the amount of 6 stations in each band.
You can listen to music from existing CDs, flash drives, or simply from your phone or player via Bluetooth. The audio system reads formats such as CD, MP3, AAC, WMA and WAV. If this is Bluetooth playback, then pause and rewind control is available not only in albums, but also within songs.
The charge indicator of the Bluetooth device is visible on the display of the radio. There is also RDS - this is when the title of the song and its artist are displayed on the display. The device understands Russian fonts in ID Tag. The audio system has several options for connecting additional devices: Jack connector, USB connector and Bluetooth connection.
The radio has various inputs for reading music from external devices
Many car enthusiasts are not happy that the standard radio panel is not removable. However, there is nothing to worry about, because drivers often store the removable panel of their audio systems directly in the car, either in the glove compartment or under the seat. Therefore, if someone decides to steal a radio, it is unlikely that the main criterion when choosing a device will be the absence of a removable panel.
Summarizing all of the above, we can conclude that the standard radio in the Lada Largus car is quite good. It has a sufficient number of functions so that drivers do not have any difficulties when using it. And detailed instructions will help you easily master all the capabilities of this audio system.
Step-by-step car radio firmware
First of all, it is worth remembering that updating the Lada Largus standard radio is a rather risky undertaking. After all, the manufacturer is not responsible for its possible outcome and excludes repairs under warranty in case of failure.
Step one
Before the actual flashing procedure, you can use the help of various resources, including the manufacturer’s website. Especially if this is a new version of the car radio model. In most cases, this procedure is provided free of charge, so offers for a certain cost should already alert car owners. After all, fraudulent actions will not only deprive you of money, but can also “reward” your device with malware.
Step two
In the instructions for the car radio you should find information about the version of the software currently installed. By the way, the same data can be displayed in the settings of the device itself.
Step three
Having found the necessary information, you can start installing the firmware. In this case, you should remove the radio from the dashboard and connect it to a personal computer. As you know, the latest models are equipped for this with a special connector called mini-USB. If you don't have one, an adapter wire is perfect.
Step four
After the radio is recognized by the computer, all the necessary software is downloaded to a separate folder and installed in the specified order. As a rule, this does not take much time - just a few minutes. This is due to the small amount of memory available, much less than that of standard computer applications.
Step five
When the flashing procedure comes to an end, the message “COMPLETE!” appears on the disk, which indicates automatic reinstallation after loading new data. If this does not happen, then turn off the ignition and remove the negative seal placed on the battery for 1 minute.
Step six
After turning on the car radio again, if the installation is successful, a prompt to enter a security code appears on the display. It comes in addition to newly installed files or is written in the instructions.
The only nuance that requires attention is the display of the caller's name when connecting a mobile phone to the car radio. Here the version of the number is simply changed to the international format, that is, the eight changes to a seven with a plus.
Some car owners use pre-downloaded programs, which are subsequently simply transferred to a disk or memory card. In this case, there is not even a need to remove the radio from the “socket” of the dashboard.
Device installation
Some Lada Largus cars are initially equipped with a standard 1DIN device and a CD player. Basic models are equipped with audio only. It is a mounted plastic plug.
To install the Largus car radio with your own hands you need:
- remove the plastic blank and place special slides with fasteners in the dashboard;
- fix the mounting unit with tabs located around the perimeter;
- Unbend the clamp using a screwdriver so that the installed shaft does not vibrate;
- connect the ISO connectors located on the standard wires to the radio;
- connect the antenna socket to the device socket, and if the sizes and shapes of the sockets do not match, take suitable adapters;
- install the car radio in its seat and push it in until the latches engage, as indicated by a characteristic click;
- take care of the decorative frame located around the device panel.
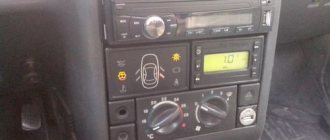
Exterior of standard car radio
To paraphrase a well-known saying, it should immediately be noted that in terms of taste and color characteristics you will not find two identical people. This also applies to the radio in the Lada Largus. Some owners will zealously prove its superiority, elevating it to the rank of ingenious devices, while others, on the contrary, will sarcastically criticize it, wanting to find more shortcomings. In general terms, we will say that the device harmoniously combines with the design of the panel and does not cause a feeling of rejection. Its functionality is convenient, and all elements (buttons) are located in optimal places, which allows you to make switches and other manipulations on an intuitive level. There are no backlashes, squeaks or other negative factors here. The fit is excellent.
Radio code for Lada Largus and radio firmware
- 1 Functions of the standard Largus audio radio
- 2 Coding the original car radio
- 3 Enter the code. Step-by-step instruction
- 4 How to decode the head unit
- 5 Firmware for Largus car radio
The Lada Largus model is a joint brainchild of the designers AvtoVAZ and Renault-Nissan. Its design is based on the popular universal public car Dacia Logan MCV. When creating this car, the main focus was on the category of practical and family car enthusiasts, because the set of technical and operational features of the model fully correspond to its image.
The basic version of the equipment of the Lada Largus implies the presence of a standard radio, which the Korean company Daewoo kindly shared with Tolyatti residents. However, sometimes the firmware of the radio is required. In addition to the head unit, the developers addressed 4 loudspeakers located around the perimeter of the interior space, or rather in the door panels. Owners notice that this device fits harmoniously into the interior and has quite simple and convenient functionality. All controls and buttons are intuitive and do not cause “stupor” even for “wild” drivers. The high-quality fit of all components of the audio complex is also noted, since during operation it was not possible to find any backlashes or squeaks in the buttons.
To study in detail the full range of functions of this radio and how to control them, you should watch this informative and useful video:
Note that the consumer radio kit includes convenient instructions, which are designed to provide a quick acquaintance with the device and its functionality. In this article we will tell you how to unlock the Largus head unit.
Functions of the standard Largus audio radio
The audio device that is present in the Lada Largus allows the owner to acquire such useful options as:
- search and memorize radio stations broadcasting in the traditional FM or AM bands;
- the ability to display the names of tuned stations with a convenient “RDS” function;
- playback of audio programs recorded in the following formats: “MP3” and “WMA”, as well as “AAC” and “WAV”;
- connecting external sources to the head unit for the purpose of subsequent playback of information programs through standard speakers (for this, the radio has “USB” and “Jack” connectors, as well as a “Bluetooth” option;
- switching with the “Hands Free” wireless kit, which allows telephone communication with subscribers while driving.
Sound via Bluetooth
A standard car radio in combination with dynamic speakers “reads” music programs equally well, “digesting” any genre without much difficulty. The manufacturer has addressed radio lovers with a powerful antenna device that allows them to pick up a signal of even minimal power. The radio allows you to memorize 6 stations in each frequency range.
Listening to music is available via CD drives or flash devices. Also for the same purposes, switching using Bluetooth is possible.
With a wireless connection, it is possible to rewind not only between music programs, but also directly within a track.
The display clearly displays the charge level indication (if “Bluetooth”), as well as the “RDS” line. There is a Russified font in “IDTag”.
Other methods of connecting to this device are the “Jack” and “USB” sockets.
Some owners are not satisfied with the lack of a removable decorative panel for the radio. We consider this point to be unimportant, since it is not able to protect against fraudsters.
How to remove the Lada Largus standard radio and enter the code
- Files
- Engine
When removing the battery or for other reasons, the Lada Largus head unit requires entering a 4-digit code.
The code is usually written in the service book, but anything can happen - they lost the book, changed the radio, etc.
The radio code can be restored using our Renault and Lada Largus standard radio code generator
To do this, we need to find out the so-called PRE-CODE, which is contained in the information on the radio itself; to find it out, we remove the radio.
How to remove the standard radio of Lada Largus
The standard radio on the Lada Largus is removed in the same way as removing the standard radio on many Renault models, for example: Megane
For removal there is an original tool from Renault, code - 7711381821
But there is no need to buy it; 4 or even 2 regular ballpoint pen refills are suitable for removal.
How to find Pre-code
Largus cars use a head acoustic device, unified with Renault-Nissan products. To protect the radio from theft, there is coding that does not allow access to the device's functions without first entering a 4-digit number. The prerequisites for the appearance of a text message like “Radio Code 0000” on the screen are as follows: a terminal has been removed from the positive or negative terminals of the battery to install additional equipment, repair electrical circuits, or install a new battery.
Another reason for enabling encoding is poor contact in the power supply plug, which is connected to the rear wall of the head unit. In this case, the radio operates for a few minutes and then turns off. When you turn it on again, you will be prompted to enter a password.
Firmware for audio device on Lada Largus
The standard head unit on cars of this model does not look very presentable, but at the same time the functionality is complemented by a large number of possibilities. Unfortunately, despite the decent quality of the technical part, the manufacturers did not pay enough attention to the software. It's no secret that modern audio systems have a full-fledged electronic control unit, which is a kind of computer. There is a processor, devices for reading removable media, various connectors and other functionality. In addition, the standard radio is combined with the on-board computer.
On the other hand, the more complex the audio system, the greater the likelihood of failures and malfunctions. The radio installed on the Lada Largus is no exception to the rule. The software has not been properly tested, so malfunctions are not uncommon. The most common problems are the inability to recognize the file format, reproduce high-quality sound, or identify the removable storage device. Also on Largus, incorrect display of Russian fonts on the display is often encountered. As a result, instead of the usual Cyrillic alphabet, the driver sees incomprehensible symbols. It is in these cases that updating the device firmware will help solve the problem.
Radio malfunctions and methods for diagnosing them
As you know, the Lada Largus is equipped with an audio system with a set of speakers already from the factory (depending on the configuration). The amplifiers are located in the front and rear door panels. To connect non-original speakers, several wiring harnesses are provided (including for increasing power using an amplifier when connecting a subwoofer). Since the connector plugs do not comply with the current standard, to connect another head unit you will need to additionally purchase adapters.
A standard car radio sometimes brings not only the pleasure of listening to music, but also some problems. The device may not work or function incorrectly for various reasons. In general, the list of faults includes only those that an ordinary driver (without special knowledge of electrical engineering) can fix with his own hands, without the need to contact a specialized center.
When it comes to repairs, it can often be cheaper to replace the device. Especially considering the availability of alternative options in different price categories and with different capabilities. At a cost of no more than 6,000 rubles, repairs can cost half this amount.
Main problems
If, when you press the power button, the head unit does not respond and does not turn on, then first of all you should pay attention to the mounting block, checking the 15A fuse in socket F28. Through it, the electrical circuit of the device’s memory is connected with the saved settings.
The mounting block cover is located on the front panel on the left side at the end. You can understand that this fuse has blown by the absence of signs of operation of the instrument cluster panel, interior lighting and trunk lighting, since their electrical circuit is also powered by F28. If the fuse has not blown, the next check point will be the condition of the connecting contacts and the integrity of the wire that goes from the fuse to the A4 power connector on the back of the radio.
A common problem is no sound, i.e. the device itself turns on but there is no sound coming from any of the speakers when playing music.
In this case, the fault may also be the fuse, but F38. It supplies power to audio output devices. A faulty fuse is also indicated by a non-functioning cigarette lighter. If the latter works, then the fuse is intact. The lack of sound can also be caused by a violation of the integrity of the wire running from the fuse to connector A7 on the radio. And if only the rear speakers do not work, the culprit may be a broken connection in the block, which is located directly behind the driver's seat between the front and rear doors.
The cause of the malfunction may be the absence of ground - this is the black wire going to the radio (terminal A8). In all other cases, intervention in the electrical circuits of the device will be required. Without appropriate knowledge in this area, there is a high probability of complete failure of the radio. When contacting specialists, repairs can cost at least 1,000 rubles, not counting diagnostics.
Removing and installing the radio
If a device fails, you will need to dismantle it to install another one. Removal will also be necessary if it is necessary to connect speakers, repair, clean terminals or reflash. Visually, there are no latches or keys for removal on the front panel.
In fact, on the front of the radio there are four holes into which you need to insert 4 rods of suitable diameter (about 2 mm). The dismantling process is as follows.
- Two rods are inserted into the holes on the left side.
- Two more - on the right.
- Now you should simultaneously press all the rods at once.
- At the same time, pry it with a suitable plate, for example, a plastic card.
- After characteristic clicks indicating that the latches are loosened, you can remove the device.
Installing the radio is even simpler: just insert it into the mounting socket and press until the latches fit into the grooves.
Review of the Lada Largus car radio
Some car enthusiasts love their favorite car so much that they cannot live a day without it. And considering that many people live in huge cities, it takes a lot of time just to get to work and back. If you add traffic jams, you can spend almost half your life in a car. It’s good that at least the Lada Largus has modern acoustics at its disposal. This feature allows you to brighten up a little downtime in long lines, when your last nerves give out.
Source
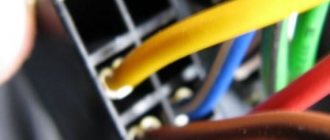
Pinout diagrams for radios of various Lada models
Pinout of Lada head unit
Among Lada drivers there is a special type of driver who constantly improves and refines the car’s audio system. Changing, often in a circle, a bunch of head units, eventually arriving at the point where the standard radio is put in place. If you belong to this type, or simply, for some other reason, removed the radio from its original place, and now want to return it, then our material today is for you! The pinout of the standard Lada radio does not hide anything particularly complicated; anyone with growing hands can handle it. Well, at least from somewhere. To begin with, we will have to deal with the wires, namely their color. Which wire will be responsible for some component of the car's audio system, and it would be advisable not to confuse them. Although in this case there will be nothing terrible and it is not forbidden to search at random. But there’s no need for you and me to wander around; we’ll figure out the color marking of the Lada wires right away. So let's get started.
Let's look at the color scheme of the wires for cars of the Lada family of the following models: Vesta, Priora, Grenade, X-Ray, Largus, Kalina, Niva 4×4, Chevrolet Niva
Lada Largus › Logbook › Installing a 2 Din radio on Android + joystick (setup, programs)
The article will be long, I even wanted to break it into several.
End result: A long time ago (4 years ago) I was impressed by the Android GU from Romario-163 here, but somehow I never got around to buying it, but the toad was choking me. And then I saw that Android radios now cost around 3 thousand for 7 inches, so I decided to order one. Moreover, on 4pda there is a topic here about this radio “Head unit ML-CK1018 and similar ones, based on the MT/AC8227L processor” Characteristics:
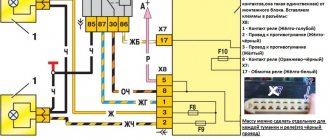
Radio connection diagram
Largus radio block diagram
Delivery took about a week (I ordered from the Russian Federation), delivered by courier. With delivery in the Russian Federation, it was possible to buy only with a universal connector, but I already had an ISO adapter - FR-12 and ISO-Ant1, the wires on the radio were all labeled, so connecting it was not difficult. By the way, the connector on the Android 2DIN radio is called Alpine, if anyone suddenly needs to buy an adapter at an auto parts store. I ordered a frame on Avito for 2,500 rubles (the Largus shop also has it, but the wait is long). Fits perfectly, I had to cut the panel a little.
Screwed it on with self-tapping screws.
I glued the GPS sensor on double-sided tape to the upper right windshield. I ran the wires along the rack. It picks up satellites well.
On the plus side, the screen is 7 inches, the play market works, I installed Yandex navigator, YouTube and other programs, installed a 128 GB flash drive, now I have a multimedia archive with cartoons and music in the car.
But the standard launcher on this radio is something like a cross between a Pavasonic and Abibas radio. Fortunately, there is a free, advertising-free Car Launcher (4pda.ru/forum/index.php?showtopic=672503) and similar ones. Setting up the radio - in the standard launcher you can change the default Navigator and player. In the settings, look for the “Developer Mode” item, password 8888
You can change the default navigator and player. There are still a bunch of settings. You can set the automatic download of some programs when you turn on the radio. I set the Navigator, the store and the DVR to turn on automatically.
Smart YouTube TV (YouTube without advertising) 4pda.ru/forum/index.php?showtopic=932360 (tried to install, it starts loading some libraries, that’s all. I haven’t solved the problem yet
You can change the boot logo and animation. I did it according to the instructions and it worked.
You drop the prepared archive with the animation onto a flash drive, select it in the menu, and your zip archive on it, refuse the preview in the pop-up window and that’s it, the animation is installed. When you reboot you will see it. The animation is copied to the system partition and remains there forever; it is not erased when resetting the settings. If, when you select an animation, the archive with it is not visible on the media, then rename it bootanimation.zip; other file names are not displayed in the file window. When making your own boot animations, adhere to the following recommendations: frame format for our GI is 1024x600, frame extension is jpg (must be jpg, otherwise you will get a bootlap!), be sure to pack it in a zip archive without compression.
There is an ILL wire in the radio, when +12 is applied to it from any blue wire from the button illumination (for example, central locking keys or power windows), the touch buttons on the radio are illuminated and you can dim (reduce brightness) the screen. Apparently, some kind of stray current arose on this wire. About 4 years ago I installed the DRL as a high beam at full intensity (Scandinavian light) on a PWM controller. Like this: or here he is. And I noticed this strange thing - when the DRLs are on, the screen flashes, i.e. Then it goes out, then it lights up in full force. Most likely there is some kind of stray current running on this wire. There were thoughts of putting diodes on all the wires from the DRL controller, but I decided to start by putting a 20 kOhm resistor in the ILL gap. And it helped
While I was still trying to figure out the resistor, I found the Dimmer program (play.google.com/store/app…id=giraffine.dimmer&hl=ru). The advantage is that it is free, without advertising. When you click on the shortcut, it decreases the brightness. Can be set by time. I blanked the screen from 17:00 to 7:00 and I was happy. But with the ILL wire it’s somehow more correct, it seems to me.
Operation has shown that a touch screen in a car is evil. The knobs and buttons of the old radio are much more convenient. I even thought that this is not what I need this Android for. But fortunately, during disassembly, I came across a radio joystick from Duster for 500 rubles. The radio has key1 and key2 connectors. The wise man SOVA at the Duster Club (www.dusterclubs.ru/vb/sho…thread.php?t=7564&page=52) makes adapters for Arduno, and there I noticed that
I also immediately looked at Drive2 from Igoritt. I didn’t want to cut the wires on the joystick, in case nothing would work out, but on the adapters from Sova I saw that it uses wires from Arduno. I bought a pack for 50 rubles. They are called "Dupont dad-dad for Arduno." Or something like that.
And voila, the joystick worked. I just had to teach the radio. I did this - the top buttons are “forward” and “back”. Volume up/down and Mute/Hang up left unchanged. The bottom button is programmed as “Back”. It’s convenient that you just need to press it a couple of times and you can go to the central screen from any application. The simultaneous volume clamp was set not to “Mute”, but to “Blackout screen”. Now, when leaving, I turn on “Shut Up” first, then turn off the screen. There is training in the radio settings
The disadvantage of connecting the joystick this way is that the encoder (song switching wheel) does not work. If you really want to switch tracks with a wheel, then you can buy at DusterClub from SOVA a normal adapter for Arduno like here: or here: (but the price is stinging - 1500 rubles) or you can make it yourself, in principle, except for hands from shoulders, no other special equipment is required. Full instructions here: www.drive2.ru/l/6899697/. For now I ordered an Arduino Nano 3 on Ali for 150 rubles, until it arrives I’m just ready to redo it.