Owners of VAZ 2107 begin acoustic tuning of their car by installing or replacing the main components - the head unit (car radio) and low-quality standard speakers. Replacing the head unit (head unit) is also practiced if the VAZ 2107 radio tape recorder stops working, which they refuse to repair as outdated.
Theft of a radio is also a common reason for installing a new PG. For professionals, installation operations are not difficult, but a novice amateur can damage the dashboard by connecting the wires incorrectly. Incorrect installation of the VAZ 2107 radio leads to short circuits and burnout of the receiver's electronic boards.
In this article we will describe how:
- replace front speakers;
- use the sound shelf correctly;
- move the radio to the place of the air ducts or to the glove compartment;
- install a 2DIN car radio;
- Connect the head unit to the speakers and power supply.
We hope that the tips will be useful to you.
Installing the front speakers
First of all, we install the front speakers. Then, when connecting the radio, you will not have to get confused in the wires installed by an illiterate radio technician. Most often, buyers of used cars encounter such cases. Identical black wires with careless twists and minimal insulation need to be ringed and labeled. It is much easier to replace unreliable electrical wiring with cables of the desired cross-section and color.
Speaker wires of different colors are used for the left and right speakers. The color of the wire is selected according to the pinout of the car radio manufacturer. In radio engineering, pinout is the color, letter, and digital designation of outputs and cables. When installing more powerful speakers (100 - 150 watts), take into account their mounting depth, which should not interfere with the movement of the glass. To extend the speaker, spacer rings are used.
To install the speakers, you need to disassemble the front door and remove the window lift mechanisms.
The bottom of the door is usually used to install speakers. Holes for the diffuser are cut in the door panel.
Spacer rings are attached to the door frame, into which the speakers are installed. The wires for connecting the speakers to the head unit are pulled into the technological holes in the door. After assembling the door, additional work can be done.
A grill (decorative and protective grille) is installed on the speaker, the door card is covered with vinyl or leatherette. Without additional door cavity soundproofing, the speakers may sound muffled or resonate. For sound insulation, the outer metal is glued with a vibration-insulating material that dampens metal vibrations (for example, “Bimast”). The internal surfaces of the frame and stiffeners are covered with noise-absorbing “Spleen”.
Installing an automatic antenna on a VAZ 2107
It is quite clear that not a single car speaker system that includes a radio receiver can do without an antenna. Currently, there are quite a large number of different antenna devices of external, interior, active and passive types, each with their own advantages and disadvantages, but if we are talking specifically about interior antennas, they are easy to install, do not require additional maintenance during operation, and do not create aerodynamic resistance when the car is moving and, of course, do not attract the attention of car thieves and vandals. True, in fairness, it should be noted that the characteristics of such antennas largely depend on the orientation and distance of cars relative to the position of radio stations, and they are also sensitive to the presence of nearby sources of electromagnetic interference. In addition, it should be taken into account that, in accordance with some installation features, such antennas are disposable and after removing the elements from their installation site, it will not be possible to re-attach them. Next, we will consider the second option for mounting the antenna. When installing the antenna on VAZ cars, it is easiest to hide part of its cable wiring behind the roof lining.
Post subject: Re: Installing a MF in a VAZ. I put my antenna on the drain, the crackling noise remained, but it was better than on the trunk.
Expanding the sound system with speakers on the rear sound shelf
The extended connection diagram for the VAZ 2107 radio provides for the installation of front speakers and rear acoustics. The front speakers create frontal sound, the speakers from the passenger compartment are responsible for the lower frequencies and surround sound. At the rear, multi-way speaker systems use woofers or oval full-range speakers.
From an acoustics point of view, the best place to install ovals or compact subwoofers in the 7's cabin is the rear parcel shelf of the car. The standard rear shelf of the VAZ 2107 for mounting equipment is not strong enough. If you simply cut holes in it for speakers, the plastic will vibrate and distort sound waves.
To reconstruct the shelf, additional fasteners (corners) are used along the sides of the body. The shelf is reinforced with an additional frame, soundproofed, and covered with carpet (a special sound-absorbing and decorative material).
The acoustic wires are pulled under the interior flooring along the sides of the car.
How to install
It is no secret that AvtoVAZ in Tolyatti still gives the future owner of the VAZ 2107 car complete freedom of action, covering the place for installing the radio in the “beard” or the center console with a plug. Connecting the radio yourself is a matter of honor for an amateur. Installation here is safer in terms of theft, since the radio is not conspicuous to anyone and is located low.
In addition, it is easier to install the device - no re-arrangement of electrical and internal space is required. The only significant “minus”, even two, is the rather strong heating of the audio system when the heating is on. At high temperatures, the radio does not work for long. There is also the inconvenience of pulling out the audio disc due to the fact that the gear shift lever is in the way. But since disks are already becoming a thing of the past, giving way to “flash drives,” this is not a very significant drawback, unlike the first.
Shown here is a homemade installation on a “seat” under the radio instead of elongated and removed air ducts. This homemade configuration has the following advantages: no heating (after all, the air ducts are removed), and ease of control of the device. Disadvantages are: changes in design, strong heating in direct sunlight, and the risk of theft.
In addition, if your radio does not have a USB input, then know that you are purchasing and intend to install a very cheap and old model.
After this, you need to purchase speakers, at least four: a classic installation contains two front and two rear, with a power of about 200 Watts. It is not worth purchasing higher power speakers for the VAZ 2107.
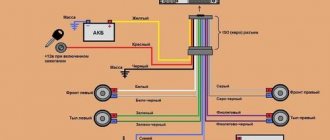
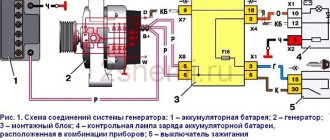
By the way, the standard color of the wires on the power supply is as follows:
- Red color is always “ ” in the on-board power supply, which operates at a voltage of 12 V, with the engine running or the ignition on;
- Black wire – “minus”, ground of the on-board circuit.
- Blue – antenna power;
- Yellow – constant voltage from the battery.
- Orange – connection of the console backlight.
When installing the radio in its original location, be sure to read the instructions. It should have a diagram of how to connect the speakers, indicating the “plus” and “minus”. Remember that the “minus” is the mass, that is, the car body, and in this capacity you can consider a well-cleaned bolt in contact with the body. It works as a contact.
Of course, before you begin, you need to remove the negative terminal from the battery.
Then we connect the speakers: we hide the wiring harnesses in the cabin and route them to the speakers.
When choosing a radio, it is recommended to pay attention to products manufactured under the Pioneer brand. It is characterized by high performance characteristics and can last for a long period
You can install the radio to improve the quality of music as follows:
- In the car, the radio is fixed using a standard ISO connector. This international standard has become widespread.
- When choosing a radio, you should consider its size. If they do not fit, installation will become more difficult. The seat can be changed in the machine.
- There are no problems with updating the radio if the seat has the required dimensions. All cables are fixed into a rectangular block.
- If the contacts do not fit, you can use a special adapter.
Choosing a location for the car radio
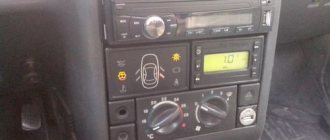
The standard connection of the VAZ 2107 radio is provided by the factory in an inconvenient place. The factory niche, closed with a plastic plug, is located at the very bottom of the center console.
This place is inconvenient for three reasons:
- when the stove is operating, the radio tape recorder overheats, which reduces its operating time;
- the gearbox selector interferes with working with SD and DVD drives (this drawback is not critical when using flash drives and compact storage media);
- You cannot install radios of larger sizes or with retractable screens in the standard niche.
If you want to avoid these troubles, you have no other choice but to install the radio in the VAZ 2107 in place of the two central air ducts.
In principle, this method does not affect the operation of the heating system, since the mass of warm air will pass through the side and bottom air ducts.
Before moving the radio up to the VAZ 2107, you need to remove the air ducts and do a number of preparatory work.
When installing a car radio in place of the air ducts, difficult work for a novice amateur will include making sealed plugs for the air ducts, carefully cutting out plastic partitions and shaped protrusions on the dashboard. Under the installation frame of the car radio, you need to make and secure brackets (bars - inserts). To close the gaps between the dashboard and the car radio body, you need to buy and fit a factory adapter frame.
Even more difficult is the independent production of original decorative cladding made of wood or fiberglass. Installing the radio in the air duct slot makes it easier to control the receiver and view the display.
how to install an antenna
Problems with T-type antennas Often, when choosing an antenna, clients are based on the dimensions of the antenna, that is, on its length. But here’s the paradox: customers just want to buy a short antenna, explaining that with a short antenna their car will look more or less beautiful, and a long antenna will turn their car into a trolleybus. Of course, competent salespeople try to reorient the client in the right direction, putting the goals and objectives of radio communications for this client at the forefront. This is not observed in the Gazelle van.
VAZ car of the year, MJ turbo radio station from Kaban, Lemm Magnum antenna. It so happened that it was due to work.
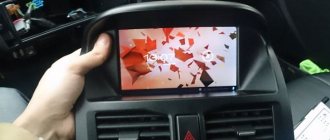
Installing a double din car radio
Modern 2DIN size standard radios are equipped with a larger display and touch controls. They are similar to 1DIN car radios in width and installation depth. Better functionality is achieved by increasing the height of the housing by 2 times (up to 100 mm).
The two-din radio tape recorder does not fit into the VAZ 2107 car in its regular place. The installation of a large housing under the center console is hampered by the gear lever. It is also impossible to install a 2DIN car radio in place of the air ducts. At the top, the edge of the “dashboard” does not allow expanding the niche of the air ducts. To expand the niche downwards, you need to remove the stove controls. Much easier than a complex reconstruction of the dashboard would be to install a double-din radio in the glove box of the car. There is enough space in the glove compartment to install a double-din radio, which can be supplemented with a separate amplifier. The main difficulties of this method are the design of fasteners for the installation section. Under them you need to install damping pads that absorb vibrations of the plastic.
Installation
Installing a car radio on a VAZ 2107
We will begin our story with the simplest way to install a car radio. This approach is completely justified, because it is impossible to learn complex installation options right away and you need to start from the simple. Before purchasing expensive equipment, you should decide on the choice of installer. If you intend to carry out such an operation on your own, then you need to know many secrets. On the contrary, an inexpensive device is very easy to connect and there is no need to spend money on the services of a specialist. So, what does a typical speaker system consist of? Of course, the main role here is occupied by the car radio, the installation of which we will do. But don’t forget about the four standard speakers that come included. You will need to connect wires from the head unit to them.
Note. All speaker components are installed only in places designated in advance by the automaker. This is done not only for the sake of simplicity, but also to avoid short circuits.
Starting the installation process
How to connect a car radio to a VAZ 2106
First of all, you should check the wires of the power supply, each of which should have its purpose written on it. The wire can simply be painted a certain color:
- The red color of the wire will indicate a cable implying power supply of plus 12 V when the ignition is on.
- Yellow will mean constant feeding.
- The blue wire is the power going to the antenna.
- The orange wire is for controlling the backlight.
- The black wire is always negative.
Let's consider installing a head unit, which, in addition to playing CDs, is also equipped with a radio receiver:
- We study the block for connecting speakers (see How to choose speakers for a car radio on your own). It consists of 8 plugs. Each speaker has two plugs. It turns out – 4 speakers x 2 = 8.
Note. The speakers can be installed as follows: two in the front doors, two in the rear parcel shelf.
- We study the player's power supply, which consists of 5 plugs.
Note. This does not mean that it should always be this way. There are different power strips, and they can have different numbers of plugs: 5, 8, etc.
How to install a car radio on a VAZ 2107
The connectors for connecting speakers and power are traditional. In other words, they (the plugs) have a specific purpose. In our case, it is assumed that these pads are included with the car radio and there is no need to buy them separately:
- We purchase special connectors, which are very important when connecting a car radio. Such components a priori eliminate the need to use soldering. These components are designed to connect an additional wire to the vehicle wiring. Typically, the connector has two channels: the main wire goes into the through hole, and the additional wire goes into the blind hole.
Installing the head unit
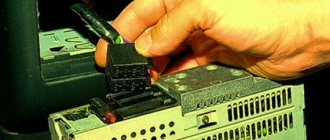
All modern power units use a standard ISO connector (International Unified Electrical Engineering Standard) to connect power cables and speaker wires.
After installing the car radio housing in the selected location, all cables must be secured into a rectangular block suitable for this connector. The letter markings of the car radio outputs are different; you need to look for them in the equipment manufacturer’s instructions. If your existing wiring uses a different type of connector, purchase an ISO connector adapter.
How to connect
The correct connection of the radio on the VAZ-2107 and any other car is carried out through the contact group of the ignition switch. In this case, when the key is removed, the power supply to the equipment is stopped; only the memory unit is powered, which is supplied from the battery.
On carburetor cars it is necessary to modify the contact group:
- Disassemble the plastic steering column cover.
- Remove the connector from the ignition switch and unscrew the 2 mounting screws.
- Remove the lock from the column by squeezing the lock with a thin object (with the key inserted and turned to position 0).
- Remove the contact group that needs to be modified by soldering an additional element.
- Assemble the lock and install the parts in their original places.
A lock modified in this way receives the ACC position instead of 0, which is used to operate the head unit in the parking lot. An additional fuse is introduced into the connection circuit of the tape recorder to protect the circuits from overload. Connection with speaker cables is made through an adapter.
Connecting the radio to the VAZ 2107 power supply
The standard connection of the VAZ 2107 radio through the ignition switch is inconvenient because the radio and player can only be listened to when the engine is on. The designers chose this connection scheme for reasons of increasing battery life. To connect a new car radio in the same way, you can use the standard wiring. But keep in mind that with such a connection, advanced power units, such as Pioneer, KENWOOD, Alpine, Hertz, can reset new settings when the engine is started. Indeed, a more logical connection of the radio directly to the VAZ 2107 battery can drain a worn-out battery. Most often this happens when the driver forgets to turn off the quiet music at night. To avoid this drawback, a manual power switch button is embedded into the yellow power wire from the battery. The standard fuse for the VAZ 2107 radio is not provided in the block of protective devices. To install protection in a reserve location in the fuse box, you need to rebuild the electrical circuit. It's easier to buy a power cable that has a fuse built into it. For normal protection of the radio from strong inrush currents and short circuits, a 20-amp blade fuse is sufficient. To expand the acoustic system, move the installation location, and install complex power units, an acoustic tuning enthusiast must master the skills of an auto mechanic, radio technician, or electrician. If you do not have confidence in your abilities, it is better to turn to car acoustics professionals.
Car sound system
The rarest driver can do without music in the cabin. Depending on the preferences of the owner, the system can be regular or twisted. Advanced acoustic systems are a separate topic, worthy of a multi-letter story with a continuation. The degree of sophistication of the acoustics is limited only by the wallet of the car music lover and his personal awareness of coolness. In this article we will talk about what it is and how the most common music is installed in the interior of a VAZ.
No matter what kind of acoustics, including a car, it consists of a head acoustic unit (HA) and speakers. In a simple case, these functions are performed by a radio tape recorder and a pair of speakers
A modern default radio tape recorder combines a music player from digital media - disks or flash drives - and a radio receiver. It also has an integrated amplifier.
The standard location of the radio, as provided by the manufacturer, is in the panel above the interior heater fan switch. Before the first use, the hole created for installation is closed with a plastic plug.
Features of connecting a car radio
The standard connection diagram is generally similar for all cars and radio models. But there are a number of aspects that need to be taken into account.
- The wiring of Russian cars is designed to connect a device with a mechanical search for radio stations, this may cause some difficulties if you are planning to connect a modern model;
- In most VAZ models, a branch of the wiring for connecting the power supply comes from the ignition switch: when you turn the key, a short-term power failure occurs, which leads to resetting the options if the model does not provide for the presence of an uninterruptible power supply system;
- Before starting the installation, the user needs to decide whether he is happy with the fact that he can only listen to music when the engine is on, or whether he wants to be able to use the radio while parked.