How to install
When choosing a radio, it is recommended to pay attention to products manufactured under the Pioneer brand. It is characterized by high performance characteristics and can last for a long period. You can install the radio to improve the quality of music as follows:
It is easy to install the radio correctly, since in most cases it has standard dimensions. For cars, it is recommended to purchase appropriate wires that are well insulated.
Instructions on how to connect the radio to the battery
Car players that exist today have a huge selection in their functional qualities, appearance, cost and other technical, quality and social parameters. But no matter how much this device costs, what functions and options it has, how well the radio will perform its direct duties. Namely, the playback of sound and video recordings from various media of such information largely depends on how the said head unit is correctly connected to the power supply system of your car - the battery.
Scheme
How to connect
You can connect the radio to the VAZ-2106 via the ignition switch, but this scheme is considered less attractive, since you won’t be able to listen to the radio with the engine turned off. The standard connection diagram involves the use of standard wiring. Among other features of connecting the VAZ-2107, we note the following points:
The service life of the speaker system largely depends on the correctness of the created power system. It is recommended to insulate the wire; the contacts are connected by soldering or using special adapters.
Speakers
In order to connect the radio to the VAZ-2106, you should connect it to the speakers. Among the main recommendations we note the following:
A modern radio has appropriate outputs for speakers. The power supply network should have a minimum number of connections, as they may cause increased resistance.
Subwoofer
When improving the sound system of the car in question, a subwoofer is often installed. This element is designed to output low frequency sound. Among the connection features, we note the following:
It is recommended to lay the cable under the vehicle's skin. The radio tape recorder is connected to the VAZ-2107 using special chips.
Antenna
Before connecting a car radio to the VAZ-2107, you should consider the correct position of the antenna. Various artificial interference can cause signal quality to deteriorate, resulting in extraneous noise. Among the antenna connection features, we note the following:
Installing and connecting the speaker system takes a relatively small amount of time. Most attention is paid to laying the cable to the power source, since it uses a battery.
Source
Connecting a radio without a connector
Cheap Chinese radios, as a rule, are not equipped with any connectors. Stripped wires simply come out of these, and that’s it. Let's look at how to connect the radio in this case.
The machine has a standard connector
In such situations, it is highly undesirable to cut off the connector in the car and connect the wires by twisting or soldering. It is better to buy the appropriate connector and connect it to the radio. Moreover, it will be easy to do this using the diagram on the device’s body and using the color marking of the wires as a guide.
There is no connector on the car
The most hopeless case is when there are no connectors either on the radio or in the car. However, here you can go in two ways. You can buy male and female connectors and spend some time connecting them to both the radio and the wires in the car. Or you can simply connect the wires directly, leaving this node without any connectors.
In this case, the mating ends of the wires are stripped, a heat-shrinkable tube is put on one of them, after which the wires are soldered and insulated.
Let's go through the wires themselves again and clarify some nuances not mentioned above:
Finally, let's take a quick look at how to identify unlabeled wires in your car that go to the speakers. First, let's calculate which is which, and then the polarity.
To find out which wires go to which speaker, you will need any two signal wires of the radio already connected to power and turned on. Applying them one by one to the wires going deeper, we determine by ear which speaker they are connected to. Each time we mark a pair of wires with a marker, electrical tape, a price tag, and so on.
To determine the polarity of the wires going to the speakers, you will need a AA battery and an assistant. The battery must be applied to the wires, and an assistant looks at the speaker cone. If the positive of the battery matches the positive wire of the speaker, the diffuser will deflect outward. If it’s the other way around, go inside. Again, we mark each wire, if this cannot be done by their color (cars often have homemade wiring, and all cables to the speakers are the same color.
How to install a radio in a Zhiguli.
It is no secret that AvtoVAZ in Tolyatti still gives the future owner of the VAZ 2107 car complete freedom of action, covering the place for installing the radio in the “beard” or the center console with a plug. Connecting the radio yourself is a matter of honor for an amateur. Installation here is safer in terms of theft, since the radio is not conspicuous to anyone and is located low. In addition, it is easier to install the device - no re-arrangement of electrical and internal space is required. The only significant “minus”, even two, is the rather strong heating of the audio system when the heating is on. At high temperatures, the radio does not work for long. There is also the inconvenience of pulling out the audio disc due to the fact that the gear shift lever is in the way. But since disks are already becoming a thing of the past, giving way to “flash drives,” this is not a very significant drawback, unlike the first.
READ How to connect a 900 number to a card
Some prefer an unusual place for it: to place it where the VAZ 2107 has upper air ducts. Like this:
Shown here is a homemade installation on a “seat” under the radio instead of elongated and removed air ducts. This homemade configuration has the following advantages: no heating (after all, the air ducts are removed), and ease of control of the device. Disadvantages are: changes in design, strong heating in direct sunlight, and the risk of theft. In addition, if you put it on top, the interior ventilation works worse, and this is an important argument against. Selling such a VAZ 2107 will most likely be more difficult. Therefore, before you connect a radio with such a serious modification, think carefully.
The picture shows the finished converted structure:
Either way, you need a radio. If you are just a fan of listening to “Autoradio”, then you can install “Aiwa”. If you want to get professional car audio, then think about purchasing a full-fledged audio system to connect a serious system, such as Pioneer. But at the same time, remember that you need to start working with proper complete soundproofing of the interior, purchasing a subwoofer, amplifier and other expensive things.
In addition, if your radio does not have a USB input, then know that you are purchasing and intend to install a very cheap and old model.
After this, you need to purchase speakers, at least four: a classic installation contains two front and two rear, with a power of about 200 Watts. It is not worth purchasing higher power speakers for the VAZ 2107.
The installation requires high-quality wiring, which you will have to buy yourself; in total you will need about 10 meters - 7 for the rear and 3 for the front speakers. When purchasing, it is better to take a wire with 4 cores so that the speakers can be connected “from one wire.”
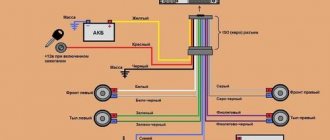
By the way, the standard color of the wires on the power supply is as follows:
When installing the radio in its original location, be sure to read the instructions. It should have a diagram of how to connect the speakers, indicating the “plus” and “minus”. Remember that the “minus” is the mass, that is, the car body, and in this capacity you can consider a well-cleaned bolt in contact with the body. It works as a contact.
Of course, before you begin, you need to remove the negative terminal from the battery.
Then we connect the speakers: we hide the wiring harnesses in the cabin and route them to the speakers.
Shown above is the wiring of four-wire wires to the acoustic shelf for the rear speakers.
Source
Connection methods
The most optimal way is to connect the radio directly to the battery, which reduces the voltage drop and protects the power circuits using a built-in fuse. But the downside is the accelerated battery discharge, which occurs even when the head unit is turned off.
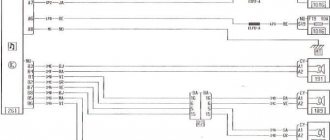
The standard connector to the radio contains 3 cables responsible for supplying power; the insulation colors are unified for all manufacturers. The red and yellow wires connected from the battery together make it possible to listen to music without turning on the ignition. The black wire connects to the point that provides negative power. There are special bolts welded on car bodies that are used to connect negative cables of electrical equipment.
We feed plus to the radio
Before connecting the cable to the battery terminal, you should install a tip that will ensure reliable contact at the junction. The tip is attached to the battery terminal using a standard bolt. A fuse rated for a current of 10-16 A is installed on the cable; the element is placed at a distance of 200-250 mm from the voltage source. The wire is then routed through the engine compartment and then fed into the vehicle's interior through a stock conduit designed for wiring or alarm harnesses.
If the additional cable is assembled from several parts, then the elements are connected by terminals, which are covered with an insulator on top.
To protect the harness from damage, it is recommended to use a corrugated plastic sleeve, which is attached with clamps to the standard electrical lines.
Contact of cables with hot or moving elements of the vehicle structure should be avoided. The cable brought into the cabin is equipped with a metal plug, which is used to connect the electrical wiring of the radio.
Through the ignition
To avoid draining the battery, the radio is connected via the ignition switch. When the ignition is turned off, it is impossible to use the head unit. For switching, a supply wire protected with red insulation is used. An additional yellow cable leads directly to the battery terminal.
If you cross both wires into a single circuit activated through the lock, then the settings will be reset every time you turn off the ignition.
Via button
The use of a separate switch to interrupt power to the car radio is used on vehicles equipped with an ignition switch without an ACC position. The power wire with a red sheath coming from the head unit is soldered to one of the terminals of the button, the other terminal is equipped with a cable going to the battery.
READ How to connect digital television in Elektrostal
The push-button switch is located on the instrument panel or center console. To start working with the player, you need to press the selector; you do not need to insert the key into the ignition switch.
To dimensions
In this case, the cable with yellow insulation is led to the positive terminal of the battery, and the red positive harness is connected to the side lighting circuit. The closest place for switching is the illumination lamp of the additional socket or glove box.
When the external lighting is activated, voltage is supplied to the radio, but if the light is turned off, it will not be possible to turn on the equipment. The advantage of the technique is the ability to listen to the radio without turning on the ignition, but the side lamps additionally drain the battery.
Installation of radio VAZ 2107
Owners of VAZ 2107 begin acoustic tuning of their car by installing or replacing the main components - the head unit (car radio) and low-quality standard speakers. Replacing the head unit (head unit) is also practiced if the VAZ 2107 radio tape recorder stops working, which they refuse to repair as outdated.
Theft of a radio is also a common reason for installing a new PG. For professionals, installation operations are not difficult, but a novice amateur can damage the dashboard by connecting the wires incorrectly. Incorrect installation of the VAZ 2107 radio leads to short circuits and burnout of the receiver's electronic boards.
READ How to connect 5 speakers to a DVD
In this article we will describe how:
We hope that the tips will be useful to you.
Connecting a radio with a standard connector
Almost all good radios are equipped with such connectors. But don't rush to rejoice. It's not always that simple.
There is a connector on the car
If the car's radio was previously installed on the same connector as on the new model, then there are no problems. As they say - plug & play, that is, connect and play. If there is a connector on the car, but it is not the same as on the new radio, then there are two outputs. You will have to either change the connector on the car or on the radio, simultaneously matching all the wires in accordance with the connection diagram. How to do this will become clear later.
There is no connector on the car
If there is a connector on the radio, but not on the car, then, again, there are two options. The first is to cut off the connector from the radio and connect the wires as described below. The second is to buy the same connector, connect it correctly to the wires in the car, and just connect it. What's better? Many will say that it is better to buy a connector. Others, after thinking a little, will answer - what’s the point of this connector if there are twists anyway.
However, it is still better to buy a standard connector, but connect it to the wires in the car not by twisting, but by soldering. This will take longer, but is more reliable.
Installing the front speakers
First of all, we install the front speakers. Then, when connecting the radio, you will not have to get confused in the wires installed by an illiterate radio technician. Most often, buyers of used cars encounter such cases. Identical black wires with careless twists and minimal insulation need to be ringed and labeled. It is much easier to replace unreliable electrical wiring with cables of the desired cross-section and color.
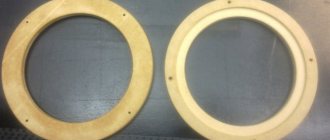
Speaker wires of different colors are used for the left and right speakers. The color of the wire is selected according to the pinout of the car radio manufacturer. In radio engineering, pinout is the color, letter, and digital designation of outputs and cables. When installing more powerful speakers (100 - 150 watts), take into account their mounting depth, which should not interfere with the movement of the glass. To extend the speaker, spacer rings are used.
To install the speakers, you need to disassemble the front door and remove the window lift mechanisms.
The bottom of the door is usually used to install speakers. Holes for the diffuser are cut in the door panel.
Spacer rings are attached to the door frame, into which the speakers are installed. The wires for connecting the speakers to the head unit are pulled into the technological holes in the door. After assembling the door, additional work can be done.
A grill (decorative and protective grille) is installed on the speaker, the door card is covered with vinyl or leatherette. Without additional door cavity soundproofing, the speakers may sound muffled or resonate. For sound insulation, the outer metal is glued with a vibration-insulating material that dampens metal vibrations (for example, “Bimast”). The internal surfaces of the frame and stiffeners are covered with noise-absorbing “Spleen”.
Alternative connection schemes
Many drivers are interested in the question of whether it is possible to connect the radio so that it does not drain the battery. The connection that satisfies this requirement is made through the ignition. It is necessary to connect the positive wires of the equipment to the terminal responsible for power supply of the contact group. This method is inconvenient because if you need to listen to the radio you will have to turn on the engine.
Connection to the battery via the “On/Off” key is carried out by a wire going to “+”, which is connected through a key with 2 positions. This method is optimal for managing the power supply of equipment. If you need to leave the car overnight or for a longer period, you need to turn off the power supply to the head unit by pressing the key. It is most often placed on a panel near the player. This switching scheme makes it possible to turn on the player regardless of whether the ignition is on.
For the next method, you need to select a cable under the dashboard that is powered through the side lights. On most models, it is easier to connect through the glove compartment light bulb. To do this, the red cable of the player is connected to it through a relay. The yellow terminal is connected through a fuse to the power source. If the connection was made using this method, the player will only function when the headlights are on. When the lights are turned off, the current memory of the radio is not erased. In order to save energy, LEDs should be installed.
Expanding the sound system with speakers on the rear sound shelf
The extended connection diagram for the VAZ 2107 radio provides for the installation of front speakers and rear acoustics. The front speakers create frontal sound, the speakers from the passenger compartment are responsible for the lower frequencies and surround sound. At the rear, multi-way speaker systems use woofers or oval full-range speakers.
From an acoustics point of view, the best place to install ovals or compact subwoofers in the 7's cabin is the rear parcel shelf of the car. The standard rear shelf of the VAZ 2107 for mounting equipment is not strong enough. If you simply cut holes in it for speakers, the plastic will vibrate and distort sound waves.
To reconstruct the shelf, additional fasteners (corners) are used along the sides of the body. The shelf is reinforced with an additional frame, soundproofed, and covered with carpet (a special sound-absorbing and decorative material).
The acoustic wires are pulled under the interior flooring along the sides of the car.
Choosing a location for the car radio
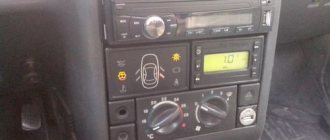
The standard connection of the VAZ 2107 radio is provided by the factory in an inconvenient place. The factory niche, closed with a plastic plug, is located at the very bottom of the center console.
This place is inconvenient for three reasons:
If you want to avoid these troubles, you have no other choice but to install the radio in the VAZ 2107 in place of the two central air ducts.
In principle, this method does not affect the operation of the heating system, since the mass of warm air will pass through the side and bottom air ducts.
Before moving the radio up to the VAZ 2107, you need to remove the air ducts and do a number of preparatory work.
When installing a car radio in place of the air ducts, difficult work for a novice amateur will include making sealed plugs for the air ducts, carefully cutting out plastic partitions and shaped protrusions on the dashboard. Under the installation frame of the car radio, you need to make and secure brackets (bars - inserts). To close the gaps between the dashboard and the car radio body, you need to buy and fit a factory adapter frame.
READ Nintendo wii how to connect a controller
Even more difficult is the independent production of original decorative cladding made of wood or fiberglass. Installing the radio in the air duct slot makes it easier to control the receiver and view the display.
Connecting a car player via the ignition switch or button
These connections are recommended as an answer to the question of how to connect the radio so as not to drain the battery.
This is done through the ignition switch as follows:
This connection is considered the most common and is recommended by experts. The positive and negative sides of this connection method are mutual. That is, the battery does not discharge while in a standby state when the car is parked. But you can listen to music only when the ignition is on.
Connection via a special button.
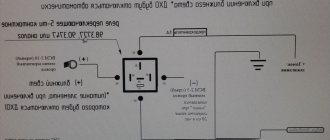
The wires are connected according to the diagram described above (ignition), with one exception. The red power wire is not connected to the ignition switch, but to the intermediate button. With a cable leading from it to the positive terminal of the battery. Thus, the player can be used without turning on the ignition, and also completely disconnected from the energy carrier (battery).
Installing a double din car radio
Modern 2DIN size standard radios are equipped with a larger display and touch controls. They are similar to 1DIN car radios in width and installation depth. Better functionality is achieved by increasing the height of the housing by 2 times (up to 100 mm).
The two-din radio tape recorder does not fit into the VAZ 2107 car in its regular place. The installation of a large housing under the center console is hampered by the gear lever. It is also impossible to install a 2DIN car radio in place of the air ducts. At the top, the edge of the “dashboard” does not allow expanding the niche of the air ducts. To expand the niche downwards, you need to remove the stove controls. Much easier than a complex reconstruction of the dashboard would be to install a double-din radio in the glove box of the car. There is enough space in the glove compartment to install a double-din radio, which can be supplemented with a separate amplifier. The main difficulties of this method are the design of fasteners for the installation section. Under them you need to install damping pads that absorb vibrations of the plastic.
Installing the head unit
All modern power units use a standard ISO connector (International Unified Electrical Engineering Standard) to connect power cables and speaker wires.
After installing the car radio housing in the selected location, all cables must be secured into a rectangular block suitable for this connector. The letter markings of the car radio outputs are different; you need to look for them in the equipment manufacturer’s instructions. If your existing wiring uses a different type of connector, purchase an ISO connector adapter.
Connecting the radio to the VAZ 2107 power supply
The standard connection of the VAZ 2107 radio through the ignition switch is inconvenient because the radio and player can only be listened to when the engine is on. The designers chose this connection scheme for reasons of increasing battery life. To connect a new car radio in the same way, you can use the standard wiring. But keep in mind that with such a connection, advanced power units, such as Pioneer, KENWOOD, Alpine, Hertz, can reset new settings when the engine is started. Indeed, a more logical connection of the radio directly to the VAZ 2107 battery can drain a worn-out battery. Most often this happens when the driver forgets to turn off the quiet music at night. To avoid this drawback, a manual power switch button is embedded into the yellow power wire from the battery. The standard fuse for the VAZ 2107 radio is not provided in the block of protective devices. To install protection in a reserve location in the fuse box, you need to rebuild the electrical circuit. It's easier to buy a power cable that has a fuse built into it. For normal protection of the radio from strong inrush currents and short circuits, a 20-amp blade fuse is sufficient. To expand the acoustic system, move the installation location, and install complex power units, an acoustic tuning enthusiast must master the skills of an auto mechanic, radio technician, or electrician. If you do not have confidence in your abilities, it is better to turn to car acoustics professionals.
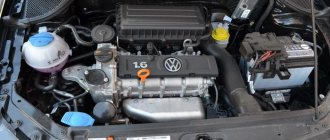
Rechargeable battery for powering the car radio
Another possible power source is a rechargeable battery. Not just the one for cars, but like the one for screwdrivers or other equipment. You can also supply power from an old car battery, but this is an option for the garage. At home we need something more environmentally friendly and safe.
Connection diagram of the car radio to the battery
There are, of course, ready-made units with a voltage of 12 - 14 volts. Ideal if you have other battery-powered equipment or an old case from a non-working battery with sagging banks. If it does not hold a charge, you need to change banks. Read more about this assembly in the article about battery restoration.