Causes of malfunctions
The gasket is placed between the exhaust manifold and the cylinder head. The stamped asbestos gasket is resistant to high temperatures, can be compressed (creating the necessary impermeability) and has increased strength. To enhance the latter quality, the exhaust manifold gaskets are additionally reinforced with steel.
The gasket is recognized as the most vulnerable point of the exhaust manifold, which operates under extreme loads in both temperature and pressure. It is not surprising that gaskets have to be changed not only on cars with significant mileage, but also on almost new cars.
Gaskets need to be rotated for several reasons:
- poor factory quality;
- engine overheating due to intensive use;
- engine repair (a used gasket loses its properties when dismantled).
More symptoms
- 1. The pressure on the turbine begins to decrease;
- 2. When driving at high speeds and under load, black smoke appears in the exhaust;
- 3. When driving on the highway, you feel increased fuel consumption;
- 4. It may start to whistle at certain speeds.
As you can see, the symptoms can significantly affect the driving characteristics of the car. Therefore, you should not delay replacing a burnt gasket. In this article, we discussed the main symptoms that the exhaust manifold gasket has burned out. I would like to add the word “may” to all the symptoms described in the article, since they may not appear, or they may appear in a slightly different way.
There are a number of “classic” breakdowns that affect cars of all makes and ages. One of these breakdowns is when the cylinder head gasket burns out. The breakdown is unpleasant and requires immediate repair.
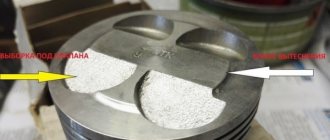
Most often, burnout occurs between one of the cylinders and the water jacket, spreading further along the plane. But there are other options, for example, between the oil channel and the cooling channel.
Signs of a burnt gasket
The easiest way is for the owner of a car with an injection engine, the operation of which is monitored by an ECU (electronic control unit). It sends a signal about a gasket failure to the dashboard, where the Check light comes on. This means that the lambda probe, which is usually equipped with the manifold, detected a change in the volume of oxygen in the exhaust, informing the ECU. The engine begins to operate in emergency mode until the defect is eliminated.
“Symptoms” of a burnt gasket:
- the engine is unstable;
- makes an uncharacteristic sound during operation;
- The cabin smells like exhaust gases.
ATTENTION! The fact that the exhaust manifold gasket has burned out is indicated by a recognizable chirping sound created by gases that break through the seal. Motorists often say that the engine “cuts.”
Exhausts through ventilation and heating systems quickly penetrate into the cabin, which is fraught not only with a deterioration of the microclimate, but also with negative consequences for health. This is why replacing the exhaust manifold gasket becomes a forced but necessary measure.
When is the manifold gasket replaced?
Nowadays, sealing gaskets are made from pressed high-strength asbestos, which, moreover, is additionally reinforced with steel. But even such a reliable material over time cannot withstand the loads it has to face. And at one “wonderful” moment, the driver realizes that the gasket on the manifold of his vehicle has burned out, which means it needs to be immediately replaced with a new one.
How does an experienced driver identify a gasket failure? Yes, very simple. Symptoms of its failure are as follows: the “aroma” of exhaust gases is noticeably audible in the cabin; The car engine does not start well; An unpleasant characteristic sound is heard from under the hood of the car. As soon as a motorist encounters the above symptoms, he should immediately begin checking the exhaust system for leaks.
And if the gasket is to blame (it’s not difficult to establish a leak - soot appears in the place where the gases break through), it must be changed immediately. See below for information on how to do this.
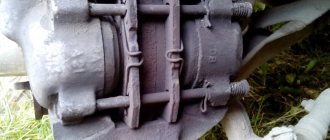
When is it necessary to replace and remove the exhaust manifold on a VAZ-2114
Huge temperature changes are the main problem faced by the exhaust manifold and the gasket, for which it is removed. The collector itself is made of a special grade of cast iron; it can withstand high temperatures (up to 800-900 degrees) , however, these are critical values, after which the collector may warp or crack.
Exhaust manifold VAZ-2114
Its main task is to collect exhaust gases and distribute them into the exhaust pipe of the muffler.
Replacing or dismantling the VAZ-2114 exhaust manifold is necessary in the following cases:
- Mechanical damage to the collector.
- Warping and loss of tightness at the junction with the cylinder head.
- Burnout of the gasket between the head and the manifold.
- The appearance of cracks as a result of engine overheating.
- Replacing the collector with a device of a different configuration, adapted to a more severe operating mode.
In the event that we are not going to participate in high-speed races for the prize of the head of the regional traffic police, replacing or dismantling the collector may be necessary in a number of cases.
Tools and materials for dismantling
There are a number of symptoms that will indicate that you need to prepare to remove the exhaust manifold:
- increased noise level in the engine compartment , the engine produces a characteristic, loud sound in any operating mode;
- breakthrough of exhaust gases into the engine compartment and sometimes into the cabin;
- reduction in engine power due to a mismatch between the exhaust gas outlets in the cylinder head and in the manifold.
Many people decide to replace the standard manifold with a “tuning” one, made of stainless steel and having a different configuration, thereby wanting to increase engine power and reduce the resistance that the standard manifold provides to exhaust gases. As a rule, the most common reason for dismantling a unit is gasket burnout .
Exhaust manifold gasket
The manifold gasket on the VAZ-2114 is made of pressed reinforced asbestos and is designed to ensure a tight connection between the block head and the manifold flanges. Asbestos is used to correct the coefficient of thermal expansion of the aluminum alloy from which the head is cast and the cast iron from which the manifold is cast. At high speeds and under prolonged loads, the gasket may burn out. Then its replacement and dismantling of the collector are inevitable.
To dismantle the manifold, you will need a standard set of tools, a set of sockets with extensions, and WD-40 penetrating lubricant or its equivalent. In case of broken studs, a stud extractor, drill, drill bits and a set of taps will be useful. A day or two before dismantling the collector, it is worth moistening all the fasteners several times, this will significantly simplify the removal procedure .
Some information about the exhaust manifold
This device, which is part of the exhaust system of a vehicle, is necessary to remove exhaust gases that depart from the cylinders into a common pipe. The manifold is also intended to improve the process of filling the combustion chambers and their high-quality ventilation. The exhaust manifold operates at high pressures and temperatures. It is attached rigidly to the cylinder head (cylinder head) and connected to the exhaust pipe or to a special catalytic converter.
How much does a repair at a service station cost?
How much will it cost to replace the exhaust manifold gasket? The price for this type of work depends on the type of engine (carburetor, injection, 8-valve, 16-valve), the model of the seal itself, as well as the prices of the service station where you plan to repair your car.
On average, the work itself, together with the seal, costs somewhere around 1,500 rubles.
But you don’t have to spend money on work. Replacing the VAZ exhaust manifold gasket can be done on your own without much difficulty. Especially if you have a set of hand tools and you have even the slightest idea about the design of your car’s engine.
This is interesting: DIY suspension tuning
Symptoms that the exhaust manifold gasket has burnt out. Complete list and action plan
In this article we will discuss the symptoms when the exhaust manifold gasket has burned out.
For an exhaust device, the gasket is one of the main parts on which the entire correctness and accuracy of the exhaust system will depend. If the manifold seal is not replaced in a timely manner, the safety conditions for operating the vehicle are greatly reduced.
In general, a manifold is a device designed to remove exhaust gases from a car engine. The second function of the collector is to improve the filling of the working chambers and enhance the ventilation of the working space. All operation of the exhaust device is carried out at elevated temperatures and high gas pressure.
What is needed for repairs
Replacing the exhaust manifold gasket involves using the following means:
- set of spanners;
- slotted and Phillips screwdrivers;
- sharp knife or spatula (to remove old gasket);
- a container with a wide neck with a volume of at least 5 liters (for draining coolant);
- rust preventative (WD-40 or similar);
- dry rags.
Important: replacing the exhaust manifold gasket 2114, like other VAZ models, requires preliminary draining of the coolant. Otherwise, you risk flooding the engine intake windows with it.
Symptoms that the exhaust manifold gasket has burnt out. Full list and action plan »
The exhaust manifold (EC) of a car engine is an element of the exhaust gas removal system. Its role is to collect combustion products from all cylinders and, combining them, transfer them to the exhaust pipe. From there they go to the catalyst, and after that to the muffler.
The exhaust manifold is attached to the cylinder head of the power unit (cylinder head). The tightness of this connection is ensured using a special gasket. Due to constant temperature loads, it sometimes fails. And although such a malfunction does not pose a serious threat to the engine, it is better to eliminate it immediately after detection.
In this article we will look at how to replace the exhaust manifold gasket using the example of domestically produced VAZ cars. But first, let's figure out what the VC itself is and how to determine that it's time to change its seal.
Changing the VK gasket on a VAZ 2110
Replacing the exhaust manifold gasket 2110 is performed in the following order:
- We put the car on the overpass (inspection hole), remove the protection, and be sure to drain the coolant.
- We de-energize the car's on-board network by disconnecting the negative terminal from the battery.
- Remove the air filter.
- Disconnect the hose of the brake booster, pneumatic valve cover, and fuel pressure regulator from the receiver.
- Disconnect the throttle sensor and idle air control.
- Disconnect the air duct and turn off the air flow sensor.
- Disconnect the crankcase ventilation hoses from the throttle pipe.
- Remove the inlet and outlet hoses of the cooling system from the manifold.
- We dismantle the receiver assembly with the throttle assembly.
- Unscrew the 5 fastening nuts and remove the inlet manifold.
- We unscrew the bolts (3 pcs.) that secure the exhaust manifold to the exhaust pipe.
- We dismantle the VK.
- Remove the old gasket or its remaining fragments.
- We clean the joints on the manifold and on the cylinder head.
- Install a new gasket.
- We install dismantled elements.
- Don't forget to add antifreeze (antifreeze).
As you can see, for a VAZ 2110, replacing the exhaust manifold gasket is performed using almost the same algorithm. Most importantly, do not forget to drain the coolant.
Replacing the exhaust manifold gasket with your own hands - do it right
- Replacing the exhaust manifold gasket with your own hands - do it right
- 1. Car exhaust manifold in detail: functions, design, proper operation
- 2. Signs that indicate the need to replace the manifold gasket
- 3. How to replace the exhaust manifold gasket: detailed instructions with explanations of the features
A car is a very complex mechanism that consists of countless systems.
The correct functioning of each of them, as well as their parts, ensures not only comfortable movement, but also saves human lives. Today we decided to introduce you in more detail to such an element of the entire exhaust system of a car as the exhaust manifold and gasket, which prevents exhaust gases from getting under the hood. Sooner or later there comes a need to replace it, but not everyone knows how to carry out such a procedure correctly. It is for such car owners that we have collected all the most necessary information. Below we will take a closer look at what an exhaust manifold is, how to understand that it is time to replace its gasket, and how to make such a replacement.
- 1. Car exhaust manifold in detail: functions, design, proper operation
- 2. Signs that indicate the need to replace the manifold gasket
- 3. How to replace the exhaust manifold gasket: detailed instructions with explanations of the features
Car exhaust manifold in detail: functions, design, proper operation
— removal of all exhaust gases that come from the cylinders of a car engine;
— effective purging and filling of the combustion chambers, which ensures uninterrupted operation of the engine and the vehicle as a whole.
On old and completely modern cars you can find two types of manifolds. The first of them is a one-piece exhaust manifold, which consists of a certain number of short channels. All these channels are combined into one common chamber, which discharges gases directly into the exhaust pipe or converter. Manifolds of this type are made primarily of metal and are installed on a large number of cars. As for the second type of collectors - tubular, they can be made not only of metal, but also of ceramics. The advantage of the second type is the ability to function more efficiently at medium and very high speeds. Models of such collectors can be found on more modern cars. Also, they are installed on cars when carrying out serious tuning of the internal filling.
Regarding the design of the exhaust manifold itself, absolutely all manufacturers try to make it exclusively from the most durable materials. For this, either stainless steel or heat-resistant cast iron are used. This ensures an extremely long service life of the collector, as well as no need for repairs. The only damage this element can really suffer from is water hammer. We are talking about cold water getting on heated metal, as a result of which cracks may appear on its surface. In this case, repairs may simply be useless.
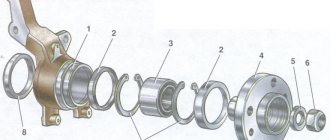
But, unfortunately, such a part of the exhaust manifold as its gasket requires regular replacement. The gasket is located directly between the manifold itself and the main engine cylinder block. Since there are four cylinders, the manifold branches into four branches, each of which necessarily has its own gasket. As already mentioned, the gasket completely blocks the possibility of exhaust gases getting under the hood of the car. Otherwise, it is quite possible that components and other equally important parts located in the engine compartment will ignite. After all, do not forget that during active operation the engine can heat up to more than 100°C
. At the same temperature, fuel combustion occurs, and all gases that are formed from combustion have approximately the same temperature.
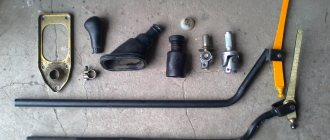
Tools and necessary parts
To remove the exhaust manifold on a VAZ 2114 in order to replace the gasket or entire part, you will need the following tool:
- open-end and ring wrenches for 8, 10, 13, 17;
- wrench with heads 17, 19;
- screwdrivers, pliers.
It is also a good idea to have tools such as a Dremel, nut saw or nut pick on hand. As a rule, the fasteners on the exhaust system parts stick tightly.
A few days before your planned repair, begin treating accessible nuts with WD-40 or another penetrating lubricant. Repeat the operation 2-3 times. This will make the task of removing the manifold a little easier .
The question often arises: is it worth using a sealant after removing and replacing the gasket? Experts believe that if you apply sealant to the gasket, it should only be high-quality silicone. A bad sealant can bring a lot of trouble to a VAZ 2114 engine: when it burns out, it turns into “pellets” that are pulled into the crankcase. And this is unnecessary contamination of the piston system.
Installing a new gasket in Toyota Dubrovka
Our specialists have been certified and work in accordance with the manufacturer's recommendations. They have modern diagnostic equipment that allows them to quickly and accurately determine the cause of the malfunction. In the case of the gasket, this is: a specific smell in the cabin, difficult starting of the internal combustion engine and characteristic sounds during its operation.
We have our own warehouse of spare parts, components and consumables, of which we are confident of originality and high quality. Our customers receive them at prices lower than dealer prices, which is another plus. The cost of the service is calculated individually, as it depends on the complexity of the event. In any case, it will be democratic, allowing you to optimize costs.
Order gasket replacement from professionals without delay, drive a working car!
How to extend gasket life
Although replacing the exhaust manifold gasket is inexpensive and can be done successfully in your own garage, who wants to waste their time on it? It's better to let it serve longer. And to extend its service life, listen to the following tips:
- monitor the condition of the cooling system, check the level of antifreeze (antifreeze) to prevent engine overheating;
- use only high-quality fuel;
- check the tightness of the connection between the cylinder head and the exhaust manifold;
- If you find that the integrity of the gasket is damaged, do not wait until it burns out completely, replace it;
- When buying an exhaust manifold gasket, choose a quality product from well-known manufacturers.
The exhaust manifold gasket is responsible for sealing the joint between the exhaust manifold, which removes exhaust gases, and the cylinder head. The part ensures the normal operation of the VK, and, as a result, the safety of the car.
How to change the gasket between the manifold and pants
The muffler gasket or O-ring is used to isolate the gas junction formed between the rear muffler and the resonator (auxiliary muffler).
Installing a gasket between the exhaust manifold (“pants”) and the muffler is also necessary to ensure mutual movement of the muffler pipes.
Damage to the gasket can be detected as follows: under the very bottom, in the place where the sections are connected, there will be carbon deposits. In addition, if the gasket between the cylinder and the muffler is damaged, an unpleasant odor created by exhaust gases appears in the car interior. A damaged unit also makes itself known by a characteristic grinding noise that occurs during engine operation.
How to get rid of the problem
The muffler gasket is usually beyond repair. If the muffler gasket (ring) is damaged, it will have to be replaced with a new one. Replacing the gasket is fairly easy.
- First of all, you need to get rid of the old gasket. You need to unscrew the two bolts that hold the flanges together. The bolts are usually rusty, making them quite difficult to remove. For this purpose, you can use a special tool (“liquid keys” or an angle grinder, if the situation is critical).
- After the bolts are removed, you will have to carefully move the resonator tube to the left side.
- The old muffler gasket is located on the resonator pipe. You will have to use a screwdriver to pry the product and remove it.
- Next, you need to use a metal brush and sandpaper to remove carbon deposits from the flanges.
- After this, the muffler gasket is replaced. The ring is installed on the resonator flange. The main muffler pipes are connected, and the flanges are screwed together using a clamp that has spring-loaded bolts that come in one set with a gasket.
The gasket (ring) of a car muffler is replaced in a fairly simple way. However, when removing the old gasket, it is important to take special care, because the cermet ring has a fragile structure, which is why it can easily break.
It is necessary to replace it in the event of a breakdown, because otherwise the car interior will be filled with fumes. Also, if a malfunction occurs, carbon deposits will begin to form under the very bottom, which will be very difficult to eliminate.
Which gaskets are best to use?
Quite often, a muffler exhaust pipe flange gasket is used for replacement, which is responsible for sealing the connection between the exhaust pipe of a car exhaust system and the exhaust manifold. This gasket is usually used on cars that have a receiving pipe mounted at two points (Volga third series, GAZ-21).
However, you can make your own pant liner. It is recommended to use the following materials:
Also, many motorists advise using automotive sealant that can withstand high temperatures. The technology for using it is quite simple: a thin layer (about one millimeter thick) is applied to the muffler in the seat, and then left to dry for twelve hours.
Most drivers prefer to use paronite to create a gasket. The creation process is as follows:
- First, a square-shaped piece of material is cut out, the old gasket is placed on it and placed on superglue.
- Then a marker is drawn along the entire contour. It is also necessary to circle all the holes located inside the product.
- The old gasket is removed, and then all the glue is removed.
- Next, the correct hole ratio is checked. If a discrepancy occurs, the product must be refined using a file.
There is an easier way:
- The surface on which the gasket will be present is cleaned and degreased;
- The gasket material is applied.
- Next, the product is hammered around the entire perimeter with a hammer.
- The gasket will gradually become visible, and the unnecessary part of the material will fall behind.
Ultimately, the finished gasket is modified using a round file and sandpaper, and then can be used for its intended purpose.
Symptoms that the exhaust manifold gasket has burnt out. Complete list and action plan
If the manifold seal is not replaced in a timely manner, the safety conditions for operating the vehicle are greatly reduced.
In general, a manifold is a device designed to remove exhaust gases from a car engine. The second function of the collector is to improve the filling of the working chambers and enhance the ventilation of the working space. All operation of the exhaust device is carried out at elevated temperatures and high gas pressure.
This element is attached directly to the head ( cylinder head
) and the other side is in contact with the exhaust pipe or converter. The most important task of the exhaust manifold gasket is to prevent exhaust gases from entering the valve space. These gases, in turn, can cause fire of parts or elements of the power unit.
Symptoms of a blown exhaust manifold gasket
The following can be distinguished: exhaust gases begin to flow into the car interior or their smell is felt; the car engine begins to start poorly; Strange sounds appear in the engine compartment. If these ailments are detected, you should begin to inspect the exhaust system. The collector itself is made of high-strength austenitic steel.
In this regard, burnout and replacement of the collector is quite rare. The main reason for the breakdown of the collector itself is drops of water falling on its hot surface, which leads to the formation of cracks in it.
The weak link of this durable and reliable element is the gaskets. Wear of the manifold gasket occurs mainly due to: poor quality of the material or very long operation under increased loads.
Manifold gaskets are now made from steel-reinforced, durable asbestos. However, even such a durable material is susceptible to destruction. The process of replacing the exhaust manifold gasket is not at all difficult.
Experts even recommend replacing the gasket after some time, without waiting for it to fail.
We carry out the following procedures:
- 1. Open the hood of the car;
2. Remove the air intake. Then remove the carburetor. Under these engine elements is the exhaust manifold;
3. Remove the thermal shield. It covers the collector;
4. Unscrew two nuts on each cylinder that secure the manifold;
5. Unscrew a couple of bolts from the exhaust pipe;
6. Remove the manifold;
7. There should be an old gasket or remains of it on the cylinder head;
8. We clear all the space for a new gasket;
9. Clean everything until it shines;
10. After cleaning, apply a graphite-based lubricant to the area;
11. Now install a new gasket;
12. Reassemble everything in reverse order.
My bad head does not give rest to my hands... I had suspicions that my exhaust manifold gasket had burned out, because the car had become too loud. Having purchased all the necessary parts, I went to a friend’s garage. And as usual, I will describe the process of replacing the gasket. We do everything on a cooled engine.
The first step is to remove the catalyst, or in my case, the transition pipe.
Using the “13” key, unscrew the two bolts with the springs securing the catalyst to the intake pipe (in common parlance, “pants”).
Using two “17” keys, unscrew the two bolts securing the catalyst to the main muffler (usually called the “resonator”).
Now we remove the pants holder (I don’t know what it’s called correctly). It consists of two parts - the bracket and the holder itself. Using a “13” wrench, unscrew the two nuts securing the bracket.
Replacing corrugations without a welding machine
If you need to replace the muffler corrugation temporarily, in unsuitable conditions, with your own hands without welding, then you can use two methods.
- The car must be jacked up on the right rear or raised on a lift or placed on a pit. Next, remove the old vibration damper by any means necessary. In its place, install a new corrugation and tighten the seats with clamps with a diameter of 48 mm. This DIY muffler corrugation replacement can last quite a long time.
- Remove the exhaust system completely. Drill 4.2 mm holes at the inlet and outlet simultaneously in the pipes and corrugation. Cut an M5 thread in the pipe, and drill holes up to 5 mm in the corrugation. It is necessary to carefully coat the outer diameter of the pipes and the inner seats of the corrugations with thermosealant. Screw in screws coated with sealant. Mount the system in place. After the thermosealant has hardened, it can be used.
Although these methods of attaching a corrugation to a muffler have shown good results, they cannot compare with a rigid welded mount.