Replacing the front brake caliper on a VAZ 2101-VAZ 2107
Welcome! The caliper - thanks to it the car slows down, inside this unit there are two so-called pistons, which, when braking, press on the brake pads and thereby these pads are rubbed into the brake disc, but over time this caliper and these pistons become unusable, and therefore the car may stop braking altogether with the wheel on which the caliper has failed and, in connection with this, the effectiveness of the brakes is significantly reduced, and just imagine if any wheel does not brake when you press the brake pedal, and the three remaining ones will, therefore, as they say, this problem must be eliminated immediately, and few people know how to do this, which is why we wrote this article in which we explained in detail the process of replacing the front caliper.
Note! In order to replace the caliper with a new one, you will need to stock up on: Be sure to have a basic set of wrenches that will contain a “17” and “14” key, and we also recommend that you also use a screwdriver or a bit, otherwise replacement turn out to be more problematic!
And one more thing, to replace the caliper you will need to take with you: Some kind of bright-colored marker, as well as a small piece of rubber tube or a bolt of a suitable diameter that will fit into the inside of the brake hose, if you don’t understand what’s going on speech then read the entire article because it says it all!
Where is the brake caliper located? If we take the majority of cars that AvtoVAZ produces, then basically all of them, including the classics, have only two calipers and they are located on the two front wheels, and the rear wheels already have drum brakes and as such they no longer have such a caliper, more For details on where this caliper is located on a classic, look at the photos just below:
Note! In the photo below, the front wheel has already been removed from the car, since a more detailed look at the caliper is only possible with the wheel removed, since it is painfully large and viewing it through the stamped “13” disc is problematic!
When should you replace your brake caliper? It is replaced in the case, as has already been said, of its severe wear, for example, in the case of its deformation due to which it was distorted by an impact, as well as in other cases when it is severely damaged and the wheel on which it is installed will not really stop .
The pistons of the brake cylinders are jammed, what should I do?
Welcome! Brake cylinders - thanks to them, braking is carried out, and without the pistons that are in them, these cylinders will not work at all, so if a piston fails, then you have to go to a car store and buy a new brake cylinder, because driving without brakes is scary and even more dangerous , but not in all cases the pistons stop working forever, sometimes they can be revived, and we will write in detail about how to do this in this article.
Note! To work, you will need to stock up on: A jack to lift any side of the car, as well as a wheel wrench and you may also have to stock up on bricks, and you may also need a basic set of wrenches and sockets!
Summary:
How to understand that the pistons of the brake cylinder are not working? Let us answer this question before we move on to the repair of pistons, namely inoperative (That is, the pistons do not move in the cylinder), the pistons are recognized if they do not move at all and stand in one place, as a result of which the car, namely the brakes, begins a number of problems occur, that is, the car cannot drive normally because it constantly slows down even though you don’t press the brake pedal at all, or it may be that the car will drive but it will brake much worse than it should, in general, let’s figure it out Why do these cylinder pistons fail?
From time to time, the sealing ring (indicated in the photo below by an arrow) that fits the piston in a circle either wears out, or micro cracks form in it through which dirt begins to get into the piston itself, where the lubricant is located, and as a result the piston becomes unusable.
And also, the piston can simply sour in the brake caliper, and this can happen because of our roads, which in winter are mostly sprinkled with sand and salt, and the brake system is located in the very bottom of the car and therefore is subject to heavy braking. and in general, when moving, all this salt flies which little by little brings the situation to the point where the piston simply rusts, otherwise it simply sours, and therefore it will then be very difficult to move it from its place and thus it stops moving and therefore stops working.
How to replace the brake caliper, also known as the brake mechanism, on a VAZ 2101-VAZ 2107?
Note! The brake caliper (We will also call it the brake mechanism, because it is the same thing), is best and more convenient to change on a car raised using a lift, but still, on a car standing on the ground, the brake mechanism can also be replaced, it will just be It's a little inconvenient!
Removal: 1) At the very beginning of the operation, either lift the car into the air using a lift, or you will need to remove the wheel on which you are going to replace the caliper in order to get to it. (For information on how to remove a wheel, see the article: “Replacing the front wheel on a VAZ”)
2) Then take a wrench in your hands and use it to completely unscrew the bolt that secures the brake hose bracket to the brake mechanism itself and then lift this bracket a little (the hose will remain in place) and thereby simply remove it, so that it simply does not interfere with you when removing the brake mechanism from the car.
Note! Under this bolt that secures the bracket there is a spring washer, you will immediately see it after you begin to unscrew the bolt securing the bracket, so remove this washer carefully without losing it!
3) Next, when the bracket is removed, immediately underneath there will be a bolt that will secure the brake hose itself to the brake mechanism, so you will also need to unscrew this bolt and then remove this bolt, remove the sealing washer that is located under it and which is also indicated by an arrow in the photo below:
Note! When you remove the sealing washer, then lift the brake hose itself and also remove it, moving it to the side and under the hose itself, by the way, there will be another sealing washer, which also needs to be removed!
4) Then when you remove the brake hose, there will be a hole in it through which the brake fluid will come out, it will flow until it comes out completely, so to prevent it from pouring out, insert it inside the hose itself (As shown in the photo below) a piece of any suitable tube, or if you can find it, insert a bolt of a suitable diameter there.
Note! While you are looking for a bolt or a piece of some kind of tube, you can at this time install the hose in its place (Where it was installed earlier) and secure it again with a bolt, and if necessary, also put a sealing under it washer and go look for something of a suitable diameter to plug the hole in the hose!
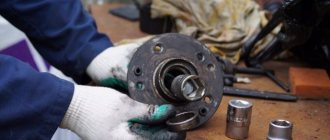
5) Then remove the brake pads from this brake mechanism, since they will interfere with removal, but you can still remove it without removing them, but as was noted a little earlier, this will be problematic. (For information on how to remove the pads, see the article: “Replacing brake pads”)
Note! In the event that you are going to continue to use the pads removed from the old brake caliper, then mark them with some kind of felt-tip pen or something else and install them on the new caliper in exactly the same way as they were installed on old brake mechanism, otherwise, if installed incorrectly, they will brake worse and quickly become unusable!
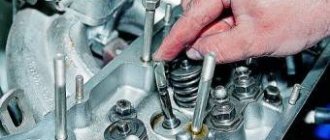
6) Now you will need to completely unscrew the two bolts that secure the brake mechanism to the steering knuckle, but before you start unscrewing them, bend them with a bit or with a thick screwdriver, carefully locking plates of both bolts as they will not allow you to unscrew them.
Note! The main photo just above shows the location of these bolts for fastening the brake mechanism, but since they are located in a very inconvenient place, namely on the reverse side, it was decided to show their location on the completely removed steering knuckle along with the caliper, and in the small photo slightly Above you can see the very bottom bolt of the brake mechanism and the same locking plate that the person in the photo bends with the help of a bit!
What to do if the rear brakes are stuck: 4 working methods
1. A screwdriver will help.
We can say that a vehicle owner is lucky if the car is equipped with disc brakes. Then there will be no difficulties with unlocking when the rear brakes jam:
- The wheel is dismantled, and the frozen brake pads are separated from the working disc of the brake system using a flat screwdriver.
- Next, the disk rotates, which should rotate easily after release.
- If the disc spins, the wheel is put back, the car is removed from the jack, you can move on.
2. Wedging the rear drum brakes using a hammer.
If drum mechanisms are installed on the rear axle (they can be seen even on modern cars), you need to act differently. The difficulty with this method is that the rear drum pads are not as easy to reach as is the case with discs. But there is a way out:
- The immobilized wheel is removed using a hammer.
- The drum is tapped along its entire circumference.
- Then the drum is rotated, it should be released. If this happens, the wheel is put in place and you can drive.
The effectiveness of the hammer method is approximately 70%. But what if the hammer didn't help?
3. Load on the rear axle plus a sharp start.
To solve the problem in this case, you need to load the rear of the car. It would be best to fit three adults in the back seat. If those interested are found, they are seated in the cabin, the power unit is started, it is spun to high speeds and a sharp start is made.
If it didn’t work the first time, don’t be upset: sooner or later the rear brake pads will come off the brake disc. This can be determined by the characteristic knock of the pads coming off. Helping passengers leave the back seat of the car, and the driver sets off.
This outcome is possible for 20% of successful wedgings, but what to do with the remaining ten percent?
4. Using a blowtorch.
The rear wheel is dismantled, the brake drum is thoroughly warmed up using a blowtorch. The main thing now is to distribute the heating as evenly as possible over the entire area of the drum. Otherwise, the brake cuffs will fail. You should work with a soldering iron until a characteristic click is heard, which means that due to heating, the drum has expanded and the brake pads have “come unstuck” from it. The wheel is put in place, after which you need to try to spin it. If everything went well, the car can continue moving.
What actions need to be taken so as not to be puzzled in the future by the question of why the rear brakes are sticking?
There are two rules:
- Do not put the car on the handbrake when parking for a long time.
- If the vehicle has driven into a puddle and the brake pads are wet, you need to dry them so that the rear brakes do not jam in the future. To do this, you need to press the brake pedal several times while driving and only then drive the vehicle into the parking lot.
“Repairing disc brakes: nuances and advice from professionals”
Do-it-yourself: Replacing the pads and caliper cylinder of a VAZ-2107
Hi all! As we remember, during the spring inspection of the car, a sticking working cylinder was discovered on the right wheel on the outside, so I decided to replace it by winter, and with it the brake pads, which came with the car. Oddly enough, in 3 years and about 25 thousand kilometers they have worn off just a little less than half the thickness, leaving about 5-6 mm.
I decided to replace them with the same ones that were there before - Ferodo in a green package, it seems like medium hardness. They have proven themselves well, they brake softly, quietly, and sometimes squeak in the heat. True, recently a slight vibration of the pedal has begun to be observed during prolonged braking.
I also bought a cylinder from Lada-Image; from experience, the factory ones last much longer. Before this, there was only one Phoenix and it turned sour in just a year.
I started replacing from the left wheel. Here the old pads turned out to be in good condition, but the lining is already peeling off from the sole.
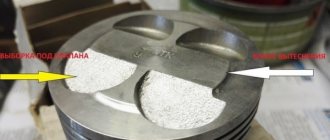
Also, on the outside of the brake disc there was a rather significant flange.
I decided to remove it using a grinder so that I could measure the approximate thickness of the disc, and the new pad simply would not be able to fit tightly to it.
This took a lot of time, and it was inconvenient; there was no smaller cutting disc available, and it was impossible to turn around because of the caliper. I decided not to do the other side, since the collar there was almost invisible.
As a result, the residual thickness of the disk was about 8 mm, which is less than the permissible 9 mm.
The new pads installed without problems.
On the right wheel they were more worn out due to a jammed cylinder.
Plus, an arc-shaped uneven development is clearly observed. Either the disc was crooked or did not fit tightly when braking.
Although, to the touch the surface of the disk seems to be smooth.
It turned out to be even thinner if you subtract the small beads from half a millimeter - in the region of 7.5-8 mm.
I changed the cylinder without any problems, since all surfaces were lubricated 3 years ago when it was replaced, then when buying the car, a couple of cylinders also turned out to be sour. I simply unscrewed the brake pipe, carefully moved it away and plugged it with a boot from the new cylinder, without draining anything.
Before installation, I lubricated the guide grooves, the threads of the fittings with graphite grease, and also under the boot with a small layer between the piston and the cylinder with special grease MS-1600.
I also lubricated the cylinder “ears” and guide pins a little.
Since only a couple of drops of brake fluid spilled out, I only bled this one wheel.
I took the old cylinder apart to see what was wrong. The piston itself had some minor corrosion on the outer edge and minor scuffs on the inner surface of the cylinder.
The pads were worn in for about a week, the pedal at first dropped almost to the bottom, but then began to grab at the very top. Braking has improved noticeably, runout is no longer observed, but still, I think that the discs will still have to be replaced in the spring.
Rear wheel jams: we'll deal with the situation
Issues discussed in the material:
- What to do if the rear wheel is stuck
- How to determine the cause of the problem
- Why, according to car enthusiasts, can the rear wheel suddenly jam?
Some motorists experience rear wheel jamming that occurs suddenly. And it’s good if the car is just starting to move. However, it is possible that the problem may arise while driving on the highway. This situation is highly likely to provoke an accident. What are the main reasons that lead to the rear wheel jamming? What should I do to successfully fix this problem? Let's look at these questions in this article.
Repair of the front caliper VAZ 2107
The front wheels of the “Seven” are equipped with disc brakes that are highly efficient. Each of the components of the VAZ 2107 car has two working cylinders, which bring the pads together and clamp the part located between them. This causes the disk to stop rotating. During operation, parts wear out and the faulty caliper needs to be replaced with a new one.
Typically, the cause of unit failure is corrosion processes of the cylinder walls and piston. In a working mechanism, they are protected from moisture by special rubber cuffs. Damage to these elements leads to moisture getting inside; over time, the unit loses its mobility and requires replacement or qualified repairs. Restoring the brake mechanism can be done independently.
What's the result?
As you can see, there can be many reasons for a failing brake pedal. If you are not confident in your abilities and skills, then you should refrain from trying to fix the problem yourself and immediately contact experienced specialists. It must be remembered that it is recommended to change the brake fluid in a timely manner, since the maximum service life is no more than 24 months. Also a sign of the need for replacement is cloudiness and blackening, and the appearance of a characteristic odor. Note that brake fluid tends to accumulate water, which significantly deteriorates its properties over time and serves as an additional reason for replacement.
Finally, I would like to note that in the event of unexpected problems with the brakes, you should not panic. There are certain techniques you can use to slow down and stop your car without using the brake pedal. First of all, don't forget about the parking brake. The so-called “handbrake” may well slow down or even stop the car if the car was moving at low speed (20-40 km/h). At the same time, an untrained driver should not sharply pull the handbrake at medium and high speeds (especially on a wet, icy or snowy road), since the car can skid, spin, be thrown off the road, into the oncoming lane, etc.
In such a situation, it is better to brake by gradually lowering the gear from high to low with shifting in a car that is equipped with a “mechanics” (manual gearbox). In some cases, you can use the contact emergency braking method, when the car deliberately collides with an obstacle and slows down after such contact or several contacts. This technique allows you to stop with minimal risks for the driver of a faulty vehicle and other road users.
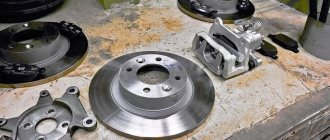
Dismantling the unit
To carry out repair work on the brake system of a VAZ 2107, you will need spare parts: a caliper assembly or a set of cylinders. Tools you will need: a set of keys, screwdrivers, pliers and a hammer. It is advisable to organize the work in a garage box; a portable lamp is used to illuminate the workplace. Repair of the brake system is carried out in the following order:
- The front part of the car is lifted with a jack and placed on a support, the wheels are removed.
- A thorough inspection of the caliper is carried out and it is cleaned of contaminants, using a key set to “17” we unscrew the bolt securing the brake hose and drain the liquid into a previously prepared container.
- Carefully move the brake pads apart using a screwdriver, applying force to the metal parts of the base. Using a drift of a suitable size, the guides are knocked out and the pads are pulled out.
- We unscrew the bolts securing the housing to the knuckle, thereby releasing the mechanism, and remove it from the brake disc.
Replacement of faulty cylinders installed in the caliper grooves is carried out by knocking it out. It is advisable to carry out repairs in a vice, having previously treated the grooves with a special penetrating liquid. Installing new cylinders usually does not cause any particular difficulties; they are inserted into the housing and driven all the way to the stop using a hammer and a soft metal drift.
Dips when pressing the pedal
Brake pedal
High-quality and clean brake fluid is the key to normal brake operation. It is thanks to its high density that the braking force is quickly transmitted to the wheels. Over time, it deteriorates its properties, air bubbles form in it, and moisture accumulates.
If a slight depressurization occurs in any area, the liquid flows out and air gets in its place. As a result, the brake pedal is either soft or hard. Several gentle pressures lead to the accumulation of pressure in an insufficiently dense liquid. Then it works, and effort appears.
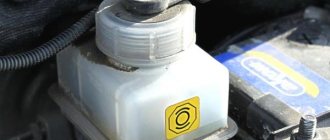
First of all, you need to check the presence of fluid in the expansion tank of the brake system; it is located on the master cylinder. If there is no liquid in it, you cannot drive; simply refilling it will not solve the problem. If you are planning a DIY repair, you will have to find the location of the leak - it could be any of the cylinders or some kind of tube.
Article on the topic: Registration of an accident according to the European protocol, how to fill out the form correctly
Installing the brake mechanism and bleeding the system
The restored caliper of a VAZ 2107 car is put on the disc and secured with bolts to the steering knuckle. The pads are inserted into the gap and fixed with guide springs; if necessary, parts are replaced with new ones. The brake hose and tube are installed in place, and the system is filled with fluid to the specified level. Repair of the brake mechanism ends with bleeding to remove it from the system.
This process on a VAZ 2107 car is carried out as follows: a hose of a suitable diameter is put on the nipple of the working cylinder. Its other end is lowered into a container with liquid. The assistant sits behind the wheel and presses the brake pedal several times and holds it in that position. Using the key, release the nipple and let out the air. We repeat this action until bubbles stop appearing in the container.
Brake pads are replaced with new ones when the lining thickness is 1.5 mm or less, when the linings are detached from the base, chipped or otherwise damaged on the surface, as well as when replacing worn brake discs. The pads can only be replaced as a set on both sides of the car.
Vacuum booster diagnostics
Often, a sign of depressurization is unstable engine operation (tribbing). This happens due to air entering the intake manifold. It sharply depletes the air-fuel mixture entering the cylinders. If the pedal does not press when the car is running, first of all you should check the reliability of the connections.
To pinpoint the problem, turn off the engine and wait a few minutes without pressing the pedal. If after this time the pedal remains hard, the most likely cause is a broken check valve.
Also interesting: How to bleed the brakes of a Niva Chevrolet
It is very easy to diagnose the correct operation of the vacuum booster
. To do this, without starting the car, you should “pump” the pedal, then, continuing to hold it, start the engine. If the vacuum seal is working properly, the pedal will go down.
What is needed to remove the caliper
- screwdriver or bit;
- keys for 17, 14 and 10;
- pliers;
- a piece of rubber tube or bolt with a diameter suitable for the inner diameter of the brake hose tip;
- marker.
It is necessary to remove and install the caliper when replacing it in case of deformation or damage. This is also a necessary action in order to repair the VAZ 2107 caliper.
To carry out the work, you must lift the car on a lift or use a jack. The latter option is somewhat more tedious, but ideal for home use.
How to determine the cause of the problem
It is not uncommon for the exact cause of a rear wheel jam to be found only by disassembling several components.
The minimum set of tools required for repairs is a jack, a wheel wrench and special keys. In addition, physical strength will not hurt. It is not always easy to unscrew a wheel, especially in winter. In winter, the wheels stick very tightly to the rim. And these details are not easy in themselves. For successful repair you need to do the following sequence of operations:
- The wheel cover must be removed. A flathead screwdriver or wheel wrench works well for this.
- Each wheel bolt should be loosened one turn using a wheel wrench.
- Attach the wheel wrench and handle to the jack.
- The jack must be installed only under special reinforced places in the thresholds of the car. Usually they are located under the doors near the arches. It is prohibited to lift the car with a jack that is not securely fixed in a specially designed place on the car.
- Then you can raise the car. This should be done carefully, rotating the jack handle clockwise. You shouldn’t raise it too high; just raise the bottom of the wheel to a height of at least 3 cm from the ground. Be sure to follow safety precautions and not stand under a car that is raised with a jack! Moreover, it is forbidden to start the car engine in this position!
- When the vehicle is raised to a sufficient height, you can remove the wheel bolts or nuts. This is done using a wheel wrench by rotating it counterclockwise. Next, the fasteners are removed and the wheel itself is removed.
- The wheel is now removed and you can begin removing the pad springs. To successfully carry out the operation, you need to hold them from the back, press them with pliers, turn them and remove the crackers. The brake disc blocks the path to the bearing, which allows the wheel to rotate. The bearing is covered with a cover secured with bolts.
We recommend
It is necessary to carefully inspect all elements. This is the only way to determine the scope of repairs. Noticeable wear on a part is a good reason to replace it. Experienced drivers can handle this work on their own. The main thing is to approach the matter carefully and carefully perform all the necessary operations. If you do not have deep knowledge and skills in car repair, it is better to send your vehicle to a service station using a tow truck.
Removing the brake caliper
To remove the caliper you must do the following:
- lift the car on a lift or jack up the wheel on which the brake caliper needs to be removed;
- Using a wrench, remove the bolt securing the brake hose bracket;
- remove the bracket so that it does not interfere with further actions;
Important: under the bracket fastening bolt there is a spring washer, which must not be lost when dismantling the bolt and bracket.
- unscrew the bolt securing the brake hose;
- remove the bolt after first removing the two o-rings;
- insert a rubber tube or bolt of a suitable diameter into the hole in the brake hose tip to prevent brake fluid from leaking out;
- Use pliers to remove the cotter pins securing the brake pad pins;
- pull out the pins securing the brake pads and remove them using a bit or a thin, but not sharp, screwdriver;
- remove the retaining springs from the brake pads;
- remove the brake pads;
Advice: if you plan to use the brake pads in the future, they should be marked with a marker so that during reassembly they can be installed in the same place where they were. If this is not done, they will wear out faster and brake worse.
- bend the locking plates of the washers on the caliper mounting bolts;
- unscrew and remove the bolts securing the caliper to the steering knuckle;
- Remove the brake mechanism (caliper) of the VAZ 2107 from the brake disc.
Important: the upper and lower caliper mounting bolts differ in the shape of the head. When installing the unit in place, it is necessary not to mix them up.
BRAKE DISC MANUFACTURERS
As a rule, car owners, having discovered the wear of one or two brake discs, are in no hurry to replace them with standard VAZ ones, remembering their mediocre quality. But since the spare parts market is now literally flooded with discs from various manufacturers, a novice driver becomes completely confused by such abundance. Which companies should you prefer? Let's list the most popular ones.
ALLIED NIPPON WHEELS
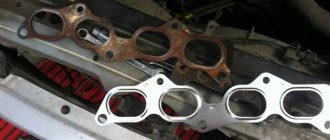
Allied Nippon is a manufacturer very well known in the domestic auto parts market. This company specializes mainly in brake pads and clutch discs, but also produces brake discs that are suitable for “sevens”.
Allied Nippon wheels have always been distinguished by the optimal combination of price and quality
Allied Nippon wheels are made from high quality cast iron and undergo mandatory three-time sizing and balancing testing. The company produces both ventilated and non-ventilated discs, which are almost always supplied complete with brake pads. The manufacturer guarantees that the brake systems it supplies will cover at least 50 thousand km before the first failure. And finally, the price for Allied Nippon wheels is more than affordable, starting at 2,200 rubles per set.
ASP DISCS
The ASP company is widely known not only in Europe, but also among domestic owners of VAZ “classics”. The Russian market offers mainly non-ventilated brake discs, which are also suitable for the VAZ 2107.
ASP discs have the highest wear resistance and reasonable price
ASP discs are processed on high-precision machines and are triple checked for balancing and dimensions. They have the highest wear resistance: the manufacturer guarantees that they are able to travel at least 100 thousand km before the first breakdown. In fact, the only drawback of ASP disks is their considerable weight, but this drawback is more than compensated for by the attractive price, which starts at 1,500 rubles per set.
ALNAS WHEELS
Another large manufacturer of high-quality brake discs is Alnas. It produces mainly ventilated discs with a wide variety of perforations. Recently, the range has been expanded with radial discs with different notches. Alnas products are in demand primarily among drivers who tune their cars and among drivers who prefer an aggressive driving style. New discs can travel at least 80 thousand km before the first failure. They are lightweight, and the price, given their sporting purpose, is steep: the cheapest set will cost the driver 2,900 rubles.
Alnas wheels are designed for drivers with an aggressive driving style
These are, perhaps, all the major manufacturers of brake discs, whose products the owner of the “Seven” should take a closer look at. Of course, there are a lot of smaller companies that are very aggressively promoting their wheels on the auto parts market. But the quality of their products often leaves much to be desired, so there is no point in mentioning them in this article.
So which wheels should a novice driver choose?
When choosing wheels, you should consider two things: your driving style and your wallet size. If the driver prefers aggressive driving, reliable brakes and is not short on money, then the optimal choice would be Alnas products. If a person is used to driving carefully, and the main criterion for him is durability and reliability, it is worth purchasing ASP wheels. And finally, if money is short, but high-quality ventilated discs are still needed, the last option remains - Allied Nippon.
Repair of brake caliper VAZ 2107
A damaged or deformed brake caliper on a VAZ 2107 needs to be replaced. Caliper repair involves replacing faulty brake wheel cylinders. In some cases, instead of replacing the cylinders, they can be repaired.
The procedure for replacing cylinders is as follows:
- clamp the caliper in a vice;
- Unscrew the fittings of the connecting tube with a 10 mm wrench;
- remove the tube connecting the working cylinders;
- Use a hammer to knock out the working cylinders from the guides, after pressing the lock with a screwdriver;
- remove the clamps and replace them with new cylinders (if they are missing);
- insert the cylinders into the guides;
- install the connecting tube and tighten the fittings.
Repair of working cylinders consists of replacing the rubber sealing rings on the pistons. The order of operations is as follows:
- remove the brake cylinder;
- remove the protective cap from the piston using a screwdriver;
- apply compressed air to the cylinder to push the piston out;
- remove the sealing ring by prying it off with a screwdriver;
- install a new ring;
- lubricate the cylinder, piston and ring with brake fluid;
- insert the piston into the brake cylinder.
Important: before installing new sealing rings and assembling the cylinders, you must make sure that the inner surface of the cylinder and the piston are free of damage, cavities, and deformations. Otherwise, replace the brake cylinder with a new one.
Other reasons why front brakes stick
The front wheels do not always jam the same way; this can manifest itself in different ways. Both front wheels can “stick” at once, and you simply won’t be able to move. It happens that they seem to be spinning, but with great difficulty, making a creaking sound. This is a dangerous situation, especially if you ignore the problem and continue driving. Only one front wheel can jam, while the other spins freely. Let's look at the possible reasons.
The brake pedal is poorly adjusted or has no free play at all.
There must be sufficient clearance between the master cylinder piston and the pusher for the pedal to move normally. This is adjustable.
The brake pad tension spring is faulty.
This does not mean that it is cracked or completely torn, perhaps just stretched. There is such a thing as metal fatigue, and a weakened spring will no longer function normally; it is better to replace it.
Another reason why the front brakes stick is that the vacuum booster is not in order.
It can jam for several reasons. Perhaps the diaphragm is swollen, or the protective cap or lid seal is pinched.
Pay attention to the amplifier adjusting bolt
It should not be too tight. It is important that it protrudes slightly above the surface of the master cylinder. There is something wrong with the brake pad friction lining.
There is something wrong with the brake pad friction lining.
The problems can be different: the gasket wears out, breaks, or becomes too thin. This usually leads to damage to the pad itself, so in this case it is necessary to change both it and the lining
Important: if you are changing a worn gasket, then the pair to it should also be replaced; they must be the same in thickness, otherwise the car will be pulled off the line of movement to the side. The reason that the front brakes are sticking may be a stuck piston in the wheel brake cylinder.
The reason that the front brakes are sticking may be a stuck piston in the wheel brake cylinder.
This kind of trouble can happen in any car, so you need to be able to deal with it. The reasons for this situation are different: low-quality brake fluid, uneven position of the cylinder body in the caliper, rust and corrosion on the working surfaces of the piston. Disassemble the problematic cylinder, clean all components, rinse with brake fluid, reassemble the system and bleed. Fill with good quality brake fluid.
The cuffs on the wheel cylinder have lost their shape or are swollen - this is also one of the reasons why the front brakes stick.
The cuffs of the master cylinder or wheel cylinders swell from fluids such as oil, gasoline and others that have entered the brake system. This jams the cylinders, which results in a problem with the brakes. But you just have to replace the cuff, and everything will work out
It is recommended to at least occasionally check the condition of the cuffs, and when disassembling the car (no matter for what reasons), replace them, even if these elements look absolutely intact
Oxidation stains on the guides.
They need to be cleaned, lubricated, and you will no longer have to think about why the front brakes are sticking.
The compensation hole on the brake master cylinder is dirty.
This is a labor-intensive process, a large and messy piece of work, but no spare parts will be needed, meaning repair costs will be minimal. It is necessary to clean the hole and bleed the brake hydraulics.
The pistons of the master cylinder as well as the wheel brake cylinders are stuck.
In this case, only experienced car owners who have already disassembled and reassembled various systems of their car more than once will be able to figure out why the front brakes are jamming. It is better to entrust the diagnostics to specialists: they will find the cause of the malfunction and immediately begin repairs.
It often happens that it is enough to just thoroughly clean and lubricate the necessary parts. Check the hoses to see if they are in order. It often happens that the hose is pinched by the clamp holding it, especially if it is corroded. This can also cause the front brakes to jam. The best thing in this case, of course, is to replace the clamp with a new one. But you can just loosen it slightly and blow out the hose well.
It is perhaps not so easy to immediately determine why the front brakes are jamming. This can happen for many reasons, and if you yourself are not very versed in the operation of car systems, then it is better to entrust the inspection and repair of the car to service station specialists. After all, a properly functioning braking system is the key to both your safety and that of other road users.
The front brakes are sticking. Causes, elimination. Watch the video:
https://youtube.com/watch?v=qZ70UPly3kc
Installing the brake caliper
Installation of the brake caliper on the VAZ 2107 is carried out in the reverse order of its dismantling.
After installing the brake caliper, it is imperative to bleed the brake system, removing air from it. Until this operation is completed, operating the vehicle is strictly prohibited.
The left and right wheel calipers are slightly different, so you need to pay attention to this when purchasing new ones.
After repairing and installing the VAZ 2107 brake caliper, it is necessary to check the brake system for fluid leaks and, if necessary, repair them.
Important points
When repairing the brake system of a VAZ 2107, you should remember several very important nuances. Without mentioning them, this article would be incomplete. So:
- On later VAZ 2107 models, spring washers began to be installed under the fastening bolts of the brake brackets. They are thin and very easy to lose when removing the bracket. To prevent this from happening, it is advisable to spread some newspaper or rag under the caliper. If the puck does pop out, it will be much easier to find it;
- If the driver does not plan to change the brake pads when replacing the caliper, then before removing them they should be marked with a marker or chalk so that they can be installed in the same place during reassembly. If you change the original location of the pads, they will become unusable much faster;
- If the driver decides to leave the caliper in place and plans to change only the brake pads, then he will have to buy not one, but two sets of pads, since these parts are always changed on two wheels, and not on one. If you leave old pads on one of the wheels, this will inevitably lead to rapid wear and new problems in the operation of the brake system;
- After removing the pads, do not press the brake pedal under any circumstances. The pistons on the hydraulic cylinders mounted in the caliper will move outward and prevent the installation of a new pair of pads. But pushing the pistons back will be very difficult: in some cases, this requires completely draining the brake fluid from the system;
- When unscrewing the fastening bolts on the caliper, you should remember: they differ in the shape of the head. The head of the top bolt is smaller, the head of the bottom bolt is larger (in the photo it is marked with the letter “a”). If the bolts are swapped, it will be impossible to install the brake pads;
- When buying a new caliper in a store, you should definitely tell the seller which side it will be installed on, since on the VAZ 2107 there are differences in the design of the left and right calipers. For example, the holes for the mounting bolts are located differently, so that the left caliper will not fit the right wheel and vice versa;
- Finally, after installing the caliper, you should be sure to press the brake pedal several times to check whether the new caliper works or not. In addition, after pressing the pedal, be sure to inspect the caliper and the asphalt under the car for brake fluid leaks.
So, replacing a brake caliper is not as difficult a task as it might seem at first glance
The main thing that the driver should remember when changing this part is its extreme importance. If a mistake is made when installing the caliper or pads, this does not bode well for either the driver or the car.
It is for this reason that the article described in as much detail as possible all the nuances of installing a brake caliper.
And it is strongly recommended that you pay close attention to these nuances.
Caliper VAZ 2107. Tips for repair and replacement (photo, video)
An important part of the brake mechanism is the caliper. It holds the brake wheel cylinders, which, when the pedal is pressed, compress the brake disc, slowing down the rotation of the wheel. Over time, the brake cylinders and the brake caliper of the VAZ 2107 wear out and the wheel begins to brake worse, which can lead to pulling to the side when braking or brake failure. Therefore, these parts need to be monitored and, if necessary, repaired or replaced.
Where is the front caliper of the VAZ 2107
On the “seven”, disc brakes are installed only on the front wheels. The rear ones use a drum brake mechanism. Therefore, in the phrase “front caliper VAZ 2107” the word “front” is redundant. There are only two calipers and both of them are on the front wheels.
Access to the brake calipers opens after dismantling the front wheels of the car.
What is needed to remove the caliper
- screwdriver or bit;
- keys for 17, 14 and 10;
- pliers;
- a piece of rubber tube or bolt with a diameter suitable for the inner diameter of the brake hose tip;
- marker.
It is necessary to remove and install the caliper when replacing it in case of deformation or damage. This is also a necessary action in order to repair the VAZ 2107 caliper.
To carry out the work, you must lift the car on a lift or use a jack. The latter option is somewhat more tedious, but ideal for home use.
Removing the brake caliper
To remove the caliper you must do the following:
- lift the car on a lift or jack up the wheel on which the brake caliper needs to be removed;
- Using a wrench, remove the bolt securing the brake hose bracket;
- remove the bracket so that it does not interfere with further actions;
Important: under the bracket fastening bolt there is a spring washer, which must not be lost when dismantling the bolt and bracket.
Disadvantages of drum mechanisms
Drum brakes Despite the fact that drum brakes are correctly designed, mounted and adjusted at the factory, which is why intervention is not required, they have certain disadvantages:
- This is an outdated solution that is practically never found on new cars from leading European manufacturers;
- When compared with disk mechanisms, drums are significantly inferior in efficiency;
- There is no cooling or ventilation on the drums, which leads to overheating under heavy loads on the car;
- The drums have a closed space, so it is not possible to remove dirt and wear products in the form of black dust, leaks of fuel oil and trapped moisture naturally. This is done by cleaning.
How to remove the brake drum on a VAZ 2110, Kalina, Priora, Granta, 2108, 2109, 2111, 2112, 2113, 2114
Installing rear disc brakes on a VAZ! Do-it-yourself replacement of drum brakes with disc brakes [BMIRussian]
Caliper: dismantling and installing the unit on a VAZ 2107
The front wheels of the “Seven” are equipped with disc brakes that are highly efficient. Each of the components of the VAZ 2107 car has two working cylinders, which bring the pads together and clamp the part located between them. This causes the disk to stop rotating. During operation, parts wear out and the faulty caliper needs to be replaced with a new one.
Typically, the cause of unit failure is corrosion processes of the cylinder walls and piston. In a working mechanism, they are protected from moisture by special rubber cuffs. Damage to these elements leads to moisture getting inside; over time, the unit loses its mobility and requires replacement or qualified repairs. Restoring the brake mechanism can be done independently.
Dismantling the unit
To carry out repair work on the brake system of a VAZ 2107, you will need spare parts: a caliper assembly or a set of cylinders. Tools you will need: a set of keys, screwdrivers, pliers and a hammer. It is advisable to organize the work in a garage box; a portable lamp is used to illuminate the workplace. Repair of the brake system is carried out in the following order:
- The front part of the car is lifted with a jack and placed on a support, the wheels are removed.
- A thorough inspection of the caliper is carried out and it is cleaned of contaminants, using a key set to “17” we unscrew the bolt securing the brake hose and drain the liquid into a previously prepared container.
- Carefully move the brake pads apart using a screwdriver, applying force to the metal parts of the base. Using a drift of a suitable size, the guides are knocked out and the pads are pulled out.
- We unscrew the bolts securing the housing to the knuckle, thereby releasing the mechanism, and remove it from the brake disc.
Replacement of faulty cylinders installed in the caliper grooves is carried out by knocking it out. It is advisable to carry out repairs in a vice, having previously treated the grooves with a special penetrating liquid. Installing new cylinders usually does not cause any particular difficulties; they are inserted into the housing and driven all the way to the stop using a hammer and a soft metal drift.
Installing the brake mechanism and bleeding the system
The restored caliper of a VAZ 2107 car is put on the disc and secured with bolts to the steering knuckle. The pads are inserted into the gap and fixed with guide springs; if necessary, parts are replaced with new ones. The brake hose and tube are installed in place, and the system is filled with fluid to the specified level. Repair of the brake mechanism ends with bleeding to remove it from the system.
This process on a VAZ 2107 car is carried out as follows: a hose of a suitable diameter is put on the nipple of the working cylinder. Its other end is lowered into a container with liquid. The assistant sits behind the wheel and presses the brake pedal several times and holds it in that position. Using the key, release the nipple and let out the air. We repeat this action until bubbles stop appearing in the container.
comments powered by HyperComments
You might be interested:
The brake failed at full speed: what to do?
First, try pressing the pedal sharply several times: perhaps its functionality will be partially restored. Next, assess the situation and identify a place where you can gradually turn. Then tighten the handbrake (don't do it too hard) and start shifting (if you have a manual transmission) to a lower gear. At the same time, when the lever is in “neutral”, press the accelerator (perform “re-throw”) to “prepare” the gearbox gears for emergency operation. As a last resort, choose the lesser of two “evils” - it is better to run into some obstacle near the road (roadside bushes are a good option) than to collide with a car.
https://youtube.com/watch?v=RLKzha1KnDk
Replacing the brake caliper on a VAZ 2101-2107
The design of the front brake caliper on the VAZ 2101-2107 is quite durable, and it is rarely replaced separately. But it has to be removed a little more often, mainly due to the replacement of brake cylinders. Nevertheless, if you need to replace the caliper on a “classic”, then below I will try to clearly explain the entire dismantling procedure. First, it's worth noting that to perform this procedure you will need the following tool:
- Wheelbrace for wheel removal
- Jack
- Driver and ratchet
- Head for 17 and 14
- Thin flathead screwdriver
- Hammer
Now let's take a closer look at how the work is done.
How to remove the caliper on a VAZ 2101-2107 on your own
First, lift the front of the car with a jack and remove the wheel. Then you need to use a flat screwdriver to bend the fixing bracket of the bolt that secures the brake hose:
Now you can unscrew the brake hose, as shown in the photo below:
Now we take a 17mm head and a wrench, and use them to unscrew the two caliper bolts. First from the bottom:
Now you can remove the entire structure, even together with the brake pads; you can knock it off the disc with small blows of a hammer:
It should easily come off the brake disc without much effort. The final result of repairing a VAZ 2101-2107 to remove the caliper is shown below:
If necessary, we replace the necessary parts and perform the installation in the reverse order. After which you will need to bleed the brake system, as air may appear in the pipes.
How to turn an inoperative brake cylinder piston into a functional one?
1) At the very beginning of the operation, you will need to remove the wheel from the car.
Note! By the way, when you remove the wheel from the car, try to spin it while it is in the air; if it slows down, then some piston has actually become unusable!
2) After your wheel is removed, immediately remove the caliper from the car after it in order to get out the brake piston that is not working. (For information on how to remove the brake caliper on front-wheel drive cars, see the article: “Replacing the brake caliper on a VAZ 2109”, and for information on how to remove this caliper on a classic, see “this article”)
3) Now, when the caliper is removed from the car, you will need to find a vice, or a very strong compressor, in order to remove the piston from the brake cylinder, so if you have a vice, then go to it and clamp the piston itself and behind the caliper after Once you clamp the piston, pull it, and thereby the piston will be removed from its installation location.
Note! If you don’t have a vice, then pick up a compressor or something else where air can come out under pressure and thereby insert the hose from the compressor into the small hole in the caliper, namely where you connect the brake hose itself and then turn on the compressor and the piston will fly out of its installation location!
4) Next, take the removed piston in your hands and inspect it, if you find traces of rust on it as shown by the arrow in the photo below, then they will have to be removed using some kind of chemical or something else (A good example of cleaning the piston from rust, shown in one of the videos below), and after the rust has been removed, also inspect the brake caliper itself and finally reassemble all previously removed parts in the reverse order of removal and at the very end check their functionality.
Note! Still, a new piston is not too expensive in the store for our domestic cars, so if you have the opportunity, then it’s better to replace it with a new one and throw away the old one, because who knows after how long it will start to rot again, maybe it won’t even last for a week will last and thus you will again have to disassemble the entire brake system, and by the way, if the boot on it is torn, then you will definitely need to replace such a piston with a new one, since dirt has already got into the inner part and it is unlikely to be able to get it out, yes Moreover, there will still be lubricant there, so as they say, decide for yourself to repair the piston or replace it with a new one!
Additional video: If you want to know how to remove the piston from the brake cylinder on front-wheel drive cars using the VAZ 2109 as an example, then watch the video below, which explains all this in detail:
Problems when braking
The parking brake is a mechanical lever-type device with a cable drive. In this case, braking is carried out only by the rear wheels. These brakes include a brake lever, cable, pads. All brake system problems can be divided into several types. Moreover, each malfunction has a list of specific causes and methods for eliminating them. Problems that arise during the operation of the braking system usually have the following manifestations:
- braking is not fast and effective enough;
- incorrect and untimely braking;
- during braking, the car drifts to the side;
- jamming of the cable when turning the handbrake on and off.
The braking process may not be fast or effective enough if brake fluid leaks. This can happen in the area where the VAZ brake cylinders are located. To fix this problem, you need to remove the broken parts and install new ones. It will be necessary to clean and dry all the pads, drums of the VAZ 2106 brake system, and the hydraulic brake drive.
Problems with braking can arise due to the accumulation of air in the depths of the VAZ system itself. If you get rid of it, the car will work perfectly. Malfunction of hoses leads to disastrous consequences, so they need to be changed on time. Rubber seals located in the brake system affect the operation of the machine, so they require timely replacement.
1 – cap; 2 – clamp; 3 – wheel mounting bolt; 4 – brake drum; 5 – hub; 6 – axle; 7 – brake shield; 8 – brake pad; 9 – pressure spring; 10 – emphasis; 11 – the tip of the spacer bar is long; 12 – tension spring (long); 13 – dirt-proof cover; 14 – cylinder; 15 – piston; 16 – cuff; 17 – thrust ring; 18 – air release valve; 19 – valve cap; 20 – flexible hose; 21 – lock washer; 22 – axis; 23 – adjusting nut; 24 – the tip of the spacer bar is short; 25 – expansion lever; 26 – cable end; 27 – cable spring; 28 – cable; 29 – tension spring (short); 30 – split washer; A – threaded holes for removing the drum
Why the rear wheel jams and what to do: advice from car enthusiasts
- “The reason is the cable.”
“I suffered with this rear wheel wedge. There was a need to transfer all new parts from an old car to a recently purchased one. I failed to notice that the defect was in the handbrake lever, to which the cable is attached. The previous owner lengthened it a little so that he could use the handbrake with the old stretched cable. This small nuance led to the rear left wheel jamming.
New pads, drum, cylinder and handbrake cable were installed, but the slightest hit in the hole on this side led to jamming. A cheap item caused significant problems. How much time was lost, I rebuilt the wheel three times, but the fault appeared again.”
“An ordinary hammer will help.”
“I had to somehow replace the drum brake pads on a VAZ 2114 car. In the process of removing the drum, the pad guides were bent. I didn’t notice this in time and, since the pad had little wear, I installed it back. After this, the wheel began to jam periodically. Repeated disassembly, straightening of the bent element - as a result, everything works without problems.”
"5 reasons for the wedge."
“I’m answering a popular question on the Internet: “Why does the rear wheel jam?” Several problems may be causing this. For example, a leaking oil seal. I myself encountered something similar in winter on a VAZ 06. Wear of the spacer bar and, as a result, mismatch of the slots. Or, for example, the tension spring has lost its properties. In some designs, the brake cylinder may be the culprit for the wedge. This applies to products with retaining rings that limit the reverse movement of the piston. When the pads are worn out, the stroke of the cylinder is no longer enough to move them apart. Designs with an eccentric have their own nuances.”
"Everything is in order."
“Many drivers have encountered a stuck rear wheel. The first thing to do here is to make sure that the levers are mobile. If there are no comments, you should check the wheel bearing. On a jacked car, move the wheel to the sides. The presence of a lift will indicate imminent wheel bearing failure.”
“A little bit of moisture and that’s it!”
“Last winter the handbrake cable froze. Even a slight jam at the end of the cable stroke led to the rear wheels blocking. If you drive a little, the brakes remain cold and the wheel does not jam. If you use the car intensively, you should put the car on the handbrake, and after turning it off, the rear wheel does not spin. I had to manually pull the cable under the car with a pry bar. We're talking about disc brakes."
We recommend
“During the replacement of the brake drums, it turned out that the adjusting bars had lost their functionality due to age and corrosion. They no longer worked automatically; only manual adjustment was possible. This is after both rear wheels suddenly jammed while driving in the parking lot with the handbrake turned off. I had to solve the problem on the spot by opening the brake mechanisms.
Removing the drums was not an easy task. The slats were completely apart. I picked at the joints of the two halves of the planks with a screwdriver and solved the problem. The slats no longer jam, but they are no longer adjustable. I'm planning to buy new ones. But they are imported and are not cheap, so now I am collecting money.”