Why are oil seals needed and how are they designed?
Engine cylinders need protection from foreign substances entering the combustion chamber. It is the oil seals (or valve stem seals) that play the role of a kind of protector. Their task is to prevent oil from penetrating while the valve stems are operating. If the caps have lost their function, they must be replaced. Otherwise, carbon deposits will begin to appear on the walls of the engine, which will lead to increased oil consumption.
A running engine causes all elements of the gas distribution mechanism to constantly move. They rub against each other, which inevitably leads to wear. To reduce the wear rate, oil gets onto the surface of each element. In this case, you need to ensure that the oil does not end up in the working area of the valves. Otherwise, the motor will begin to malfunction. To ensure that not a drop of oil penetrates into the combustion chamber, oil seals are installed.
Valve seals have a very simple structure. They consist of only three elements:
- Base. This is the oil seal frame, which is made in the form of a steel bushing. This element ensures the strength of the spare part.
- Spring. It ensures the tightness of the mechanism by pressing the rubber tightly against the valve stem.
- Cap. This is the main element of the device, made of rubber. With its help, excess oil on the rod is eliminated.
Replacing seals on valves and other structural elements of a VAZ 2106
Replacing valve seals on a VAZ 2106 is an important and not too complicated procedure, which is necessary in cases where increased oil consumption is noticed or bluish smoke is detected. These signs are harbingers that it is time to repair your car engine. Timely replacement of oil seals guarantees normal operation of the machine.
The purpose of this type of VAZ 2106 valve seal is as follows: they help remove excess oil that can get into the valve stems. They are designed to remove excess grease, since some of the oil must get into the bushing. They can be called one of the types of cuffs; oil seals must seal between car parts. Before replacing seals, you need to find out whether they are suitable for use. If this structural component fails, then the signs of failure are:
- the appearance of lubricating fluid on the threads of spark plugs;
- the appearance of increased exhaust smoke when the engine is cold;
- increased oil consumption;
- the appearance of dark lines in the camshaft area near the cap;
- frequent failure of spark plugs.
To determine the reasons for increased oil consumption, you can use a compression meter, which will help you find out the compression of the cylinders. In cases where the pressure of each cylinder is below normal, the oil scraper rings need to be replaced.
Signs of breakdown
To prevent serious problems in engine operation, it is necessary to promptly diagnose and correct oil seal failure.
You can judge the wear of valve stem seals on a VAZ 2107 by the following signs:
- There is an increased release of white or blue exhaust gases.
- Engine oil consumption increases significantly.
- The candles become covered with black soot.
If you find these signs of failure, you need to make sure that the entire gas distribution mechanism is working properly, and not just the caps. Pay special attention to valve diagnostics. If necessary, replace the valve stem seals on the VAZ.
If the problem is not diagnosed and corrected in time, the following consequences may occur:
- the motor will lose dynamics;
- it will begin to work unstably and will often stall at idle;
- the pressure in the cylinders will decrease;
- carbon deposits form not only on the valves, but also on the walls of the cylinders and pistons;
- the tightness of the system will be compromised.
When carbon deposits appear on the engine walls, its service life decreases sharply. If the problem is not corrected in time, the situation will lead to an expensive overhaul of the engine. But these difficulties can be avoided by simply replacing the oil seals on the VAZ 2107.
Replacement methods
There are a few basic options you have if the caps stop working properly.
| Option | Peculiarities |
| Let it be as it is | The most unfortunate decision, which can lead to serious consequences, engine breakdowns and huge restoration costs. Do not choose it under any circumstances |
| Contact a garage service station | There are many service stations created on the basis of a simple garage in an auto cooperative. Many people use their services, but we do not recommend that you do so. The prices are not as high as at a good car service center, but the quality of services is appropriate, there are no clear deadlines. Once you give the car away, you may not see it soon |
| Verified car service | A good option for those who do not want to do their own repairs and have enough money for high-quality car maintenance. There is only one disadvantage to this method of repair - high cost. |
| Do it yourself | The option preferred by most domestic car owners. Expenses will only be required for materials. With the right approach, you will make a replacement no worse than any good service station |
When choosing the option to replace the caps yourself, make sure you have sufficient experience and skills. Otherwise, doing the repairs yourself is strictly not recommended.
When is it time to replace
Over time, the sealing material of the valve stem seals becomes hard. As a result, it loses its elasticity, which leads to oil leakage into the cylinder. The same problem occurs when the piston rings are faulty.
The caps are changed in cases where oil leaks occur without visible places. Watch how the exhaust behaves while driving. Brake the car sharply with the engine, and then also sharply press the gas pedal. If this leads to the appearance of thick smoke from the muffler, then it is time to replace the seals.
Thick, bluish-colored smoke may appear on the car even after a long period of parking.
It's easy to explain. If the caps are worn out, this leads to oil entering the engine cylinder. If the piston rings are worn out or coked, the engine behaves a little differently. Smoke will remain behind the car only when driving uphill or during rapid acceleration.
If, in addition to smoke, you observe an increase in fuel consumption, a decrease in engine dynamics and problems during startup, this may all be evidence of wear and tear on the mechanisms.
Replacing valve stem seals for VAZ 2114, author Sergey Tarasov
Greetings, VAZ car enthusiast! Today Sergey Tarasov shows the step-by-step process of replacing oil seals on a VAZ 2114 on front-wheel drive engines.
The diagnosis of the failure of the caps was the situation when starting the car in the morning, in our case, it was a VAZ 2114. After parking for the night, when starting the engine, blue smoke comes out of the exhaust pipe, smoke is observed until the engine warms up.
Additionally, a malfunction of the valve seals is indicated by the presence of oil on the threads of the spark plugs, as well as increased engine oil consumption.
In this case, a visual inspection revealed oil on the timing belt cover. This is not the first time this has happened and the oil pressure sensor was immediately inspected. The sensor is located at the top left above the belt cover when looking at the belt drive from the right wing of the car.
The fact is that over time, the core of the sensor “squeezes out” and as a result, the oil begins to come out, getting onto both the cover and the timing belt itself. This trouble is fraught with the fact that the oily belt can “jump” on the gears and the valves will meet the piston heads. As a result, an expensive repair of the cylinder head will be required with the replacement of valves, valve seals and sometimes valve guides, depending on the situation.
In our example, Sergey Tarasov, the owner of a VAZ 2114, spent about 500 rubles on this work in order to repair the car with his own hands.
For comparison, replacing valve seals at a car service costs about 1,000 rubles.
For this we purchased:
• Valve desiccant – 200 rubles;
• Valve seal remover – 200 rubles;
• Valve seals – 100 rubles.
Before starting work on replacing the oil seals, if the engine is hot, you need to give it time to cool down. For example, in this video a fan was used to speed up the cooling process of the motor.
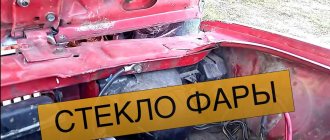
How to replace caps on a VAZ 2107
- Drain approximately two liters of coolant.
- Remove the air filter housing and throttle linkage if you have a carburetor.
- Remove the valve cover.
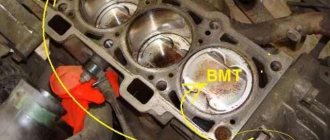
- Place the first cylinder in top dead center mode.
- Loosen the chain tension nut.
- Remove the camshaft gear mounting bolt.
- Remove the sprocket and chain and secure them with wire to prevent a possible fall.
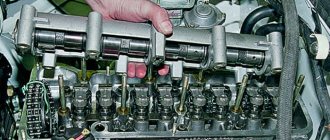
- Remove the bearing housing and rockers.
- Remove the candles. To prevent the valve from falling into the cylinder, be sure to plug the spark plug hole with a tin rod.
- Using a valve remover, remove the "crackers".
- Using a screwdriver, carefully pry and remove the oil seal.
- Before installing the new one, do not forget to lubricate the surface of the rod with oil.
- Replace the springs and other parts.
- Repeat all the described operations with each cylinder, installing them at TDC.
After completing all the work, return the crankshaft to its original state, install the bearing housing, camshaft gear and chain. The remaining elements are installed in reverse order.
Installing valve stem seals:
- Install the spring support washer (if it was removed).
- Apply clean engine oil to the working edge of the new cap and valve stem.
We put a special plastic mandrel on the valve stem (usually included in the set of new caps) so that it covers the grooves on the stem.
Place the cap on the valve stem. If there is no mandrel, the cap should be put on very carefully so as not to cut it on the sharp edges of the grooves. Before installation, you can remove the spring from the cap.
Using light hammer blows on the mandrel, press the cap onto the valve sleeve. To press on the cap, you can use a socket wrench with a deep 11 mm dodecahedron head or a 12 mm hex head.- Remove the plastic frame.
- Install the springs, spring plate and crackers in the reverse order of removal.
- Similarly, we change the oil scraper caps of the remaining valves of the first and fourth cylinders (their pistons are in the TDC position), after which we turn the engine crankshaft 180° and replace the valve caps of the second and third cylinders.
- We install the parts in the reverse order of removal, after which we adjust the tension of the timing belt.
Replacement
Before starting work, you need to prepare the car. Be sure to disconnect the battery; you may accidentally short-circuit it during operation. Put the car on the handbrake. If you have central locking, you must leave the window open. In this case, when the lock is activated, you will get into the car without any problems.
- The work is carried out in the following order:
- Using a Phillips screwdriver, unscrew and remove the clamp securing the crankcase ventilation hose;
- Remove the remaining hoses in the same way;
- Using a wrench, unscrew the nuts securing the valve cover;
- Remove the cover;
- Unscrew (wrench “10”) the nuts securing the mass to the cylinder head;
- The plug is removed. To do this, you need to unscrew the screw and 2 nuts;
- Unscrew the screws securing the front timing cover and remove it;
- The crankshaft is rotated in the direction of the arrows until the marks completely coincide. We remove the plug on the clutch housing and check the marks for matches;
- The generator pulley is removed;
- The tension roller fastenings are loosened and the belt is removed;
- Remove the pulley from the camshaft;
- Using a 13 socket, we first loosen and then unscrew the 10 nuts securing the camshaft;
- We dismantle the camshaft;
- Unscrew the spark plugs;
- The crankshaft is installed according to the position of the top dead center (TDC) for cylinders 1 and 4;
- We remove the pusher along with the adjustment washer located in the socket of the block head;
- Insert a tin or lead rod (diameter 7-9 mm) into the first cylinder. We place the rod under the valve where the cap is changed;
- The desiccant is installed on the valve stem. With its help we compress the springs. Using tweezers, take out the crackers;
- The plate and spring are removed together;
- Using tongs (pliers), remove the oil seal;
- Remove the thrust washer;
- After lubricating the replacement cap (machine oil), press it into place. This is done through a special mandrel.
Remove the hose;
The rest of the procedure is performed in reverse order. We perform the same actions for the 2nd valve of this cylinder. Next we move on to cylinder 4. Having changed the caps on it, we rotate the crankshaft 180°. Using the same principle, they are replaced on the valves of cylinders 2 and 3. Replacing oil seals on a 16-valve engine differs only in the need to remove 2 camshafts. When installing the camshaft, be sure to tighten the nuts with a torque wrench. This should be done from the middle to the edge.
Conclusion
. The engine of any car requires attention. Therefore, it is extremely important to correct even small problems in a timely manner. Therefore, replacing valve seals on VAZ 2114 (2115) 8 and 16 valves should be done at the first sign of a problem. You don't need any additional equipment for this. When carrying out repairs, you need to do all actions as carefully as possible.
Valve seal replacement process
To carry out this action, it is necessary to prepare a new set of valve stem seals in advance. You will need a flat-head screwdriver, keys, an 8 mm tin rod, tweezers, pliers, equipment for loosening the valves and a mandrel that is needed to press in the seals. First you need to remove the terminals from the battery after opening the hood.
Then you need to unscrew all three nuts that hold the air supply filter. The lid itself and the element that performs the filtration must be removed. The 4 nuts on the carburetor must be unscrewed to be able to remove the air filter housing. Now you need to remove the nuts that secure the valve covers to the block. After disconnecting the rod from the carburetor, you can remove this cover.
Next, you need to very carefully remove the camshaft, which is located in the block. To do this, change the position of the shaft pulley. Then the bolts that connect it to the gear are unscrewed from the camshaft. After this, the gear can be removed. It is better to hang the chain to make it easier to remove the camshaft later. After these steps, all the candles are unscrewed.
Next you will need to use a desiccant. After desiccation, it will be possible to remove the seal from the valve sleeve. It must be lubricated with engine oil in advance. After this, it can be removed by tapping with a hammer. Assembly is carried out in reverse order.
Device Features
Valve seals are a misnomer. It is correct to call such a part an oil scraper cap. Its function is to prevent lubricant from entering the cylinder. Essentially, it is a seal for the valve stem and guides.
On the first VAZ models, the caps were made of fluoroplastic. They had no reinforcement. These were installed on the first 2114 produced. Later, they were replaced by two-component ones, which consist of a steel bushing compressed with a rubber casing. The caps are attached using metal crackers.