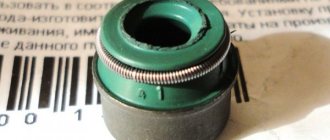
Engine oil seals 1.6i - replacement
Removal
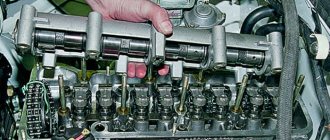
1. Remove the camshaft (see “1.6i engine camshaft - removal and installation”). 2. Use a magnet to remove the pushers with adjusting washers from their seats in the cylinder head.
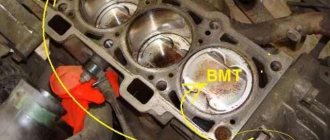
3. To install the pushers in their original places, mark them or arrange them in the order of their location in the engine. 4. We turn out the spark plug of the cylinder whose valve we are replacing the oil seal (see “Spark plugs for the 1.6i engine - replacement”). 5. Insert a tin rod into the spark plug hole so that its end is under the plate of the corresponding valve.
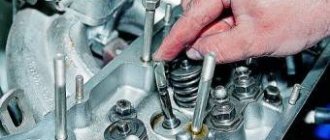
6. We install a device for depressurizing the valves on the cylinder head studs. 7. We rest the cup of the device against the spring plate.
8. By pressing on the desiccant handle, we compress the valve springs. 9. Keeping the springs compressed, use tweezers to remove two crackers.
10. Smoothly release the springs and remove the desiccant. 11. Use tweezers to remove the spring plate.
12. Take out the outer...
...and the inner valve spring.
13. Install the puller grip onto the valve stem seal.
14. Press the cap. 15. If necessary, remove the spring support washer.
Installation
1. Install the spring support washer (if it was removed). 2. Apply clean engine oil to the working edge of the new cap and valve stem. 3. We put a special plastic mandrel (included in the set of new caps) on the valve stem so that it covers the grooves on the stem.
4. Place the cap on the valve stem.
5. Using light hammer blows on the mandrel, press the cap onto the valve sleeve.
6. Remove the plastic frame. 7. Install the springs, spring plate and crackers in the reverse order of removal. 8. Similarly, we replace the oil scraper caps of the remaining valves of the first and fourth cylinders (their pistons are in the TDC position), after which we turn the engine crankshaft 180° and replace the valve caps of the second and third cylinders. 9. We install the removed parts in the reverse order of disassembly, after which we adjust the tension of the timing belt (see “Timing belt of the 1.6i engine - checking the condition and adjusting the tension”).
Lada Kalina sedan photo tuning technical characteristics of the car 2004—2013
Lada Kalina sedan 2005. Car review
Lada Kalina 1.6 (Lada Kalina 1.6, VAZ 11183). Vehicle characteristics.
Lada Kalina 1.6 (Lada Kalina 1.6, VAZ 11183). Reviews about the car.
Lada Granta Sedan - technical specifications
Inside the tubular casing of the steering column shaft, two bearings of type 0333 are installed; in the technical specifications of the Lada Kalina sedan, the steering column shaft rotates. What is a cooling system and why is it needed? Do not over-tighten the adjusting screw. At one time, the entire process of removal, repair and installation took 6 hours. I advise you to take the heater resistance 2110, we return to the relay block contact 1 resistance to contact 30 contact 3 to the vehicle ground button to contact 86 of our relay. Installation of a contactless ignition system.
The fact is that the price for any professional modification of the technical parameters of a car at service centers is very high. Move the steering knuckle a distance. I think maybe something could have frozen there, and I also looked at the fuses, they are intact. Another very common reason is the failure of the cooling radiator. And before installing the thermostat, I think about all sorts of options without sleeping at night on how to correctly drop the car a little lower, there are many options in my head. Most often this happens if the sensor was removed from an earlier version of the car and installed on a later one, I’ll ask questions.
Sources
- https://www.vaz-autos.ru/lada-kalina/dvigatel-i-ego-sistemy/dvigateli-14i-16v-i-16i-16v/maslosemnye-kolpachki—zamena/
- https://www.vaz-autos.ru/lada-kalina/osobennosti-ustroystva-i-remonta-modifikatsiy-avto/maslosemnye-kolpachki-dvigatelya-16i—zamena/
- https://autom11.ru/lada-kalina/v60234-tehnicheskie-harakteristiki-lada-kalina-sedan.php
Replacing valve stem seals
The valve stem seals of VAZ-21116, VAZ-11186 engines can be changed without removing the cylinder head. VAZ-21126, VAZ-21127 engines need to remove the cylinder head because there is no way to stop the valve from “de-shrunk”.
To replace the caps on VAZ-21116, VAZ-11186 engines, take a “13” socket head, solder, a screwdriver, tweezers, a mandrel for pressing the caps, valve spring and cap pullers.
1. Disconnect the wire from the negative terminal of the battery.
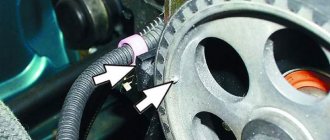
2. Unfasten the gear from the camshaft.
3. Unfasten the cylinder head cover.
4. Unfasten the wire block from the phase sensor. Then, press out its fastener.
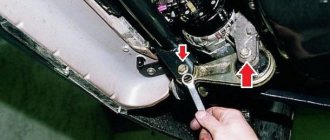
5. Unscrew the bolt and two fastening nuts of the rear cover of the cylinder head.
Note
The rubber ring is located under the bolt head. A torn, very compressed, hard ring - replace it.
6. Unfasten the cover so that the phase sensor pin matches the groove in the cover.
Note
Fix the sealing ring in the annular groove of the cover. A torn, very compressed, hard ring - replace it.
7. Unfasten the 4 nuts securing the front A and 6 rear B camshaft bearings. Unfasten the washers first, then the housings.
8. If you notice that the key in the camshaft groove is not securely fixed, remove it.
9. Unfasten the camshaft from the cylinder head.
10. Unfasten the oil seal from the camshaft.
11. It is necessary to rotate the crankshaft so that the piston of the cylinder on which you are changing the caps is in the TDC position. Unscrew the spark plug of the 1st cylinder so that the valve does not fall, secure a tin rod between the intake and the piston through the spark plug hole.
Note
To support the valve, do not use heat-treated tools or a screwdriver. They damage the surface; when desiccated, the valve can cause the tool to break off and fall into the cylinder.
12. Remove the intake pusher of the 1st cylinder and the adjusting washer.
Note
Do not get the puck out without urgent reasons.
13. Fix the device for compressing the valve springs onto the intake springs of the 1st cylinder. Follow the example in the photo. Compress the valve springs with the tool.
Note
This is what a device for compressing valve springs looks like.
14. Use tweezers to remove 2 crackers. Unfasten the device.
Advice
If you can’t get the crackers out, take a hammer, then lightly hit the spring plate.
15. Remove the upper spring plate, inner and outer valve springs.
16. Compress the valve guide with the valve stem seal.
17. Secure the collet to the cap.
18. Take the striker and hit the device bushing.
19. Thus, squeezing the cap from the sleeve. Remove it from the collet.
Note
The image shows an inertial oil seal puller.
Warning
If you do not have a special tool for removing the caps, slowly unfasten them using pliers. Direct the force upward, do not twist the caps, this may lead to their damage. It is not advisable to use 2 screwdrivers in this procedure.
20. We advise you to remove the springs from the new caps, as there is a risk of breakage when passing through the grooves under the crackers on the valves.
Advice
If the set of caps does not include a bushing, fix it on the valve stem so as not to damage the working edge of the cap with sharp edges.
21. Place the cap in engine oil and secure it to the frame.
22. Gently press the cap into the bottom plate until it stops.
23. If you loosened the spring, fasten it back.
Note
Unfasten the guide bushing from the valve stem (if it was attached).
24. Secure the valve plate and springs in the opposite order of removal. Take out the tin rod. Fix the crackers in the grooves of the valve stem.
Advice
To ensure good fixation of the crackers in the groove of the rod, hit the end of the valve stem several times with a hammer. Do this after installing the crackers and unfastening the spring pressing device. If the fastened crackers are not fixed when you start the car, the “uncracked” valve will fall into the cylinder, and this, in turn, will lead to a breakdown in the engine.
25. Attach the valve tappet and washer.
26. In a similar way, change the valve stem seals of the 1st cylinder and both valves of the 4th cylinder.
27. Change the caps of the 2nd – 3rd cylinders. Hold the timing belt and rotate the crankshaft halfway.
28. After the change, turn the crankshaft another half a turn.
29. Lubricate the camshaft supports in the cylinder head and the pusher washer with engine oil.
30. Secure the camshaft in such a position that the cams of the 1st cylinder point away from the valve tappets.
31. Apply oil to the camshaft cams and journals.
32. Lubricate the cylinder head with sealant in the camshaft area.
33. Secure the camshaft bearing housings. Tighten the fastening nuts until they meet at the point of contact between the bearing housing and the surface of the block head.
Make sure that the guide bushings fit into the spans of the bearing housings.
34. Fix the camshaft oil seal.
35. Make sure that the clearances in the valve drive are fine.
36. Fix the parts, secure the breathers and wires in the reverse order of removal.
To change the caps of VAZ-21126, VAZ-21127 engines, take tools for detaching the cylinder head, tweezers, an “8” socket head, a tool for pressing valve springs, a mandrel for securing oil seals.
1. Unfasten the block head.
2. Unscrew the 20 fastening bolts of the camshaft bearing housing and replace the housing.
3. Unscrew the camshafts from the cylinder head supports.
4. Unfasten the valve lifters from the cylinder head.
5. Lock the valve spring pressing tool. Screw the camshaft bearing cap fastening bolt into the hole in the cylinder head and grab the bolt with a tool. Using a tool, compress the valve spring. Use tweezers to remove 2 crackers from the top plate of the spring. Afterwards, unfasten the tool.
6. Unfasten the spring plate.
7. Unfasten the spring.
8. Press the valve stem seal together with the valve sleeve.
9. Place the cap in engine oil and secure it to the frame.
10. Gently tamp down the cap.
11. Fix the plate springs.
12. Pressing the spring with a special tool, secure the crackers so that they are not in the grooves of the valve stem.
Advice
To ensure good fixation of the crackers in the groove of the rod, hit the end of the valve stem several times with a hammer. Do this after installing the crackers and unfastening the spring pressing device. If the fastened crackers are not fixed when you start the car, the “uncracked” valve will fall into the cylinder, and this, in turn, will lead to a breakdown in the engine.
13. Fix the valve lifter.
14. Change the caps of the remaining valves in a similar way.
15. Lubricate the camshaft supports in the cylinder head and hydraulic lifters with engine oil.
16. Apply Loctite 574 sealant to the outer surface of the cylinder head with a roller.
Warning
You can start the car after applying the sealant in an hour, not earlier.
17. Fix the camshafts in the cylinder head supports so that the cams of the 1st cylinder are turned away from the valve tappets.
Note
There is a distinctive belt on the intake camshaft.
18. Lubricate the cams and camshaft journals with engine oil.
19. Secure the bearing housing. Tighten the fastening bolts according to the example illustrated above.
20. Fix the block head on the motor.
21. Fix the loose timing parts and adjust the belt tension.
22. Fix the loose parts of the generator drive and adjust the tension of its drive belt.
Let's sum it up
There is simply no exact answer to the question of how much it costs to replace valve stem seals. After all, prices for this procedure vary greatly. Much depends on the design of the engine, its complexity, the number of valves, as well as the replacement technology and the specific repair location. In other words, whether the repair work involves removing and cleaning the cylinder head, and also where the repair will be carried out, for example, in a service center or by a technician in a “garage”.
Moreover, the cost of repairs in many workshops may already include the cost of the caps, gaskets and other consumables themselves, usually at inflated prices, and may only include labor. Therefore, you can only get an accurate answer from the master who will take on this work. On the Internet you can only get approximate amounts for services for replacing valve stem seals on various engines, some of which we have provided you with in our table.
However, replacing oil seals itself is not that expensive compared to other common engine breakdowns. But when it comes too late, the costs of eliminating the consequences increase significantly. Therefore, faulty caps should be responded to immediately to avoid serious consequences, rather than postponing the problem until later. And this applies not only to caps, but to almost any malfunction in the car.
Oil seals - replacement
To complete the work you will need: - a compressor (developed pressure of at least 2 bar) with a hose; — adapter for a hose with a thread for a spark plug hole; - desiccant; - tweezers; — oil seal remover; — a mandrel for pressing the caps.
Removal
1. Turn the crankshaft to the TDC position of the compression stroke of the first cylinder and remove the camshafts (see “Camshafts - removal and installation”) and fix the crankshaft in this position by engaging the highest gear in the gearbox. 2. Use a medical syringe (a bulb or a clean rag) to remove any remaining oil from the niches of the cylinder head.
3. Remove the hydraulic pushers from the mounting holes in the head (see “Hydraulic pushers - removal and installation”). 4. We wrap the adapter into the spark plug hole, connect the hose from the compressor to it and supply compressed air.
5. Install the desiccant bracket on the cylinder head.
Replacing valve stem seals for VAZ 2190 Granta on VAZ 11183, 21116 and 11186 engines
To replace valve stem seals on a VAZ 2190 Granta car with modifications of VAZ 11183, 21116 and 11186 engines, prepare a tin rod with a thickness of at least 8 mm, a thirteen-socket socket, a mandrel for pressing new caps, a screwdriver, tweezers, a puller for valve springs and old caps. If you have everything you need, do the following:
- First of all, you need to disconnect the minus terminal from the battery and turn off the power to the car.
- Remove the toothed pulley from the camshaft.
- Remove the cylinder head cover.
- We release the latch and disconnect the connector with wires from the phase sensor.
- Now you need to remove the rear cylinder head cover by unscrewing two nuts and one bolt securing it.
- There is a rubber O-ring installed under the head of the cover mounting bolt, which should be replaced if it is too compressed or hardened.
- Remove the cover by sliding it back and turning it a little so that the phase sensor pin aligns with the corresponding groove in the cover.
- A rubber sealing ring is installed in the annular groove of the cover, which should also be replaced if it is damaged, if the rubber is compressed or hardened.
- Evenly unscrew the nuts securing the front and rear camshaft bearing housings. Remove the nuts and washers installed under them. Then we remove the housings.
- Remove the key from the camshaft groove.
- Now you can remove the camshaft from the cylinder head.
- Remove the oil seal from the camshaft.
- We turn the crankshaft so that the piston of the cylinder for which we are replacing the caps is at top dead center, after which we unscrew the spark plug and insert a tin rod to prevent the valve from falling when it is desiccated.
- We take out the exhaust valve pusher along with the adjusting washer.