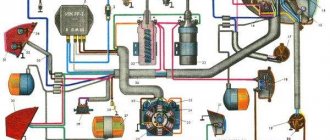
System design
Before we begin to consider the adjustment process, we consider it necessary to understand the diagram and principle of operation of the system. Vehicles of the VAZ 2109 model range are equipped with a non-contact ignition system. The connection diagram of all elements is as follows:
The operating principle of the system is not complicated. In order for a spark to begin to be produced, the motor shaft must turn. Simultaneously with its rotation, the camshaft will also turn. As a result of this, the sensor generates a signal that will be sent to the switch. The “K” terminal of the coil will connect to the common wire (to “ground”), as a result of which a spark will occur on the main wire. At the moment when the working distributor slider connects the main wire with one or another high-voltage wire on the corresponding spark plug, a spark will appear and the car engine will start.
If the setting is made incorrectly, the candles work in the wrong time modes. Consequently, such a violation becomes the cause of unstable operation of the entire power unit.
Do-it-yourself ignition system repair
So, if problems with the engine indicate problems with the ignition system, you should proceed with immediate repairs. The essence of the work being carried out comes down to installing or setting the correct ignition timing. The engine will only run stably when you adjust the ignition system. To begin repairing this mechanism, you need to stock up on some tools:
- strobe;
- tachometer;
- flat screwdriver;
- key to 10.
Having a strobe light on hand will greatly facilitate the process of setting up the ignition, so we recommend purchasing one for personal use.
Before you start setting the ignition timing and angle, do some preparatory work. The first thing you need to do is start the engine. Then either wait or rev the engine until the engine temperature is 90 degrees Celsius and the idle speed should be around 800 rpm (use a tachometer to determine this parameter). To obtain the required values, use the fuel regulator located on the carburetor body.
As the engine operating temperature reaches 90 degrees, remove the silicone tube through which the discharge occurs from the fitting. The lever for adjusting the fuel supply is located on the ignition timing distributor panel or distributor. The distributor is attached to the carburetor itself. Place your finger on the other edge of the tube and check if there is a vacuum effect. It can be checked very simply: if your finger is stuck to the tube, it is there; if not, then there is no effect either. Now you need to reduce the number of revolutions until the vacuum completely disappears.
Preparatory activities and necessary tools
Installing the ignition of a VAZ 2109 carburetor begins with preparatory activities. In particular, you need:
- Warm up the car engine;
- Set the parking brake and install wheel chocks under the rear wheels.
Remember that you cannot ignore safety rules, because a car is a highly dangerous vehicle, and failure to comply with safety rules when driving, servicing and repairing it can cost you dearly.
An important point: before you start work, you should make sure that the carburetor is correctly configured on the car. It would not be superfluous to carry out a visual inspection of all elements of the system. If we are talking about a carburetor car, special attention should be paid to inspecting the condition of the distributor.
If you have a car with an injection engine, it is worth checking the ignition module for serviceability. The thing is that, as practice shows, it is this module that fails most often and is the reason for the inoperability of the entire system.
To complete the work we need:
- strobe;
- a set of keys.
Checking the performance of the fuel pump on injection VAZ 21082109
If in Sputniks and Samaras with carburetor engines, fuel pump malfunctions are associated only with its design, then in injection vehicles they can also be caused by problems with the power supply of the device.
Diagnostics of the electric circuit of the fuel pump
To check whether voltage is supplied to the fuel pump, turn on the ignition without starting the engine and listen. When you turn the key, you should first hear the click of the relay, and then the characteristic “squeal” that the electric motor of the fuel pump emits. If these sounds are absent, the search for the problem should begin with the pump circuit protection devices.
The fuel pump relay and fuse are located in an additional mounting block, which is located under the glove compartment. The pump relay (R2) is installed in the middle, and its fuse (F2) is located to the left of it.
The fuel pump relay and fuse are located in an additional mounting block under the glove compartment.
We check them in this order:
- Disconnect the negative terminal from the battery.
- We remove the fuse from the socket and test it with a tester. If it is faulty, we replace it.
- We connect the terminal to the battery and turn on the ignition without starting the engine. We switch the tester to voltmeter mode and measure the voltage between the relay output to which the pink wire fits and ground. The device should show 12 V. If there is no voltage, the problem must be looked for in the wiring or contact group of the ignition switch. If power is supplied to the relay, use a screwdriver to close the terminal to which the pink wire fits with the terminal connected to the gray wire. This way the pump circuit will be closed directly (bypassing the relay). The fuel pump is working - we change the relay, if not - we check whether voltage is supplied to the pump itself.
- We remove the back seat. We bend the carpet underneath and find the hatch. Unscrew the screws (2 pcs) securing it. There is an electrical connector under the hatch. Disconnect it from the pump. Turn on the ignition. Using a tester turned on in voltmeter mode, we measure the voltage between the “plus” (gray wire) of the pump and its “ground”. There is voltage - the problem is in the pump itself, if not - the reason should be sought in the wiring.
Checking the fuel pressure in the system
If the diagnostics show that the pump is working, but the above signs of its malfunction are observed, you need to check the fuel pressure in the system. For this you will need:
- a pressure gauge with a measurement limit of 5–7 atmospheres (a regular tire gauge will do);
- a piece of petrol-resistant hose with a length of 50 cm and an internal diameter of 10–12 mm;
- nipple cap;
- 2 hose clamps;
- dry rag.
We check the pressure in the following order:
- We find a special fitting on the fuel rail. It is located on the right side of the device (when viewed from inside the car).
The fitting is located at the end of the ramp on the right side
Unscrew the spool with a nipple cap
We connect one end of the hose to the pressure gauge, the other to the fitting on the ramp
The pressure when the ignition is on should be 2.8–3.2 atmospheres
How to correctly set the ignition on a VAZ 2109 carburetor - detailed instructions
The setup process is as follows:
1. Start the car engine and ensure that the engine speed is approximately 800 rpm. To set the idle speed within such limits, it is enough to use a slotted screwdriver to adjust the screw responsible for the amount of fuel mixture in the carburetor.
2. After setting the idle speed to the above value, turn off the car engine.
3. Disconnect the rubber hose from the vacuum corrector. Carefully bend the hose approximately in the middle or plug it with a screw of a suitable diameter.
4. Connect the positive terminal of the strobe to the “+” terminal of the battery;
5. Connect the negative wire of the strobe to the “-” terminal of the battery;
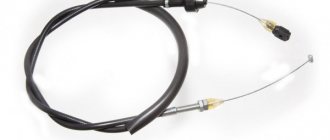
6. Disconnect the spark plug wire from the socket of the first cylinder as shown in the image:
Disconnect the spark plug wire
7. Install the strobe sensor into the socket and connect the high-voltage wire to it;
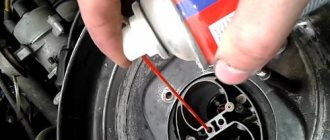
8. Remove the plug from the clutch housing hatch:
Removing the stub
9. Turn on the ignition and start the engine. We direct the actively changing luminous flux generated by the strobe into the clutch housing hatch:
We direct the strobe into the clutch housing hatch
10. When the light is flashing, it seems that the mark located on the flywheel is stationary. If the ignition is installed correctly, the first mark should be between the technological notch and the previous mark on the scale.
Tags
11. If after the described operations it was discovered that the ignition adjustment of the VAZ 2109 is incorrect, we continue to work.
12. Using an open-end wrench, slightly loosen the fastening nuts of the ignition system distributor:
Mounting nuts
13. After loosening the fastening nuts, turn the distributor body to the right side - if it is necessary to increase the ignition angle, and to the left side, if it is necessary to decrease the angle.
14. Connect a rubber tube to the vacuum corrector and check that the ignition is installed correctly. If the normal result is not achieved, we make repeated adjustments. How to check the correct operation of the system will be described below.
Setting the ignition
Now that the preparations are complete, you should set the correct ignition timing angle for the VAZ-21099. This is easy to do using the step-by-step instructions below:
- start the engine. The number of revolutions should be minimal - no more than 800 rpm. Use a tachometer to check;
- the strobe beam should shine through the observation window on the hatch;
- The longest mark on the flywheel should be set at the zero mark (in degrees). Determine the position on the mark specific to your fuel.
You need to change the ignition angle from the zero position of the long line, i.e. from the center of the triangle towards the windshield of the car. To avoid mistakes, gradually turn the ignition distribution housing to the right. This movement increases the advance angle, while counterclockwise movement decreases it.
The exact direction of movement will be helped by the scale on the distributor with a plus and a minus drawn. It is very convenient to use for proper adjustment. It is worth keeping in mind that each division is equal to 8 degrees, so to avoid errors you need to adjust slowly. Once the desired position is achieved, disconnect the distributor and secure it in the desired position.
Incandescent lamp instead of strobe light
Many car owners will ask a completely fair question: how to adjust the ignition of a VAZ 2109 in the absence of a strobe light. Of course, it is more correct to work with a strobe, especially since in this case it is possible to carry out adjustment and adjustment work as accurately as possible. However, there is another method that is useful for those who, for one reason or another, do not want to purchase a strobe.
To work, we need an ordinary incandescent lamp designed for an operating voltage of 12V. The entire algorithm of actions is as follows:
- Disconnect the wire from the distributor that goes to the ignition coil
- We connect one terminal of an incandescent light bulb to the wire. We connect the second wire from the lamp to ground.
- As in the case when setting the ignition of a VAZ 2109 using a strobe light, use a spanner to loosen the distributor fastening nuts.
- Turn on the ignition. The incandescent lamp should light up.
- Gradually turn the distributor until the lamp stops glowing. After this, turn the distributor slightly in the other direction. As soon as the lamp starts to glow again, you can tighten the fastening nuts.
Of course, the method described above cannot provide the highest possible adjustment accuracy. However, with its help it is quite possible to achieve more or less correct and stable operation of the power unit.
Adjusting the ignition by light bulb
There are ways to adjust without a strobe. To make adjustments using a light bulb, you will need a crankshaft wrench and a standard 12-volt light bulb.
Setting the ignition timing by loosening the spark timing sensor.
The procedure for adjusting the ignition by light bulb
- Use a special wrench to turn the crankshaft until the marks match. If you do not have a crankshaft key, engage 4th gear and push the car until the marks match.
- Connect a 12-volt light bulb to the wire connecting the distributor and the ignition coil.
- Connect the light bulb to ground using the second wire.
- Connect the central wire to ground Lada 2109.
- Loosen the bolts on the distributor body and turn on the ignition - the light should light up.
- Rotate the body to the right until the light goes out.
- After the light goes out, smoothly turn the distributor to the left.
- Stop when the light comes on.
- Tighten the housing bolts.
The ignition control circuit based on the light bulb is ideal for carrying out the operation at home without additional costs for the device.
How to adjust the ignition on a VAZ 2109 - an alternative method
In addition to the adjustment methods described above using a strobe and a light bulb, you should remember one more method - adjustment using a standard tachometer. We emphasize that this method, like the method using a light bulb, cannot provide high accuracy of adjustment. Moreover, it is characterized by one significant drawback - it is impossible to carry out the adjustment yourself; you will need to hire an assistant. So:
- Your assistant is located behind the wheel of the car. He turns on the ignition and monitors the readings of the standard tachometer on the instrument panel.
- You loosen the nuts securing the distributor and turn it a little.
- Your assistant turns the ignition key. The tachometer needle should quickly deflect and return to zero.
- You need to ensure that the distributor remains in a position in which the tachometer needle deflects.
You may notice that this method requires patience and quite a lot of time. As practice shows, it is not possible to adjust the ignition quickly and the first time using this method . Therefore, we recommend using it only in extreme cases.
So how does it work
How to change the starter
And here everything is quite simple. To put it in words, the driver presses the gas pedal, sensors that are built into the base of the pedal see the angle of deflection and transmit the position of the pedal to the throttle valve via wires, it in turn bends to the desired angle, thereby either supplying more fuel or less.
Now a little more detail...
The electronic pedal is not a simple “piece of hardware”, which was the usual “cable” pedal. In fact, this is an entire electronic module. If you don’t go into complex technical terms, but put it in a language that is more understandable to everyone, then you can compare an electronic pedal with a kind of rheostat. The pedal has special tracks along which a group of contacts runs, and these contacts are duplicated for accurate readings. These contacts move along the track, thereby changing the load on the sensors, and these sensors send information to the throttle valve unit.
Pedal module (rheostat) circuit diagram
That is, there are no cables here, pure electrics! Let's look at the work diagram.
Many can say that the cable is much more reliable, because the more electricians, the more failures! And maybe they are right about something! However, statistics indicate the opposite; the electronic pedal is a very durable element! No, of course they break, but this happens extremely rarely! But the cable throttles broke much more often! Moreover, it was not the pedal itself that broke, but the cable that connected the throttle valve wore out - and everything broke, we pressed the pedal and there was no “gas”! Moreover, cable breakage occurred much more often than failure of the electronic gas pedal.
Another advantage is the “automaticity” of the system. The electronic pedal is controlled by the vehicle's ECU. You no longer need any “choke” during a cold start, you also don’t need to “pump” the pedal to start the car, the injector will do everything, it also automatically adjusts the throttle when starting (a kind of smart automatic choke) - very valuable when starting idle! With an injector it is much more difficult to fill the car's spark plugs!
At speed, the ECU can automatically adjust the throttle position for optimal performance, even if you hold the pedal in one position - a prime example of this is the cruise control system! You can see about his work in this video.
If we summarize the electronic gas pedal, we can understand that this is a modern step forward, which provides much more comfort and possibilities for using electronic systems than the old cable mechanism.
(8 votes, average: 4.75 out of 5)
E-Gas (electronic gas pedal) is an electronic gas pedal that replaced the cable-operated throttle valve. Email The gas pedal controls the throttle electronically rather than physically. AvtoVAZ began producing models with E-Gas at the beginning of 2011, the reason was the environmental standards Euro-4 and Euro-5, which must be observed.
In this article you will learn what E-Gas is, how it works, why it was introduced, and what advantages and disadvantages it has.
How to set the ignition on a VAZ 2109 injector
Above we described the process of adjusting carburetor engines. However, there are VAZ modifications equipped with injection power units. How to set the ignition on a VAZ 2109 with such an engine?
First of all, you should pay attention that in the case of injection engines, they do not have a distributor and a Hall sensor. At the same time, the system provides two ignition coils at once, and, accordingly, two switches. The main difference between the injection system and the classic one is that the control signals are generated by a special electronic unit. The operating principle is as follows:
Operating principle of the injection system
Thus, there is simply no need for a distributor, because it is the electronic control unit that determines in which cylinder and at what point in time there should be a spark. Signals from the control unit are supplied to the inputs of the switches, and from them to the ignition coils. One switch is responsible for sparking in the first and third cylinders, and the second - in the second and fourth.
As in the case of engines with a carburetor fuel system, adjustment is carried out according to special technological risks. The ignition marks of the VAZ 2109 injector are shown in the photo below:
Ignition marks VAZ 2109 injector
Please note that it is not possible to configure the injection engine system yourself. The thing is that this operation involves making changes to the software of the microcontroller of the electronic control unit. Of course, each specific microcontroller has its own specific firmware. Moreover, there are also non-standard firmwares, for example, with settings for a sporty driving style.
Only an experienced specialist with certain knowledge can flash an electronic control unit. Therefore, if malfunctions occur in the ignition system of an injection engine, you should seek help from a trusted car service center.
Basic concepts in ignition operation
To get to the bottom of the problem, you need to know the operating mechanisms of this node. To do this, let’s look at some basics of the theory, knowing which you can delve deeper into the issue of fixing the breakdown.
The first thing you need to understand is what the ignition system is. The ignition system is interconnected components and devices, the joint operation of which ensures the occurrence of an electrical discharge that ignites the air-enriched fuel mixture in the internal combustion chamber. Stable and uninterrupted operation of this unit plays a big role in the good technical condition of the machine in general and electrical equipment in particular.
However, to analyze the problem we do not need to know the entire system. We are more interested in the moment the spark appears, which is responsible for the correct operation of the entire system. The moment when the spark appears is called the ignition moment, since it determines the time frame in which the compressed fuel mixture is ignited. Remember once and for all: incorrectly set ignition timing causes various problems in the operation of the car. In this article we will look at several basic issues:
- how to understand that the ignition is set incorrectly;
- what consequences may there be;
- how to set the ignition correctly.
Verifying that the settings are correct
After we have dealt with the question of how to install the ignition on a VAZ 2109, we will consider the process of checking whether the adjustment work has been carried out correctly.
So, if configured correctly:
- during the process of rapid acceleration of the power plant (when the car is warm), there is no violation of the stability of its operation;
- When the car is moving at a speed of about 50 km/h in fourth speed and during sharp acceleration, there should be a short detonation of the engine. If there is no detonation, ignition is later; if it is present, but does not go through, it is earlier. We make the adjustment by turning the distributor in one direction or another.
Remember that it is often impossible to achieve stable operation of the power unit due to improper operation of the fuel system or even due to low quality gasoline. In this kind of situation, the best way out of it would be to set the carburetor to the most optimal operating mode and then adjust the ignition timing.
Very often, these ignition system malfunctions are caused by a trivial reason - an incorrectly set ignition.
Possible reasons for the appearance of soot
Before answering the question of why the candles are black, it is necessary to determine how exactly they turned black. After all, it depends on which direction to search. In particular, the candles can turn black all together, or maybe only one or two of the set. Also, the candle may turn black only on one side, or perhaps along its entire diameter. There are also so-called “wet” and “dry” carbon deposits.
It should be noted that the speed of appearance and nature of carbon deposits directly depends on existing faults (if any):
- Carbon deposits on new spark plugs begin to form after at least 200-300 km. Moreover, it is advisable to drive along the highway at approximately the same speed and engine load. This way the spark plugs will work in optimal mode, and it will be possible to more objectively assess the condition of the car’s components.
- The amount and type of soot depends on the quality of the fuel used. Therefore, try to refuel at trusted gas stations, and not drive with gasoline or similar mixtures. Otherwise, it will be difficult to establish the real cause of the appearance of soot (if it occurs).
- In a carburetor engine, the idle speed must be set correctly.
Now let's move directly to the question of why black soot appears on the spark plugs. There may be 11 main reasons:
- If you notice blackening on only one side, then most likely this is caused by a burnt-out valve. That is, carbon deposits on the spark plug fall on the side electrode from below (and not on the central one).
- The cause of black spark plugs may be a burnt-out valve. The situation is similar to the previous one. Carbon deposits may penetrate the bottom electrode.
- An incorrectly selected glow rating of a spark plug causes not only damage to it during further use, but also uneven blackening at first. If the mentioned number is small, then the shape of the soot cone will change. If it is large, then only the top of the cone will turn black, and the body will be white.
“Dry” carbon deposits on a candle
As a rule, when the ignition is set late and the air-fuel mixture is rich, the following consequences arise:
- misfires (error P0300 appears on injection engines);
- problems starting the engine;
- unstable engine operation, especially at idle, and as a result, increased vibration levels.
Next, we will tell you how to eliminate the listed faults and how to clean the spark plugs.