Types of window lifters
Automobile manufacturers produce cars of different configurations. The cheapest ones have manual windows. They create fewer electrical problems, but the inconvenience of using them is that while in the driver's seat, it is impossible to open the window on the passenger side without being distracted from driving.
Manual window lifters, which are installed on the conveyor, have slight differences from electric ones. The mechanism itself that lifts the glass is exactly the same.
The difference is that the manual version has a gearbox that transmits the rotation of the window handle to the window lifting device, while in the electric version this function is performed by an electric motor. On the door trim, in place of the hole for the manual drive, there is a plug. In addition, the electrical wiring has an additional connection diagram for VAZ-2114 window regulators.
Manual window lifters
The glass lifting devices on the front and rear doors are similar. The difference is only in the sizes and proportions of the parts, while the operating principle is the same.
The main part is the guide in which the bracket that fixes the glass moves. The guide has fastening bolts at the top and bottom. With their help, it is installed in its position on the door. On the upper and lower edges of the guide there are rollers rigidly fixed along which the cables run that drive the glass mounting bracket.
Another part of the window regulator is the mechanism that operates the cable. It consists of a roller and a gearbox, which is rotated either by a handle or by an electric motor (if the VAZ-2114 window regulator has an electrical circuit).
To ensure that the cables are constantly lubricated and not subject to contamination, they are placed in rigid steel jackets that connect a system of three rollers together.
There are two threaded holes on the top of the glass bracket. The bolts that secure the glass holder are screwed into them.
How to remove the window regulator on a VAZ 2114, step-by-step description with photos
Window lifter - this mechanism is found in almost any car, depending on the car, it can be either a mechanical type (With a handle for adjusting the position of the glass) or an electric one (In this case, the handle is removed and a button is placed together with it), in addition, we immediately note the fact that the window lifter and the glass itself are two different things (some people just confuse it) and thanks to it you can adjust the position of the glass in the car (raise it higher or lower it).
To carry out the procedure for replacing the window lifter on the door, you will have to stock up on: Various types of screwdrivers, as well as a set of wrenches, if you have an extension cord with union heads, then you can use it, and thin pliers or pliers may also be needed, and if you have them If you have one, be sure to take them!
Where is the door window lift located?
On cars of the Samara 2 family, different types of window lifters are installed, namely in the front there are electric ones, and in the rear mechanical ones (If the car is in a top configuration, then there are electric ones in the back), both types are hidden in the door itself and you won’t see them without removing the trim, so for For clarity, in the photo below, the trim was removed from the front door of the car, and the window regulator itself is indicated in this photo with a red arrow.
When do you need to replace your door window regulator?
If we are talking about an electric window lifter, then as a rule, when it fails, the glass stops going up and down when you press the corresponding button, in addition, on some cars (you most likely have already paid attention to this) it happens that the glass somehow goes down (Slowly ) and almost does not rise (you have to help with your hand), this also indicates that the window lifter has become unusable and requires replacement, but by the way, in some cases, due to the fact that the glass does not rise and fall poorly, it may not even be the window lifter itself that is to blame glass, it’s just that over time its fastening weakens and thus the glass becomes skewed, which is why problems occur with lowering and raising the glass on the car, but as for mechanical window lifters, everything is simple here, if by rotating the handle the glass has ceased to be adjusted, then the window regulator itself has failed and requires replacement.
How to replace the door window lifter on a VAZ 2113-VAZ 2115?
Note! The window lifter on both the rear door and the front door is replaced almost identically, although there are small nuances, but you don’t even have to pay attention to this, and therefore if you learn how to replace the window lifter at the front, then you can also replace it on the back door and vice versa, but there is just one But! The window lifter can be replaced both with the glass removed from the door and with the glass installed (How you do it is up to you, if you don’t want to remove the glass, then in this case you can simply fix it with a screwdriver, but if suddenly the door moves a lot, then the glass may fall and break, but this won’t happen to you with the glass removed), if you still want to remove it, then in this case read the article entitled: “Replacing glass on a VAZ”, if you don’t want to remove the glass and are sure that it will not fall, then start reading the article; in it we just described the process of replacing a window lifter with the glass installed on the car door!
1) Let's start with the front doors, but even if you replace the power windows only on the rear doors (And this is point 2), then still study point 1, because they are interconnected and from all these points you will understand more than just reading one of them, in general, before replacing, it doesn’t matter which door, but you will need to remove the trim from it, because the mechanism is located inside the door and without removing the trim you simply won’t get to it (For information on how to remove the trim, read the article: “Replacing front door on the car" points 1-8), after the trim is removed, disconnect the wire block and the connector that go to the window regulator (see photo 1), then remove all the nuts (there are only three of them) that secure the mechanism itself to door (see photo 2) and then unscrew the two bolts securing the window lifter slider to the glass frame itself (see photo 3), when the bolts are unscrewed, lift the glass to the very top if you have not removed it and fix it in this position (You can Use a screwdriver to fix it, see photo 4, or you can ask an assistant to hold the glass in the upper position).
Note! So that the window lifter mechanism can be removed from the door and thereby completely removed, unscrew the two screws that secure the door opening handle to the car (see photo 1), after unscrewing the screws, remove the handle by pushing it into the inside of the door and through remove the cutout in the door (see photo 2), then using thin pliers or pliers or simply by hand, disconnect the rubber holder that holds the rod on the handles (see photo 3) and after that disconnect the rod from the handle and you you can completely remove it from the car in this way (see photo 4) and therefore, when the handle is removed, remove the window lift mechanism itself through the same cutout in the car door!
2) As for the rear door and window lifter, in order to remove it, take a wrench in your hands and use it to unscrew the three nuts that secure the mechanism to the door (see photo 1), as soon as the nuts are unscrewed, unscrew the two bolts that The slider with the glass is attached to the window lifter holder (see photo 2), then fix the glass in the same way as described in the first paragraph (see photo 3) and finally, when the glass is already stationary, unscrew the three nuts securing the mechanism to the door (see photo 4) and, also grabbing it with your hand, remove it from the door and thereby completely remove it.
Everything is installed in its place in the reverse order, or, to put it simply, everything is put in its place in the reverse order of removal.
You can see an interesting video on repairing the front door window lifter in the video attached to our website just below:
If you find an error, please select a piece of text and press Ctrl+Enter.
Lever window lift
One type of window lifting mechanism for the VAZ-2114, which, unfortunately, does not come from the factory, is a lever window lifter. These products are manufactured by Ningbo Stone.
These devices have proven themselves to be reliable and unpretentious mechanisms. Unlike cable window lifts, they have a greater lifting force. Glass frozen in winter is not a problem for them. They can handle them easily, while cable lifts experience significant stress on both the mechanism and the electrics.
One small disadvantage of the lever mechanism is that the speed of raising the glass is not the same. The higher the glass, the smaller it is. This is due to the geometry of the lifting mechanism. A good example would be scissors. If you take them by the rings and move the ends apart as much as possible, and then bring the rings closer to each other, it becomes clear that the height of the cutting ends changes faster when the rings are moved apart as much as possible. Conversely, the rate of ascent decreases as the rings move closer together.
It is this circumstance that allows this mechanism to create significant force. As we know from physics lessons, when you lose in distance traveled, you gain in strength. The same thing happens here: at the top of the range of motion, the distance traveled decreases and the lifting force increases.
The mechanism is driven by an electric motor and is connected as standard to the VAZ-2114 window lift circuit.
Window regulators VAZ-2114: correct connection diagram. Window lifter button pinout
VAZ-2114 is a car in which a window regulator malfunction is a common occurrence. This is one of those troubles that does not interfere with driving, but pretty much spoils the nervous system of a car enthusiast. The inability to ventilate the air in the cabin or reduce the temperature in the summer often reduces the composure that is so necessary for a person behind the wheel.
Types of window lifters
Automobile manufacturers produce cars of different configurations. The cheapest ones have manual windows. They create fewer electrical problems, but the inconvenience of using them is that while in the driver's seat, it is impossible to open the window on the passenger side without being distracted from driving.
Manual window lifters, which are installed on the conveyor, have slight differences from electric ones. The mechanism itself that lifts the glass is exactly the same.
The difference is that the manual version has a gearbox that transmits the rotation of the window handle to the window lifting device, while in the electric version this function is performed by an electric motor. On the door trim, in place of the hole for the manual drive, there is a plug. In addition, the electrical wiring has an additional connection diagram for VAZ-2114 window regulators.
Manual window lifters
The glass lifting devices on the front and rear doors are similar. The difference is only in the sizes and proportions of the parts, while the operating principle is the same.
The main part is the guide in which the bracket that fixes the glass moves. The guide has fastening bolts at the top and bottom. With their help, it is installed in its position on the door. On the upper and lower edges of the guide there are rollers rigidly fixed along which the cables run that drive the glass mounting bracket.
Another part of the window regulator is the mechanism that operates the cable. It consists of a roller and a gearbox, which is rotated either by a handle or by an electric motor (if the VAZ-2114 window regulator has an electrical circuit).
To ensure that the cables are constantly lubricated and not subject to contamination, they are placed in rigid steel jackets that connect a system of three rollers together.
There are two threaded holes on the top of the glass bracket. The bolts that secure the glass holder are screwed into them.
Lever window lift
One type of window lifting mechanism for the VAZ-2114, which, unfortunately, does not come from the factory, is a lever window lifter. These products are manufactured by Ningbo Stone.
These devices have proven themselves to be reliable and unpretentious mechanisms. Unlike cable window lifts, they have a greater lifting force. Glass frozen in winter is not a problem for them. They can handle them easily, while cable lifts experience significant stress on both the mechanism and the electrics.
One small disadvantage of the lever mechanism is that the speed of raising the glass is not the same. The higher the glass, the smaller it is. This is due to the geometry of the lifting mechanism. A good example would be scissors. If you take them by the rings and move the ends apart as much as possible, and then bring the rings closer to each other, it becomes clear that the height of the cutting ends changes faster when the rings are moved apart as much as possible. Conversely, the rate of ascent decreases as the rings move closer together.
It is this circumstance that allows this mechanism to create significant force. As we know from physics lessons, when you lose in distance traveled, you gain in strength. The same thing happens here: at the top of the range of motion, the distance traveled decreases and the lifting force increases.
The mechanism is driven by an electric motor and is connected as standard to the VAZ-2114 window lift circuit.
Rack and pinion window lift
Another good option for replacing standard mechanisms is rack and pinion windows. They are produced and have proven themselves well. These devices are characterized by high lifting and lowering speeds. Just as in the case of lever mechanisms, they have more force than standard ones. Despite the more modest dimensions of the electric motor, which is connected by standard connectors of the VAZ-2114 power window connection diagram.
The secret to the reliability of the device is the simple kinematic diagram of the transformation of the rotation of the electric motor shaft into the translational movement of the glass mounting bracket. There is a gear on the motor shaft that meshes with the teeth of the rack. This allowed additional parts to be kept to a minimum and simplified the design. And in combination with high-quality manufacturing materials, it ensured reliable operation.
Power window
The vehicle configuration with electric windows contains additional bundles of wires that make up the VAZ-2114 window lift circuit. In addition, there is a control button on the front passenger door trim. On the driver's door there is a block of buttons that control all windows that have an electrical connection for the VAZ-2114 power windows.
The scheme has the following elements:
- Mounting block.
- Front passenger door ESP button.
- Front passenger door lift motor.
- Driver's door ESP electric motor.
- Driver's door switch button.
- Egnition lock.
The letter “A” in the diagram indicates the wires going to the power supply of the circuit, and the letter “B” indicates the wires going to the side lights.
How to convert a manual drive to an electric one?
If you decide to install electric windows instead of manual ones on the front doors, then you need to understand that you will have to not just install an electric motor, but change the entire assembly mechanism. It will be necessary to install new wiring and modify the door trims: install a plug in place of the window lifter handle, cut a hole to install the control button.
How to connect a button?
The driver and passenger door buttons are connected to each other, as well as to the ESP motor and power cable. Correct pinout of the power window button:
- Pin 1 on the driver's door is connected to pin 6 on the passenger side. Contact 1 on the passenger door is connected to the negative terminal of the ESP motor.
- Pin 2 on both buttons is connected to power.
- Pin 3 is the ground on the driver's side and the positive wire on the passenger's side.
- Contact 4 in both cases goes to the headlight switch.
- Contact 5 is ground in all cases.
- The positive wire of the ESP motor corresponds to pin 7 of the passenger door button.
How to disassemble the door of a VAZ-2114?
To get to the window lifting mechanism, you need to remove the door trim. In addition, if you plan to replace it with an electric lift, then you need to dismantle the opening limiter, since a bundle of wires will need to be inserted into the door. To remove the casing:
- Unscrew the three screws from below that hold the plastic pocket of the trim.
- Remove the two bolts holding the inner handle. To gain access to the bolts, you need to remove the round plugs using a thin flat-head screwdriver.
- Remove the plastic trim from the door lock handle. To do this, you need to pry it up with a screwdriver and, moving it a little to the side, pull it out of its recess.
- Unscrew the lock button.
- Remove the trim. This is done as follows. A flat pry bar or a powerful screwdriver is inserted into the gap between the trim and the door frame. It should fit between the door clip and the door frame. Then you need to squeeze out the clip, not the casing. Otherwise, the clip fastening can be broken, and during subsequent installation the casing will not sit tightly in place. There are 8 clips installed around the entire perimeter of the door. They need to be pulled out one by one.
After releasing the door trim, there is no need to rush to remove it. If it is a door with an electric drive, then it is connected by a bundle of wires going to the window lift button, the pinout of which consists of seven contacts covered by a plastic connector. To disconnect it, you need to press the latch with a small screwdriver and pull out the part into which the wires go.
Replacing the window regulator
If the VAZ-2114 window regulator does not work, it can be replaced with a new one. To do this you need to do the following:
- Using a 10 mm wrench, unscrew the three nuts that hold the glass guide.
- Using a size 8 wrench, unscrew the three nuts that secure the electric motor or manual drive gearbox.
- Disconnect the glass mounting bracket from the glass holder. To do this, you need to unscrew the two 8mm bolts on the bracket.
After this, you can pull the window regulator out of the door. The glass must remain raised. Otherwise it will be impossible to remove the mechanism.
The new lift is installed in the reverse order. However, there is no need to rush to tighten the glass mounting bracket. First you need to make sure that the glass is in the correct position in the guides and moves clearly in them.
Reasons for poor performance
There are not so many reasons why the VAZ-2114 window regulator does not work well. Conventionally, they can be divided into mechanical and electrical. Let's consider the main ones:
- Glass distortion. Often the reason for poor performance is not the window lifting mechanism itself, but a violation of the position of the glass relative to its guides. This can happen either due to the bracket fastening being unscrewed, or the damp rubber fixing the glass in the holder has ceased to perform its functions. This option occurs much less frequently.
- Contamination of the guide rubbers. The glass moves inside the grooves formed by the rubber bands. These grooves tend to become clogged with dirt. It, like an abrasive, increases the friction force, which creates resistance to glass movement.
- The window lift mechanism is dirty. During operation, drivers do not realize that maintenance is also necessary inside the doors. This is especially true for the cable mechanism. Over the years, not only does contamination occur, but also the lubricant of the mechanism and cables dry out, which increases the friction force. The front left window regulator fails faster due to more frequent use.
- The next reason is wear of the plastic teeth of the mechanism drive. In this case, when you press the control button, you can hear the electric motor running, but the glass does not move.
- Broken cables. This occurs due to attempts to open frozen windows. With repeated loads exceeding the rated ones, the cables begin to delaminate and gradually fail.
Electrical reasons can be reduced to either a short circuit or loss of contact in the VAZ-2114 power window circuit.
Replacement cost
Replacing VAZ-2114 window regulators is cheaper than installing electric mechanisms to replace manual ones. If, in order to simply change the window regulator, you need to disassemble the door trim, dismantle the old mechanism and install a new one, then to install an electric version instead of a manual one, you need to partially disassemble the instrument panel, select a power source and run the wiring from it inside the door. This work requires the intervention of an electrician. Because power cannot be taken from anywhere: the source must match the power of the electric drive, and in the event of a short circuit, the fuses must protect the main wiring of the car. In addition, the power windows must operate when the ignition switch is on.
To summarize, we can say that in the first case, the qualifications of the work are minimal, and it can be done by yourself, without having specific knowledge, while working with an electrician requires a specialist who needs to be paid.
The price of a VAZ-2114 window lifter ranges from 2.5 thousand to 3.5 thousand rubles, depending on the design and manufacturer. But as was said earlier: the lever and rack and pinion options are preferable. If you buy a device for only one side, then the left front window regulator will be more expensive, since it is more in demand.
Rack and pinion window lift
Another good option for replacing standard mechanisms is rack and pinion windows. They are produced and have proven themselves well. These devices are characterized by high lifting and lowering speeds. Just as in the case of lever mechanisms, they have more force than standard ones. Despite the more modest dimensions of the electric motor, which is connected by standard connectors of the VAZ-2114 power window connection diagram.
The secret to the reliability of the device is the simple kinematic diagram of the transformation of the rotation of the electric motor shaft into the translational movement of the glass mounting bracket. There is a gear on the motor shaft that meshes with the teeth of the rack. This allowed additional parts to be kept to a minimum and simplified the design. And in combination with high-quality manufacturing materials, it ensured reliable operation.
Power window
The vehicle configuration with electric windows contains additional bundles of wires that make up the VAZ-2114 window lift circuit. In addition, there is a control button on the front passenger door trim. On the driver's door there is a block of buttons that control all windows that have an electrical connection for the VAZ-2114 power windows.
The scheme has the following elements:
- Mounting block.
- Front passenger door ESP button.
- Front passenger door lift motor.
- Driver's door ESP electric motor.
- Driver's door switch button.
- Egnition lock.
The letter “A” in the diagram indicates the wires going to the power supply of the circuit, and the letter “B” indicates the wires going to the side lights.
How to connect a button?
The driver and passenger door buttons are connected to each other, as well as to the ESP motor and power cable. Correct pinout of the power window button:
- Pin 1 on the driver's door is connected to pin 6 on the passenger side. Contact 1 on the passenger door is connected to the negative terminal of the ESP motor.
- Pin 2 on both buttons is connected to power.
- Pin 3 is the ground on the driver's side and the positive wire on the passenger's side.
- Contact 4 in both cases goes to the headlight switch.
- Contact 5 is ground in all cases.
- The positive wire of the ESP motor corresponds to pin 7 of the passenger door button.
How to disassemble the door of a VAZ-2114?
To get to the window lifting mechanism, you need to remove the door trim. In addition, if you plan to replace it with an electric lift, then you need to dismantle the opening limiter, since a bundle of wires will need to be inserted into the door. To remove the casing:
- Unscrew the three screws from below that hold the plastic pocket of the trim.
- Remove the two bolts holding the inner handle. To gain access to the bolts, you need to remove the round plugs using a thin flat-head screwdriver.
- Remove the plastic trim from the door lock handle. To do this, you need to pry it up with a screwdriver and, moving it a little to the side, pull it out of its recess.
- Unscrew the lock button.
- Remove the trim. This is done as follows. A flat pry bar or a powerful screwdriver is inserted into the gap between the trim and the door frame. It should fit between the door clip and the door frame. Then you need to squeeze out the clip, not the casing. Otherwise, the clip fastening can be broken, and during subsequent installation the casing will not sit tightly in place. There are 8 clips installed around the entire perimeter of the door. They need to be pulled out one by one.
After releasing the door trim, there is no need to rush to remove it. If it is a door with an electric drive, then it is connected by a bundle of wires going to the window lift button, the pinout of which consists of seven contacts covered by a plastic connector. To disconnect it, you need to press the latch with a small screwdriver and pull out the part into which the wires go.
Photo report on the installation of the MAX-2 window closer on a VAZ-2114
We present to your attention a report on the installation and connection of the MAKS-2 automatic window controller module on a VAZ-2114, which was prepared by our buyer Maxim Olegovich Kirpikov (Sterlitamak, Bashkortostan), as part of participation in our promotion.
This is the second time I have ordered products on the Steklopodem.RF website, such as FORWARD rack and pinion window lifters and MAX-2 glass closers. I am pleased with the quality of the product, as well as the affordable prices.
Let's start the story with the latest order "MAX-2".
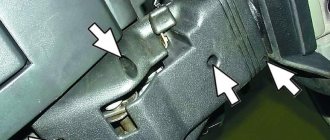
First of all, remove the door trim.
The figure shows in red the places where the casing is attached: the pistons. In the area of the handle, it is advisable to pry it with a thin flat screwdriver (-) and then unscrew the 2 (+) bolts with a Phillips screwdriver. For those who have standard podiums, yellow indicates the location of the three bolts (+) that hold the podium, as well as the power window buttons.
For ease of pulling the wire, it is advisable to unhook the corrugation and remove the plastic threshold, which is secured with 3 bolts, the mounting location is indicated in yellow. There is a technological hole where the wire will come out.
Now we have to choose where to place the MAKS-2 module. I chose this location for ease of connection, since I have power window buttons from LADA GRANTA installed.
The length of the original wiring for connecting to the module is completely sufficient.
The surface is degreased, the place is prepared for the module. Secured.
Next, having connected the wires from the power window buttons, we take the control (indicator). We look for the wiring that goes to the lock closing activator (we strip the red wire), put the car on security and look for +12V. In our case, the light on the indicator should light up.
After this, we take the yellow wire from the module, twist it and insulate it (you can solder the contacts and use heat shrink).
To use the functions of automatic closing/opening of windows, connect the MAX module to the control output of external security alarm devices and the “switched plus” circuit, on which +12 V appears in the “Ignition” ignition key position. Depending on the polarity of the pulse of the alarm control output, it must be connected either to the “ARMED +” input (in security mode, a positive pulse of +12 V is applied to it), or to the “ARMED –” input (in security mode, a reverse pulse of 0 V is applied to it ).
Since I decided not to use the door opening function when opening the windows while the ignition is on, I decided for the future purchase of rear electric windows and a second MAX-2 closer, to stretch a wire (from green - cascading modules), which controls the closure of the windows of both the front doors and and rear when arming the car.
When connecting the second MAX module, the “CASCADE” output of the first module is used to control the rear window lifters. It is connected to the “SECURITY –” input of the second module. The second module automatically closes the rear windows after closing the front ones. If it is necessary to automatically close the top hatch, you can install a third MAX module.
The location of the closer can be selected in two places (marked in red) or inside the technological hole of the door (marked in yellow).
Further, so that the module does not come off and does not make unnecessary sounds, it is fixed to the door more tightly.
To complete the installation, we need to make a jumper and install it in place of the power window relay in the fuse box. To do this, we need 2 terminals (male), heat shrink if desired, and a wire. I used a section of 2.5 square meters.
We install it on contacts 87 and 30.
We assemble everything in reverse order.
The final stage requires training:
- Turn the ignition key to the “ignition” position. Don't start the engine!
- For the driver and passenger window lifters, perform the following operations:
— briefly press the control button to completely lower the window;
— press and hold the window up button until the window is fully raised and begins to lower (see below);
— after a full rise, the glass automatically lowers by about 10 cm.
- Everything is finished and ready for use.
Thank you Steklopodem.RF.
I recommend!
We thank Maxim Olegovich for the prepared report, and we will also transfer the promised prize to his mobile phone account.
You can buy the MAX-2 automatic window regulator module in our online store
Replacing the window regulator
If the VAZ-2114 window regulator does not work, it can be replaced with a new one. To do this you need to do the following:
- Using a 10 mm wrench, unscrew the three nuts that hold the glass guide.
- Using a size 8 wrench, unscrew the three nuts that secure the electric motor or manual drive gearbox.
- Disconnect the glass mounting bracket from the glass holder. To do this, you need to unscrew the two 8mm bolts on the bracket.
After this, you can pull the window regulator out of the door. The glass must remain raised. Otherwise it will be impossible to remove the mechanism.
The new lift is installed in the reverse order. However, there is no need to rush to tighten the glass mounting bracket. First you need to make sure that the glass is in the correct position in the guides and moves clearly in them.
Repair, operation and replacement of window regulators on Lada Samara cars
Don’t know how to replace the window regulator of a VAZ 2114? Our article describes what types of these devices exist, the main causes of breakdowns and much more. The recommendations are suitable for repairing almost any car belonging to the Lada Samara family, if the windows do not work on it.
Design and types of window lifters
The window regulator of the VAZ 2115, VAZ 2114 and other models of cars in this series can be of two main types. The mechanisms on the VAZ 2115 or 2114 do not have any fundamental differences from other models of the family.
The first of them is collapsible. They consist of two parts, a motor and a trapezoid, which are connected with fine thread bolts. If necessary, you can replace one of these parts while leaving the other. Previously, this was the most profitable option, since repairing a window regulator was much cheaper. Most often the trapeze had to be removed and replaced.
But in recent years it has been quite difficult to find high-quality trapeze on sale. Almost everything that is in stores lasts a month or two, and then again requires replacement. Therefore, collapsible device models are no longer so popular.
The second option is non-separable models. They are solid and do not allow the replacement of individual parts. On the other hand, a new non-removable factory window regulator for the VAZ 2113 and other models can last up to 3-5 years without requiring replacement. And with adequate use, even longer.
In addition to these types, devices are also distinguished by their operating principle. These are mechanical and electric windows of the VAZ 2114 and other models. The latter are also divided into lever, cable and rack and pinion. Their main difference is how the impulse of movement from the engine is transmitted to the plate holding the glass. This can be done by cable, lever or using a rack system.
Common faults
One of the most common malfunctions is gear wear. Usually plastic is used, which wears out quickly over time. A symptom of this problem is a rumble and crackling sound that is heard when the glass is raised or lowered.
Also, the automatic switch on the power windows may burn out, which is why the inclusion will not work. Also, problems may arise with the rear doors. They either stop working altogether or respond to pressing a key from the main unit, but not on the doors themselves. Check current continuity.
The electric motor may also fail. To fix it, you will need to check the voltage in it and the wiring. Mechanical damage to the guides may also occur.
Removal instructions
If you don’t know how to remove the window lifter handle, don’t despair, it’s easy to do. Before removing the mechanism, you need to remove the trim from the door. Then be sure to disconnect the wire block and the power window connector. Then remove the three nuts that secure the mechanism to the door. Next are two bolts that secure the lift and the glass itself.
Dismantling process
Then, lift the glass to the very top and fix it, you can use a screwdriver or ask someone to hold it. But it’s better to pull it out, because otherwise there is a risk that the glass may break.
To completely remove the mechanism, you need to additionally remove the door handle. To do this, unscrew its two screws and push the handle inside the door. Then, you will need to disconnect the rubber holder that holds the rod on the handle. Once you're done with this, you can pull out the handle, and then the window regulator itself through the same hole. Now you know how to remove the window handle and the entire mechanism.
Installation Features
The connection diagram is the opposite of the above method of removing the device and, in general, has no special nuances. If you have completed the removal operation, then installing the VAZ 2114 electric windows will not be a problem.
The only nuance that you should not forget about is the window lifter guides. Before completing the connection, it is better to lubricate them - then the mechanism will last longer.
Reasons for poor performance
There are not so many reasons why the VAZ-2114 window regulator does not work well. Conventionally, they can be divided into mechanical and electrical. Let's consider the main ones:
- Glass distortion. Often the reason for poor performance is not the window lifting mechanism itself, but a violation of the position of the glass relative to its guides. This can happen either due to the bracket fastening being unscrewed, or the damp rubber fixing the glass in the holder has ceased to perform its functions. This option occurs much less frequently.
- Contamination of the guide rubbers. The glass moves inside the grooves formed by the rubber bands. These grooves tend to become clogged with dirt. It, like an abrasive, increases the friction force, which creates resistance to glass movement.
- The window lift mechanism is dirty. During operation, drivers do not realize that maintenance is also necessary inside the doors. This is especially true for the cable mechanism. Over the years, not only does contamination occur, but also the lubricant of the mechanism and cables dry out, which increases the friction force. The front left window regulator fails faster due to more frequent use.
- The next reason is wear of the plastic teeth of the mechanism drive. In this case, when you press the control button, you can hear the electric motor running, but the glass does not move.
- Broken cables. This occurs due to attempts to open frozen windows. With repeated loads exceeding the rated ones, the cables begin to delaminate and gradually fail.
Electrical reasons can be reduced to either a short circuit or loss of contact in the VAZ-2114 power window circuit.
Troubleshooting electrical problems
During the operation of the vehicle, problems may arise due to malfunctions of electrical components.
- at the operation of the power unit, preventing it from developing its rated power;
- on the operation of devices, not allowing control of engine systems and other components;
- on the operation of lighting devices and comfort mechanisms (heating systems, interior lighting, window lifts, etc.)
Ignition system malfunctions
The main signs of a malfunctioning ignition system are:
- Difficulties in engine operation when accelerating the car;
- Loss of engine power during operation;
- Unstable or erratic idle;
- Malfunction of one or more cylinders.
Do-it-yourself troubleshooting should begin by checking sparking.
- Turn on the ignition;
- Remove the wire tip from the spark plug of the first cylinder;
- We bring it to the metal part of the motor at a distance of 4-5 mm;
- Turn on the starter;
- Let's see if a spark jumps between the wires;
- Similarly, we check the wires from spark plugs 2, 3 and 4 of cylinders.
Advice: If the spark discharge was stable in all cases, then the reason for the interruption in engine operation lies in the spark plugs. If there was no spark, the cause of the failure should be sought in the primary circuit from the generator to the ignition coil.
The search starts with:
- Directly ignition coils;
- Ignition module;
- ECU - on cars with VAZ-11183-1000260 engine
To check the ignition coil, you need to use a tester, with which you should measure the resistance of the primary and secondary windings.
Checking the performance of the ignition coil with an ohmmeter
Advice: If the readings obtained do not correspond to the data given in the car's passport, then the coil must be replaced. The probable cause of coil failure is a breakdown in the winding.
The ignition module is also checked using a tester. To do this, measure the resistance at its paired high-voltage terminals of the ignition module. The resistance should correspond to 5.4 kOhm.
The cause of module failure may be increased resistance between the terminals
Advice: if the cause of engine interruptions lies in the ignition module, then it needs to be replaced. The asking price is no more than 1000 rubles.
Sensor malfunctions
The injection engine is equipped with a fairly large number of sensors. And their failures and breakdowns can also lead to unstable operation of the power unit or control devices.
Tip: Underhood wiring can also cause the engine to run rough. Before using radical methods, you can try moving the connectors and terminal blocks. If operation returns to normal, the pad should be replaced with a new one.
Terminal block of the mass air flow sensor (MAF)
Most sensors are analyzed by the scan tool and if there is a problem, the CHECK ENGINE light will illuminate on the instrument panel.
However, some such as:
- Mass air flow sensor;
- Idle speed sensor;
do not have such functions. This means that their failure and malfunction can be found out only after inspection. Diagnostics of such sensors responsible for engine operation can be carried out by disconnecting them.
CHECK ENGINE lamp on the instrument panel
Tip: If after removing the wire from the sensor the engine operation does not change, then the sensor is faulty. It should be replaced with a new one.
DPKV installation location
If the engine does not start at all, then the most likely cause of the failure is a breakdown of the crankshaft position sensor.
Without it, the ECM cannot determine the engine operating phases and, accordingly, will not give a signal:
- Fuel injectors about the start and cycle of operation;
- The ignition module knows when the discharge is applied to the spark plugs;
- Throttle valve drive about opening angle, etc.
Conclusions: as you can see, the VAZ 2114 has absorbed not only the best from its predecessor, but also inherited some problems with the electrical part. But if you know the principles of operation, troubleshooting will not turn into an unsolvable task. On the contrary, having visual diagrams in front of you, you can easily eliminate the cause of the interruptions and can continue to use the car.
Replacement cost
Replacing VAZ-2114 window regulators is cheaper than installing electric mechanisms to replace manual ones. If, in order to simply change the window regulator, you need to disassemble the door trim, dismantle the old mechanism and install a new one, then to install an electric version instead of a manual one, you need to partially disassemble the instrument panel, select a power source and run the wiring from it inside the door. This work requires the intervention of an electrician. Because power cannot be taken from anywhere: the source must match the power of the electric drive, and in the event of a short circuit, the fuses must protect the main wiring of the car. In addition, the power windows must operate when the ignition switch is on.
To summarize, we can say that in the first case, the qualifications of the work are minimal, and it can be done by yourself, without having specific knowledge, while working with an electrician requires a specialist who needs to be paid.
The price of a VAZ-2114 window lifter ranges from 2.5 thousand to 3.5 thousand rubles, depending on the design and manufacturer. But as was said earlier: the lever and rack and pinion options are preferable. If you buy a device for only one side, then the left front window regulator will be more expensive, since it is more in demand.
Features of the new model
The electrical wiring of the VAZ 2114 has a different design than its predecessor:
- Inside the car;
- In the engine compartment;
- In the rear of the body.
The new engines were equipped with a more powerful ignition system, as a result of which the wiring diagram of the VAZ 2114 to the injector had some peculiarities.
- A wiring harness was added to connect to the terminal of the ignition module, which supplied impulses to the spark plugs;
- A wiring harness has been added for connecting to the electronic switch;
- Wiring has been added to connect the adsorber valve to the injection system controller.
Photo of the ignition module pinout
For reference: there is a misconception that the ignition module replaces the coil. In fact, the ignition module has 2 coils and 2 switches at once. The first coil supplies an impulse to the 1st and 4th cylinders, and the second - to the 2nd and 3rd cylinders.
The wiring for the VAZ 2114 has undergone changes not only due to the addition of new electronic devices, but also due to the automaker's further plans to modernize the functionality of the car.
- It is possible to connect heated exterior mirrors;
- It is possible to install heated front seats;
- It is possible to install front fog lights, etc.
Connection diagram for fog lights: instructions for VAZ 2114
Engine compartment
The first thing that owners of a carburetor power system pay attention to is the modified wiring diagram of the VAZ 2114 to the injector.
To operate on a lean mixture, the vehicle is equipped with:
- Forced fuel injection system directly into each cylinder;
- Installation of an increased power ignition system on the vehicle;
- Self-learning ECM - electronic engine control system.
The ignition module on the VAZ 2114 allows you to increase spark generation power
For reference: a feature of EURO 3 standards is the low content of unburned fuel components in the exhaust gases. To this end, the car's fuel system reduces the amount of gasoline in the air-fuel mixture, compensating for this by better filling the cylinders due to forced fuel injection.
To ignite a lean air-fuel mixture in the engine cylinders, it is necessary to provide a more powerful spark at the moment when the piston is at TDC (top dead center).
This is realized by installing an ignition module, the operating principle of which is implemented:
- The generator produces alternating electric current;
- It is supplied to the ECU, which converts it to direct current;
- From the control unit, current is supplied to the windings of the ignition module coils;
- High voltage is generated in the secondary winding (according to the law of induction) of the coils;
- It is supplied to the spark plugs at the start of the ignition phase.
Advice: if you want to understand the operation of a car’s ignition and power system, it would be a good idea to watch video materials from a school physics course. Or find videos on automotive websites.
Vehicle interior
For the VAZ 2114 model, the automaker developed and installed a new dashboard, which differed from its predecessor:
- the absence of a glove compartment in the upper part - it was moved lower;
- new instrument panel;
- the advent of an on-board computer
For reference: the on-board (trip) computer gave readings about the outside air temperature, the voltage in the vehicle's on-board network, current fuel consumption, power reserve and other parameters.
Torpedo VAZ 2114 with a new instrument panel, better known as “Europanel”
The emergence of new electronic components has led to a change in the wiring diagram of the VAZ 2114 panel.
- a wiring harness with a connector for the on-board computer was added;
- an outside air temperature sensor has appeared, installed in front of the radiator;
- The voltmeter relay appeared.
Wiring diagram for power windows on a VAZ 2114
In addition, a wiring harness was added to the front door panels, which were equipped with electric windows.
The diagram below shows:
- mounting block with terminal “A” to the power source and “B” to the external lighting switch;
- relay for turning on electric windows “K5”;
- switch for the right front door “2” and “5” for the left door;
- gearmotor of the right door “”3” and “4” - left door;
- ignition switch "6".
The wiring for the VAZ 2114 window regulators was also completed with an actuator unit