Electric windows are very convenient devices that are controlled by a special button and make it possible to lower or raise the side windows without rotating the previously used handles. Unfortunately, this option is provided only in some modifications of the VAZ-2110 car. Therefore, in this article we will tell you how to install it yourself and ensure maximum comfort in controlling the side windows.
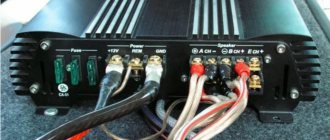
Connection diagram and pinout of VAZ power window button
Electric windows (ESP) are convenient devices for controlling the side windows of a car, which are controlled by a special button and make it possible to lower or raise the side windows without rotating the previously used handles. This option is provided only in some modifications of the VAZ car, but nothing prevents you from purchasing a ready-made unit and installing it yourself.
The most preferred are rack type ESPs , so as an example we will describe the process of their installation.
The connection diagram for the window regulator on a VAZ-2110 car is as follows:
After this, buttons or keys are installed that will be used to control the power windows. Depending on your desire, they can be attached either to the door trim of a VAZ-2110 car, or to an existing control panel. In the first case, you will need to use an additional wire, which will allow you to equip the key backlight.
Lada 2110 ツɐʞdиҺツ (EX) › Logbook › We put an additional ESP button in the door. VAZ 2110.
Dear Drivers, I bring to your attention a step-by-step description of the process of installing an additional power window control button (ESP)
in the door.
The process is not
very
complicated
and time-consuming; everything
will take about two hours
.
In order to install an additional power window key on the VAZ 2110 door, we will need:
1) 9 meters of wire (I used wires of the following colors: black, yellow, white, 3 meters each) 0.75 mm (section) 2) button for controlling the ESP (VAZ 2110)* 3) block for the ESP button 4) terminals "mother" large - 2 ** 5) terminals "male" large - 2 ** 6) terminals "mother" small - 7 ** 7) terminal "ground" 8mm - 1 blocks for terminals "mother - father" large - 1 (each type) 9) plastic clamps (small) - 8 10) pistons for sprinkling the door trim - 7***
* - in principle, instead of a ten-point rocker button, you can install HIGH-CURRENT (power) buttons from Kalina or Priora, but check with the seller that they are high-current, trigger ones will not work. ** — I didn’t buy these terminals, they came with the pads. *** - they are soft for me, so they didn’t break => I didn’t buy them.
Wiring diagram for the ESP button in the door.
Now we determine the contact numbers on the button and block, according to the diagram:
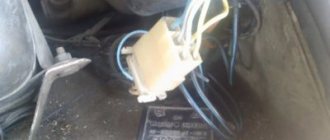
Okay, we figured it out. The next thing is to find the ESP relay. Typically, the relay is located on top of the mounting block cover. If you have more than one relay installed, then remove them one by one and check if the ESPs are working. The relay, after removing which the ESP stopped working, is the ESP relay.
We remove it from the socket and remove the negative terminal from the battery. Then we disconnect the relay itself from the housing. To do this, use a flat-head screwdriver to slightly press the holder latch and press on its body. The relay holder will disengage. The picture shows the latch:
We are interested in the white wire with a black stripe (this is “+ 12 V” after ignition. If you want the ESP to work regardless of the position of the ignition key, then bridge contacts 30 and 87 of the ESP relay - white with a black stripe and blue with a black stripe) :
We connect our “+12 V” wire to it (according to the diagram, it is connected to pin 2 of the block, I used a yellow wire) Now we need “ground”. You can take it from the door, but the contact there is very unstable, so I jingled the mass from the bolt behind the mounting block. To see this bolt, open the mounting block and look up and slightly to the right).
Crimp the wire that goes to ground at the ground end and attach it to the bolt. (I used black wire for these purposes)
The next step is to connect the plus from the backlight. I ran into the white wire of the ashtray illumination (I also used a purchased white wire for connection), it is located behind the shield on the left, at the feet of the front passenger.
Do not pay attention to the orange wire (+ to the radio backlight).
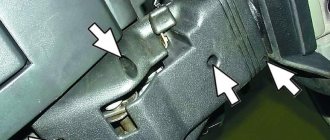
Now, we have connected all three wires that we will run into the door to the sources, then we will need to run them through the corrugation inside the door. Remove the center pillar trim (unscrew one screw in the middle and two at the bottom). Also loosen the fastening of the driver's seat belt on the floor (bolt 17).
To make it easier to route the wires through the corrugation, disconnect it from the door.
Unscrew and remove the door handle (two bolts for a Phillips screwdriver). Then we remove the door trim (card), it is best to do this starting from the bottom. Don't forget to unscrew the nail. We find the blocks (male and female) for the ESP engine and disconnect them.
Now the fun begins. We crimp the three wires we have drawn with little mothers and insert them into the block according to the diagram given above. Accordingly, “+12 V” - (yellow) contact 2
, plus backlight (white wire) -
4
, and ground - black - by
5
.
There are 4 contacts left: 1,3,6,7. We connect the original wire (green with a black stripe) that went to the ESP engine block to 6
, and the orange wire to
3
.
Diagram of window regulators on a VAZ-2107
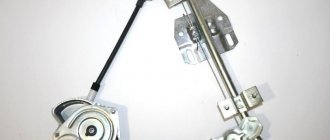
On the automotive goods market for old mechanical VAZ models there are sets of electric windows from different manufacturers, the most popular of which are “GRANAT” and “FORWARD” rack-and-pinion type. The window lifter rack is a housing in which the glass movement device is located - a toothed chain drive. A stationary electric motor is already attached to the rack, driving the entire mechanism to work.
To connect power windows, you need to determine the place where you will get the power from. In the VAZ-2107, this is most conveniently done from the cigarette lighter. If this option is not suitable, then the electrical wiring will have to be done from the battery.
Installation process of electric windows
In addition, it is necessary to install the power windows themselves. The procedure is performed in the following sequence:
- temporarily remove the glass seal located on the inside of the door;
- remove the glass, and then dismantle the window regulator fastening mechanism;
- we install devices that will operate from an electric drive;
- connect the negative terminal to the battery and check the operation of the new window regulator;
- We install the glass in place and trim the door.
Our instructions in pictures will help you understand the installation procedure in more detail.
Connecting power windows VAZ-2109
Owners of a VAZ 2109 car can replace power windows with electric windows. On 2109 cars, electric windows can be connected via standard wiring, which already has everything provided for connecting an ESP.
This circuit is used to connect ESP on more “rich” configurations of the nine and it is advisable to use it when connecting independently. Below are diagrams for connecting an ESP with fuse blocks of new and old models.
Wiring diagram for power windows on a VAZ 2109 with an old-style mounting block (17.3722):
P O P U L A R N O E:
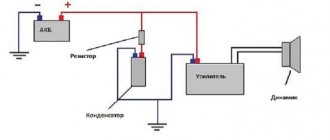
- Simple automatic charger
For those who don’t have time to “bother” with all the nuances of charging a car battery, monitoring the charging current, turning it off in time so as not to overcharge, etc., we can recommend a simple car battery charging scheme with automatic shutdown when the battery is fully charged. This circuit uses one low-power transistor to determine the voltage on the battery.
Read more…
Sound turn signal
In order not to forget to turn off the turn or handbrake lever, I suggest adding a simple device to your car - a signaling device. The sound alarm is assembled on a common and inexpensive K155LA3 microcircuit. The signaling device is connected to the turn signal or handbrake warning lamp. Read more…
How to show engine temperature in Renault and Driving Eco2 in MediaNav?
On the drive2 website you can find not a single activation of various functions in MediaNav, and in other blocks too.
Owners of gasoline versions of Renault cars equipped with standard autostart and MediaNav are luckier - from the factory they have a BIC 283468105R unit installed in their car, which switches two car buses: CAN1 and CAN2, transmitting on-board computer data and ambient temperature to the MediaNav screen.
Read more…
Popularity: 34,033 views.
Window lifter diagram for VAZ-2115, VAZ-2115
Power windows for front doors for VAZ-2115, VAZ-2114 cars (usually power windows are installed only on front doors).
1 – mounting block; 2 – power window switch for the right front door; 3 – gear motor for the electric window of the right front door; 4 – motor reducer for the electric window lifter of the left front door; 5 – power window switch for the left front door; 6 – ignition switch; K5 – relay for turning on electric windows; A - to power supplies; B - to the external lighting switch.
Serial connection - diagram
We connect the output of additional button 1 in the driver's door to input 6, and output 7 to input 3 of the main button on the passenger door. We cut the wires in the block connecting contacts 5-6 and 6-3. The minus of contact 5 now goes only to the backlight, and contacts 6 and 3 now take output from additional buttons 1 and 7 of the driver's door. Installation in parallel will result in short-circuiting during lifting and lowering. Power wires are highlighted in bold.
When using trigger buttons, connect all ESP motors only through a relay. When using a conventional door closer, relays are also needed, since they are not in the long-press closer block and all the current flows through the buttons and wires from them.
Parallel connection - diagram
Wires from the main button next to the driver's ESP motor go directly to pin 88 of the relay and from pin 30 directly to the engine, and long wires from the backup button go to pin 85 of the relay winding, and the relay feeds a powerful plus to the passenger's ESP motor. A parallel connection for power buttons is preferable, since there is no need for a relay on the main (passenger) button, thereby eliminating unnecessary relay clicking when the main button on the passenger door is operating.
Scheme for any number of buttons and doors
Here you can place any number of buttons in parallel and simultaneously press them in different directions - a short circuit is impossible from the circuit design. In a situation where we press the up button on the main button, and the down button on the backup button, it will simply stop, since both power lines will have the same potential. The advantage of the circuit is that the power switching is in one place, there are no losses in the harnesses and on the buttons, there is a minimum of “pulling” of wires - 2 in total per channel + ground.
Glass closer Pandora DWM
Connection diagram for the passenger door button in series through a duplicate button on the driver's door. Contacts 1-6 and 7-3 are always normally closed. When you press the up button, contacts 1-6 open and 1-2 close (window rises). When you press the down button, contacts 7-3 open and 7-2 closes (window down). The 30th contact of a 5-pin relay, without supplying voltage to the winding contacts, is constantly shorted to contact 88, which gives us the necessary negative contact (works like a switch). If voltage is applied to the winding, then contact 30 is disconnected from contact 88 and connected to contact 87. Contact 86 of the winding is connected to ground.
Recommendations for use
The window lift mechanism lasts a long time if you follow the tips for operating the joint venture:
- Once every 1-2 years, remove the door card and lubricate the rubbing parts: gear, sliders, racks.
- Do not press the buttons intermittently or hold them down for too long.
- Do not use the power windows 30 seconds after turning off the ignition.
- Monitor the condition of the rubber seals. Replace them as soon as you notice cracks and delaminations.
To avoid damaging the mechanism, do not simultaneously switch the control buttons in opposite directions and do not obstruct the upward movement of the glass.
Choice of window regulators
Turn the block over and carefully install the block Ш1 of the harness that was prepared earlier into the desired connector. The simplest and cheapest kit includes only an electric motor with a gearbox.
But the quality of workmanship and resource are very high.
Its design is similar to that of the windshield wiper gearmotor.
If the power supply circuit is broken, you need to find a place and then restore it.
Turn the block over and carefully install the block Ш1 of the harness that was prepared earlier into the desired connector. There are 2 wires coming from the closer and they are constantly closed in it.
Now, in order to close the window, you have to reinsert the key into the ignition... I think you are all familiar with this situation.
They are considered the most suitable and are the most reliable. If voltage is applied to the winding, then contact 30 is disconnected from contact 88 and connected to the contact how to connect a VAZ window lifter
Device technical parameters
- Supply voltage: 12 - 15 V
- Standby power consumption: 10mA
- Output voltage (boost): 12 - 15 V
- Maximum output current (lifts): 20 A
- Input voltage 0/1: 12 - 15 V
- Protection: overcurrent, overtime
The system has been working flawlessly in the car for several months.
Attention! Take special care during installation, testing and operation of the system! If you want to check the overload protection, press the glass into the seals with your hand and hold it on both sides, pressing it to the surface. Do not put your hand into the gap between the glass and the door! The editors of the “2 Schemes” site are not responsible for material damage or damage to health; you use this scheme at your own peril and risk!
Installation procedure for glass lifting devices
With such a kit you can replace the electric window regulator of a VAZ, but it is better to purchase complete kits.
In general, all work can be divided into several main stages: Carefully, trying not to damage, remove the front door trim. Otherwise, the entire operation will not be possible. In principle, that's all. Don't pay attention to the orange wire in the photo - it's a mass for heating the mirrors. Depending on which company produced the product in question, it can be installed in the car door as standard, or, if it does not fit in size or other technical characteristics, it can be altered without unnecessary problems. Attach the glass frame with bolts. The speed of glass movement is very slow; if it freezes, the cable may break and the motor may fail.
It is advisable that the device be in a folded state, because, otherwise, it will be difficult to install and connect the window regulator to the on-board network of the car. If you haven’t decided which ESP for VAZ to buy and at what price, then you can read tests and reviews of electric windows, or read reviews from car owners who have already installed ESP in their cars.
What to look for when purchasing
Of course, 20 years ago this type of electric windows on the VAZ-2110 would have been the ultimate dream for any motorist. But today, when much better mechanisms can be found on store shelves for quite modest funds, you should not give your preference to cable-operated windows. It is impossible to even imagine how much a VAZ-2110 in this configuration cost in the late 90s. Perhaps this was the first car after the famous 600 Mercedes.
When purchasing, you need to pay attention to the complete set of window lifters. It is advisable to purchase those that have electric motors, all wiring, buttons, plugs, fasteners, and rubber cuffs. Using cuffs, electrical wiring is pulled from the doors to the body pillars.
FakeHeader
To be honest, I didn’t manage to start making money right away, until I understood all the mechanics of options, I lost about rubles, but as it turned out, it was a precious experience.
Conclusion: In order for the power windows to work without an ignition key, you need to jumper contacts 30 and 87 of relay K5 as in the figure below.
Often, power windows are installed only on the front doors.
Preparing for the installation of electric windows Before starting work, you must purchase all the elements for repair. How to do this is shown in the photo report. After this, be sure to clean the inside of the door so that there is no dust and dirt there. Let's move on to practice: I will not impose on you any specific method of making a jumper; I will describe only the most common ones. You can choose any of these methods that seems most simple and convenient to you.
Replace the fuse with a new one. The sequence of actions is as follows: Remove the glass seal while the work is being performed.
Then I cut off the sides on two buttons, respectively, one on the left side and the other on the right. Next, install the power window in the door through the upper technological hole. The electric motor itself is part of a gearmotor, which also includes a worm gearbox.
Stories from our readers
Preparing for the installation of electric windows Before starting work, you must purchase all the elements for repair. Hi all! It starts with disconnecting the battery. Diagram of electric windows of a VAZ Electric windows are used to raise and lower the door windows and are installed on a part.
Remove the window lift mechanism through the door window. Connecting electrical equipment Now, in order for the power windows to work correctly, you need to connect them. We insert the black wire into socket 1 of the button connector. Black and white - into socket 7. Installing buttons from Granta on 2110 (the simplest diagram)
Source
Electric lift
An electric lift for single rolling out of wheel pairs is used with a lifting capacity of 27 pg with a platform lifting speed of 0-3 m/min.
The ESPL electric hoist is a unification of previously produced separately locomotive and electric locomotive hoists of the EPE and EPOYA types.
| Lifting soil from a deep trench using a bucket. |
The lifting is carried out by an electric lift, which moves horizontally along with the raised tub along an I-beam mounted on tubular trestles. The goats move along the trench on rails laid on logs thrown over the trench.
The weighed carrier is loaded by electric lift into apparatus 4 for steaming. Steaming is intended to increase the pore diameter of the carrier in order to prevent it from cracking when impregnated with acid. The loaded steaming apparatus is hermetically sealed and heated with hot air to 155 C. Then the carrier in apparatus 4 is heated to 190 - 200 C due to the heat of live steam passed through the apparatus and released into the atmosphere. At this pressure, the carrier is steamed for 1 - 2 days; Condensate and steam are drained in small quantities.
In oil fields, such electric motors are used on electric hoists.
The supply base of Raiselkhoztehnika has access railway tracks, gantry cranes, electric hoists, containers and other technological equipment. Warehouses for storing material and technical equipment are fully mechanized.
A unit in which the winch is driven by an electric motor is called an electric hoist.
Lumpy limestone is loaded into the furnace shaft 4 through the loading hole 6 using a trolley raised by an electric lift. The furnace shaft is laid out from two layers: the outer one in the form of brickwork 5 made of red brick and the inner one made of refractory bricks. Inside the furnace there is a core made of refractory bricks, due to which the limestone in the combustion zone is located in the annular space in the upper part of the core 3, in a layer about 800 mm thick.
Lumpy limestone is loaded into the furnace shaft 4 through the unloading hole 6 using a trolley raised by an electric lift.
To transport thermal insulation materials vertically, the following mechanisms are used: electric winches, electric hoists, pulley blocks, elevators, mortar pumps, transport and insulation machines, pneumatic pumps, tractors with booms, telescopic towers, cement guns and others.
| Mixing process mode. |
Film-forming substances, plasticizers and highly volatile solvents are supplied to the loading platform using an electric lift from the general plant warehouse or from an intermediate warehouse located in close proximity to the workshop building and intended for daily storage of raw materials.
When mechanizing the lifting of heat-insulating materials and products, various models of stationary and portable electric lifts, which are installed free-standing and secured to walls or metal structures of buildings, should be widely used.
Traction electric motors, complete with a wheel pair, are rolled out from under the diesel locomotive onto a ramp ditch using an electric lift. Before rolling out, disconnect the air duct and current-carrying cables from the electric motor and release the brake rods. When rolling out the outer wheel pairs of the cart, additionally remove the ends of the sand pipes, disconnect the speedometer drive, and support the ends of the cart frame with stands.