You will need: two 13mm wrenches, a Phillips-blade screwdriver.
1. Remove the windshield wiper from the car (see section 9 “Electrical equipment”, subsection “Front windshield wiper”).
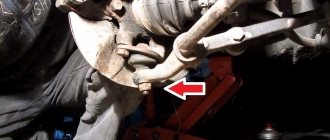
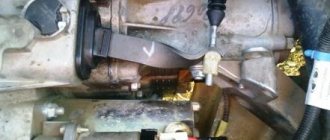
2. Loosen the tightening of lock nut 1 and adjusting nut 2 of the clutch drive and remove the cable guide from the clutch release fork.
3. Slide the cover from the lower end of the cable sheath and unscrew the nut securing the end to the bracket, holding the end from turning with a second wrench. Remove the tip from the bracket on the gearbox.
4. Unscrew the two nuts securing the windshield wiper bracket and remove the bracket from the studs. Please note that the bracket is installed with an inclined platform towards the front of the car.
5. Unscrew the screw securing the protective cover and remove the cover holder.
6. Bend the cover to the side to gain access to the cable end attachment to the clutch pedal. Using a screwdriver, remove the retaining clip from the pin.
7. Remove the cable end from the pin.
8. In the passenger compartment, unscrew the bolt securing the cable holder to the pedal bracket and remove the cable into the passenger compartment.
9. Remove the bushing from the clutch pedal pin and check its condition. Replace a broken or worn bushing. Please note that the bushing is split, which is not a defect.
10. Install the new cable in the reverse order of removal, having first lubricated the cable guide and the clutch pedal pin with Litol-24 or LSC-15 grease.
11. Tuck the edge of the cable seal into the hole in the bulkhead, first pushing it towards the engine compartment. After installing the cable, adjust the clutch pedal travel.
Reference manual for servicing VAZ, LADA 110 cars.
Ignition adjustment 2110. Engine compression for VAZ 2112, immobilizer for VAZ 2111. Valve cover for VAZ 2112, cylinder block gasket for VAZ video. The cost of a generator for a VAZ. replacement of fuses for VAZ 2112, design of the oil receiver for VAZ 2112. oil recommended by the factory for the box of VAZ 2112. replacement of the water pump (pump) for VAZ 2112. Replacement of valve stem seals for VAZ 2110.
To replace the clutch cable on a VAZ-2112, you need to drive the car onto an inspection hole or overpass. If this is not possible, then you can simply raise the left side of the car on a jack. But the latter replacement method will be less convenient. Also, in this case, you will need to put the car on the handbrake, and put a beam under the rear wheels so that the car does not move while the work is being carried out.
Replacement Tools
To work you will need:
- The key is "8".
- Two keys for "14".
- Screwdriver (phillips).
Sequence of work
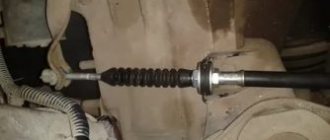
For comparison, old and new clutch cables
They go in this order:
- Move the air filter housing to the side.
The air filter housing will interfere with us, so we will move it to the side. Moreover, all the housing latches were broken and it was dangling under the hood
Pull the cable out of the bracket
Clutch cable bracket in the cabin - you'll have to tinker with it
Important! Before installing the cable, you need to adjust the clutch pedal so that it is 10-13 centimeters from the floor level. We have already written in more detail about replacing the clutch itself on a VAZ-2112.
Video about replacing the clutch cable
Clutch adjustment on a VAZ-2112
During clutch adjustment
To adjust, you will need to rotate the bolt, which is located on the cable on the gearbox side. When the pedal distance is adjusted, tighten the nut and press the pedal 2-3 times. If all is well, then tighten the locknut on the casing. Next, the car is assembled in the reverse order.
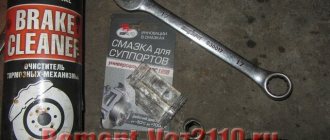
The clutch cable must first be lubricated with LSC-15 or Litol-24.
Replacing the cable
Diagnosis and replacement of the pressure sensor on a VAZ 2114 is easy and simple
The situation in which the clutch pedal fails on a VAZ 2110 is not at all uncommon. And she says that the cable has broken. There is nothing left to do but replace it.
Even if there is no break yet, but there is deformation or a violation of the integrity of the cable, there is definitely no point in postponing the dismantling process.
The whole process can be divided into three main stages:
- Preparation;
- Dismantling;
- Installation.
Let's consider them separately.
Preparation
During preparation, we recommend that you not only get ready for work, but also study the operating manual and watch several visual videos. This will give you additional knowledge and understanding of what needs to be done with the clutch system.
Also stock up on the necessary tools:
- 8 wrench;
- Two 17mm wrenches;
- Phillips screwdriver;
- New high-quality clutch cable;
- Lubricants.
Dismantling
Next, you need to remove the old cable, which will allow you to install a new element of the clutch system. The sequence of work will be as follows:
- Remove the windshield wiper from your "ten".
- Loosen the locknut and adjusting nut slightly.
- Remove the rim of the damaged cable from the clutch release fork.
- Slightly move the cover of the lower end of the cable casing using a 17 wrench.
- At the same time, you need to loosen the nut securing the tip to the bracket. The tip must be held with a second key of 17, which will prevent turning.
- Remove the required tip from the bracket.
- The windshield wiper mechanism bracket is held on by 2 nuts that need to be unscrewed. Plus, dismantle the bracket itself directly.
- Do not forget that during reassembly, the bracket must be installed with the inclined part towards the front of the car.
- Now you tighten the screw that secures the protective cover and remove its holder.
- Bend the cover a little, which will allow you to reach the fastening of the cable tip to the pedal responsible for the clutch.
- Using a flathead screwdriver, pry and remove the support bracket from the “finger”, and then remove the cable end from it.
- The next step is to remove the bolt securing the cable holder to the pedal bracket. This way you will finally be able to pull the damaged cable through the interior.
- But that's not all. Remove the bushing from the pedal pin.
- If the bushing is broken or worn out, be sure to replace it with a new one. But keep in mind that the design stipulates that the sleeve is cut. Therefore, this is not a defect that arose during operation, but the manufacturer’s idea.
Installation
The hardest part is probably behind us. But the work cannot be considered complete. Installing a new cable does not involve complex processes, but then you will need to reassemble the entire structure, adjust the clutch and check its operation.
Installation is performed as follows:
- Immediately before installation, remove the bushing from the pedal pin to check for integrity. As noted earlier, if it is damaged, the element must be replaced;
- The fastening of the new cable is carried out in accordance with the dismantling, only all processes are carried out in the reverse order;
- The end of the cable is inserted through the passenger compartment into the engine compartment, after which it is fixed to the clutch pedal of the car;
- Next, the cable together with the shift fork is hooked and led to the mounting bracket on the gearbox, where fixation occurs;
- The pedal travel is checked, which should be about 13 centimeters from the floor. We will tell you about clutch adjustment separately, in specially prepared material.
Well, at this point the cable replacement can be considered complete. It has certain difficulties, but with the right approach you can easily cope with the work on your own.
Be sure to study the instructions in the instruction manual, watch video tutorials, and also get a high-quality new element. Only with a combination of all these factors will you be able to achieve the desired result and save an impressive amount of money on the services of specialists from service stations.
Loading …
How to prevent cable failure on a VAZ 2110
A failed clutch pedal that fails at the most inopportune moment is a very unpleasant result of careless and extreme driving. The cable resource is extremely long and does not often require replacement. Its breakdown most likely indicates the age of your iron horse.
Typical driving mistakes that lead to cable failure:
- Do not press the clutch pedal while driving, causing it to slip. This can cause not only cable breakage, but also gearbox failure;
- starting from a standstill with high torque is also the main factor that ultimately leads to cable breakage and requiring its replacement.
By the way, failure of the cable is another one of the most benign and simple breakdowns on the VAZ 2110. Replacing the clutch fork (about 10% of the total number of relevant faults) can be a much more unpleasant problem. In this case, repairs will cost several thousand rubles.
Thus, if your clutch pedal has sunk to the floor, there may be several reasons:
- the cable needs to be replaced;
- the clutch fork is broken;
- the cable simply flew off its seats and requires re-tightening the bolts.
How to change the clutch cable on a VAZ 2114 - the best instructions
Hello dear readers, in this article I will tell you how to change the clutch cable on a VAZ 2114. Most Russian car owners are accustomed to carrying out simple repairs on their own car, rather than using the services of car repair shops and garage technicians. If you've ever had to repair a car more difficult than replacing a flat tire, then this task will be up to you.
When the deadline comes
It should be noted that the clutch cable on the VAZ 2114 is a consumable item, and its wear is quite common on cars of this series. Condensing moisture leads to corrosion and rapid wear, and frayed steel threads cause the cable to jam in the jacket.
But the price of a high-quality torso is quite affordable, and repairs can be done yourself. It is quite easy to determine if a cable is faulty; when you press the pedal, it may not return completely or partially. In order for the pedal to return to its place, you have to press it several times. In this case, the clutch does not fully engage, the car begins to slip, when you sharply press the gas pedal, the engine develops good speed, but the car practically does not accelerate. If your car shows these signs, then it's time to think about replacing the clutch cable. A cable break is a fairly rare occurrence; in this case, the clutch simply does not disengage when the pedal is depressed. Replacing the clutch cable involves carrying out repair work and subsequent adjustment. If you are doing this work for the first time, then it is better to first familiarize yourself with the photo and video materials offered on the site. Don't be alarmed, there is nothing complicated in these operations.
What you need
When carrying out the work, you will not need any special tools or equipment. Replacement can be carried out even on the street, in the absence of precipitation, but it is better to do this in a garage or under a canopy with good lighting. To perform the work, you will need a 17mm wrench, pliers, a new clutch cable, grease (the most common is Litol or graphite), a ruler for making adjustments, knitted gloves and WD-40 rust conversion fluid. You can do the replacement yourself, but it’s better to invite an assistant, it will make changing easier and more fun.
Execution of work
We open the hood, and the first thing we do before work is remove the negative terminal from the battery. This is necessary so that you do not accidentally short-circuit the battery terminals when performing operations. We unscrew the nuts securing the cable casing to the mounting bracket using 17mm wrenches. Usually the nuts come off without much effort, but if they are rusty and won’t budge, treat them with WD-40 and wait a little.
After the nuts are loosened, we pull out the jacket from the bracket and the lower end of the cable from the pressure bearing fork. Next we move into the car interior. We remove the rug and bend the carpet in the area of the pedal assembly. We find the place where the cable is attached to the pedal; it is put on the hook with its eyelet. Disconnect it and the bushing holding the cable. We simply push the faulty cable forward towards the engine. This is where the help of an assistant may be required; usually the cable becomes sour and in order to pull it out you will need to pour a little waste or engine oil into the casing. Let the oil spread a little and begin to develop the cable in the casing. To do this, we move it with the help of an assistant back and forth from the interior and engine compartment. Having pulled out the damaged cable, we install the purchased new one in its place. Before installation, you should check the bushing for wear, or better yet, replace it along with the cable. We put one end on the pedal, having previously lubricated the bushing, and put the other end into the clutch fork and attach the shirt to the bracket. The work is done and as you can see, replacing the cable is very simple.
Adjustment
After carrying out the work, the full travel of the clutch pedal should be adjusted. There is nothing complicated about it either. We start the car, engage first gear and slowly release the clutch pedal. It should be noted in what position of the pedal the car begins to move. If the clutch begins to engage at the very end, then adjustment will be required, which is performed with the already familiar casing fastening nuts. By tightening or unscrewing the nuts, we ensure that the pedal stroke is 12.5-1.5 centimeters; we measure it using a ruler.
Shifting gears without clutch
Not every driver of a VAZ 2110 imagines how to not only start, but also drive a car without using the clutch pedal. Of course, this skill is very specific, but it can be vitally important when the clutch cable breaks at the most inopportune moment.
The easiest way is to start the car in first gear, first pressing the gas pedal halfway. After turning the ignition, the car will immediately move off with a very noticeable jerk, so be extremely careful when trying to start it this way. Similarly, we turn on the reverse gear.
Driving for a long time in first gear can cause the engine to overheat. If there is a considerable distance to be covered, it is better to learn how to shift higher gears without using the clutch, for which:
- release the gas pedal and, at the moment of least resistance, switch off the gear, moving the transmission lever to the neutral position;
- then engage the next gear, continuing acceleration.
The proposed algorithm for downshifting in the event of a non-working clutch requiring replacement is somewhat different:
- Having switched to neutral gear, we revise the throttle, thereby increasing the speed of the input shaft;
- and only then switch to a lower gear.
Replacing the VAZ 2110-2112 clutch cable with your own hands, recommendations
In order to replace the clutch cable, you will need the following set of mechanic tools:
- flat and Phillips screwdrivers;
- a set of open-end wrenches and sockets with a ratchet.
Next, you need to perform a simple algorithm of actions, which involves dismantling the VAZ 2110 windshield wiper and window trim. Of course, it is possible to replace the clutch cable without the above steps, but complete instructions according to standard recommendations will still be more clear.
- 1. First, you need to discard the front facing panel for the wind window frame (jabot), held in place by a set of screws;
- 2. Next, remove the windshield washer tubes, wiper arms (in the case of an old-style frill) and, finally, the casing itself.
- 3. Remove the windshield wiper, having first disconnected the negative terminal of the battery and disconnected the expansion tank, for which:
- the gear motor connector is dismantled;
- unscrew the nuts of the left and right fastening of the trapezoid, as well as the bolt holding the gearmotor to the bracket;
- finally, the wiper base, removed from the studs, can be removed from the air supply box.
Self-replacement of the clutch of a VAZ 2110 car on video:
The clutch plays the role of a link in a car between the transmission and the engine. This element of the internal combustion engine takes on the “impact” and all the loads that arise when transmitting torque from the engine to the gearbox. Therefore, the clutch can be conditionally classified as consumables, i.e.
It wears out quite often and requires immediate replacement. It is impossible to influence the wear of the clutch, unless you manage to change gears without its participation, although in this case it will not go unnoticed in relation to other parts of the engine.
Clutch replacement is necessary in the following cases:
- If the clutch begins to “lead”, that is, when engine power decreases.
- If the clutch is not fully engaged, that is, it “slips.”
- If you hear extraneous sounds when turning on - clicks, jerking, etc.
- In case of unauthorized disengagement of the clutch.
- In case of vibration when pressing the clutch pedal.
In this article I will tell you how to replace the VAZ 2110 clutch at home without removing the box and draining the oil.
To work you will need:
- 1. Jack.
- 2. Inspection hole or lift.
- 3. Set of socket and open-end wrenches: “19”, “17”...
- 4. Mount or amplifier pipe.
None 2. Remove the wheel and unscrew the two lower ball joint bolts.
3. Remove the “-” terminal from the battery.
4. Remove the mass air flow sensor, then loosen the clamp securing the mass air flow sensor corrugation and remove the air filter. 5.
Now you need to remove the clutch cable from the clutch fork. Loosen the two mounting nuts that secure the cable to the bracket on the gearbox.
6. Unscrew the bolt securing the starter to the box, then unscrew the first bolt securing the gearbox.
7. Head on “19” amplifier pipe. There is another gearbox mounting bolt nearby.
8. Loosen this nut and the upper starter mounting bolt.
9. Remove the connector from the speed sensor, then unscrew the speedometer cable.
10. Remove the longitudinal brace paired with the lever.
11. Now unscrew the lower starter mounting bolt.
12. Unscrew the 3rd gearbox mounting bolt; in the area of the right CV joint there is another nut that needs to be unscrewed.
13. Unscrew the two torque rod mounting bolts. 14. Loosen the nut located on the clamp of the gearbox control drive rod, then remove this rod from the box.
15. Place a support under the engine, then unscrew the two nuts securing the rear cushion. This is done just in case, so that if the engine lowers too much, your hoses do not break.
16. Carefully move the gearbox away from the engine and lower it to the floor, it will hang on the axle shafts.
17. I recommend replacing the clutch release bearing at the same time.
Assess the wear, replace the disc, and if necessary, the clutch basket, check whether the petals are normal.
Further assembly is carried out in reverse order
Thank you all for your attention, this is actually the simple way to replace a VAZ 2110 clutch without removing the box and draining the oil. Do-it-yourself VAZ 2110 clutch replacement video:
- www.drive2.ru
- vaz-remont.ru
- prostovaz.ru
- 7bm.ru
Changing the clutch cable, basic algorithm
Replacing the VAZ 2110 clutch cable is extremely simple. Even a novice amateur motorist will be able to do the job, and it’s quite difficult to make a mistake. What we do:
- 1. To start, use two 19 mm open-end wrenches. loosen the nuts of the clutch cable end, tilting it away from the bracket;
- 2. Disconnect the cable from the fork that controls the clutch release;
- 3. Now you need to disconnect the cable end from the clutch pedal lever. This can be done through the interior, but if you worry about dismantling in advance, then the task is greatly simplified. First, remove the protective cover of the mechanism.
- 4. The end of the cable is unscrewed with a nut, additionally secured with a locking bracket. Unscrew the pedal lever nut, thereby releasing the cable;
- 5. To release the upper end of the cable sheath, unscrew the corresponding bolt of the thrust plate in the passenger compartment. Then the thrust plate is removed along with the cable;
- 6. The old cable is removed through the interior. When replacing, the lead of the new cable is lubricated with silicone.
Replacement process
Diagram of a car clutch
Most car enthusiasts and owners of the VAZ-2114 are accustomed to doing most of the repair and restoration operations on their car with their own hands. Replacing the clutch cable is no exception. Of course, not everyone is able to do this on their own, because they do not know where to start and carry out the process.
Algorithm of actions on the VAZ-2114
In principle, when everything is put together, you can proceed directly to the repair process:
- We remove the negative terminal from the battery to disconnect the power to the car.
- We find the cable and begin the dismantling process.
- Using a 17mm wrench, unscrew the fastening nuts.
- We remove the cable from the bracket and clutch fork.
- All other actions will be performed from the salon. To do this, you need to free access to the clutch pedal. We remove the carpet from the driver's side, and then carefully move the carpet away.
- Disconnect the cable eye from the hook on the pedal. There is a locking bracket installed there. You'll have to tinker with it.
- The cable is pulled out from the engine compartment, so it needs to be pushed through from the passenger compartment. You can, of course, pull under the hood and pull it out, but this is dangerous because you can hit wiring or other elements.
- Now you need to disassemble the cable housing and remove it from there.
- We install the new cable into the old housing and mount it in place.
- The remaining parts must be assembled in reverse order.
- After installing the product, it is necessary to adjust the cable tension.
Cable selection
The old clutch cable is worn out and needs to be replaced.
While researching the spare parts market while searching for a clutch cable for a VAZ-2114, it turned out that there is an original part, as well as several analogues that are no different in quality, and in some cases even better.
Original article
2109-1602210-10 – original catalog number of the clutch cable manufactured by AvtoVAZ. It is installed quite easily and simply, and also does not require modifications or improvements. The cost of the product is 1200 rubles.
Analogs
Clutch cable
In addition to the original part, you can find analogues that are recommended for installation on the VAZ-2114. So, what non-original parts can be found on the spare parts market:
- Adriauto 0101 is an Italian manufacturer that offers high-quality clutch cables. The average cost is 1000 rubles.
- ABS K22120 – part made in the Netherlands. High quality and not expensive. The average cost is 1200 rubles.
- TRW GCC 3123 – German spare part. The company is known for its wide range of products for domestic cars, as well as the excellent quality of parts. The price will be 1500 rubles.
Adjusting the newly installed cable
After the VAZ 2110 clutch cable has been replaced, all that remains is to make its final adjustment, spending about 30 minutes of your personal time. Thus, we ensure comfortable and reliable operation of the VAZ 2110 clutch mechanism.
The degree of tension is adjusted by changing the position of the lower end of the cable fixed in the gearbox bracket. You can navigate by the position of the adjacent pedal. When the adjustment is completed, we check it using a tape measure or ruler.
The pedal travel from its initial position to its stop on the floor should be within 125 mm with an error of 5 mm up or down. If the pedal position does not correspond to the specified recommendations, adjustment should be continued.
When the clutch pedal suddenly falls to the floor, most likely the cable has broken. Replacing the clutch cable of a VAZ 2112 is easy and even done in several ways. You don’t need any special tools or specialist skills; any driver can replace the VAZ 2112 clutch cable on his own.
Adjusting the clutch pedal cable
The clutch pedal travel to the floor is usually 125±5 mm. To adjust the pedal using two 13mm wrenches, loosen the locknut of the lower cable end. By rotating the adjusting nut (changing the position of the lower end of the cable), set the desired clutch pedal travel, then press the pedal a couple of times and check the travel amount. As a general rule, the clutch pedal should be level with the brake pedal.
REPLACING THE CLUTCH CABLE FOR VAZ 2110, 2111, 2112, LADA
How to replace the clutch cable yourself without removing the frill on a VAZ 2110, 2111, 2112, LADA.
THIS VIDEO SHOWS IN DETAIL HOW TO REPLACE THE CABLE ON A VAZ 2110, 2111, 2112
The procedure for replacing the cable itself is not complicated, but it is still better to turn to professionals if you are not confident in your abilities. There is also a more convenient way to replace the cable, but then you will need much more time for the entire replacement process. Since it will be necessary to remove the front frill, the one near the windshield, therefore, the wipers will also have to be unscrewed. But for such efforts, you will get more convenient access to the upper part of the clutch cable. In general, it is advisable to have such a cable with you in reserve, since it can break at any moment.
Adjustment
To adjust, you will need two 13mm wrenches. Open the hood, find the end of the cable that is inserted into the fork. There you will see a lock nut, which you unscrew and use the second nut to adjust the pedal travel. When you twist towards the tip, you increase the pedal stroke and, accordingly, by unscrewing the nut away from the tip, you decrease the pedal stroke. Thus, the approximate travel of the clutch pedal should be somewhere around 13 centimeters. When you are satisfied with the result of your adjustment, calmly tighten the lock nut and, on the other side, bring the rubber stop up to the stop (fork).
If you have already noticed signs of wear on the clutch cable, then it is better not to delay replacement, because the cable can break at the most inopportune moment and precisely where there is neither a store with auto parts nor a service station nearby.
2. Loosen the tightening of lock nut 1 and adjusting nut 2 of the clutch drive and remove the cable guide from the clutch release fork.
3. Slide the cover from the lower end of the cable sheath and unscrew the nut securing the end to the bracket, holding the end from turning with a second wrench. Remove the tip from the bracket on the gearbox.
- https://xn—-8sbapc1bfiir0a.xn—p1ai/remont/transmissii/zamena-trosa-scepleniya-vaz-2110.html
- https://lentacar.ru/zamena-trosika-scepleniya-na-vaz-2110-2111-2112-lada.html
- https://vaz-omg.ru/transmission/clutch/replacing the clutch cable.html
What to do if the clutch pedal does not work
If this is exactly what happened, do not panic, call a tow truck or ask other drivers to tow the car. You can drive without using the clutch, start in first gear and either drive slowly with the hazard warning light on, or rev the throttle while changing gears. Driving for a long time without a clutch will “kill” the gearbox, but if you need to get to the garage or workshop once, you can. Of course, you can do it your way if there is no other choice and the price of transportation suits you.
Purpose of the cable and its place in the device
VAZ 2112 cars have a mechanical drive; it is installed on passenger cars of the VAZ family and not only, which are equipped with low-power power units. This type of drive compares favorably with others due to its very simple design and low cost of production. In addition, the mechanical drive is easy to repair and maintain because it contains a minimum number of necessary elements, see photo below:
- As can be seen from the diagram, the main element of the mechanical drive is represented by a flexible cable enclosed in a shell
- The clutch pedal is located inside the car and is connected to the lever (clutch fork) through a flexible cable.
- At the junction of the fork and the cable there is an adjustment device, which is designed to regulate the free play of the pedal
- The operation of the drive is incredibly simple: the driver presses the pedal
- This sets the VAZ 2112 clutch cable in motion, which pulls the lever device
- This device (fork) moves the release bearing along the guide
- The release bearing presses on the legs (petals) of the basket
- Thus, the clutch is disengaged
Features of replacement for VAZ-2109
The difference between the VAZ-2109 cable comes down to the presence of a special leash for engagement with the fork lever, which is quite large in size, so the cable is pulled out towards the engine compartment and not the passenger compartment.
We will not consider the entire sequence of replacing the drive on a VAZ-2109, but will only go through the key points. Note that the tools required are the same as those indicated above, and the change is made as follows:
- Loosen the nuts securing the braid to the bracket on the gearbox and pull it out. Then we press the lever with our hand and disengage the leash;
Under the dashboard, remove the fixing plate and tip from the rod.
There is no braid mounting bracket under the panel, and the braid simply rests against the rear wall of the engine compartment using a special thrust plate. Therefore, we go to the engine compartment and pull out the cable. Installation of a new drive is performed in the reverse order.
Let's start replacing
As you know, there are two ways to replace the clutch cable on a VAZ 2112, with and without removing the frill and wiper. Which one is faster is a moot point; without removing it, it seems to be faster, but then when installing the cable in place, a lot of inconvenience arises, so I recommend leaving the method without removing the frill to yoga. The standard instructions included with the car require their removal, therefore:
- Carry out work on a cooled engine.
- Disconnect (just in case) the battery terminals
- Take off the frill, don't be lazy
- Unscrew the wiper so it doesn't interfere
- We unscrew the nuts that secure the clutch cable in the bracket on the VAZ 2112 using two 19mm wrenches (twist one, hold the other)
- After this, remove the cable from the bracket
- Then you need to disconnect the cable end from the fork
- If the cable breaks, there may be nothing left to remove
- After this, use a screwdriver to unscrew the protective cover covering the clutch pedal.
- And remove the casing
- Unhook the bracket that secures the cable end to the pedal
- To make this easier, you need to raise the pedal as much as possible and use a screwdriver to pry out the clip
- Since we removed the frill, it is now much more convenient to remove the bracket from under the hood
- From the interior, using the “8” key, unscrew the bolt that secures the thrust plate of the upper cable tip
- In the image below, the steering column was removed for clarity; in general, replacing the clutch cable on a VAZ 2112 does not require removing the column
- Then we pull out this support plate
- Pull the cable into the cabin
- Now push the new cable under the hood from inside
- After this, replacing the VAZ 2112 clutch cable in the reverse order of disassembly
- You can coat the inside of the cable with engine or transmission oil
- For lubrication in the winter season or closer to it, grease is better, as is used in CV joints
- Just keep in mind that it is most difficult for her to lubricate the cable from the inside.
- As you can see, replacing the clutch cable on a VAZ 2112 is quick and easy, all that remains is adjustment, which you shouldn’t forget about
Stories from our readers
“Fucking basin. "
Hi all! My name is Mikhail, now I’ll tell you a story about how I managed to exchange my two-wheeler for a 2010 Camry. It all started with the fact that I began to be wildly irritated by the breakdowns of the two-wheeler, it seemed like nothing serious was broken, but damn it, there were so many little things that really started to irritate me. This is where the idea arose that it was time to change the car to a foreign car. The choice fell on the melting Camry of the tenth years.
Yes, I had matured morally, but financially I just couldn’t handle it. I’ll say right away that I am against loans and taking a car, especially not a new one, on credit is unreasonable. My salary is 24k a month, so collecting 600-700 thousand is almost impossible for me. I started looking for different ways to make money on the Internet. You can’t imagine how many scams there are, what I haven’t tried: sports betting, network marketing, and even the volcano casino, where I successfully lost about 10 thousand ((The only direction in which it seemed to me that I could make money was currency trading on the stock exchange, they call it Forex. But when I started delving into it, I realized that it was very difficult for me. I continued to dig further and came across binary options. The essence is the same as in Forex, but it’s much easier to understand. I started reading forums, studying trading strategies. I tried it on a demo account, then opened a real account. To be honest, I didn’t manage to start earning money right away, until I understood all the mechanics of options, I lost about 3,000 rubles, but as it turned out, it was a precious experience. Now I earn 5-7 thousand rubles a day. I managed to get the car buy after half a year, but in my opinion this is a good result, and it’s not about the car, my life has changed, I naturally quit my job, I have more free time for myself and my family. You’ll laugh, but I work directly on the phone)) If If you want to change your life like me, then here’s what I advise you to do right now: 1. Register on the site 2. Practice on a Demo account (it’s free). 3. As soon as you get something on the Demo account, top up your REAL ACCOUNT and go to REAL MONEY! I also advise you to download the application to your phone, it’s much more convenient to work from your phone. Download here.
In the store I ask jokingly that I need a clutch cable for a ten, which will never break! They answer me: change the car. I bought a clutch cable for a VAZ 2110 in Balakovo. Of all, he was the most expensive.
You can replace dozens of clutch cables in various ways:
- Remove the frill and the windshield wiper (to make it easier to get to the attachment of the cable end to the clutch pedal)
- Without removing the frill (method for those who are able to take the lotus position)
The standard instructions for replacing the VAZ 2110 clutch cable involve removing the frill and windshield wiper, but I decided to take the shortcut and not disassemble anything.
Also, after replacing the cable, the clutch needs to be adjusted.
Replacing the VAZ 2110 clutch cable without removing the frill
We unscrew the clutch cable fastening using a 19 key. Next, you need to remove the cable tip from the clutch release fork, but since the cable was torn, there was no need to remove anything
In fact, replacing the VAZ 2110 clutch cable with your own hands is quite simple. I did this procedure for the first time. The replacement was carried out in the winter outside in the evening with a flashlight in hand. I spent 2 hours replacing the clutch cable. I spent most of my time in the pedal area when removing and installing the cable.
Adjusting the clutch pedal VAZ 2110
The clutch pedal travel (all the way to the mat) should be 125mm (+-5mm). The maximum permissible pedal stroke is 160 mm. To adjust the clutch, you need to unscrew or tighten nut No. 2, after completing the adjustment, tighten lock nut No. 1. Tighten the rubber washer as much as possible to the fork.
You can adjust the clutch so that the pedal is lower than the brake pedal, then it will grab almost immediately after the pedal leaves the floor. If you make the clutch pedal high (higher than the brake pedal), then when you lower the clutch it will grab almost at the very end. A pedal that is too high can accelerate wear on the basket.
Replace the clutch cable on the “ten” yourself..