On the Lada Granta, the cable-driven clutch is a fairly reliable element. However, the drive itself wears out quite actively during the operation of the vehicle, resulting in:
- Grant's clutch cable stretches and breaks (the problem is solved by replacing the clutch cable);
- the Grant clutch is also adjusted (the required pedal travel and the moment of “grabbing” the clutch are set);
It is important to take into account a number of nuances both when removing the old cable and when installing and subsequently adjusting the new cable. Read more in our article.
Clutch cable: how the drive works
Cars can be equipped with two types of clutch engagement and release drives:
- mechanical cable drive;
- lever hydraulic drive.
At the same time, cable clutch release is widely used on budget cars with front-wheel drive. This is exactly the clutch cable installed on the Grant by the manufacturer. This cable is responsible for connecting the pedal to the fork.
On a Lada Granta, the clutch in good condition operates with medium hardness, as the manufacturer tried to balance the settings. The clutch pedal of the Lada Granta cannot be called too light, there is a certain rigidity, but the clutch is not too tight either.
When the driver presses the clutch pedal, the fork moves. In turn, the fork retracts the clutch disc (the clutch disengages), the engine and transmission are disconnected, due to which the Lada Grant’s clutch “opens”, and you can change gears softly and smoothly.
Let's take action: how to adjust the clutch on a VAZ 2114 car yourself?
The essence of the operation is to force a change in the length of the cable “jacket”, due to which the clutch pedal stroke changes. To complete the process there is no need for high qualifications - a little free time and desire are enough.
Experts have developed a good algorithm for how to adjust the clutch cable on a VAZ 2114; it consists of the following points:
- Open the engine compartment and disconnect the negative battery.
- For ease of operation, disconnect the hose from the air filter and remove it.
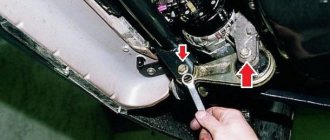
- Using two 17" wrenches, rotate the tip nuts and set the desired pedal stroke.
- Press the clutch pedal several times and measure again the distance from the lower to the upper point of the pedal position.
- Tighten the nuts and install the air filter in its original place.
During setup, you should pay attention to the condition of the cable. If there are abrasions on the “shirt” and the steel fibers are partially torn, then you will have to replace the Lada Samara clutch drive cable
Often there is corrosion on the tip, making it difficult for the nuts to rotate. WD-40 will work to solve the problem. It would be a good idea to inspect the pedal bracket bushings and replace them if they are severely worn.
The main task of the clutch is to temporarily separate (uncouple) the engine and transmission and smoothly connect them. These operations are necessary while driving to control a manual transmission: shifting gears, stopping, braking, starting the car.
If the adjustment of the free play of the clutch pedal is disrupted, the car stops moving normally, various problems arise - it becomes impossible to move away, gears are switched with a crunch, and the car may also slip and accelerate poorly.
When is it necessary to change the clutch cable?
As a rule, replacing the cable is necessary when it breaks or is stretched too much (adjusting the cable does not allow normal operation of the clutch).
In this case:
- the clutch pedal becomes tight;
- the pedal stroke changes;
- squeezing the clutch is also difficult;
- the clutch pedal falls to the floor;
As a result, gears are difficult to engage, and a crunching noise may appear in the gearbox when shifting. Please note that ignoring the problem, as well as active attempts to “stick” the gear with a crunch while driving and other efforts that the driver makes when trying to change gears with a faulty clutch, can cause severe wear of the synchronizers and other elements of the gearbox. This means that there is no need to delay replacing the cable.
Moreover, this procedure is not complicated and can be done with your own hands in a regular garage. The only caveat is that you have to work in the area of the pedal assembly, which is not entirely convenient (the fuse box and power steering are in the way).
Sequence of actions when removing and replacing the Lada Granta clutch with cable drive
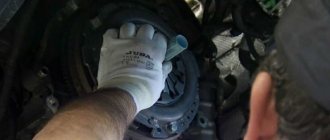
- After removing the manual transmission (the process is described above), we mark the location of the basket and flywheel with marks. In the event that we do not plan to replace the basket or pressure plate. The decision is made by the repairman based on the diagnostic results.
Removed manual transmission
- Unscrew the bolts and remove the basket with the pressure driven disk.
Cart with disc
Note to the driver. We loosen the tightening of the bolts evenly, according to the diagonal principle, one turn of the key.
- Remove the discs from the clutch basket.
Removing a disc from the bin
- We carry out troubleshooting of parts, adjacent mechanisms and elements.
What to pay attention to when troubleshooting:
What tools will you need?
If the Grant clutch pedal is too tight or, conversely, has completely failed, and the Grant clutch does not work properly, you will need to change the cable. By the way, a breakdown of the clutch fork will lead to exactly the same symptoms.
To replace the clutch cable you will need:
- open-end wrench at “8”, as well as at “10”;
- a knob (for the end cap) and a knob attachment “10”;
- a pair of Phillips screwdrivers (wide and medium), a flat screwdriver;
- ruler and caliper or ruler
It is also necessary to purchase a new clutch release cable for the Lada Granta and prepare a Litol type lubricant. You may also need a bushing for the clutch cable adjustment mechanism if this element is severely worn or damaged.
Removing and disassembling the Lada Granta gearbox control mechanism
Tools:
- Driver for socket attachment
- Extension for the end attachment on the wrench
- 8mm wrench attachment
- 10mm wrench attachment
- Ratchet wrench
- 13 mm head
- Open-end wrench 13 mm
- 13 mm straight box spanner
- Small flat screwdriver
- Large flat screwdriver
- Circlip Pliers
- Pliers
- Calipers
Parts and consumables:
- Chalk
- Aerosol lubricant type WD-40
- Lubricant LSC-15
- Tie rod end bushings and damper (if required)
- Plastic shifter shaft washers (if necessary)
- Shift lever ball joint (if required)
Notes:
Remove and disassemble the transmission control mechanism to replace the plastic washers on the gear shift shaft and ball joint. Carry out the work on an inspection ditch or overpass.
1. Remove the middle mudguard as described in this article.
2. Inside the car, overcoming the resistance of the latches, use the yoke to remove the frame for fastening the gear lever cover from the hole in the floor tunnel.
Removing the gear shift cover frame:
1 – gear shift lever cover with frame;
2 – floor tunnel lining.
3. Slide the cover along with the frame along the gear shift lever.
4. Turning the cover inside out, unwind the insulating tape covering the lever cover (during subsequent assembly, the insulating tape can be replaced with a plastic clamp).
5. Pull the cover together with the frame from the gear shift lever and from the lever handle.
6. From the bottom of the car, use chalk to mark the positions of the gear selector rod hinge shank relative to the control rod (this will help with subsequent assembly of the parts).
7. Using a 13 mm spanner, loosen the nut of the clamp bolt securing the control rod to the transmission shank to remove the rod away from the gearbox.
8. Use a flat screwdriver to open the clamp and slide it along the rod.
9. Remove the control rod from the shaft of the gear shift rod joint.
10. To remove the reaction rod, use two 13 mm wrenches to loosen the nut of the coupling bolt of the clamp securing the reaction rod to the tip and remove the rod from the tip.
11. Using a 13 mm socket, unscrew the four nuts securing the base of the gear shift lever.
Note:
Removing the gearbox control mechanism (items 11-12) can be done after removing the lever from the holder (after steps 19-21).
12. Remove the gearbox control mechanism downwards.
13. Using a 13 mm socket, unscrew the nut securing the gear shift lever axis (which is also the stop for locking the reverse gear) and remove it.
14. Pull the gear shift lever out of the control rod.
15. Remove the two inner plastic and two outer metal washers, as well as the metal spacer.
16. Each of the plastic washers has one protrusion that fits into the corresponding grooves in the lever.
17. Use pliers to remove the retaining ring of the plastic shift lever insert.
18. Remove the gear shift lever together with the bushing from the ball joint cage, as well as the spring under the bushing.
19. Using a 13 mm socket, unscrew the two nuts of the gear lever ball joint bracket and remove it (shown on the installed gearbox control mechanism).
20. Separate the base of the gearbox control mechanism from the cover and lever cage.
21. Using a 13 mm socket, remove the two bolts securing the torque rod to the base of the ball joint, holding the nuts from turning with a spanner of the same size (shown on the installed transmission control mechanism).
22. Remove the jet rod.
23. With your hand on the control rod fork, pull it through the shift lever base boot and remove it.
24. Remove the cover from the gear shift lever cage.
25. If you need to replace the plastic bushings and the torque tip damper, use a 13 mm spanner to unscrew the nut securing the torque tip to the gearbox bracket and remove the tip.
26. Remove the two plastic bushings and the rubber damper from the torque rod end.
27. Assemble and install the gearbox control drive in reverse order.
Note:
Before assembly, put LSC-15 lubricant into the gear shift lever bushing.
28. Install the control rod onto the shank of the gear selector rod hinge according to the previously marked marks. Check that the drive is installed correctly - nothing should interfere with the movement of the lever, the gears should engage easily without jamming.
29. Otherwise, the drive needs to be adjusted. An assistant will be required to adjust the drive. After loosening the clamp, remove the rod from the shank of the gear shift rod hinge.
30. Make sure the switch rod in the box is in the neutral position. Set the switch rod to the reverse gear position. To do this, use pliers to turn the switch rod counterclockwise by the hinge shank (looking in the direction of the car) until it stops, overcoming the spring force, and move the rod inside the gearbox until it locks.
Checking the control mechanism adjustment:
1 – lever axis stop;
2 – lining of the reverse gear lock bracket.
31. Place the transmission control rod on the joint shank (do not tighten the clamp) and set the gear shift lever to the reverse position. In this case, the stop of the lever axis should be in the extreme forward position of the groove of the reverse gear lock bracket lining. After this, tighten the clamp on the control rod.
32. Install the gearbox control rod on the joint shank so that the distance between the end of the rod and the end of the joint fork is 11-13 mm. In this case, the lower (non-bent) end of the gear shift lever will be approximately vertical.
Note:
To check the correct installation of the transmission control rod, set the gear shift lever to the neutral position, while the stop of the lever axis should not reach the step in the groove of the lining by 2-3 mm. If the gears do not switch on and off clearly, repeat the adjustment.
The article is missing:
- Photo of the instrument
- Photos of parts and consumables
- High-quality photos of repairs
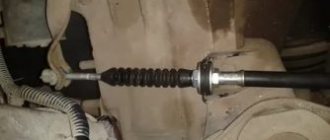
How to remove the clutch cable of a Lada Granta
Having prepared the tools and the Grant clutch cable for replacement, you can proceed to the replacement. The initial step is to remove the old clutch cable. To do this, do the following:
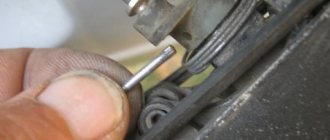
- First, in the cabin under the dashboard, using a 8mm wrench, unscrew the nut securing the cable braid bracket to the pedal assembly bracket. Then, using a Phillips screwdriver, you need to pry the spring bracket and remove it from the groove of the clutch pedal finger.
- The next step is to remove the eyelet of the automatic cable length adjustment mechanism housing from the clutch pedal pin, after which you need to remove the upper part of the cable from the pedal assembly bracket.
Now you need to move to the engine compartment, from where the cable is pulled forward, the cable lead is removed from the groove of the clutch release fork lever (for convenience, remove the air filter housing). - By rotating counterclockwise, the leash is unscrewed from the threaded end of the cable;
- Next, the protective rubber cover is removed from the tip of the cable, after which the tip of the cable sheath is removed from the hole in the bracket at the gearbox.
- Now, inside the car, the cable sealing cover is removed from the hole in the engine shield, after which you can pull the cable into the passenger compartment.
- After removing the cable, you need to check the general condition of the plastic bushing on the pedal pin. If the bushing is worn, it needs to be replaced. You should also lubricate your finger with Lithol.
Replacing the Grant clutch cable
Having completed the removal of the old cable and preparation, you can proceed to installing a new Grant clutch cable. Installation is carried out in the following order:
- a new cable is threaded through a hole in the shield from the passenger compartment and brought out into the engine compartment;
- then the sealing cover is installed in the hole of the shield;
- Next, you need to put the automatic cable length adjustment mechanism on the pedal pin, after which the mechanism is secured;
- Now you need to screw a plastic leash onto the threaded end of the cable (it is important to do this so that the end of the cable tip is flush with the end of the leash);
- After that, the leash is inserted into the groove of the clutch release fork lever.
How to adjust the clutch on a VAZ 2108, 2109, 2199
1). When the pedal is released, you need to use a tape measure to measure the distance from the floor to its lower edge. It should be within 18-20 centimeters.
2). Next, press the pedal with your hand all the way to the stop and measure the distance from the floor, again to the bottom edge. It should be within 6-7 centimeters.
3). From the first result obtained, 18-20 cm, we subtract the result of the second measurement, 6-7 cm. As a result, we get 13-14 cm. For cars of the VAZ 2108 and VAZ 2109 brands, this value is considered normal.
4). If this value differs in one direction or another, you will need to readjust the clutch. That is, we either tighten it up or weaken it.
5). We hold the adjusting nut with one wrench, and with the second we slightly loosen the lock nut.
6). By rotating the adjusting nut clockwise, we increase the pedal stroke, and therefore it should move downward.
7). We take measurements and if the result is satisfactory, we tighten the locknut and the work can be considered complete. But if not, then you will need to do this operation again.
Video
Clutch adjustment on VAZ 2108.09.99
How to adjust the clutch on a Lada Kalina?
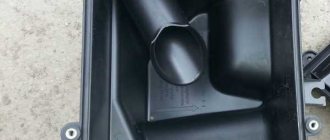
1). Open the hood and remove the air filter. To do this, unscrew the bolts securing the air filter housing to the hood. Then disconnect the mass air flow sensor. Next, unscrew the clamp and remove the air filter housing.
2). Pull out the cable by the threaded end to the maximum possible distance. In this case, it will be necessary to overcome the resistance exerted by the spring attached to the PS.
3). Holding the cable in this position, using a caliper we measure the distance between the plastic leash and the fork lever. It should be 2.7 cm.
4). If the distance does not match, then using an open-end wrench, we either tighten or loosen the tension nut.
5). Next, we survive the clutch pedal again and take measurements again. If it was not possible to achieve the desired result the first time, you can repeat it again.
6). After the distance has been adjusted, install the air filter in place.
Video
https://youtube.com/watch?v=Eg5BETyYxZ8
How to adjust the clutch on a VAZ 2107
To adjust the clutch of the VAZ 2107, you need to drive onto a pit or overpass. But, if this is not possible, then we install the car on supports using a jack, observing all safety measures.
1). The free play must be adjusted so that the distance from the top position of the pedal to the stop is 0.4 - 2 millimeters. Otherwise, you will need to make adjustments. Using a 10mm wrench, unscrew the locking nut slightly and by rotating it set the required gap.
2). If the VAZ 2107 engine system provides for fuel injection, then you will need to remove the protective shield.
3). Before applying the lubricating mixture to the threads of the pusher, clean it from dirt.
4). We check the stroke of the pusher, since the stroke of the release bearing depends on it. Push the fork back all the way, the pusher stroke should be four to five millimeters. Since significant force is required, it is better to disconnect the spring from the lever.
5). The stroke of the pusher is adjusted using a 17 key. It is also necessary to restrain the pusher adjusting nut from turning, but using a “13” wrench, loosen the lock nut.
6). Fixing the pusher using the “8” key, using the “17” key we set the required 4-5 millimeters.
7). We fix the locknut.
8). We check the pedal travel, which should be approximately 30 millimeters from its top position until it turns off. If necessary, you can perform the operation again.
Clutch drive adjustment
After installing the cable, it is necessary to adjust the clutch drive. To do this, the cable is pulled forward by the threaded end until it stops (you need to overcome the force of the clutch pedal spring). Next, the cable is held in an extended position.
The adjustment looks like this:
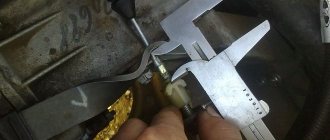
- Using a caliper, measure the distance from the end of the plastic guide to the clutch fork lever (the norm is 27 mm).
- If deviations are noticeable, you need to obtain the desired distance by rotating the leash.
We also recommend reading the article about why the clutch slips. From this article you will learn about the main causes of clutch slipping, as well as how to repair this problem. - When there is no load (the cable is released), it is necessary to ensure that the leash is adjacent to the fork lever without any gap.
- Next, you need to press the clutch pedal 2-3 times for the automatic cable length adjustment mechanism to work. Then you need to measure the full travel of the clutch pedal, which should not exceed 146 mm.
Having completed the adjustment, you can replace the air filter housing. After installation, you can check the quality of the clutch and drive while driving. Please note that if the clutch on the Grant is selected incorrectly or is badly worn, there are problems with the gearbox, etc., replacing the drive cable will not solve the existing problems with the smoothness and clarity of gear shifting.
Second adjustment method
If you don't have a caliper on hand, you can use an alternative method. It begins similarly to the previous case. Again, you need to pull the tip forward as much as possible. When he rests, release him and see how tightly the leash adheres to the fork. If it’s not tight enough, it means you need to wrap it around the rod. Then we return to the salon and press the clutch pedal three times. Once you've done this, go back and look under the hood again.
Pay attention to whether the leash is pressed against the metal? A prerequisite is the minimum movement of the fork (it is better that there is none at all). The fork movement is allowed no more than 2 millimeters
Car enthusiasts can use any of the above methods. If any points remain unclear to you, we recommend watching the video instructions on our website. Despite the presence of an automatic adjustment system, you will still need to carry out this procedure. Even if the cable serves you reliably and does not break, you will still need to periodically look under the hood.
Experienced car enthusiasts recommend not waiting for problems with the clutch and performing this work at least once every 10,000 kilometers. This way you will protect yourself from problems with this system. During adjustment, be sure to evaluate the condition of the cable. If it has become thin and cracked somewhere, it won’t last long. In this case, you can immediately replace it.
Lada Granta - eliminating noise (crackling/creaking) from the clutch pedal.
To remove the clutch pedal on a Lada Granta car, you must perform the following steps:
- Secure the car on a level surface, squeeze the parking brake lever, and install wheel chocks on the rear row of wheels.
- Using a “14” key, unscrew the three bolts and disconnect the steering shaft (interior of the car, at the base).
- Unscrew the plastic clamp from the clutch cable lead.
Plastic retainer
- Replacing the clutch cable of a VAZ 2109/2110/2112 with your own hands
- Remove the protective bracket and remove the brake pedal vacuum booster pin.
Safety bracket
- We disconnect the block with wires from the dashboard with the sensors on the bracket.
- Using a key set to “13”, unscrew the four nuts and remove the vacuum brake booster.
- Using a “13” wrench, unscrew the five nuts and remove the clutch pedal bracket and brake assembly.
After troubleshooting, we replace the worn elements with new ones and assemble the structure in the reverse order.
Recommendations
- As a rule, the clutch “disappears” when the clutch fork breaks or the cable breaks.
In such a situation, you can drive your car to the service center without using the clutch pedal. To do this, turn off the engine, engage first gear, then start with the gear engaged. To upshift, you need to re-gear, and to downshift, you need to wait until the engine speed drops to suitable values. We also recommend reading a separate article on how to drive without a clutch. In this article you will learn how to get to the repair site with a broken clutch. - Usually the cable threads break at the base of the pinch.
Some car enthusiasts attach the clutch cable lead to bearings to avoid bending it. The result is increased reliability and increased service life of the cable. When replacing the cable, the plastic insert is removed from the old cable and placed on the new cable. If this is not done, the plastic on the new cable will quickly break. - If the Grant clutch is being replaced, the gearbox or engine is being removed, experienced car enthusiasts recommend replacing the clutch cable if the cable has traveled more than 30-40 thousand km. Also on the Granta, clutch adjustment and inspection are necessary if even minor problems appear with the clutch pedal or difficulties with gear shifting.
How the clutch works
The clutch device on the VAZ-2190 with a cable box is quite simple and understandable for an experienced car enthusiast. As soon as you open the hood, you will probably immediately notice the cable. It is held in place by a bushing
Pay attention to the clutch fork, through which the tip is passed, and on it there is a special plastic leash. This same leash can be screwed onto the tip or, conversely, twisted
Accordingly, the cable tension will be adjusted.
Before starting work, you will definitely need to dismantle the filter. It will interfere with you, so we will temporarily eliminate it. This is done quite simply:
- Remove the negative terminal from the battery.
- Disconnect the mass air flow sensor connector, the adsorber and the mounting tie. We don't need all these elements now.
- To remove the filter, you will need to remove the supports from the special holes. Now the structure can be removed.
So, when the filter is removed, it’s time to start the main work. Visually locate the plug and tip. Try to pull the tip out using pliers (don't forget to wrap it with electrical tape).
Praise to the author! I am also a terrible car enthusiast, albeit with little experience... I also had right-hand drive ones, but unfortunately, they are not convenient with our traffic. I now have probably the most boring Toyota model. For almost 2 years of owning this car, I had no problems at all, it burned out once a light bulb in the foot, and I changed the brakes and oil according to plan, despite the fact that the car is 8 years old, the mileage is about 150 thousand. It accelerates quickly, drives smoothly, and is maneuverable. spacious trunk and for its size a very comfortable and spacious interior, dad feels completely comfortable in the back seat, and he is a large man. After a night in a windswept parking lot at minus 35, it started up and didn’t even sneeze once. The stove heats perfectly, the air conditioner cools quickly, the consumption is 6-7 liters of 92 in the city. engine 1.5. 106 horses, + with its size it will fit into any hole in the parking lot. In short, the car is just great. )))
I've been meaning to adjust the clutch on my Grant for a long time. I made a printout of your article. Tomorrow I’ll arm myself with the necessary tools and go to the garage to do everything with my own hands step by step, as described in the article.
Open the hood, under the air filter there is a clutch foot. It is equipped with a cable with a plastic screw. Lightly pressing the foot, remove the cable to the side. We adjust the cable screw and put it back on the foot.
When accelerating, the engine roars slightly when the leveler revs up
Clutch needs replacement! It's slipping!
When starting off there is jerking, what could be the problem?
Replacement clutch disc
I sharpened the flywheel! and he was crooked. so you can’t get away with just one disk
The clutch cable broke. I went and bought a new one. Changed it. While I was driving, the clutch was soft; accidentally, in 4th gear at 90 km/h, I jumped into 3rd gear instead of 5th. But nothing. An hour later, I noticed that when changing gears, my car seemed to be giving up gas (by the sound), but in fact I don’t know what it is. The clutch pedal has free play, i.e. hanging out. And the pedal is too soft. Can there be different clutch cables on the grant?
Operations for removing the gearbox from a Lada Granta car
The gearbox is heavy and its shape does not have the correct contours, which is why it is best to carry out the work with at least two people.
1. Disconnect the wire from the negative terminal of the battery.
2. For ease of operation, remove the air filter.
4. Raise the car on a lift or hang its front part and place it on reliable supports (if you are working on an inspection ditch). For ease of operation, you can remove the front wheels.
6. If the gearbox is removed for repairs, drain the oil from it
7. Remove the four bolts securing the front clutch housing cover.
8. and remove the cover.
9. Disconnect the front suspension arms from the steering knuckles by unscrewing two bolts securing the ball joints to the knuckles on both sides of the car.
10. Leaning the mounting blade on the gearbox housing, press the left inner joints out of it.
11. and right-hand drive of the front wheels. Move the drives away from the transmission by moving the corresponding front suspension shock absorbers outward.
The movement of the shock absorber struts is prevented by the steering rods. To eliminate their influence, when disconnecting the right-hand drive from the gearbox, turn the steering wheel all the way to the left, and when disconnecting the left-hand drive, turn it to the right.
Disconnect the right drive only after removing the front cover of the clutch housing (see paragraphs 7 and 8), otherwise the mounting blade can bend the cover and the flywheel will touch it.
Do not disconnect both drives at the same time, as in this case the axle gears in the differential may move and it will be impossible to install the drives without disassembling the transmission . If it is necessary to disconnect both drives after disconnecting one of them, insert a technological plug or the old internal joint housing in its place and tie the plug or housing to the gearbox with wire so that they do not fall out when removing the box. After this, disconnect the second drive.
12. Disconnect the wiring harness connectors from the reverse light switch.
Grant gearbox cables
Removing the cable
at the cable gear selection
of the Grant gearbox
.
Removing manual transmission 2181 with cable drive
This video shows the process of removing the transmission
.
13. and from the speed sensor.
14. Unscrew the nuts of the two bolts securing the torque arm to the gearbox and remove the bolts.
15. and move the rod down along with the bracket,
16. Mark in any way the relative position of the transmission control rod and the shank of the gearshift rod hinge so that when reinstalling, maintain the drive adjustment.
17. Loosen the tightening of the nut of the clamp bolt securing the transmission control rod.
18. and disconnect the rod from the gear shift rod joint.
19. Disconnect the lower end of the clutch cable from the gearbox (see “Replacing and adjusting the Lada Granta clutch cable”).
20. Remove the rear bolt securing the ignition coil bracket.
21. Remove the two upper bolts securing the transmission to the engine, simultaneously securing the second support bracket. Bolt A (front in the direction of travel of the car) is short, bolt B is long. Move the throttle cable together with the bracket to the side.
22. Place a reliable support under the engine or hang it using a lifting mechanism.
23. Disconnect the left brace mounting bracket from the body (see “Replacing the brace and its mounting bracket of a Lada Granta”) without disconnecting the brace from it. Move the stretcher along with the bracket to the side and secure it in any available way (for example, by tying it with a wire).
24. Unscrew the nut of the lower right mounting of the gearbox to the engine and remove the lower end of the inlet pipe spacer (shown by the arrow) from the stud. If necessary, loosen the upper mounting nut of this spacer.
25. Place a secure support under the gearbox.
26. Remove the bolt from the lower left mounting the gearbox to the engine.
27. Remove the two bolts securing the left power unit support cushion to the support bracket.
28. Unscrew the three nuts securing the bracket to the gearbox, remove the spring washers installed under the nuts.
29. and remove the bracket.
30. Remove the three bolts securing the rear power unit support bracket to the gearbox.
The bracket fastening bolts are different: one bolt has a 17mm wrench head, and the other two have a 19mm wrench head.
31. Move the gearbox as far back as possible (the input shaft should come out of the clutch). While holding the transmission, remove the support and remove the transmission from under the vehicle. Do not rest the transmission input shaft on the clutch pressure spring petals to avoid damaging them.
32. Install the gearbox and all removed parts and assemblies in the reverse order of removal.
Before installing the gearbox, we recommend lubricating the input shaft splines and the outer surface of the clutch release bearing guide sleeve with a thin layer of grease. Using a special mandrel, check how the clutch driven disc is centered (see “Removing and installing the Lada Granta clutch”).
Before attaching the front wheel drives to the gearbox, replace the locking rings on the splined shanks of the inner joints with new ones, otherwise there is a possibility that the drives will become detached from the gearbox while driving.
33. If necessary, restore the initial installation of the clutch cable (see “Replacing and adjusting the Lada Granta clutch cable”) and adjust the gearbox control drive (see “Adjusting the Lada Granta ”).
How to replace the cable in the clutch mechanism?
How to properly replace a clutch cable? Below are detailed aspects of the instructions to successfully replace the cable.
- First, we begin to unscrew the cable nut from the bracket, which is located under the dashboard. We perform this action using the key set to “8”, after which access to dismantling the bracket stop appears.
- We disconnect the locking bracket, which is located on the “finger”.
- Next, remove the body of the compensation device (use a screwdriver).
- We remove the fluoroplastic bushing from the pedal pin.
- We visually monitor the assembly element for wear. If such “artifacts” are present on the surface of the bushing, then we definitely replace it by pre-treating it with grease.
- We dismantle the cable seal, which is mounted in the technological hole of the frontal shield of the body (in the photo it can be seen from the engine compartment).
- Pull the cable end as you move until it is removed from the fork groove.
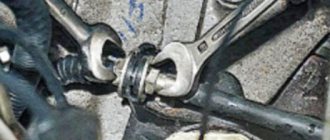
- Using the key “17” we “defeat” the nut by means of which the cable tip is held on the corresponding bracket of the transmission unit. To prevent the tip from turning, we use an additional key.
- Now we proceed to dismantling the cable end, after which we remove this element from the hole. The cable itself can also be removed.
- Having completed the indicated manipulations, we begin the installation of a new unit.
- First, we pass the cable into the previously designated hole in the front shield.
- We treat the bushing with a special compound and fix the wear compensation element on the corresponding pin.
- Now we attach the cable directly to the pedal and return the previously removed seal to its place.
- We move on to installing the tip on the LADA Granta transmission bracket. Screw the retaining nut with the required torque (do not overdo it).
- We remember the need to tighten the leash.
- We continue the installation procedure by moving the lower tip in the forward direction until a feeling of stop occurs.
- We hold the tip in the designated position and at the same time measure the distance that was illuminated by us earlier (more specifically: in the “leash-fork” section). If the parameter is incorrect, rotate the leash until the optimal value appears.
- We remember the need to lubricate the body of the leash before installing it in the knot. The surface in contact with the fork must be lubricated.
- The final action is to press the pedal to its full value multiple times. Then we again make a control measurement in the “fork – leash” sector and, if it deviates from the regulations (27 mm), we make a re-regulation. This completes the clutch cable replacement.
Adjusting and replacing the clutch cable on a Lada Granta
Adjusting and replacing the clutch cable on a Lada Granta You need to disable the clutch device on the car by changing the location of its petals. They should be pressed out using the bearing of this device, moved by a fork. Required: flat-blade screwdriver, 8-point wrench, ruler Steps for changing the clutch cable of the Lada Granta model From inside the cabin below the dashboard, unscrew the nut. Then remove the stop from the stud.
Using a screwdriver, remove the plastic housing belonging to the wear compensation mechanism from the pedal rod.
In the engine compartment, remove the seal from the cable sheath from the connector in the bulkhead, pull the cable forward. Unhook it from the recess located on the fork, which serves to disengage the clutch device
Then unscrew the leash from the cable end and pull out the cable sheath bushing from the hole located on the bracket. Remove the cable from the car.
To install a new drive cable, you must first pass it through the shield hole and fix it on the pedal rod. Fix the cable sheath stop on the pin from the bracket. Place the cable sheath seal inside the partition hole. Pass the cable through the bracket hole on the transmission box, then install the guide sleeve of its sheath in this hole Screw the leash onto the lower tip belonging to the cable, installing it with the protrusion towards the end
Review of Manufacturer Prices
| Manufacturer | Price, rub.) | Resource (Thousand km) |
| LADA 21901-1602210 Lada Granta hatchback liftback original | From 634 | 100 |
| ASPCC260210 | From 465 | 75 – 80 |
| BRAND 219011602210 | From 300 | 75 — 80 |
| Plastic cable lead 21901-1602266-00 | From 150 | 40 |
| 21901-1602210-00 clutch cable assembly | From 550 – 600 | 75 |
| 21901-1602210-00 clutch cable assembly | —/— | 75 |
| JSC "ProSport" 26594516 | From 500 | 80 – 85 |
| JSC Vortex 5465465 | From 550 | 80 — 85 |
*prices are current as of October 29, 2018.
Recommendations for the selection of parts and components
The vast majority of spare parts for the Lada Granta are domestically produced. Foreign analogues are not in demand due to their high cost. Compared to “our” products, imports are 10–15% more expensive. The workmanship is at the same level.
When purchasing spare parts and components, always give preference to high-quality, original parts. Check the correspondence of catalog items with the actual data specified in the operating instructions for the technical device.
If you have no experience in car maintenance, seek qualified assistance from service station specialists.