- Replacing the cooling radiator
- How to remove the old one?
- How to secure a new one
- Refilling a new radiator
Cooling radiator for VAZ cars
VAZ 2114 is considered one of the most striking examples of success of the domestic automobile industry. This model is a modified version of the VAZ 2109 and differs from it in the design of the front part of the body, updated headlights and hood, radiator grille design, as well as plastic moldings and spoilers. However, as it became known, the car is susceptible to radiator failures, which can lead to overheating, and as a result, to engine failure.
Replacement of cooling radiator VAZ 2113, 2114, 2115
During vehicle operation, various damage to the cooling radiator is possible, as a result of which the coolant level decreases, which in turn can lead to engine overheating and costly repairs. Therefore, if a VAZ 2113, 2114, 2115 needs to replace the cooling radiator, there is no need to hesitate - we buy a new one and carry out the repairs ourselves, following the step-by-step instructions in the photo and video.
Required spare parts
First of all, you need to select a new radiator. It is better to purchase an analogue of what is on your car. You can also make a choice by article number: 2108-1301012, 21082-1301012, RO2108-01, LRc 01082.
The average price of a new unit is 1,750 rubles. Copper models will cost more.
Tools required for repairs
If you want to do the repairs yourself, you need to prepare the following tools:
- keys for 8 and 10;
- screwdrivers;
- heads for 8 and 10;
- pliers;
- container for draining antifreeze;
- jack;
- sealant;
- rags.
Independent work is completely justified, since as of March 24, 2019, the average price for replacing a cooling radiator for a VAZ 2114 and other models is 2.2 thousand rubles. Which will more than double costs.
Order of Operations
If the car has a low seating position or the coolant drain tank is large, work should begin by lifting the car with a jack. The radiator is installed on the TV along with fog and regular headlights. Work should only begin with a cold engine. If the engine is hot, be sure to wait until it cools down.
Now you can get started:
- After removing the plug from the expansion barrel, the working fluid is drained into a container. It is necessary to drain all the antifreeze that is in the cooling system.
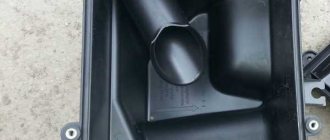
- Now you need to dismantle the filter.
- The radiator must be removed together with the electric fan. To do this, you need to disconnect the power supply to the cooler. Now you need to unscrew the pressure plate and remove it.
- Now you need to remove the inlet and outlet hoses from the pipes. To do this, loosen the fastener clamp.
The radiator with fan is tilted towards the engine and removed. Attention! Before pulling out the fan, you need to disconnect the wires. They are usually located at the bottom of the device. This is necessary in order to maintain the functionality of the wiring.
- Now you need to disconnect the fan from the radiator. To do this, use a 10mm wrench to unscrew 2 nuts. The fan must be removed along with the casing.
- Installation of the radiator is carried out in the reverse order to that described above. It begins with switching the new node and the fan. Important! Before replacing, make sure that there are 2 rubber cushions. If they are missing, install new ones in the crossmember holes. If they are in place, then the installation of the new unit is carried out on them.
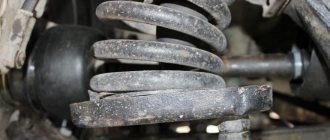
- mechanical shocks, for example, stones bouncing off the wheels of passing vehicles;
- pockets of corrosion and contamination inside the tubes;
- damage in an accident.
The main causes of radiator malfunction
The most common reasons for radiator failure on VAZ 2113, 2114, 2115 are:
Let's summarize
In general, repairs are quite accessible for doing it yourself, but you need to immediately prepare for a significant time investment. Work can last for 2-6 hours. When replacing the radiator, it is necessary to change the coolant. Work with 8-valve and 16-valve engines is carried out in the same way. If the car has air conditioning, you will have to remove and install it during the repair, but not on all models. It is advisable to replace the bushings at the same time. The work is completed by checking the functionality of the engine and the condition of the coolant. Namely, whether it is boiling.
For greater clarity on replacing the VAZ 2115 injector cooling radiator, you can watch this video:
Tools required for repairs
If you want to do the repairs yourself, you need to prepare the following tools:
- keys for 8 and 10;
- screwdrivers;
- heads for 8 and 10;
- pliers;
- container for draining antifreeze;
- jack;
- sealant;
- rags.
Independent work is completely justified, since as of March 24, 2019, the average price for replacing a cooling radiator for a VAZ 2114 and other models is 2.2 thousand rubles. Which will more than double costs.
Algorithm for replacing the VAZ 2115 radiator
If the engine overheats severely, major repairs and large cash injections will be required. To prevent this, you need to monitor the coolant level, proper operation of the thermostat, and the condition of the engine cooling radiator.
Wet marks or a hole in the radiator, a coolant leak or fluid accumulation during long-term parking require immediate repair of the engine radiator. You can try soldering the radiator if the crack is small. In addition to cracks and holes, poor connections and loose clamps can lead to leaks. If this is not the case, and repairs are not financially viable, you will need to replace the radiator .
Worth checking out:
You can replace the radiator at a service station or yourself.
Algorithm for replacing the VAZ 2115 radiator
- Empty the radiator and drain the coolant located in the engine cooling system.
- Remove the radiator with electric fan (if you have a VAZ-2111, you will need to remove the air filter housing).
- Using an “8” socket wrench, unscrew the 2 nuts of the pressure plate and remove it.
- The radiator inlet hose must be removed from the outlet pipe by lowering the mounting clamp to do this.
Also check out
- We remove the radiator outlet hose from the thermostat.
- Tilt the radiator towards the engine, and lower the clamp of the radiator steam exhaust hose. Remove it carefully so that the plastic fitting is not damaged.
- Remove the cooling radiator and fan, lowering it towards the engine. If you plan to repair the radiator, do not disconnect the fan from it. If the radiator needs to be replaced, the fan should be removed and installed on a new part.
- Using a “10” wrench, unscrew 2 mounting bolts, 1 nut and remove the electric fan.
- Using a 10mm socket wrench, unscrew the nut on the upper mount of the fan to the radiator.
- Using the “8” socket, unscrew the 2 nuts that secure the pressure plate and remove it.
- Remove the shroud and cooling fan.
Current:
Before replacing the radiator, make sure that there are 2 rubber pads at the installation site. The radiator must be installed on them, and they must be fixed in the holes of the cross member.
This completes the replacement of the VAZ 2115 radiator. You need to put everything back together and fill it with coolant.
We recommend reading
We will talk about removing the VAZ 2115 starter if there is a need for repair or replacement. Removing the starter varies on different cars: on .
One of the problems that occurs with headlights is damaged headlight optics. Next we will talk about how to replace headlights.
The knock sensor, as the name implies, is necessary to monitor knocking inside the engine and knocking noises that indicate existing knocking.
"Poker" (metal hood support) makes many car owners feel uncomfortable. To get rid of it, you need to install .
DIY car repair and maintenance
How to replace the radiator on a VAZ-2114?
And this radiator is also suitable for Lada 2108, 2109, 2199, 2113 and 2115 models. Let's start with the antifreeze, you need to drain it by unscrewing the drain plug on the lower left corner of the radiator...
..., and then unscrew the air filter (as shown below in the photo), which is fastened with two bolts, under the head 13 - in this case. We release the filter from the air duct by loosening the clamp (under a curved screwdriver).
Next, in order to free the radiator from the “TV”, we need to unscrew the upper mount of the radiator by removing two 8 nuts and freeing it from the iron clamp.
After that, loosen the “return” clamp of the expansion tank
And let's move on to the pipes. The photo below shows that they can be removed by loosening the clamps using a screwdriver or a 7 or 8 wrench.
In the photo above we see that the lower pipe is not just screwed to the thermostat, but sealed with sealant, which eliminates the possibility of leakage. We also remove the upper pipe.
Be sure to disconnect the fan power plug.
Now carefully pull out the radiator and make sure not to lose the landing pads. There are two of them at the lower corners of the radiator.
Now you need to remove the fan from the radiator. To do this, you need to unscrew the four nuts by 10. You can see where they are located in the photographs below.
Then, in the same way, install the fan to the new radiator and install the two pipes in their places. And reinstall the radiator in reverse order.
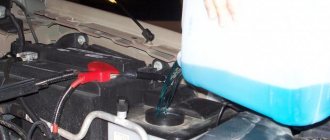
At the end, all that remains is to fill in antifreeze (preferably antifreeze). It needs to be poured into the expansion tank. Approximately 8 liters of antifreeze is poured into such a radiator. But, after filling the radiator and expansion tank full, start the car and let it work. As it heats up, the thermostat will open and the antifreeze in the expansion tank will flow into the system. Then add slowly to the maximum mark on the expansion barrel.
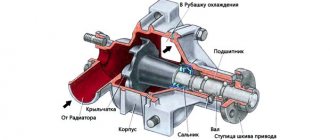
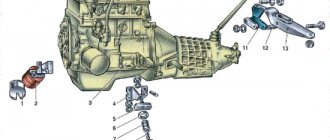
Engine cooling system VAZ 2113, 2114, 2115
: 1 — expansion tank; 2 - plug; 3 - steam removal hose; 4 — hose from the expansion tank to the thermostat; 5 — coolant temperature sensor in the outlet pipe; 6 — throttle assembly; 7 — radiator supply hose; 8 — radiator outlet hose; 9 — left radiator tank; 10 — right radiator tank; 11 - drain plug; 12 — radiator core; 13 — electric fan casing; 14 — electric fan impeller; 15 - electric motor; 16 — pump gear pulley; 17 — pump impeller; 18 — timing belt; 19 — heater radiator outlet pipe; 20 — pump supply pipe; 21 - tap; 22 — heater radiator; 23 — coolant drain hose from the throttle pipe; 24 — hose for supplying coolant to the throttle pipe; 25 — coolant temperature indicator sensor; 26 — exhaust pipe; 27 — heater inlet pipe; 28 — thermostat; 29 - coolant level sensor
How to change the radiator on a VAZ 2115
Radiator VAZ 2115
Engine overheating is a terrible phenomenon that promises its owner major repairs and serious cash injections. In order to prevent engine overheating, it is necessary to regularly monitor the coolant level, proper operation of the thermostat, and the condition of the engine cooling radiator.
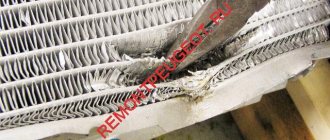
If you find a coolant leak or puddles after a long period of parking, check the engine radiator for coolant leaks. A wet mark or hole in the radiator is a signal for immediate action. If the crack or breakdown is small, you can try to solder the cooling radiator. In addition to cracks and holes in the radiator, leaks can be caused by faulty connections or loose clamps. If the reason is not the clamps, and repairing the radiator is impossible or unprofitable, the radiator will need to be replaced.
How to remove
1) First, drain all the liquid from the cooling system (How to drain the liquid, read the article: “Replacing the coolant on a VAZ”), when the coolant is drained, remove the air filter housing so that it does not interfere (How to remove the housing, read “in this article") and after the completed operations, you can begin to unscrew all the bolts that secure the fan to the radiator (Without unscrewing them, you will not remove the radiator), but just do not forget to also disconnect the pipes before unscrewing, they are fastened with screws, there are only three pipes that fit radiator (Two large, one small), when they are already disconnected, you can begin to unscrew the bolts and nuts securing the fan, there are only two such bolts, but in addition to the bolts, the fan is also held in place by nuts (And there are only four nuts), one nut is located in the the lower part of the fan on the side (It is easy to see if you remove the crankcase protection and crawl under the bottom of the car) and the other three are at the top (see small photo, they are indicated by arrows) and two of these three nuts also hold the pressure plate (Indicated by red arrows ), so when the nuts are unscrewed, remove this plate and put it away, but just be careful not to lose it, otherwise in this case you will have to go to the auto shop for a new one, and when all four remaining nuts are unscrewed, remove the fan by tilting it towards the engine and pulling it out up (On 16-valve cars, you can’t remove it to the top, because the engine will get in the way, so both the radiator and the fan are removed through the bottom).
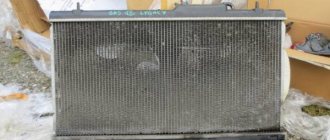
The main causes of radiator failure
Engine cooling radiator
Let's look at the main reasons for radiator failure on a VAZ-2114:
- mechanical damage (bounced stones or large debris on the road);
- deposits inside the tubes in the form of scale or rust, dirt;
- damage as a result of an accident.
How to prevent engine overheating?
To prevent engine overheating, it is necessary to constantly monitor the amount of coolant in the expansion tank, the operation of the thermostat and the condition of the radiator itself.
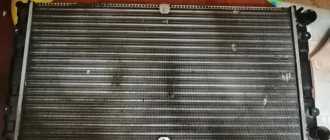
This is what a newly installed engine cooling radiator looks like. You need to make sure it is clean and blow it out regularly.
The appearance of traces of coolant on the asphalt after a short or long period of parking, as well as wet marks on the radiator itself, is a signal to check the radiator for leaks and possibly subsequently replace it.
Coolant leaks can be caused by small cracks or loose connections. In such cases, it is possible to repair the radiator even without dismantling it. When repair is not possible, the only option is replacement.
How to properly replace a radiator
Before replacing the radiator in their car, many car owners ask the question: “how to remove the cooling radiator?” In this article you will find answers to your questions.
How to remove the radiator?
Radiator and fan parts:
- Radiator.
- Radiator tank.
- Electric motor.
- Casing.
- Impeller.
- Rubber cushion.
- Drain plug.
So, before starting work, you should remember that the entire removal and installation process takes place on a cold engine.
- First of all, we unscrew the cap of the expansion tank (do not forget about the radiator and cylinder block caps - they also need to be removed).
- Drain the coolant into a clean container.
- Disconnect the radiator fan from the power supply.
- We disconnect all the hoses, both from the radiator and the expansion tank.
- Then we proceed to unscrewing the nuts from the cooling system casing.
- Hold the radiator and remove the casing with the fan.
- The radiator is free and ready to be removed.
If necessary, you can also disconnect the casing from the fan to remove the electric motor.
How to install a radiator?
After removing the radiator, replacing it or repairing it, you need to put it in place and secure it. Radiator installation is described in this article: How to install a radiator?
Installation of the cooling radiator is carried out step by step in the reverse order of removal.
- First of all, we string the radiator itself and cover it with a fan and casing.
- After tightening the nuts, connect the tubes, install the plugs, and connect the radiator fan.
- Fill with coolant and close the lid.
- We start it up, check our final result and that’s it.
Radiator repair
The most common reason for replacing or repairing a radiator is the loss of coolant due to the presence of a hole.
Typically, coolant leaks from the junction of metal and plastic. And if the leak is not large, then solving this problem yourself is quite simple. Along with the coolant, we add a special mixture to the radiator (sold in the store) and after a while the leak will go away on its own. Otherwise, you cannot do without purchasing a new radiator.
Checking the radiator tightness
To check the tightness of the radiator, do the following:
- Fill the bath with water.
- We plug all the holes in the pipes.
- We lower it into the bath by 20-40 cm and apply pressure to the radiator in the amount of 0.2 MPa (2 kgf/cm 2 ).
- We look at the result in the form of the presence or absence of bubbles.
Radiator replacement
Also, a forced replacement of the radiator occurs after the car is involved in an accident, both in a frontal and side collision.
Preparatory work
- Remove the “-“ (minus) terminal from the battery
- Drain the coolant from the cooling system. We unscrew the fluid drain plug located on the cylinder block using head 13. The plug is located just below the ignition unit
- In some cases, this is due to the design of the ignition unit; it has to be removed, because it blocks access to the drain plug
- To reduce the loss of the coolant itself, place a container (bucket, pan) under the engine to collect the liquid, then unscrew the plug
- We remove the cap of the expansion tank so that a vacuum does not form in it, which will prevent the coolant from draining
How to correctly replace the heater radiator on a VAZ 2114 with removal and installation
The VAZ-2114 and VAZ-2115 models are in stable demand. These are inexpensive, quite dynamic and comfortable cars, with affordable spare parts. From time to time they have problems with the heating system, many of which can only be solved by replacing the radiator of the VAZ-2114 or model 2115 stove. You can do this yourself, and without removing the dashboard, as required in the operation and repair manual.
The design of the heating system VAZ-2114
The design of the heating system for cars of the Samara-2 family, including the VAZ-2114 and 2115, was unified to reduce the cost of production and the cost of cars. It is simple and reliable, but from time to time some of its elements fail. The heating system consists of:
- radiator-heat exchanger with connected pipes;
- faucet that shuts off the coolant supply;
- air duct systems with dampers;
- fan for air supply;
- control block.
The air is heated by feeding it through the honeycomb of the stove radiator. The flow is forced by a fan and directed through the air ducts by dampers. The entire system is controlled by a special unit from the driver's seat. In the warm season, the tap allows you to shut off the supply of coolant through the heat exchanger. If the radiator of the VAZ-2114 stove leaks or remains cold when the tap is open, the only solution is to replace it.
Causes of radiator failure
The need to replace the stove radiator arises in several cases. If the heat exchanger remains cold even when the heat supply is set to maximum, it is highly likely to become clogged. The reason is scale that forms at high temperatures and settles in the radiator tubes or pipes connected to it. The second reason is a burst and depressurized radiator or pipes. When this breakdown occurs, antifreeze begins to flow into the passenger compartment on the passenger side, the mats become wet, and a characteristic unpleasant odor appears in the car.
In both cases, be it a cold heater radiator or an antifreeze leak, this unit will need to be replaced, since it cannot be repaired. Copper heat exchangers can be temporarily soldered, but this will not solve the problem for a long time; the part will still need to be replaced. This must be done as quickly as possible, since driving a car with a damaged heating system is uncomfortable and can be dangerous, since fogged or frozen windows impair visibility.
Tools and materials
To replace the heater radiator in a VAZ-2114 you do not need expensive and complex tools or equipment. It is enough that almost every car enthusiast has a new spare part in his garage. To complete the job you will need:
- new heater radiator - aluminum or copper;
- a set of ring and open-end wrenches, you can use a set of sockets with a ratchet;
- curly screwdriver;
- set of hexagons;
- container for draining antifreeze;
- fresh coolant, no more than 4 liters.