Replacing the cooling radiator on a VAZ 2109 is done in cases where it is impossible to repair the radiator. I am replacing the VAZ 2109 engine cooling radiator together with replacing the antifreeze (coolant).
If the car has an air conditioner, then replacing the VAZ 2109 cooling radiator is done together with removing/installing the air conditioner radiator. Fortunately, this is not done on all models. On some VAZ 2109 models, replacing the engine cooling radiator requires partial disassembly of the front part. If your car has radiator bushings, it is better to replace them immediately. Please note that the same engine model comes with different radiators, which differ depending on which gearbox is installed: manual or automatic.
Cost of replacing the cooling radiator on a VAZ 2109:
| Replacement options | Replacement | Radiator price |
| Replacing the VAZ 2109 cooling radiator | from 2,000 rub. | from 3,400 rub. |
| Replacing the VAZ 2109 cooling radiator, with A/C | from 2,500 rub. | from 3,400 rub. |
| Replacing the VAZ 2109 cooling radiator, with removing the bumper | from 3,500 rub. | from 3,400 rub. |
| Washing the VAZ 2109 cooling radiator (removed) | 300 rub. |
In terms of time, replacing an engine cooling radiator on a VAZ 2109 takes from 2 to 6 hours.
Warranty for radiator replacement
– 180 days.
Rating of VAZ 2109 cooling radiators based on owner reviews:
1. AVA (Holland) 2. Nissens (Denmark) 3. Termal (European Union) 4. Denso (Japan) 5. Luzar (Russia)
When you need to change the cooling radiator on a VAZ 2109:
– broken radiator mounts; – radiator leak beyond repair; – the radiator is clogged from the inside or outside – washing does not help.
Replacing the cooling radiator on VAZ 2108, VAZ 2109, VAZ 21099
When should you replace a radiator?
It must be replaced if it becomes deformed, namely if a coolant leak appears from it.
But not always, when a leak appears in the radiator, it needs to be replaced with a new one; if the radiator is slightly damaged, then it can also be repaired, anywhere in special auto repair shops, such repairs will help you save your money!
VAZ 2109: replacing the cooling radiator yourself
As a rule, a modern car, be it a domestic model such as the VAZ 2109 or a foreign car, is a complex system of parts interconnected with each other. If even one link in the chain breaks, it will ultimately lead to the breakdown of others. A car is like a living organism, and for a VAZ 2109, replacing a cooling radiator is a process that will help save not only some parts, but also the engine itself, because a faulty radiator will not cool it properly. Replacing the VAZ 2109 cooling radiator is a mandatory job that you can easily do with your own hands.
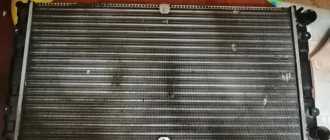
The radiator is a vulnerable car part
Replacing the cooling radiator VAZ 21093
The radiator itself is a rather vulnerable part of the machine, because it has a brass body that is subject to numerous loads. And this part is thin in design, and if you take into account the huge number of solder joints in it, then the quick failure of the cooling radiator becomes understandable. The radiator is located in front of the car and a pebble from the road or a tree branch that accidentally hits it can become a fatal bullet. Even the smallest foreign objects that get into the radiator can destroy soldering and resistance welding points.
VAZ 21099 replacement of cooling radiator
In addition, the mutual influence of the elements of the car in this case plays a cruel joke. Long-term use of chemicals, whether you like it or not, weakens the contact zone, disrupts the operating mode of the pump, increases the temperature of the coolant, etc. In addition, if the radiator cap valve gets stuck, it will not allow the pressure to be relieved in time, which will ultimately lead to set of flow points.
Note. There are many reasons why a radiator can fail or function unfairly. We will not dwell on them in this article. The purpose of this instruction is to familiarize the reader with how to easily remove the radiator and replace it with a new one.
Part selection
Before replacing, the first thing you need to do is select a radiator and buy it. Aluminum and copper radiators are available on the market today.
Aluminum has the following features:
Copper radiators are characterized as follows:
The high price of copper radiators, as well as low demand, makes copper radiators a rare item that cannot always be found in stores (a small number of manufacturers produce them).
Which one to choose is up to you. In this article you will learn only food for thought, on the basis of which you can make an informed choice. The main thing to note is that do not buy painted radiators.
Replacement
Replacing the cooling radiator in a VAZ 2109
This part must be replaced if a leak is detected. But still, first it’s better to check it to make sure where the leak is coming from.
Examination
To check the radiator, you need to remove it (how to do this will be described below), plug all the pipes and lower it into a bath of water. Work must be carried out in a specially designated place (workshop, garage, etc.). We supply air under pressure to the bath. If bubbles appear within 30 seconds of air entering, then there is a hole in the radiator and you can even find it if you watch carefully.
Removing the radiator
VAZ 2109 cooling radiator
Note. To quickly remove the air filter, press the latch with your finger or a screwdriver, disconnect the block with wires, loosen the clamp and remove the filter, first lifting its front part.
Note. It is worth noting that the same bolt secures the fan casing.
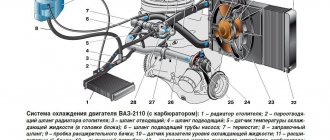
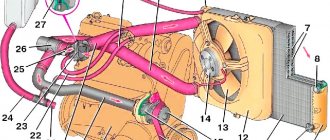
VAZ 2109 radiator cooling system diagram
Note. It is necessary to visually inspect the pillows and if they are torn or have lost their elasticity, replace them with new ones.
VAZ 21099 cooling radiator
Installation of a new radiator takes place in the reverse order. Don't forget to put on only the lower mounting cushions. We fill in new antifreeze and that’s it, the radiator is ready for use. It is definitely recommended to watch the corresponding video or photo materials while working with your own hands. The step-by-step instructions given above were written by specialists who know everything first-hand. Therefore, you need to comply with all its points. By learning how to change the radiator and other parts of your car yourself, you can save a lot on periodic repairs, the price of which is constantly growing.
Source
Do-it-yourself replacement of a VAZ 2109 radiator
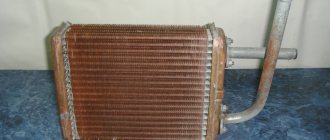
Trouble-free operation of any car is impossible without a cooling system. The main element of this system is the radiator, which is a reservoir made of synthetic material or aluminum, equipped with fins on the left and right sides.
Constant circulation of coolant through special channels allows you to maintain a certain temperature regime necessary for normal engine operation.
Failure of the cooling device, leakage of coolant, or insufficient coolant level can ultimately lead to overheating of the engine and, ultimately, to its breakdown. The VAZ 2109 radiator can be repaired after identifying the main reasons that could cause a failure in its effective operation.
Removing the radiator and its subsequent installation in place must be performed on a cold car engine. Before installing a new or repaired radiator, you should check it for leaks.
To do this, just plug the pipes, lower it into a bath of water and supply air with a pressure of 0.2 MPa. If bubbles do not appear on the surface within 30 seconds, then we can assume that the device has passed the leak test. All work on repairing and replacing the radiator can be done independently with your own hands, without the help of a specialist.
Types of radiator sealants
The modern market for auto chemical products is replete with various sealants for eliminating minor damage to radiators. They are produced in the form:
According to their intended purpose, such funds are divided into:
The former are intended for emergency repair of radiators made of either copper (for example, Bar's Leaks Block Seal Liquid Copper) or aluminum (for example, Rislone Liquid Aluminum Radiator Stop Leak). Using the latter (for example, K-Seal ST5501) you can eliminate leaks in the entire cooling system. Moreover, they can be used regardless of the material from which the radiator is made.
Reviews of the use of such drugs vary widely: from the most enthusiastic to the purely negative. The truth is, as usual, somewhere in the middle. It is important to remember that eliminating a leak using one of the proposed drugs is a temporary measure: it only allows you to continue using the car for a period of 2–3 days to several months.
Do-it-yourself replacement of a VAZ 2109 radiator
Over time, all car systems fail. And the radiator of the engine cooling system often fails under the influence of external factors (stones from under the wheels of cars or branches sticking out of the ground).
In this article you will learn how to replace the radiator of a VAZ 2109 and, in general, the entire Samar family with your own hands.
- antifreeze or antifreeze, or any automotive coolant
- high temperature silicone sealant
Let's start replacing the VAZ 2109 radiator ourselves
1. Disconnect the negative terminal from the battery and wait until the engine has completely cooled down.
2. Remove the crankcase protection and remove the cover of the expansion tank.
3. Unscrew the drain plug on the radiator (on the radiators of VAZ 2109, 2108, 21099 cars it is located in the lower right corner) and drain all the coolant into a previously prepared empty container (the volume of coolant is approximately 5 liters, so select the appropriate container).
4. Next, you need to disconnect the wires of the fan switch sensor.
5. If the car has an injection engine, then to replace the VAZ 2109 radiator yourself, you additionally need to remove the air filter.
6. Disconnect all pipes leading to the radiator.
7. Unscrew the radiator mounts to the body and remove the radiator and fan housing from the engine compartment of the car upwards, with a slight tilt towards the engine.
8. Unscrew the nut and three bolts securing the fan to the radiator. It is necessary to check the condition of the radiator cushions located on the lower mounts. If they are torn or have lost their elasticity, they must be replaced.
9. To install a new radiator, it must be placed on the lower mounts and a fan attached to it. Next, all previously removed hoses are connected, having previously lubricated them with sealant and tightened with clamps.
10. Connect all previously disconnected wires.
11. Fill in new coolant and wait 10-15 minutes until the sealant sets.
12. Start the engine, open the heater tap and let it run a little so that the coolant fills the entire system. At this moment, do not forget to monitor the coolant level in the expansion tank and top up as necessary. To fully release the air from the cooling system that appeared there after replacing the radiator, you need to raise the front of the car as high as possible and let it run like that for 10-15 minutes.
13. Tighten the expansion tank cap.
This completes the replacement of the VAZ 2109 radiator with your own hands! Good luck to all!
My blog is found using the following phrases
Interior heating device
Designers of manufacturing plants have provided for the installation of a radiator for the heating system of the VAZ-2109 car interior. Under the panel of auxiliary devices, which is located between the two front seats, the design provides for the location of the interior heating stove. It contains a frame for installing a radiator. Plastic protective panels are installed on this panel on both sides (passenger and driver). They are attached to four self-tapping screws:
- Unscrew the screws.
- Take them off.
- This frees up access to the interior heating radiator.
- It is secured with four self-tapping screws.
- They are installed in holes located on the upper and lower surfaces of the radiator.
- Tighten the screws.
- After this, connect the hoses of the interior heating system.
Note: before tightening the pipes, it is necessary to put fastening clamps on them.
Tip: Before installing, clean the clamps along the inner edges with sandpaper. This is necessary to remove sharp edges. Since sharp edges can damage the rubber surfaces of the pipes.
This is the structural procedure for attaching radiators to the VAZ-2109:
Advice: it should be taken into account that before fixing the upper part of the cooling radiator, it is necessary to install the upper pipes on it.
- Secure them with clamps.
- Only then attach the top bar to the vehicle body.
- The following procedure for bringing the cooling system into working condition.
- Install the lower pipe and tighten the clamp.
Note. The lower pipe can be easily installed from the inspection hole. First you need to remove the engine crankcase protection.
Assembling and checking the cooling system
Necessary:
- Install .
The fan shroud is attached to the radiator with two bolts on the right side. On the left side, it is carefully put on the studs and screwed with nuts.
- Then insert the cooling motor power supply terminals.
- Check the tightness of the drain plug.
- Stretch the clamps on the installed pipes.
- Check the interior heating valve; it must be open and the lever handle must be in the extreme right position.
- You just need to remove one hose that goes to the carburetor.
- Pour antifreeze into the expansion tank. You need to pour carefully, looking at the carburetor fitting.
- As soon as antifreeze flows from it, install the pipe and tighten the clamp.
- Fill the tank to a level between the minimum and maximum marks.
- Close the expansion tank cap.
- Start the engine.
- Leave it to work for 2-3 minutes.
At this moment, the system is filled and air pockets are removed. In case of poor warm-up, turn off the engine.
- Open the tank cap.
- Wrap the upper pipe to the engine block with a rag.
- Apply a few sharp pressures on it.
- Air bubbles should appear from the tank.
- Then close the tank again.
- Start the engine.
- Wait 5 minutes.
The engine should warm up. Bottom pipe too. The temperature of the device should show 85-90 0.
Conclusion: the check of the engine cooling system can be considered complete.
It is necessary to carry out all work related to checking the operation of the structural systems of a vehicle with your own hands after watching the video. It is necessary to review and carefully study the written accompanying instructions. Check out the attached photos. Carrying out independent maintenance is always accompanied by knowledge of the design features of the vehicle. In addition, this makes it possible to save a lot of money, because the price for repairs and diagnostics at a service station is quite high.
VAZ 2109, 21099 cars are equipped with injectors and carburetors. Moreover, both versions of the car have a cooling system.
Replacement
Replacing the cooling radiator in a VAZ 2109
Read more: Renault Logan tank volume
This part must be replaced if a leak is detected. But still, first it’s better to check it to make sure where the leak is coming from.
Examination
To check the radiator, you need to remove it (how to do this will be described below), plug all the pipes and lower it into a bath of water. Work must be carried out in a specially designated place (workshop, garage, etc.). We supply air under pressure to the bath. If bubbles appear within 30 seconds of air entering, then there is a hole in the radiator and you can even find it if you watch carefully.
Removing the radiator
VAZ 2109 cooling radiator
Note. To quickly remove the air filter, press the latch with your finger or a screwdriver, disconnect the block with wires, loosen the clamp and remove the filter, first lifting its front part.
Note. It is worth noting that the same bolt secures the fan casing.
VAZ 2109 radiator cooling system diagram
Note. It is necessary to visually inspect the pillows and if they are torn or have lost their elasticity, replace them with new ones.
VAZ 21099 cooling radiator
Installation of a new radiator takes place in the reverse order. Don't forget to put on only the lower mounting cushions. We fill in new antifreeze and that’s it, the radiator is ready for use. It is definitely recommended to watch the corresponding video or photo materials while working with your own hands. The step-by-step instructions given above were written by specialists who know everything first-hand. Therefore, you need to comply with all its points. By learning how to change the radiator and other parts of your car yourself, you can save a lot on periodic repairs, the price of which is constantly growing.
Instructions for removing and installing a radiator on a VAZ 2109-2108
Then we remove the pipe and hose, the result of which is shown in the picture below:
Then we proceed to the lower pipe, having also first unscrewed the bolt securing the clamp, and remove it:
All that remains is to disconnect the two wires from the temperature sensor, which is located on the right side of the radiator. This is shown more clearly below:
After this you can start withdrawing. Carefully move the radiator slightly forward towards the engine:
And also, no less carefully, we take it up, making sure that it does not cling anywhere during dismantling, so as not to damage it:
If replacement is necessary, you must buy a new one and install in the reverse order. The price of a new radiator for a VAZ 2109-2108 is about 1100-1500 rubles and differs depending on the manufacturer and material of manufacture.
Trouble-free operation of any car is impossible without a cooling system. The main element of this system is the radiator, which is a reservoir made of synthetic material or aluminum, equipped with fins on the left and right sides.
Constant circulation of coolant through special channels allows you to maintain a certain temperature regime necessary for normal engine operation.
Failure of the cooling device, leakage of coolant, or insufficient coolant level can ultimately lead to overheating of the engine and, ultimately, to its breakdown. The VAZ 2109 radiator can be repaired after identifying the main reasons that could cause a failure in its effective operation.
VAZ 2109: replacing the cooling radiator yourself
Trouble-free operation of any car is impossible without a cooling system. The main element of this system is the radiator, which is a reservoir made of synthetic material or aluminum, equipped with fins on the left and right sides.
Constant circulation of coolant through special channels allows you to maintain a certain temperature regime necessary for normal engine operation.
Failure of the cooling device, leakage of coolant, or insufficient coolant level can ultimately lead to overheating of the engine and, ultimately, to its breakdown. The VAZ 2109 radiator can be repaired after identifying the main reasons that could cause a failure in its effective operation.
Removing the radiator and its subsequent installation in place must be performed on a cold car engine. Before installing a new or repaired radiator, you should check it for leaks.
To do this, just plug the pipes, lower it into a bath of water and supply air with a pressure of 0.2 MPa. If bubbles do not appear on the surface within 30 seconds, then we can assume that the device has passed the leak test. All work on repairing and replacing the radiator can be done independently with your own hands, without the help of a specialist.
Malfunctions in the system
In a domestic car VAZ-2109, you can independently identify problems in the cooling system.
For example, system overheating occurs if:
- lack of coolant - check, add if necessary;
- the pump belt is torn or worn - replace it;
- the radiator is clogged with dirt - flush or replace;
- The fan may be broken.
There are also a number of other malfunctions:
- Coolant leak. Hoses may be damaged or parts may crack. If fluid is lost, the system is overfilled.
- Corrosion can occur if the water is contaminated or the antifreeze solution is not formulated correctly.
- Air locks (warm up the engine properly, then let the car sit, remove the hose and start the engine again - this will help expel the air).
How to replace the engine cooling radiator on a VAZ 2108-VAZ 21099?
1) First drain all coolant from the radiator. (How to drain it, see the article: “Replacing the coolant”)
2) Next, if you have an injection engine, then remove the air filter housing from it. (For how to remove the housing, see the article: “Replacing the air filter housing”)
3) Then remove the fan from the engine cooling radiator. (For how to remove the fan, see the article “Replacing the Radiator Fan”)
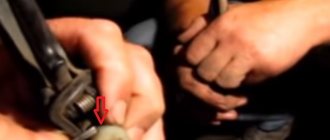
4) Next, using a screwdriver, loosen the supply hose clamp, also known as the thick hose (Indicated by the blue arrow), and after loosening the clamp, proceed to removing the steam hose, also known as the thin hose (Indicated by the red arrow), to do this: “Continue immediately under the picture"
The radiator is a vulnerable car part
Replacing the cooling radiator VAZ 21093
The radiator itself is a rather vulnerable part of the machine, because it has a brass body that is subject to numerous loads. And this part is thin in design, and if you take into account the huge number of solder joints in it, then the quick failure of the cooling radiator becomes understandable. The radiator is located in front of the car and a pebble from the road or a tree branch that accidentally hits it can become a fatal bullet. Even the smallest foreign objects that get into the radiator can destroy soldering and resistance welding points.
VAZ 21099 replacement of cooling radiator
In addition, the mutual influence of the elements of the car in this case plays a cruel joke. Long-term use of chemicals, whether you like it or not, weakens the contact zone, disrupts the operating mode of the pump, increases the temperature of the coolant, etc. In addition, if the radiator cap valve gets stuck, it will not allow the pressure to be relieved in time, which will ultimately lead to set of flow points.
Note. There are many reasons why a radiator can fail or function unfairly. We will not dwell on them in this article. The purpose of this instruction is to familiarize the reader with how to easily remove the radiator and replace it with a new one.
Instructions for removing and installing a radiator on a VAZ 2109-2108
Before proceeding with dismantling, you must first remove the fan along with the housing. Then be sure to drain the coolant from the system. Once that's done, all that's really left to do is remove the cooling system pipes. So, two pipes are at the top, and they are clearly shown in the photo below. First, unscrew the clamp bolts:
Then we remove the pipe and hose, the result of which is shown in the picture below:
Then we proceed to the lower pipe, having also first unscrewed the bolt securing the clamp, and remove it:
Main design features
So:
- At the bottom of the radiator there are pins into which rubber inserts are installed. These inserts are responsible for shock absorption of the radiator while the vehicle is moving.
Radiator mounting in VAZ 21093
- There is a threaded pipe in the lower part; a plug is screwed into it to drain the brake fluid.
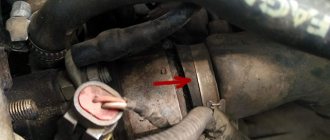
- If you look at the front surface of the radiator, in the right middle part there is a place for installing a fan switch sensor.
- In the upper part there are two cylindrical protrusions for connecting rubber pipes.
- There is one protrusion at the bottom.
Replacement
Replacing the cooling radiator in a VAZ 2109
Read more: Hyundai Getz under the hood diagram
This part must be replaced if a leak is detected. But still, first it’s better to check it to make sure where the leak is coming from.
Examination
To check the radiator, you need to remove it (how to do this will be described below), plug all the pipes and lower it into a bath of water. Work must be carried out in a specially designated place (workshop, garage, etc.). We supply air under pressure to the bath. If bubbles appear within 30 seconds of air entering, then there is a hole in the radiator and you can even find it if you watch carefully.
Replacing the radiator VAZ 2109 video instructions
Video lesson on replacing the radiator on a VAZ 2109 car.
Step-by-step replacement of the VAZ 2109 radiator
To replace the radiator you will need:
And so let's start replacing the radiator.
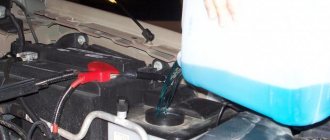
1. Remove the negative terminal from the battery. If you have just driven, wait until the engine cools down. Next, remove the crankcase protection and open the heater tap. Also open the expansion tank cap. Unscrew the drain plug and drain all the coolant into a prepared container.
2. Disconnect 2 wires from the electric fan sensor. Next, disconnect the fan wire connector. Now disconnect all hoses from the radiator. To remove the hoses, you need to loosen the clamps before removing them. Next, unscrew the 2 fastening nuts on top of the fan casing, and then remove the radiator mounting bracket.
3. Remove the radiator (together with the fan housing), tilting it slightly towards the motor. The fan housing is secured with four bolts. Remove the bolts and remove the fan housing. I advise you to look at the condition of the pillows; they are located on the lower radiator mount. If they are damaged, I recommend replacing them.
4. Take a new radiator and place the fan housing on it. Next, install the pillows on the lower mount. Now we take the radiator and carefully start it and lower it onto the cushions into the holes of the bracket. Next, secure the pillows with pins. Now we connect all the hoses and wires. When connecting the fan sensor, insert protective rubber rings into its housing, and only then the wire tips themselves.
5. Check that all hoses are secure and see if you have tightened the drain plug. After checking, fill in new coolant. Next, connect the battery.
That's all the work is, if anything is unclear, watch the video tutorial.
I would also like to make a note for those who want to repair an old radiator. To check where there is a breakdown, you need to lower it into a vat of water and see where the bubbles go. Note the location of the leak and make repairs. Good luck!
Why does the radiator become unusable?
Despite the fact that all radiator components are made of metal parts, the metal is still used in thin sheets. To protect the tubes, special tins of the same material are used, which are applied in the form of strips.
Old radiators were made of copper, which perfectly resisted almost any impact, unless of course the car was involved in an accident. New radiators are made of aluminum, which bends even under minor mechanical stress. They are the ones that often fall into disrepair.
Reasons for the release
The first step is to figure out why the coolant is being thrown out of the expansion tank.
From this we can conclude that the quality of the CO directly depends on the technical condition of the car and the quality of the components used.
Coolant emission
Signs of coolant emission
It is important to understand that coolant can be thrown out not only through the expansion tank cap, but also inside the system. It is important to monitor the condition of the CO and identify signs of a leak in time.
Antifreeze evaporates very quickly, so traces of it are not always visible.
Expansion tank
Signs of boiling
If there are problems with the engine, antifreeze may simply boil in the CO. There is nothing good about this, so it is important to detect the malfunction in time. There are five main signs of coolant boiling:
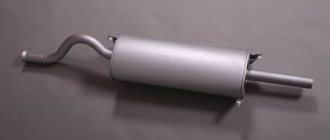
If problems arise with CO, you must first check it for leaks. According to recommendations, this should be done every 15 thousand kilometers. If a problem is discovered with hoses or pipes, they are replaced as a whole set, and not just those that have defects.
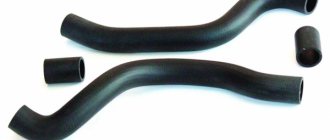
Replacing pipes
The entire process of replacing pipes is divided into two stages:
Let's start with dismantling work.
Dismantling works
At this point, the dismantling work can be considered completed. But there is an equally important event ahead - the installation of new pipes.
How it works
The operating principle of the cooling system (CO) is as follows:
- The pump drive operates from the timing belt;
- The system has a volume of 7.8 liters, if you take into account the stove;
- The temperature is controlled by a sensor installed in the cylinder block jacket. Temperature readings are displayed on the instrument panel;
- When the engine is running, liquid from the jacket passes into the radiator (heat is removed there) or into the thermostat (work on a small circuit necessary to warm up the engine);
- Then the cooling liquid, using a pump, passes into the cooling jacket of the engine (injection);
- Due to the pipelines, coolant circulates through the system;
- CO uses a centrifugal pump;
- The radiator is a tubular-plate, dismountable, equipped with a plastic expansion tank;
- Inside, the radiator has aluminum tubes and cooling fins, but there is no filler hole;
- An expansion tank is used to fill and top up coolant. The fan switch sensor is also located there;
- The tank is equipped with a filler neck, inlet and outlet valve;
- To drain coolant from the system, you need to unscrew the drain plugs on the tank, radiator and cylinder block.
If you understand in detail the components of the cooling system and their functions and features, you will be able to carry out repair and maintenance work without outside help, change the radiator or individual components of the coolant.