Some features of the VAZ 2109 cooling system
- The VAZ 2109 CO is liquid, with a total volume of 7.8 liters, if you count it together with the stove. The type of system is closed, it is sealed. The operating pressure in the cooling system is maintained at about one atmosphere. Due to the increased pressure, the liquid in it boils at a higher temperature than at normal pressure. This significantly increases the service life of the CO itself, as well as the engine.
- Liquid circulation is carried out forcibly, that is, using a pump or pump. The CO “nine” is equipped with a centrifugal pump. Its body is made of aluminum. The pump mechanism operates from a timing belt drive. The rotation of the pump shaft is carried out on double-row ball bearings. Moreover, the role of the bearing cage is played by the pump roller; it does not have its own.
- The mechanism is filled with the appropriate lubricant (Litol) during manufacture. While it is functioning, it is not being maintained; such a possibility is not provided for by the design. If it breaks, it cannot be repaired, therefore, it is recommended to completely replace the pump if it breaks. In such systems, for greater reliability, they try to replace the pump when changing the timing belt.
- Since CO "nine" is liquid, this liquid needs to be replaced from time to time. The VAZ 2109 cooling system is undemanding in terms of antifreeze quality. However, the Antifreeze A 40 that was produced for such COs in the last century is no longer produced. What is produced under this brand, alas, does not comply with the GOST standards according to which this coolant was produced.
- Many auto mechanics do not recommend its use; from what is recommended by AvtoVAZ, it is quite possible to choose a replacement. As a last resort, purchase imported antifreeze with a composition that meets the requirements. But water cannot be used at all as antifreeze; it will leave a layer of scale on the walls of all pipelines of the system, and aluminum parts will undergo active corrosion.
- For coolant, working tO is +85O – +95OC. Additionally, at a temperature of about +99°C, the contacts in the fan relay close. The engine electric fan stops working when the relay sensor contacts open, this is +93°C. This means that, focusing only on the fact of turning the fan on and off, you can make a correct conclusion about the temperature in the system. Even with a failed (or missing) thermometer on the dashboard.
- The relay temperature sensor is installed in the cylinder head. There is a thermometer on the instrument panel that shows this temperature, signaling possible overheating. While the engine is running, liquid flows from the cooling jacket of the cylinder head and block to the radiator, where it picks up heat or to the thermostat.
- The cooling system of the VAZ 2109 has a small and large circulation circle, the separation occurs at the thermostat. Which is convenient, especially when you need to quickly warm up the engine at low air temperatures. The valve closes, liquid flows only through a small circuit. As the temperature rises, the thermostat valve allows coolant to flow into the large circle pipes.
- During engine operation, during combustion of the fuel mixture, temperatures reach 2,000°C and this happens intermittently. Poor performance of the cooling system not only leads to premature destruction of the cylinder-piston group due to thermal overload. The lubricant dries out and burns out, fuel costs increase with decreasing efficiency.
- Hypothermia leads to the accumulation of condensation, which washes away the lubricant (gasoline is a good solvent), enters the crankcase, mixes with the oil, diluting it. This is another reason to keep the CO in order, otherwise expensive engine repairs cannot be avoided.
- In addition to cooling the engine, CO heats the air in the radiator and cools the turbine (if there is a turbocharger), and also cools the oil and working fluid in the automatic transmission.
- For greater driving comfort, you should also do a little tuning of the system. You can increase the efficiency and reliability of operation by installing a pump that has an impeller with many blades. The fan is also desirable to be more powerful, six-bladed.
- It would be good if a manual fan start/stop system is installed, in addition to the relay, the sensor of which may fail. An additional fan on/off relay would also be useful; in city traffic jams, this will add peace of mind to the driver and reliability of the system.
Self-replacement
Like most repairs, this procedure is carried out on an overpass. Replacement requires the following tools:
- Container for draining coolant;
- Classic set of wrenches and screwdrivers;
- Sealant;
- WD – 40;
- New faucet with a set of rubber gaskets.
- 1. Display the VAZ 2109 car;
- 2. Place the prepared empty container under the motor and, opening the drain hole, allow the coolant to drain;
- 3. Next, you need to unscrew the pipes running from the engine to the heater. To do this, just loosen the fastening clamps. It happens that they do not give in, then it makes sense to use a “bucket” and clean the threads of the crane bolts;
- 4. Remove the pipes and drain the remaining antifreeze;
- 5. Remove the side trim of the dashboard in the car interior. Here, too, unscrew the pipes;
- 6. Then, using a 10mm wrench, loosen and unscrew the faucet fastening nuts. It's under the car. Continue working inside the car again and tighten the tap on the passenger seat side. Then remove the clamp. Disconnect the control cable;
- 7. The next stage is the installation of a new tap. First of all, it must be connected to the control cable. Now put the spring clip in place. Tighten the fasteners. When installing pipes, use sealant.
Having finished installing the new heater part, you need to pour coolant into the system and check how the replacement went as a whole.
Design of the VAZ 2109 engine cooling system and its elements
The cooling system of a VAZ 2109 with a carburetor engine is distinguished by the presence of 2 parts - hoses; through the first, heated antifreeze is removed from the inlet to heat the carburetor, and through the second, liquid is removed from the carburetor and the intake pipe.
And in the cooling system of the VAZ 2109 injector there are 2 other hoses, one of which supplies liquid to the throttle pipe, heating the fuel mixture already supplied to the chamber, the second carries out the outflow of antifreeze. At the same time, another difference between these cooling systems is thermal and liquid sensors . The carburetor-type VAZ 2109 engine cooling system uses sensors screwed into the cylinder head; for the VAZ 2109 injection 8-valve engine, a cooling system sensor is located in the throttle pipe and also controls the antifreeze level. In new models of injection engines, this sensor is sealed in an aluminum housing, which increases its service life and increases reliability.
Design of the VAZ 2109 engine cooling system: 1 – expansion tank plug; 2 – expansion tank; 3 – coolant drain hose from the throttle pipe; 4 – hose from the radiator to the expansion tank; 5 - radiator outlet hose; 6 – left radiator tank; 7 – aluminum radiator tubes; 8 – plug; 9 - right radiator tank; 10 – drain plug; 11-radiator core; 12 – electric fan casing; 13 - electric fan impeller; 14 – electric motor; 15 – pump gear pulley; 16 – pump impeller; 17 - toothed camshaft drive belt; 18 – engine block; 19 – pump supply tube; 20 - radiator supply hose; 21 – heater radiator outlet hose; 22 – coolant supply hose to the throttle pipe; 23 – exhaust pipe; 24 – filling hose; 25 – heater radiator supply hose; 26 – thermostat; 27 – coolant temperature sensor; 28 – coolant level indicator sensor.
Otherwise, the design and operating principle of the VAZ 2109 engine cooling system, carburetor and injector, are the same.
The system includes:
- Pump for pumping antifreeze and maintaining pressure in the system. The pump mechanism operates from a timing drive, a camshaft toothed belt. The pump has an aluminum body, the roller is installed and rotates on a double-row plain bearing, it is locked with a special screw in the pump body. After assembly, the contour of the screw is hammered to ensure a reliable connection, and the bearing itself is devoid of an inner race and its role is played by a roller.
- The lubricant in this system is applied during manufacture and cannot be replaced. A metal-ceramic toothed pulley is press-fitted to the front part of the roller; an impeller is attached to the opposite part, to which a graphite-composite oil seal is pressed. The purpose of this sealing thrust ring is to prevent antifreeze from leaking; it is pressed into the pump body and cannot be removed.
- Due to these features, if a pump breaks down, it is usually not repairable; it is recommended to replace it entirely. If you have the skill and tools, you can make an attempt, but the result is not guaranteed. And since the timing belt also drives the pump, during any repair on the timing belt it is recommended to change the pump; its failure threatens to break the belt, which in the worst case will lead to the pistons meeting the valves.
- The thermostat is an element that cannot be disassembled or repaired, but if it breaks, it can simply be removed. The liquid will circulate in a large circle, with this you can get to a car service center or garage for more thorough repairs. The thermostat divides the antifreeze current into a large and small circle, using 2 valves - the main and bypass.
- A sensor screwed into the water jacket of the cylinder head monitors the temperature, and the data is displayed, among other things, on a thermometer on the instrument panel.
- Depending on the temperature of the liquid, the thermostat valves pass it to the large or small circulation circle of the VAZ 2109 cooling system, through the outlet pipe and hose, into the radiator for cooling. The coolant is heated on the cooling jacket of the cylinder block and head, from where it flows further.
- To ensure engine cooling, antifreeze is supplied under pressure by a pump into the cooling jacket of the power unit.
- In a small circle, along two hoses, the liquid moves, heating the fuel mixture in the intake pipe, the throttle valve area of the 1st carburetor chamber. Another pair of pipes connects and redirects the heated liquid to the hoses of the cabin heater.
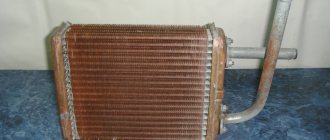
- The heater radiator is disassembled. To improve air heating and, at the same time, cooling of antifreeze, its core is made of small tubes (material is aluminum), as well as aluminum cooling plates.
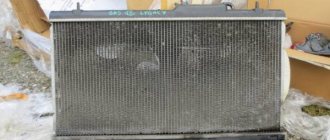
- The radiator tanks are made of plastic; they are attached to the core, and to seal the attachment points they are sealed with rubber gaskets. Unlike the expansion tank, where the coolant is poured, liquid flows into and out of the radiator only through pipes, which are also attached to the tanks.
- The top one is connected through a hose to the expansion tank. The left tank also has 2 pipes, liquid inlet and outlet. There is also a drain plug installed on the right tank, as well as a sensor-relay that starts the fan.
- The transparent plastic expansion tank is attached to the body mudguard brackets, on the left, using a fastening belt. The lower pipe goes to the thermostat (through a hose), and the upper pipe, through another hose, connects the tank to the radiator.
- The filler neck of the tank is closed with a plug with a pair of valves, inlet and outlet. The latter is intended for steam to prevent the formation of steam locks. The valves have one body, non-separable, for the release to work, the pressure must reach 1.1 kgf/cm2, for the inlet it is enough from 0.03 kgf/cm2 to 0.13 kgf/cm2. But to completely drain the antifreeze from the system, it is necessary to remove the drain plugs from both the cylinder block and the radiator tank, and the expansion tank plug covering the filler neck.
- The fan provides additional cooling and is equipped as standard with a 4-blade impeller with an electric motor. The fan is placed in a casing and secured to the radiator brackets. To trigger the temperature sensor TM108 (on the radiator tank), tO +99°C is required (fluctuation by 3°C up or down is acceptable). At 94OS (with the same tolerance) a shutdown will occur.
- The thermostat is responsible for maintaining temperature parameters and helps speed up the warming up of a cold engine. Normal operating tOC will be between 85OC and 95OC. The body of this non-separable element is covered with a cover rolled with the seat of the main valve.
The liquid enters the thermostat through pipes, the inlet pipe is for the cooled pipe, from the radiator, the second inlet pipe is for the bypass from the block head, and also supplies antifreeze to the pump and the expansion tank hose.
Based on the structure and operating principle of the CO, you can independently carry out its maintenance, tuning, and repair. This does not even require any special skills or tools. But it is necessary to correctly identify the malfunction, as well as the method for eliminating it.
Thermostat
This element of the system also plays almost the main role. Although in fact, of course, the system can work without it. The cooling system of the VAZ 2109 engine is designed in such a way that the engine first warms up to operating temperature - about 90 degrees. After this, it is necessary to further cool the liquid. But the fact is that at first the antifreeze moves in a small circle - it passes through the cooling jacket, enters the heater radiator, and the excess goes into the expansion tank.
But when it warms up to operating temperature, the thermostat directs a flow of liquid into the radiator. How it works will be discussed a little below. A thermostat is a kind of mechanical valve. But it has a small modification that allows you to automate the cooling operation. A simple bimetallic strip that deforms when exposed to hot liquid. With its help, the antifreeze supply valve to the radiator opens/closes.
Malfunctions in the VAZ 2109 engine cooling system and methods for eliminating them
Simple systems are usually very reliable. This also applies to the SO VAZ 2109. Basically, it does not cause problems, especially with proper care.
Most often, there are breaks, pipes jumping off, the radiator may leak, and temperature sensors also fail. In addition, a common problem is the thermostat getting stuck and the pump failing.
Replacing the pump (pump) on a VAZ 2109
The pump may simply wear out. One of its elements may be damaged, a manufacturing defect - there are many reasons.
Signs of malfunction:
- Noise during operation. Faults in the bearing system due to wear and operation.
- Antifreeze has leaked, which will speed up the operation of the bearing, and vice versa, a worn bearing will lead to leakage of the oil seal and cuffs, and, accordingly, to leakage.
- Installation with a skew, in which the alignment to the gears and timing rollers is broken. It may simply be a defect, a consequence of incorrect installation during the next replacement; with such a defect, the position of the pulley during rotation is skewed, uneven load leads to wear of the bearing, oil seal, and timing belt breakage.
- The engine is overheated. If there are no other reasons (let’s say the radiator was “treated” for leakage with sealant and the pump impeller and cooling tubes were filled with it at the same time), the reason is broken off impeller blades. In any case, the pump will have to be changed.
- The stove does not heat well, another indirect sign indicating a decrease in the efficiency of the pump.
- If you install a weak pump on a more powerful, and therefore hotter, engine, it will wear out faster when working under overloads and will not be able to provide the proper temperature conditions.
In fact, fluid leaks and fogging in the drainage area do not necessarily indicate the need to change the pump. It may be enough to apply sealant to the leakage areas and change the sealing gaskets. Most often, the cause of the breakdown is a leak in the oil seal or rubber cuff, aggravated by low-quality antifreeze.
To replace the pump you will need:
- Spanners, No. 17, No. 10.
- Knife and slotted screwdriver (large).
- Heads with collars and open-end wrenches, No. 10, No. 17.
- Actually, the pump, a new one and a gasket for it.
- Sealant, rags, something for the liquid to be drained, any container, jack.
Pump replacement:
- The car is put on the handbrake, the gearbox is set to “neutral”, the engine must be cold.
- The antifreeze is drained, if what is drained is brown and dirty, the cooling system must be flushed and the fluid replaced.
- The bolts that hold the timing belt protective cover (on the left side of the engine) are unscrewed with a ten key. On the removed cover there are marks by which the first cylinder is placed at TDC, so it should remain at hand.
- Now it is important to correctly set the timing marks, since in the VAZ 2109 engine the timing belt also rotates the pump mechanism, a misalignment will lead to destruction of the pump and motor. Carefully, turn the crankshaft to align the mark on the rear cover with the mark on the camshaft gear, and twist the pulley bolt. Without securing the cover, put it in place to check how the marks on the cover and the pulley line up. The alignment of the points on the flywheel must be observed through the clutch housing window. The crankshaft is rotated until the marks align.
- To tighten the tension roller nut, you need a number 17 wrench. The removed roller must be checked, it may also be worn out, it is important that it does not “stick” when rotating, play is also not allowed.
- The belt is removed, the fastening bolt of the camshaft gear is unscrewed, the gear will have to be locked in the process with a more powerful screwdriver, the wrench fits No. 17.
- When removing the gear, it is advisable not to lose other spare parts (keys).
- The back cover is dismantled (a ten key), all the fastening bolts of the pump are tightened, which then needs to be pryed up and moved out of place. Since the placement of the pump and motor excludes the possibility of displacing and removing it, it is necessary to jack up the motor until there is free space to remove the pump.
- Clean the pump location and remove any remaining gasket.
- With the end part of the housing marked upwards, in place of the broken one, a new pump is placed and carefully screwed on. The main thing is not to break the threads in the mounting holes of the aluminum block on which the pump is placed. True, the extra play is also not needed.
- Now everything that has been dismantled must be reassembled in the reverse order.
Some features:
- When installing the belt, all timing marks must be aligned clearly and correctly so as not to disrupt the timing and ignition systems.
- It is also important to properly tension the drive belt.
If the belt on the gear has shifted by a tooth, the engine will not start after assembly and you need to remove the belt, tighten the gear, and tighten the belt again (correctly).
Air in the cooling system
If you use low-quality fluid, the cooling system of the VAZ 2109 will be air-filled, which makes its operation problematic, because air pockets interfere with the circulation of antifreeze. Removing them, however, is no more difficult than removing them from the brake system, both are sealed, the principle is the same.
Air in the cooling system
The method is simple, you need to create excess pressure in the system using a pump, compressor and drive the liquid under pressure through all hoses and pipes, draining through the upper radiator pipe. The drain hose is immersed in a container with antifreeze, and antifreeze is added to the expansion tank until all the plugs are squeezed out. This will be indicated by the absence of bubbles at the output.
Self-replacement
Like most repairs, this procedure is carried out on an overpass. Replacement requires the following tools:
- Container for draining coolant;
- Classic set of wrenches and screwdrivers;
- Sealant;
- WD – 40;
- New faucet with a set of rubber gaskets.
- 1. Display the VAZ 2109 car;
- 2. Place the prepared empty container under the motor and, opening the drain hole, allow the coolant to drain;
- 3. Next, you need to unscrew the pipes running from the engine to the heater. To do this, just loosen the fastening clamps. It happens that they do not give in, then it makes sense to use a “bucket” and clean the threads of the crane bolts;
- 4. Remove the pipes and drain the remaining antifreeze;
- 5. Remove the side trim of the dashboard in the car interior. Here, too, unscrew the pipes;
- 6. Then, using a 10mm wrench, loosen and unscrew the faucet fastening nuts. It's under the car. Continue working inside the car again and tighten the tap on the passenger seat side. Then remove the clamp. Disconnect the control cable;
- 7. The next stage is the installation of a new tap. First of all, it must be connected to the control cable. Now put the spring clip in place. Tighten the fasteners. When installing pipes, use sealant.
Having finished installing the new heater part, you need to pour coolant into the system and check how the replacement went as a whole.
