Replacing tie rod ends
When knocking occurs in the front suspension on a Priora, you should pay attention to the following parts and components:
And in this article we will look at repairs related to tie rod ends. If the knocking noise appears specifically from the tips, and the play when turning already exceeds the permissible limit, it is necessary to replace the tips. for new ones. To perform this repair, you will need the following tools and accessories:
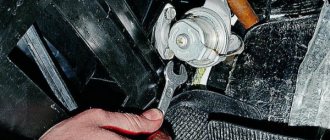
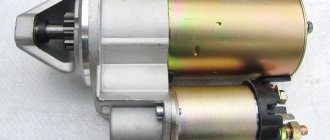
Removing and installing EUR at home
In order to remove the device from the car, you will need to prepare in advance everything that may be useful to you in the process.
In particular, we are talking about flat-head and Phillips-head screwdrivers, as well as a set of socket wrenches. So, how does the procedure for removing and installing the electric amplifier take place:
- First of all, you need to turn off the power to the on-board network; to do this, disconnect the negative terminal from the battery. Then dismantle the steering wheel by first removing the plastic cover under it and on the control panel. The steering wheel is dismantled in accordance with the service book for the car.
- Using a Phillips screwdriver, you need to unscrew the four bolts that secure the decorative trim on the steering panel.
- Having done this, you will be able to see the wiring pads - they need to be disconnected from the steering column switch, and the slip ring is also disconnected.
- Using a size 8 wrench, you need to unscrew the screw that secures the wire blocks that run from the ignition switch.
- Next, you need to press on the plastic fixing elements and disconnect the pads with wires at the top and bottom of the column itself.
- In the place where the electric power steering wheel is attached to the column itself, you will need to dismantle the so-called plastic curtain; to do this, disconnect the clamps.
- Using a socket wrench, you need to slightly loosen the nuts that secure the assembly to the bottom of the column.
After completing these steps, the amplifier itself is removed - it is dismantled along with the intermediate shaft. But in order to make it more convenient for you to clean the assembly and then perform the installation in reverse order, it is advisable to disconnect these components from each other in advance. To do this, use a 13mm wrench to unscrew the screw securing the universal joints to the shaft itself. Then you will need to unscrew the two fixing nuts at the ends, after which the steering column itself can be removed.
Then you will need to remove the screw and remove the cardan from the splined pulley of the unit. To make the reinstallation procedure more convenient after removal, it is advisable to make sure that all marks match. We are talking about marks on the protective cover, pulley, and also the starter cover
Cleaning the contact group mechanism and other elements of the system must be done carefully so that all components remain intact and undamaged. If you seek help from specialists in this matter, the cleaning procedure will cost you on average about 30-50 dollars, depending on the region
Replacing tie rod ends on a Priora with your own hands
1. First of all, remove the wheel bolts and lift the front of the car with a jack.
2. Apply penetrating lubricant to all threaded connections:
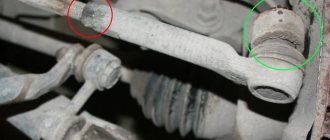
3. Now, using pliers, we align and pull out the cotter pin from the tip pin, as is clearly shown in the photo below.
4. Now loosen the coupling bolt that presses the tip to the rod:
5. Then, using a puller or a pry bar with a hammer, you need to press the tip out of the hole in the rack.
The result of this action is shown clearly below.
6. Next, you need to unscrew the steering tip, twisting it from the rod. To do this, you may need an additional lever, for example, a small piece of pipe or a deep socket. It is worth noting that the left tip unscrews clockwise, and the right one counterclockwise. The photo below shows everything using the left side as an example:
The result can be seen below.
7. If you want to maintain the alignment of the front wheels, at least at approximately the desired angle, you need to count the number of revolutions made when unscrewing the tip. The new one should be wound at the same number of revolutions.
8. After replacing the tip, screw on all the nuts and bolts, and also install the cotter pin in place.
9. We do the same with the second side. Of course, the ideal option is to definitely go to a service station after replacement and have the front wheels wheel aligned. There is no need to save money on this procedure; it may cost more if the wheel angles are disturbed after the repair.
If there are any unclear points, the video below will tell you everything more clearly! The price of new tips for Priora is from 700 rubles per pair, of course, from 350 rubles. a piece.
Necessary tool
Keys and accessories:
- Rozhkovy on “16”.
- Hammer.
- Wooden beam.
- Balloon wrench.
If you have a little experience in carrying out such work, then you can replace the tips on Renault Logan yourself. To do this, you should only adhere to the rules listed below.
Let's start replacing (preparatory work)
To replace the tips, you need to put the car on supports. Then you should remove the front wheels. In this case, it is recommended to turn on the handbrake and place wheel chocks under the rear wheels to ensure the stability of the car.
Stages of work
- Before repairing, all elements of the steering mounts must be sprayed with WD-40. You can also use water if liquid is not available. You should pour it over the bolts and wait a while until they are saturated with moisture. This will make it easier to unscrew the bolts.
We removed the wheel and treated the tie rod end to the hub with WD-40
Loosen the tension, indicated by an arrow
Loosen the pin bolt
We use a ball joint remover (it is universal for all cars)
The steering knuckle was removed
We use a jack to help
AHTUNG! Do not overtighten, otherwise you will have to take a new tip
Adviсe
It is recommended to lift the car on the side on which the part will be replaced. When carrying out work, the car must be on the parking brake. To clean dirt from the steering column, you can use a metal brush. In the event that you do not have a puller at hand to press out the finger, you can use a wooden block and a hammer. Using a hammer through the beam, you need to hit the mounting hole of the finger, freeing it
It is important to remember that the steering wheel tip on the right has a left-hand thread, and on the left – a right-hand thread (that’s why the article numbers are different, they are lower)
Communities › Lada Priora Club › Blog › Replacing tie rod ends.
Well, I found some time between a project at work and the preparation of a technical report on pre-graduation practice. We continue to replace faulty components. It came to the tie rod ends. After scouring the forums for a long time in search of quality spare parts, I compared the reviews with what you can choose from in stores. The choice is of course huge, with a range of prices for any buyer. The choice was made - either lemforder or Lucas. After a visual inspection in the store, I chose Lucas TRW. They are more massive.
Comments 10
The suspension warranty is 1 year or 35,000 km. I didn’t do it myself. I have very little free time, and I’ve been sick for a week now. And on September 7th I have to go to Khokhland by car. I had to go to the service center. In the service, replacing tips costs 210 rubles per piece. So, having thought about it, I headed to the service center. In addition, after replacement, the wheel alignment still needs to be set again. It's not very difficult to do it yourself. The tools you need are a steering rod puller and a couple of keys. Jack it up. You take off the wheel. You pull out the cotter pin and unscrew the nut, but not all the way. Use a puller to press the rod pin out of its seat. You unscrew the locking nut and then unscrew the rod, counting the number of turns. You install a new one by tightening it the same number of turns. You're all going to a wheel alignment. I preferred to pay 400 rubles for replacing the rods.
everything is clear, thank you very much!
Did I do it myself or under warranty? My mileage is 26,000 and I think the tips are also there, although maybe the rack, I still need to check. But that’s not the point, if you change them yourself, what do you need, not counting the keys, is there a puller there, or something else?
Same question...I have 40 miles, the tips are dead. We need to change it too, but the price for these TRWs is space ((
The difference in tips ranges from 250 rubles to 700 rubles per piece. They change in pairs. This means the price is from 500r to 1400r. I don't argue that they are expensive. When I bought them they were the most expensive, and LEMFÖRDER cost about a kilo ruble per pair. Spare parts at our car markets are a lottery. You can get an excellent part for pennies, or you can fly away with branded ones.
Signs of a bad tip
The steering tips on the Priora fail quite rarely, but you need to keep an eye on them. The main thing in operation is to keep the anthers in good condition. The service life of the entire tip directly depends on them. If dust and water do not get inside, the ball joint will last its entire service life - and this is at least 100 thousand kilometers. But this is provided that the driving style is not aggressive, most of the operation takes place on relatively smooth roads, without a large number of holes.
If there is a malfunction in the steering tips, the following symptoms appear:
Similar symptoms appear when a ball joint or strut bearing breaks, so you need to carefully diagnose the entire suspension and steering.
Main components of the steering mechanism.
The steering linkage consists of several main elements interconnected:
- side tie rods,
- average,
- bipod,
- pendulum lever,
- steering knuckle levers.
The column itself consists of two parts - an intermediate shaft, which is connected to a trapezoid using a hinge, and a steering column on which the wheel is attached. To ensure the best connection of the steering wheel, it has conical splines.
The side rods are composite; for adjustment, there is a split coupling in the middle. There is a left-hand thread on one end of the tip, and a right-hand thread on the other. As the clutch rotates, the length of the lever can either increase or decrease. This is necessary to be able to adjust the toe angle of the wheels.
Standard clamps are used to secure the coupling. The rods end with hinges. They usually have a cone-shaped fit and nuts are used to secure them.
The hydraulic booster is a system consisting of several additional elements:
- pump,
- expansion tank for liquid,
- radiator,
- pipes
The column is attached to the left side member using three bolts. The power steering pump is located on the left side of the engine. To rotate it, an additional belt is used to connect the auxiliary units.
If the power steering fails, the ability to control the car remains, but the required force on the steering wheel only increases.
The design of the steering wheel on the Chevrolet Niva is considered injury-proof by its design. This is ensured by the ability to fold the column in the hinge area.
The tie rods themselves are metal rods, which are quite difficult to damage. They can only be bent by “catching” the wheel on a stone or other obstacle.
Diagnostics of steering ends and ball joints
Much more often there are malfunctions associated with:
- Hinges. These parts are located at the ends of the steering rods. Most often, the cause of failure is excessive wear of the liner (or rubber bushing) or the spherical surface of the pin (damage to the thread, cone, surface due to corrosion or unprofessional installation/disassembly).
- A cotter pin securing the castle nut. Incorrect installation of this small and not particularly significant, at first glance, part can lead to irreparable consequences: the cotter pin falls out -gt; the nut is loosened -gt; finger loses tight contact -gt; the steering linkage loses its geometry -gt; it is impossible to drive the car.
- Anthers or a hinge cover. When the boot breaks or the cover moves from its seat, the hinge becomes dirty and, as a result, wears out faster.
- Bushings, threaded parts of rods and other parts of the toe angle mechanism. They may become corroded or damaged when driving in poor road conditions.
Removing old tips
To remove the Priora tie rod end, you can use one of the following methods:
The last two methods are very dangerous - you can damage not only the tip, but also the stand itself. And if you plan to replace only the anthers, then the risk of knocking off the thread on the finger is very high.
Therefore, it is best to use a puller for work. Follow these steps to remove the tip:
After repairs, be sure to do a wheel alignment. Even if you measure the total length of the rod before dismantling, you are unlikely to achieve the same value afterwards.
If you cannot unscrew the nuts on the rod, it is best to remove it completely. To do this, unscrew the bolts securing it to the rail. If necessary, you can warm up the threaded connection with a gas spray. But this is an extreme measure; usually pre-treatment with a penetrating lubricant such as WD-40 is sufficient.
Let's get started
It is worth noting that replacing the left steering tip of a Renault Logan is no different from replacing the right one. Therefore, this instruction can be used for both sides of the elements.
So, first we put the car on a flat area (or better yet, on a viewing hole). Next, install the Renault on the handbrake. This way we will block the rear wheels. Then we tear off the bolts on the front discs and jack up the desired part of the car. We remove the wheels and get to the tips themselves. If they have not been inspected before, spray them with WD-40 and wipe them off from dirt. Then we treat the bolts themselves with lubricant. If necessary, use a metal brush
It is important to clean the threads from dirt. If you don't do this, you can easily break the bolts
Yes, and it will be very difficult to unscrew them.
How do you then replace the steering ends of a Renault Logan with your own hands? Next you need to loosen the locknut on the rod. Then unscrew the nut on the rotary cam. This may cause your finger to scroll. To fix it, we use a hex key.
Next, you need to remove your finger from the socket. This completes the dismantling of the old element.
Ford Mondeo We Can Do Anything › Logbook › Replacing tips WITHOUT ALIGNMENT COSTS
The Delphi steering lugs I ordered on existential arrived on Sunday. And just last night I got around to it, or rather my wife let me into the garage to change them :))) I decided to replace them, the old way, through which many cars have already gone through: the Fourteenth, the Ten, the Elantra, the Chrysler 300m, the Dodge Sratus, etc. This is done using a regular caliper - a compass. And so, in order: We hang the wheel, remove it. Next, unscrew the nut from the steering tip pin:
Now let's measure the old and new tips and compare. It turned out that the old one is 1.5 mm longer than the new one. Accordingly, you need to tighten the new one so that the distance is not 139, but 137.5 mm; for me it turned out somewhere closer to 137 mm. We put everything back together, tighten it well, put the wheel on, and go check on the road to see if the steering wheel is moving or if it’s level. Everything is ok, let's go to the garage and change the other side. Here’s a way to save about 3,000 rubles :)) ps, well, I’m in the process of working:
Ford Mondeo 2003, 125 l. With. — scheduled maintenance
Cars for sale
Ford Mondeo, 2002
Ford Mondeo, 2003
Ford Mondeo, 2004
Ford Mondeo, 2004
Comments 25
I have been changing this method for a long time, only before removing the tip I find the center in the tip and make a mark on the tie rod and measure the distance of the rod with a compass (after installing the new tip I also find the center and adjust to this distance, if you change the rods it is even easier, unscrew the rod together with a tip, measure the distance from the edge of the rod to the center of the tip and transfer this distance to the new rod (if the rod has a lot of play, you can measure from the edge of the steering shaft), the first tip was changed to 80000, the second to 120000, the third to 160000, to 180000 I replaced the steering rods with a wheel alignment, I didn’t drive, the main thing is to change each side separately, after replacing one side, we make sure to drive through and make sure that the car does not pull to the side (usually the steering wheel immediately shows (looks to the side)), if it does, then we adjust the draft until the steering wheel is straight (the steering wheel is very sensitive to increasing or decreasing the distance between the steering shaft and the tip), after which we proceed to replacing the second side. Volkswagen Polo sedan 2011
Prerequisites for carrying out repair work on the steering rack of the nine.
The steering rack of the VAZ 2109, as mentioned above, is the element that is responsible for steering the car. More precisely, the steering rack is part of the mechanism responsible for controlling the rotation of the wheels: this mechanism converts the rotation of the steering wheel into translational movements of the steering rods. Consequently, wear or any other malfunction of the parts of this mechanism increases the backlash, which becomes the result of poor vehicle handling.
What are the prerequisites for repairing an element such as a steering rack? The answer is obvious. Knocking when turning, increased play, tight rotation of the steering wheel, difficulties in adjusting the toe angle - this is the minimum list of those malfunctions that must be eliminated immediately after they are detected.
However, before you start carrying out repair work, do not forget to make sure that these malfunctions are actually a consequence of a defect in the steering rack! I advise you to read my post - DIY steering rack repair.
Video on adjusting the steering rack of a VAZ 2109
The steering rack in front-wheel drive cars is fully responsible for the functionality of the entire steering mechanism. The VAZ 2109 also belongs to this category of car. If it fails, appropriate action should be taken immediately.
The occurrence of signs of malfunction does not always indicate the need to completely replace the unit. Sometimes it is enough to repair the rack using a special repair kit.
Replacing steering tips of a Priora without camber
If knocking occurs in the front suspension of a Priora, you should pay attention to the following parts and components:
And in this article we will look at repairs related to tie rod ends. If the knocking noise appears specifically from the tips, and the play when turning already exceeds the permissible limit, it is necessary to replace the tips. for new ones. To perform this repair, you will need the following tools and accessories:
The role of the electric power steering in the steering of the VAZ 2170 Priora
It's no secret that the electric control method plays an important role in ensuring safety while driving. EUR or power steering of Priora performs the option of reducing the level of load on the steering wheel while turning it. The key advantage of using such an EUR device on the Priora is comfort when moving as a result of improved feedback between the steering wheel and wheels.
The electric amplifier is a more modern and improved unit, which is not only easier to use, but also does not require the introduction of additional highways to ensure operation. In addition, this device does not take power from the power unit. The main advantage of the EUR is that it does not require frequent maintenance and fluid monitoring, unlike power steering.
But it should be noted that such a system has several disadvantages, one of them is rather weak feedback between the road surface and the control system. As a result, it may become difficult to drive in snow. Unlike Prior, foreign cars are equipped with additional mechanisms and units for blocking and stabilization, so the method of controlling the electric power steering in the domestic version is less reliable. In addition, in practice, a faulty electric booster with poor traction is a fairly common occurrence.
Replacing tie rod ends on a Priora with your own hands
1. First of all, remove the wheel bolts and lift the front of the car with a jack.
2. Apply penetrating lubricant to all threaded connections:
3. Now, using pliers, we align and pull out the cotter pin from the tip pin, as is clearly shown in the photo below.
4. Now loosen the coupling bolt that presses the tip to the rod:
5. Then, using a puller or a pry bar with a hammer, you need to press the tip out of the hole in the rack.
The result of this action is shown clearly below.
6. Next, you need to unscrew the steering tip, twisting it from the rod. To do this, you may need an additional lever, for example, a small piece of pipe or a deep socket. It is worth noting that the left tip unscrews clockwise, and the right one counterclockwise. The photo below shows everything using the left side as an example:
The result can be seen below.
7. If you want to maintain the alignment of the front wheels, at least at approximately the desired angle, you need to count the number of revolutions made when unscrewing the tip. The new one should be wound at the same number of revolutions.
8. After replacing the tip, screw on all the nuts and bolts, and also install the cotter pin in place.
9. We do the same with the second side. Of course, the ideal option is to definitely go to a service station after replacement and have the front wheels wheel aligned. There is no need to save money on this procedure; it may cost more if the wheel angles are disturbed after the repair.
Assembly of the unit
After removing the old rods, take a tape measure and measure their length. The problem is that you will have to adjust the wheel alignment - you won’t be able to do this yourself, it’s better to go to a service station and do diagnostics on a computer stand. After replacing the steering tips of a VAZ-2107, even if you have achieved the same length with the new elements, it is necessary to carry out diagnostics. Otherwise, when driving, tire wear will occur much faster.
Installation of new tips is carried out in the reverse order. Insert the ball pins into the steering knuckles and holes in the bipod, tighten the nuts and secure their position with cotter pins. It is advisable to purchase new cotter pins, as old ones are usually covered with a layer of dirt and rust.
Source
Video review of replacing steering tips on a Priora
Since the procedure for replacing tips is practically no different from the tenth family, it is with the example of 2110 that everything will be shown.
If you have any questions, please discuss them below in the comments.
The steering ends on the Priora, as well as the ball joints, can last more than 80,000 km without replacement, but given the current state of the road surface that exists in the cities of our country, not every owner is able to reach such a milestone, even with careful operation. Fortunately, if you notice knocking on the tips and excessive play of the ball pin, you can replace them yourself, having only the necessary tools:
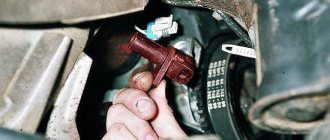
First, we lift the front part of the car with a jack, after which we remove the wheel where the first step will be to replace the steering tip:
Now we apply penetrating lubricant to all threaded connections, and then loosen the pinch bolt, as shown in the photo below:
Then you need to use pliers to remove the cotter pin from the ball pin of the steering tip:
And now you can unscrew the nut completely:
Now, using a puller or a hammer with a pry bar, you need to knock out the pin from the seat of the strut knuckle:
Next, you can unscrew the tip from the tie rod, since nothing else holds it. It is worth noting that on the left side you need to turn it clockwise, and on the right side, vice versa. Also, be sure to count the number of revolutions made when turning, so that in the future you can install a new tip with the same number of revolutions, thereby maintaining the toe-in of the front wheels:
When installing new steering tips on a Priora, you must use a torque wrench, since the ball pin must be secured with a nut with a torque of 27-33 Nm.
The price of these parts can vary quite a lot depending on the manufacturer, and can range from 400 to 800 rubles per pair. If after the replacement you notice that the wheel alignment has become disturbed, tire wear has increased, it has become uneven, etc., then you should definitely contact a service station to have the wheel alignment procedure performed.
On the Priora, the steering tip has the same design as on cars of the tenth family. The element consists of a base in which the ball pin is located. Using the tip, movement is transmitted from the rack to the front wheel struts. The entire mechanism is protected by rubber boots; they are the most vulnerable elements: under the influence of water, dirt, and heat, cracks appear on them, through which lubricant escapes. And dust gets inside, destroying the ball pin.
Steering rod Lada Granta
Replacing the Lada Granta steering rod
Replacement of the steering rod on a Lada Granta car is carried out in the event of its failure, when play in the ball pin increases, as well as to replace the rubber protective boot or when carrying out other work in which the presence of traction will interfere. Prepare a standard set of tools, a ball pin remover and perform the following sequence of actions:
· Remove the battery by disconnecting the terminals.
· Use pliers to remove the locking pin and, having unscrewed the pin nut, use a puller to disconnect it from the rotating arm of the telescopic stand.
· Use a flat-head screwdriver to pry up the locking plate of the tie rod bolt heads.
· Remove the locking plate and loosen both bolts.
· Unscrew the bolt securing the linkage and remove it from the engine compartment through the wheel niche.
· Carry out the necessary repairs, then install in the reverse order.
About installing plugs for Lada Granta steering rod openings
The very location of the holes for the tie rods and the logic of air exchange in the engine compartment actually allow us to hope that air will escape through them. And dirt, accordingly, will not fly inside through them.
However, everything is ruined by the size of the openings. It's huge. Even if dirt doesn’t hit the engine compartment like a fire hose, something certainly gets there.
To eradicate these holes, plugs for steering rod openings 2110 were purchased at a cost of 65 rubles. The quality of the material is quite consistent with the price. Coal dust lightly bonded with rubber. It tears like paper. But the workmanship is quite up to par, oddly enough.
There is, however, some redundancy of design ideas. Curly cutouts, complex edge profiles, bosses for self-tapping screws - I remember on Moskvich - 2141 everything was much simpler. There was a frame and two simple sheets of rubber were nailed to it, fastened together with ordinary pistons (like palms folded together, between which the rod itself passed).
You need to start installation from the right side. It’s simpler, clearer, and there’s an opportunity to warm up the muscles that have shrunk over the winter in front of the heavy left side. We remove the wheel. I cut the plug at the bottom so that it became open and the steering rod could pass through it. The cunning figured profile of its edge must be placed on the edge of the opening in the body. It is not simple. But it is possible. I still have some extra rubber that I have nowhere to put on - I cut it off with scissors. This is slightly visible in the lower right corner of the photo. Then I picked up my sea green BDF 451 RFE, some screws with a drill end and... here it is:
Please note that the edge profile of the plug is interlocking. A correctly and firmly seated plug will not fall out even without self-tapping screws. I think so. For those for whom an extra hole in their own car is like an extra hole in their own body, this is important. In general, the part into which we screw the screws is strong and quite thick. It won't rot for a long time.
Let's move to the left side. There is a machine gun stuck out of the window on the left side. That's what the lath used to be called. The plug has a “codpiece” for the protrusion of the rail. I think that contact of the movable rubber band (opening plug) with the fixed rubber band (rail boot) will lead to rubbing of the latter and failure of the rack. Therefore, I cut off this part of the plug with a margin. After repeated fittings, cutting and exercises with a screwdriver, the result was something like a curtain.
Signs of a bad tip
The steering tips on the Priora fail quite rarely, but you need to keep an eye on them. The main thing in operation is to keep the anthers in good condition. The service life of the entire tip directly depends on them. If dust and water do not get inside, the ball joint will last its entire service life - and this is at least 100 thousand kilometers. But this is provided that the driving style is not aggressive, most of the operation takes place on relatively smooth roads, without a large number of holes.
If there is a malfunction in the steering tips, the following symptoms appear:
Similar symptoms appear when a ball joint or strut bearing breaks, so you need to carefully diagnose the entire suspension and steering.
Removing old tips
To remove the Priora tie rod end, you can use one of the following methods:
The last two methods are very dangerous - you can damage not only the tip, but also the stand itself. And if you plan to replace only the anthers, then the risk of knocking off the thread on the finger is very high.
Therefore, it is best to use a puller for work. Follow these steps to remove the tip:
After repairs, be sure to do a wheel alignment. Even if you measure the total length of the rod before dismantling, you are unlikely to achieve the same value afterwards.
If you cannot unscrew the nuts on the rod, it is best to remove it completely. To do this, unscrew the bolts securing it to the rail. If necessary, you can warm up the threaded connection with a gas spray. But this is an extreme measure; usually pre-treatment with a penetrating lubricant such as WD-40 is sufficient.
Installing new items
Installation is performed in reverse order:
- Screw the tip onto the rod, counting the turns. The main thing is to achieve an approximate match in the length of the rod with the new and old tips.
- Place the pin in the hole in the stand and secure it with a new nut.
- Tighten the nut on the rod.
- Tighten the bolt on the tip clamp.
- Install a cotter pin to secure the nut to the pin.
At this point the repair can be considered complete. If you only need to replace the “Priora” steering tip boot, then you do not need to remove the entire element, just remove the pin from the hole in the steering knuckle of the strut. Be sure to wash the hinge and apply new grease.
Source: fb.ru