It is recommended to adjust the valves on the VAZ 2106, as well as on other classic Lada models, every 10 thousand kilometers.
Failure to follow these recommendations can lead to disastrous consequences, in particular, increased fuel consumption, decreased engine power and many other troubles.
But the last link in diagnosing that it is time to adjust the valves is their knocking while the engine is idling.
This sound is very specific and it is impossible to confuse it with some other sound.
Each driver decides for himself where to adjust the valves of his six, at a service station or in the garage on his own.
Let's assume that you yourself decided to carry out this work, especially since if you are reading this article, then most likely this is all true.
Specifics of the work
There is a category of drivers who strive to do all the maintenance and repair work on their car themselves.
This is especially true for owners of domestic cars, and this is commendable.
But such drivers need to realize that a number of works, especially those related to adjustments, require not only theoretical knowledge and experience, but also a kind of “feeling” that comes with time, through trial and error.
Especially such work includes all adjustments carried out on the carburetor, as well as valve adjustment and a number of other adjustments.
Therefore, if you are doing this for the first time, then call a person who has done such work on his car at least 3-5 times, and preferably on the same model as yours.
Also, before carrying out work, check the timing belt tension. It is important.
IMPORTANT: The engine should only be cold, but not lower than 30 - 400C, this is the ideal temperature.
If you have just arrived at the garage and want to adjust the valves on the same day, then it will take about 5-6 hours for the engine to cool down.
You can immediately begin removing the valve covers and other parts; this will reduce the engine cooling time to 1-2 hours, as the heat exchange between the hot engine and the environment will increase.
It’s better to proceed from the principle: arrive in the evening, carry out the work in the morning.
By the way, don’t forget about the gasket under the valve covers; in 90% of cases it has to be replaced, so you should have a new gasket on hand.
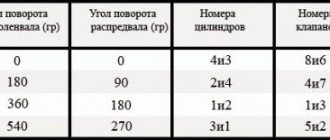
Counting cylinders and valves.
The valves are counted as follows. Stand to the left of the car in the direction it is moving, near the engine. Face the engine.
Cylinders and valves are counted from left to right of the timing chain.
The last will be the 4th cylinder and 7.8 valves, but the adjustment begins with valves No. 6 and 8.
How to set the gap correctly?
Adjusting the VAZ-2106 valves with your own hands requires strict adherence to the sequence of actions and careful preliminary preparation.
Tools
First of all, make sure you have the necessary tools:
- socket wrenches;
- screwdrivers equipped with a flat blade;
- adjustment probe or micrometer;
- crankshaft turning key.
The adjustment sequence and instructions can also be found on the probe cover. Since the tool in question has standard parameters, and its thickness is 0.15 mm, its width does not cover the entire gap, and its use for fine tuning is not advisable. Moreover, the accuracy of adjustment with this tool decreases even more, since over time the gap width is deformed due to wear of cylinder head seats, valves and other parts.
Preparation
First of all, make sure that the battery is disconnected, otherwise you risk shorting out the wiring.
- There should be supports under the rear wheels, activate the neutral speed mode.
- Open the hood, wait until the engine cools down, otherwise there is no hope for accurate adjustment, and the risk of getting burned increases.
- Buy a rubber gasket under the cover; it will not deform when exposed to high temperatures. If you choose the old part, oily smudges will appear on the lid.
- If necessary, remove the gas pedal cable along with the carburetor cover.
- Get rid of the cover bolts, use a 10mm wrench for these purposes, make sure that the washers under the bolts are not lost.
Timing chain tension
After preparation, you must also make sure that the timing chain tension is at the optimal level and adjust it if necessary. Stretching the chain contributes to increased wear, the appearance of tapping sounds during engine operation, and disruption of the timing belt functionality.
There are two ways to check.
- Remove the engine from the protective casing, insert a screwdriver into the chain and try to bend it in two places where there is a little free space. With optimal performance, you won’t succeed and the chain won’t bend.
- Listen to the engine running when active. If noises are clearly audible, but a short activation of the gas eliminates them, the tension has weakened.
To adjust the tension, use a special tensioner.
Preparatory activities
In order to adjust the valves on a VAZ 2106, you don’t need many tools; the list is given below.
- A wide feeler gauge for measuring a gap of 0.15 mm (a narrow one will not work, there are special ones from VAZ);
- A special key for cranking the engine shaft (you can do without it);
- 10mm socket wrench for removing valve covers;
- Wide flat screwdriver;
- Open-end wrenches for 13 and 17;
- Standard set of tools.
Type of probe for adjusting VAZ valves.
How to adjust valves on a VAZ 2106
How to adjust the valve clearance of a VAZ-2107 and not harm the engine
Thousands of instructions are ready to answer the question “how to adjust the valves on a VAZ-2107.” All car repair shops do this work, but many of them do not take into account the factors described in this article, and as a result of the valve operation, the valves knock even louder. About how to make adjustments and not make things worse, as well as little-known “pitfalls” of the VAZ 2107 valve mechanism in this article and the attached material.
What are valve clearances?
From physics courses we know that at high temperatures bodies can expand and at low temperatures they can contract. The same thing happens to engine parts when it cools down or is in operation.
If you carefully study the nature of the operation of the valve mechanism, you will notice that the camshaft has cams that at certain times pass through the rocker, opening or closing the valve. To reduce losses, they are in close contact and must ensure long-term opening of the valve, as well as hermetically sealed closure of the internal volume of the motor cylinder.
However, it is impossible to leave a zero gap between the rocker and the cam, since the rocker decreases from cold temperatures and increases at high temperatures, so it must be maintained at 0.15 mm to ensure normal engine operation when reaching the rated temperature.
How to adjust valves?
Adjusting valves on VAZ-2107 cars and the entire family of “classics” is a simple procedure that only requires the driver to have a standard set of tools, as well as a feeler gauge to check the clearance.
Feeler gauge for adjusting the gaps in the valve mechanism of the VAZ “classic”
The car must be placed in the garage on a flat surface and a valve cover gasket must be purchased in advance, since it is disposable.
Valve adjustments are always made with a cold engine. The most important requirement is that the temperature should not exceed 36 degrees and it is advisable to have a garage in which the temperature is within 20 degrees Celsius.
Before carrying out the procedure, it is recommended to tighten the timing chain. To do this, loosen the nut 13 of the chain tensioner and turn the crankshaft a couple of turns. This can be done by turning the pre-hung rear wheel with fourth gear engaged. The mechanism will automatically adjust the desired tension. It is better not to use the starter in this situation. Don't forget to tighten the nut again.
Now remove the air filter housing and anything that interferes with access to the valve cover. Unscrew the nuts securing it and pull it out, opening access to the camshaft bed.
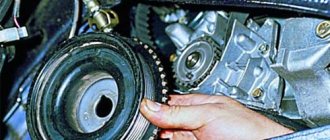
At the next stage, you will need a special key, which is necessary to rotate the crankshaft to set the desired camshaft positions. If there is no such key, then lift the rear wheel and set the fourth gear. You can turn the motor by rotating the wheel with your hands. Now turn the crankshaft so that its mark coincides with the large mark on the oil seal cap, and the camshaft mark coincides with its mark on the bed. This will correspond to the end of the compression stroke of the 4th cylinder.
Freeing up work space
You need to understand that you won’t immediately remove the valve cover, you need to get to it.
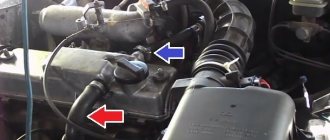
Using a size 8 wrench, unscrew the three bolts and remove the air filter cover, and then remove the filter element.
Disconnect all the hoses that go to the air filter.
Using a size 8 wrench, unscrew the four bolts securing the air filter housing to the carburetor and finally remove the air filter.
Go ahead.
Using the same key number 8, disconnect the choke cable.
Disconnect the washer spring, and then the gas pedal linkage itself.
Then we remove the distributor cover and move the high-voltage wire harnesses to the side so that it is convenient to work.
We take out the oil dipstick, while inserting a clean rag into the hole to prevent dirt from getting in.
Now we can freely make the adjustments we need.
Also read - Do-it-yourself valve lapping, videos, photos, devices and tools used.
Set the piston of the 4th cylinder to the TDC position
This action is mandatory and to perform it you will have to turn the engine crankshaft.
If you do not have a special key,
You can use a 36mm head, or by hanging the rear wheel and engaging 4th gear, turn it in the desired direction.
Achieve:
The long mark on the front cover and the mark on the crankshaft pulley matched.
The mark on the camshaft driven sprocket must coincide with the protrusion on the bearing housing bed.
If this requirement is not met, then the marks on the crankshaft pulley are taken as a basis, and the marks of the gas distribution mechanism will have to be adjusted.
How to do this is a separate topic of “conversation”, but we will definitely touch on it in the following articles.
If all the marks are set correctly, we proceed to adjusting the valves of the VAZ 2106.
Adjusting the valves of the VAZ “Classic”
The first car to roll off the assembly line of the Volzhsky Automobile Plant was the VAZ-2101 model. Subsequently, the manufacturer produced 6 more models, up to the VAZ-2107. All these cars are popularly designated “Classic” due to the layout features. All these models were produced in a sedan body (except for 2102 and 2104 - which are station wagons), equipped with an in-line 4-cylinder engine with a longitudinal arrangement, as well as rear-wheel drive.
It is noteworthy that almost identical engines were installed on all these cars. And although as a result of modifications it was possible to change the performance characteristics of the power plants, their layout was the same.
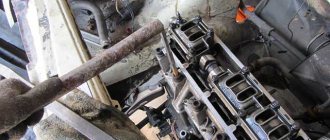
Removing the valve covers
To remove the valve cover of a VAZ 2106, a 10mm socket wrench is used; as a rule, this action does not cause problems for anyone.
After the valve cover is removed, check the condition of the gasket; if there are defects on the surface, it is advisable to replace it immediately.
The marks are set, the cover is removed, we proceed directly to adjusting the valves.
Work order
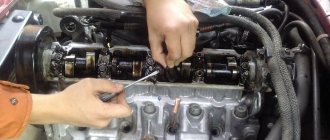
We have the fourth cylinder at TDC, we adjust the thermal clearances in the 6th and 8th exhaust valves. The 6th valve belongs to the 3rd cylinder.
Now a wide probe up to 0.15 mm comes into play. It must be inserted as shown in the photo.
The penetration force of the probe is not unimportant. Many people make a mistake here, which leads to incorrect results.
The dipstick should fit between the camshaft and the rocker with a certain force, which indicates correct valve adjustment.
This is the difference between an experienced master who feels the right effort, and a beginner who can make a mistake.
If the probe passes freely or does not pass at all, then it needs to be corrected to the standard of 0.15 mm.
To do this, use a 17 wrench to loosen the nut, as shown in the photo below.
Using an open-end wrench 13, depending on the situation, by rotating it in the desired direction, the correct gap is set.
The lock nut fixes the set adjustment value, but then a control check is made, since when the lock nut is tightened, the gap may be lost.
After making sure that everything is fine, we move on to the 6th valve. All actions are repeated.
When the clearances of valves No. 6 and 8 are adjusted, we proceed to adjusting the clearances of valves No. 4 and 7, No. 1 and 3, No. 5 and 2.
To obtain the correct result, it is necessary to rotate the crankshaft a certain degree, see the figure below.
Since the distributor cover has been removed, you may notice that its slider turns. This point can also be used to properly adjust the valves.
After turning the slider every 90 degrees, the next pair of valves is adjusted.
For convenience, you can make marks on the body every ? runner revolutions.
After adjusting valves 5 and 2, we can consider that the work is completed; all that remains is to return everything to its normal places and check the operation of the engine.
Start the car, see how the engine works at idle, then you need to drive a couple of kilometers and compare the engine response with what it was before the work.
Also read why valves bend on VAZ engines.
The procedure for adjusting valves using a feeler gauge
Adjustment work is carried out on a cold engine. The engine temperature should be between 20-25 degrees Celsius. The car must be parked on level ground. If work is carried out in a garage, it is necessary to ensure a sufficient level of illumination of the work area. List of tools for making adjustments:
- Flat slot screwdriver.
- Key or recoil starter to turn the crankshaft.
- Wrenches rated “10”, “14” and “17”.
- Directly the dipstick itself. The probe will act in this case as a special measuring device, which will allow one to judge whether the thermal gap is set correctly.
- The initial stage of work can be called partial disassembly of the gas distribution mechanism, which will provide access to adjustable parts. To do this, remove the air filter cover and the air filter itself.
The valve system of the VAZ 2106 engine is made according to the rocker arm scheme. Then the valve cover is removed and the camshaft housing, valve rocker arms and valve stems themselves are revealed to our eyes. After this, rotate the crankshaft until the marks on the front oil seal cover and the pulley match. This position of the crankshaft corresponds to the beginning of the compression stroke in cylinder No. 4. In this position, the clearances of valves No. 8 and No. 6 of the fourth and third cylinders are checked. We insert a 0.15 mm thick feeler gauge into the gap between the camshaft cam and the rocker arm. The probe should enter with some effort. If the dipstick does not enter or enters too easily, then the gap must be adjusted. Correct clearance adjustment occurs as follows:
- Using a wrench set to “14” we hold the head of the adjusting bolt, and with a wrench set to “17” we loosen the tightening of the lock nut.
- By turning the head of the adjusting bolt, we adjust the gap.
- We use a locknut to fix the position of the adjusting bolt.
- After fixing the position of the bolt, we recheck it with a feeler gauge.
In order to correctly adjust the valves, it is necessary to create a kind of table indicating the sequence of valve adjustment:
- adjust 6 and 8 valves;
- turn the crankshaft half a turn;
- adjust 4 and 7 valves;
- turn the crankshaft half a turn;
- adjust valves number 1 and 3;
- turn the crankshaft half a turn;
- We complete the adjustment by setting valve clearance 5 and 2.
Then you should completely rotate the crankshaft several times and check the clearance again using a feeler gauge, and then reassemble all the components and parts dismantled before adjustment. We have made sure that adjusting valves using the feeler gauge method comes down to two simple operations (in two steps): turning the crankshaft and adjusting the height of the bolt. However, this method cannot be called accurate due to the presence of wear in the cam-rocker friction pair. The adjustment method using an indicator and an adjustment rod does not have the above disadvantage.
This is interesting: How to change brake pads on a VAZ 2110