Replacing valves on a VAZ 2114: reasons and repair process
The main problem in which valves have to be changed on VAZ 2114-2115 cars is their burnout. These cases are quite rare, but still occur. This happens for various reasons:
- low-quality fuel regularly poured into the car
- operation of the vehicle on PROPANE without appropriate changes to the controller firmware
- Incorrect spark plug heat rating
- constant engine detonation, or more precisely, its causes
- regular driving at high speeds (maximum permissible)
Of course, not all factors that can affect valve burnout were listed above, but the main points are still presented. There is one more time when it will be necessary to change the valves - if they are bent when they meet the pistons. But here - ATTENTION! On standard VAZ 2114 engines with 8-valve cylinder heads, this cannot happen in principle.
But if you have a 16-valve engine installed, which happens even on late factory models, then a broken timing belt can lead to dire consequences. Below we will briefly discuss the replacement procedure, with photo reports on repairs based on personal experience.
Causes of valve failure
Why does it happen that valves burn out over time and engine performance is disrupted? The main reasons are:
- Use of low quality fuel;
- Installation of spark plugs that are not suitable for the heat number in the cylinder head;
- Frequent driving at engine speed limits;
- Using a propane mixture as fuel without flashing the control unit;
- Operation with signs of engine detonation.
The root cause is always an unscrupulous attitude towards the car, if you monitor the operation of the engine in a timely manner, refuel with a high-quality fuel mixture and service all units in a timely manner, you can avoid subsequent problems.
Replacing valves on a VAZ 2114 - photo report
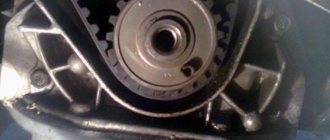
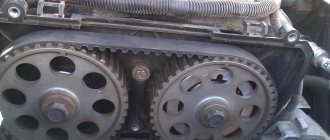
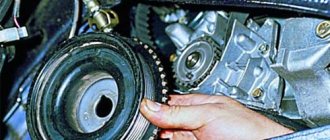
So, the first step will be to remove the cylinder head, since it is simply not possible to get to the valves otherwise. Of course, first we remove the timing belt and everything that will get in our way further, including the valve cover.
After this, unscrew the bolts securing the head to the block. There are 10 of them in total. Depending on the release date of the car, they will be either hexagon or TORX profile.
The bolts on one side are outside, and on the other, inside the head, so they are not visible in the photo. After all of them are unscrewed and everything that may interfere with further dismantling is disconnected, remove the cylinder head from the engine:
It is best to remove the camshaft in advance, since it is not very convenient to unscrew it with the head removed. Once it is removed, you can begin to dry out the valves.
To do this, you will need a special device called a desiccant. Again, to ensure that the cylinder head is securely fixed, you can put it back on the block and tighten it on a couple of bolts diagonally.
The desiccant rail is installed and each valve is “worked out” one by one, as shown in the photo below:
Once the valve springs are removed, you can begin to remove the oil seals. The result is clearly shown in the photo below.
After which you can without any problems remove the valve from its guide sleeve from the inside of the head.
The remaining valves are removed in the same order. When installing new valves, they will need to be ground in. To visually familiarize yourself with this procedure, watch the video clip where all this is shown.
Valve lapping video
The review was made by Evgeny Travnikov, who is known to everyone for his YouTube channel Theory of ICE:
When you have finally completed all the work, you can install all the removed parts in reverse order on the car. As for the price for a set of new valves, it is about 1,500 rubles. If you buy separately, you can easily find out the cost by dividing the amount by 8.
Replacement on an 8-valve VAZ 2114 engine
The most common problem with such engines is valve burnout. It is worth noting that this happens quite rarely, but it still happens. Valves can burn out for the following reasons:
- Engine detonation. In this case, in addition to replacing the valves, it will also be necessary to eliminate the causes of detonation.
- Driving a car fueled with propane. The valves may burn out if appropriate changes are not made to the computer software.
- Operating a vehicle with low-quality fuel.
- Driving at too high speeds. Even the maximum permissible speed values can lead to valve burnout.
- Incorrect spark plug heat rating.
This listing applies to an 8-valve engine, while a 16-valve engine has another reason for replacing the valve. When the timing belt breaks, the pistons crash into the valves at high speed and simply bend. It is worth recalling once again that owners of cars with a conventional 8-valve engine have nothing to fear, but it is recommended to change the timing belt in a timely manner.
Procedure for replacement
- Open the hood of the car, unscrew the injection system fasteners and remove it. Disconnect the timing belt cover and dismantle it. Then, unscrew the valve cover and remove it. Loosen and unscrew the camshaft fasteners and remove it. It is also possible to dismantle the shaft on a removed cylinder head, however, due to the lack of normal fixation of the head, this will be very difficult to do.
- Remove the ten cylinder head bolts. On different sides of the engine they are located differently: on one side inside the cylinder head, and on the other outside.
- Disconnect everything that prevents further work and remove the cylinder head.
- When the head is on the workbench, you can begin to dry out the valves. To do this, you need to purchase a special device. To prevent the cylinder head from swinging and moving, install it on the cylinder block and tighten it with a couple of bolts.
- Remove all valve springs using a puller (desiccant) and remove the oil seals.
- Now remove the valves from the guide holes on the inside of the cylinder head.
- When replacing valves, it is necessary to grind them in. After this, assemble all the nodes in reverse order.
How to replace valves on a VAZ-2114 8 valves with your own hands
In order for the VAZ-2114 car to work properly and not let the driver down on the road, the car owner must certainly monitor the technical serviceability of the car.
At the slightest change in the operation of the car, it is important for him to establish the true cause of the malfunction and eliminate it as quickly as possible. You need to constantly monitor the technical serviceability of the thermostat, injectors, manifold and even seals, because most often serious damage is caused by the failure of these elements, which can be quite easily replaced yourself.
If during operation a specific, previously unobserved knocking noise is heard, then this should be regarded as the first sign that replacing the valves on a VAZ-2114 8-valve car should be carried out as quickly as possible. After all, if this action is not carried out in the near future, the timing belt may break, which will lead to engine failure.
Experienced drivers and service station workers recommend changing the timing belt after 30-35 thousand kilometers, but these are just recommendations that do not always correspond to every car. Therefore, the car owner must independently monitor the condition of this element and promptly replace the one that has become unusable.
Function of valves in an engine
The valve in the motor plays an important role. This part allows the fuel-air mixture to enter the cylinders. In addition, the valves are responsible for the release of exhaust gases after the end of the cycle. The element constantly works in very difficult, even aggressive conditions. They are constantly exposed to high temperatures and gases. Over time, the metal of the part breaks down and burns.
Especially often, signs of burnt valves can be observed on old car models, the engine parts of which are made of far from high-quality materials. Most people create these troubles for themselves. Often the engine runs on low-quality fuel and sometimes not even intended for a specific unit. As a result, higher combustion temperatures lead to damage and destruction of the cylinder head.
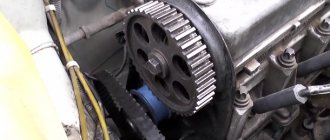
Where is the timing belt located?
Monitoring the condition of the timing belt and its serviceability is quite simple, because this part immediately catches your eye after opening the hood. Its surface is toothed, it passes through the crankshaft and camshaft, and is a connecting link for the following elements:
Since the belt performs several tasks simultaneously, it can quickly fail, so you should pay very close attention to its appearance.
If it is noticed that this element often “slips” from its main place or begins to tear, it needs to be replaced as soon as possible. A broken belt in a VAZ-2114 will be indicated by an injector in the form of a light that lights up on the dashboard, while other models may simply stall on the way, and the driver will not be able to start the car on his own. However, not only a broken belt becomes the reason for replacing the valves; quite often the valves have to be changed due to a violation of the clearance in the motor chain. If the car owner notices that the valves are not positioned as usual, then the car is under no circumstances allowed to be operated until the valve guides are completely replaced. It’s really possible to do this kind of work yourself, despite the lengthy process. Every car enthusiast can handle it if he follows the instructions provided by professionals in their field.
Step-by-step valve replacement
- First of all, you need to remove the cylinder head from the car:
- the battery is de-energized and removed;
- Coolant and engine oil are drained into separate containers;
- vacuum hoses, cylinder head gaskets, cooling systems are completely removed from the car;
- the cylinder head cover is removed, the timing belt and casing are removed;
- Using a key, the fasteners that secure the cylinder head are unscrewed.
- After removing the cylinder head, you can begin replacing the valves. But before you start, you need to prepare a special tool called a puller. Of course, you can use improvised tools, for example, a chisel and a hammer, but this will complicate the work a little:
- the camshaft and gas camshaft are removed from the cylinder head;
- using a removable device or a hammer with a chisel, the studs are secured to the gas distribution shaft;
- a stand is placed under the “plate” of the valves, and the “crackers” are removed;
- the seals are removed. To make it more convenient to remove the camshaft oil seals, experts recommend using a clamp to press the oil seal, but not very hard, and carefully turn it in different directions;
- the springs and the “plate”, which is located under them, are removed.
- We remove the valves that have become unusable.
Replacing piston rings
The process of replacing piston rings, which most often become unusable due to mechanical damage, is carried out in the following order:
- the valve protective cover is removed;
- the ground wire is removed from the engine;
- the fixing fastener holding the cylinder head bracket is unscrewed;
- The thermostat mount is disconnected;
- the thermostat is carefully moved to the side, the clamps and connecting hoses are removed;
- the tension roller and bracket clamp is unscrewed;
- the timing belt and tension roller are removed;
- the crankshaft must be turned to such a position that the desired piston is in the “dead zone”, for convenient unscrewing of the connecting rod clamps;
- After removing the connecting rod cover, the piston is pulled out, the same process should be done with the remaining cylinders.
Next, all that remains is to remove soot and deposits from the surface, to examine the markings of the piston rings, buy similar components and install them in the reverse order.
As you can see, replacing valves, although labor-intensive, is still not a very complicated process, so every car enthusiast can cope with such work if he follows the instructions and recommendations. A video tutorial on the Internet resource, which you can watch at any time of the day, will further simplify the replacement process and help you find the answer to any question regarding replacing valves for the VAZ-2114.
Replacing and grinding in VAZ 2114 valves
The mileage was 130,000, the engine began to consume oil, and the traction disappeared. I didn't measure the compression. It took me a long time to decide whether or not to take on this difficult task. Someone said, “We need to immediately prepare money for a new engine,” “maybe at a service station?” But I know that my hands are straight, as long as there are no people nearby who distract or interfere. While it was still warm outside, we had to take it.
After you have removed the head, we look at the condition of the valves, cylinders and pistons. Remove the camshaft, take out the tappets, shake the valve tappets one at a time, they should not have any play in the seat. Exhaust valves (the smaller ones) are usually killed more than intake valves.
Intake valve VAZ 2114
The valves are sold as a set, 8 pieces at a time. So for the sake of two I had to change everything.
I didn’t regret it when I checked the tightness after removal, it turned out that only in one, the 4th cylinder, both valves did not pass.
Before working with the “head”, wash it externally to remove dirt and dust, and remove carbon deposits to make it more pleasant to work with. As it turned out, the new valves sat in the guides just like the old ones, some will have to change the guides, some will have to be tinkered with, each has its own case, I’m analyzing mine specifically. So it was decided to change all the valves. The cost of the valves is 1100 rubles, lapping paste, the cheapest one is 100 rubles. Everything got used to it properly! I polished it in two ways:
Apply paste.
We wiped the rod from dust and lubricated it with oil.
1st method.
I cut a piece of hose, insert a drill on one side, and put the other end on the valve.
We take a screwdriver, hook it up, and start oiling it in one direction and the other. Press the valve with your finger and only turn it with a screwdriver.
We don't set the speed high.
If you have a drill, then at low speeds. IMPORTANT!
Do not grind the valve for too long! Apply the oil for 15-20 seconds and see the result.
2nd method.
There is another way, as you know, to grind the valves by hand. I didn’t have a special device with a suction cup; we take the same hose that we used, but twice as long, and instead of a screwdriver we twist it with our hands.
For me, doing it manually is certainly more difficult and takes longer. But grinding works the same way. The advantage of a screwdriver is that you press the valve with your finger, thereby it fits into place faster. I watched a lot of videos on the Internet about how to grind them. I will tell you for my own reasons. The fact that you oil it for a long time will not rub it in better, it’s not a matter of time. It’s important not to miss the very moment when he gets used to it! You’ll think, “A LITTLE BIT MORE AND THAT’S ALL,” and he’ll miss it even more. So in this regard, we need to find a middle ground. How can you tell if the valve is worn in?
Like scratches. This is a sign of wear-in. The main thing is that they are all over the circle. Now the important part is the valve itself! Let's watch it!
The dark gray stripes on the valve are where it does not rub in!
Let's get rid of them! But! Careful, he's already on his way. If you grind them, they will appear again in another place. It is necessary to make a monochromatic surface. Let's spill the valve!
Assembling the valve,
WITHOUT OIL SEALS!
What should I use to spill it with? In Lenta I bought a regular degreaser, such as acetone, took it to wash the piston and it came in handy in another matter. Bottles 0.5l. you will have enough and even have some left over. Fill from the collector side.
And then we look at the valve. If the valve is not worn in, it will be wet until a puddle appears, or liquid will appear immediately. We waited a couple of minutes, smoked and walked around. If everything is top-notch, then the valve is ground in! No need to wait a day! Let's dry it out to install the valve stem seals! Be sure to dip them in oil!
© 2016-2021 24techno-guide.ru
All rights reserved.
Use of site materials is possible only if you install an active direct link to our resource. FEEDBACK
Home
(Main page of the site)
Auto
(Reviews, reviews, test drives of cars)
Engines
(Description and design of various engines)
Techno
(Articles about equipment and mechanics)
Tuning
(Review of tuned cars)
Repair
(Do-it-yourself repairs)
Tractors
(Tractor special equipment)
Osago
(All about car insurance)
Car audio
(Music for the car)
Car LAWS
(Traffic rules, fines and car laws)
Lifehacks
(Tricks of life)
Photo/Video
(No comments)
All articles
(All publications that are on the site)
Replacing valves of VAZ-2114 8 valves with your own hands
In order for the VAZ-2114 car to work properly and not let the driver down on the road, the car owner must certainly monitor the technical serviceability of the car. At the slightest change in the operation of the car, it is important for him to establish the true cause of the malfunction and eliminate it as quickly as possible.
You need to constantly monitor the technical serviceability of the thermostat, injectors, manifold and even seals, because most often serious damage is caused by the failure of these elements, which can be quite easily replaced yourself.
If during operation a specific, previously unobserved knocking noise is heard, then this should be regarded as the first sign that replacing the valves on a VAZ-2114 8-valve car should be carried out as quickly as possible. After all, if this action is not carried out in the near future, the timing belt may break, which will lead to engine failure.
Experienced drivers and service station workers recommend changing the timing belt after 30-35 thousand kilometers, but these are just recommendations that do not always correspond to every car. Therefore, the car owner must independently monitor the condition of this element and promptly replace the one that has become unusable.
Replacing valves
Before changing the valves on a VAZ 2114, you should disconnect the ground terminal from the battery. This must be done even if during the repair the car’s electrics themselves are not affected, since even tampering with the mechanical units does not exclude a short circuit in the on-board network connected to the battery.
Also, before starting repairs, you need to wait until the car engine has cooled down (if it has recently been running).
This is followed by:
- Unscrew the fasteners and remove the gas distribution mechanism casing.
Where is the timing belt located?
Monitoring the condition of the timing belt and its serviceability is quite simple, because this part immediately catches your eye after opening the hood. Its surface is toothed, it passes through the crankshaft and camshaft, and is a connecting link for the following elements:
Since the belt performs several tasks simultaneously, it can quickly fail, so you should pay very close attention to its appearance.
If it is noticed that this element often “slips” from its main place or begins to tear, it needs to be replaced as soon as possible. A broken belt in a VAZ-2114 will be indicated by an injector in the form of a light that lights up on the dashboard, while other models may simply stall on the way, and the driver will not be able to start the car on his own. However, not only a broken belt becomes the reason for replacing the valves; quite often the valves have to be changed due to a violation of the clearance in the motor chain.
If the car owner notices that the valves are not positioned as usual, then the car is under no circumstances allowed to be operated until the valve guides are completely replaced. It’s really possible to do this kind of work yourself, despite the lengthy process. Every car enthusiast can handle it if he follows the instructions provided by professionals in their field.
Step-by-step replacement of valves.
- First of all, you need to remove the cylinder head from the car:
- the battery is de-energized and removed;
- Coolant and engine oil are drained into separate containers;
- vacuum hoses, cylinder head gaskets, cooling systems are completely removed from the car;
- the cylinder head cover is removed, the timing belt and casing are removed;
- Using a key, the fasteners that secure the cylinder head are unscrewed.
- After removing the cylinder head, you can begin replacing the valves. But before you start, you need to prepare a special tool called a puller. Of course, you can use improvised tools, for example, a chisel and a hammer, but this will complicate the work a little:
- the camshaft and gas camshaft are removed from the cylinder head;
- using a removable device or a hammer with a chisel, the studs are secured to the gas distribution shaft;
- a stand is placed under the “plate” of the valves, and the “crackers” are removed;
- the seals are removed. To make it more convenient to remove the camshaft oil seals, experts recommend using a clamp to press the oil seal, but not very hard, and carefully turn it in different directions;
- the springs and the “plate”, which is located under them, are removed.
- We remove the valves that have become unusable.
At this point, the valve replacement process can be considered complete, and assembly should be performed in the reverse order.
Replacing valves VAZ 2110, 2112
see also
Compression on a hot engine
- 54 6 40k
Blue smoke from the exhaust
- 113 2 98k
Valve cleaner
- 54 10 52k
The best set of tools for cars
- 48 1 45k
Thread locker
- 72 7 72k
Calculator for calculating the working volume of an internal combustion engine
Calculator for calculating the cylinder displacement of a car engine
One of the most common signs of a violation of the normal functioning of valves on a VAZ 2110/2112 is a distinct knocking sound when the engine is running. Also, improper operation of the valves may be indicated by the engine stopping when starting the car, and a decrease in compression in the cylinders.
Causes of valve malfunction on VAZ 2110, 2112
The main reason is that the timing belt has broken. The consequences that this can cause are the bending of these parts. Although the design of the 8-valve engine on the “tens” does not imply that the valves meet the pistons at the so-called dead center during breaks. But on the 2114(1.3) engine and 16-valve engines 2112(1.5), 2114(1.5) this leads to the inevitable “death” of the valves and quite expensive repairs. Another quite trivial reason is wear of the valve stem, which must have certain dimensions, measured with a micrometer.
Replacing VAZ 2110, 2112 valves is a very responsible matter and requires certain skills from the employee. However, no special equipment is needed. Therefore, a person who is familiar with the tool and has an idea of the design of mechanisms can do it with his own hands, in the garage.
How to change valves on VAZ 2110/2112 (instructions)
- Replacement must be done in a garage or closed box, where there is no wind and dust.
- Turn off the power to the car and disconnect the battery.
- Drain the engine lubricant and cooling fluid.
- We dismantle all the attachments: hoses, fuel supply, vacuum system, we get wide access to the parts that need to be worked with.
- Remove the cover from the main cylinder block (cylinder head).
- Remove the casing and belt.
- We unscrew the bolts that secure the cylinder head.
- After removing the cylinder head, we arm ourselves with a special puller (if it’s not available, ask your neighbors in the garage - it’s really more convenient to do the work with it). We remove the camshaft and disassemble the pushers from the cylinder head. We attach the removal device to the studs. And put a stand under the plate and take out the fastener crackers. We remove the plate along with the springs, as well as the stop plates located under the springs (before that, we also remove the valve seal).
- We remove worn out or damaged valves.
- The next step is to replace the guide bushings. It is better to use a special device (screw version) because when struck there is a chance of damaging not only the head, but also the landing site. We press out the guides and treat the new ones with lubricant.
- We press each bushing into its proper place. They have special locking rings installed on them, so we press them in until there is a characteristic click, which means that the part has found its place. Everything should happen without strong tension, which could damage the bushing. If things get tough, don't rush. When the guide is pressed in, it is adjusted to the required fit dimensions (we use a reamer 8 mm in diameter, install it in the guide and scroll).
- We blow air through the holes, removing any foreign debris. We take measurements of the guide holes. We insert new valves.
- If you notice that the valve does not fully adhere to the seat, you need to grind the valves. It is produced on special machines. However, it should be remembered that you should not grind the valve too much, and after grinding it must be thoroughly washed. An ideal grind is considered to be one in which the working visible strip is 1 millimeter.
- We assemble the cylinder head in the reverse order and connect the fuel and air supply and cooling systems. We connect the battery.
What valves should be installed on the VAZ 2110, VAZ 2112?
Original number 2112-1007010, average price 258 rubles.
- Riginal (8 valves) RG2110-1007010 — 1127 rub.
- Herzog (16 valves) HL0 7010/12 — 1592 rub.
- QML (8 valves) MV-1006 — 779 rub.
We disconnect the hoses of the vacuum booster, electro-pneumatic valve and fuel pressure regulator in the fuel rail from the receiver.
Using a 13mm wrench, unscrew the two nuts securing the fuel pipe bracket to the receiver. Remove the bracket. We unscrew the nut securing the receiver to the bracket and the five nuts securing it to the intake manifold. Remove the receiver and gasket.
Using a 13mm wrench, unscrew the upper and lower nuts of the bar for the supply pipe of the coolant pump, and remove the bar. Using a 13 mm wrench, unscrew one nut from the bottom and two on the sides and remove the intake manifold.
Unscrew the two nuts on the sides with a 13mm wrench and remove the exhaust manifold.
Using a Phillips screwdriver, loosen the clamp securing the crankcase ventilation supply hose and remove the hose.
Set the gear shift lever to the neutral position and turn the crankshaft clockwise so that the mark on the flywheel, visible in the clutch housing hatch, is opposite the middle division of the scale.
In this case, the mark on the camshaft pulley should be opposite the installation mark on the rear cover of the toothed belt.
Using a 10mm wrench, unscrew the two nuts securing the valve cover.
Remove the valve cover.
Remove the timing belt. Then the camshaft pulley. Using a 10mm hexagon, unscrew the ten bolts securing the cylinder head.
We take out the bolts and washers. The cylinder head bolts can only be reinstalled if they have been extended to a length of no more than 135.5 mm. If the length is longer, replace the bolt with a new one.
Replacing piston rings
The process of replacing piston rings, which most often become unusable due to mechanical damage, is carried out in the following order:
- the valve protective cover is removed;
- the ground wire is removed from the engine;
- the fixing fastener holding the cylinder head bracket is unscrewed;
- The thermostat mount is disconnected;
- the thermostat is carefully moved to the side, the clamps and connecting hoses are removed;
- the tension roller and bracket clamp is unscrewed;
- the timing belt and tension roller are removed;
- the crankshaft must be turned to such a position that the desired piston is in the “dead zone”, for convenient unscrewing of the connecting rod clamps;
- After removing the connecting rod cover, the piston is pulled out, the same process should be done with the remaining cylinders.
Next, all that remains is to remove soot and deposits from the surface, to examine the markings of the piston rings, buy similar components and install them in the reverse order.
Replacing valves on a VAZ 2114 - photo report
None After this, unscrew the bolts securing the head to the block. There are 10 of them in total. Depending on the release date of the car, they will be either hexagon or TORX profile.
The bolts on one side are outside, and on the other, inside the head, so they are not visible in the photo. After all of them are unscrewed and everything that may interfere with further dismantling is disconnected, remove the cylinder head from the engine:
It is best to remove the camshaft in advance, since it is not very convenient to unscrew it with the head removed. Once it is removed, you can begin to dry out the valves.
To do this, you will need a special device called a desiccant. Again, to ensure that the cylinder head is securely fixed, you can put it back on the block and tighten it on a couple of bolts diagonally. The desiccant rail is installed and each valve is “worked out” one by one, as shown in the photo below:
Once the valve springs are removed, you can begin to remove the oil seals. The result is clearly shown in the photo below. After which you can without any problems remove the valve from its guide sleeve from the inside of the head.
The remaining valves are removed in the same order. When installing new valves, they will need to be ground in. To visually familiarize yourself with this procedure, watch the video clip where all this is shown.
Valve lapping video
The review was made by Evgeny Travnikov, who is known to everyone for his YouTube channel Theory of ICE:
When you have finally completed all the work, you can install all the removed parts in reverse order on the car. As for the price for a set of new valves, it is about 1,500 rubles. If you buy separately, you can easily find out the cost by dividing the amount by 8.
As is already clear from the title, we will talk about removing the cylinder head. In the previous entry I wrote that I had a blown gasket under the cylinder head. I started looking for solutions from the experts. But the price tag really upset me. Replacing the gasket (just a replacement, without grinding!) the price starts from 100 American rubles and this is not at a company service, but in the garage of Uncle Vasya (Petya, etc.) who do not provide a guarantee. After surfing the Internet, I found a good video on how to replace it yourself:
In the end, I decided to change it myself. Of course, I don’t have enough experience (before this I raised my head twice in a Volga 31029), but that didn’t stop me) Luckily I have a second car. Therefore, you can safely put one in for repairs;) Initially, I wrote it down and took photos for myself (so that later it would be easier to assemble everything and not have to look for where the “extra” spare parts came from). But I decided to put it on Drive - it might be useful to someone. So we drive the car into the garage and start removing the cylinder head. Don't consider this an instruction - I'll just write out my sequence of actions.
None 2. Take the miracle product WD-40 and generously water the nuts on the pants fastenings so that they begin to sour. The more time, the better.
3. Remove the battery (terminals with a 10 key, fastening with a 13 key)
Full sizeBattery removed
4.Remove the terminal from the sensor on the air filter:
Full sizeDraining antifreeze
How to quickly drain antifreeze is described in the article
6. Remove the throttle cable (unscrew the two fastening bolts and remove the clamp):
Full size Screw the bolts into place so they don’t get lost
7. Remove two plugs from the sensors near the thermostat:
Full size Sensors are marked in red
8. Disconnect the connector to the injectors:
Full size injector connector
9. Remove the clamps and disconnect the pipe to the thermostat: 10. Unscrew the mass from the engine (key 13) 11.
Unscrew the clamps and remove the pipes to the radiator and stove12. Remove the terminal under the thermostat (single):
Full size I don’t know what this terminal is responsible for, I just remove it;)
13. Remove the vacuum pipe: 14. Remove 2 plugs from the throttle:
Full size These are the plugs
15. Remove the single terminal in the area of the injectors:
Full sizeI also don’t know what it is, I’m just filming
16. Unscrew the two head mounting levers on the sides:
Full size This is on the right side, the same bar on the left
17. Unscrew the thing near the pants to make it easier to get to the bolts securing the pants:
Full size This thing lies on the left, and on the right is the head mounting rod described in the previous paragraph
18.Remove the timing case (3 bolts for 10): 19. Unscrew the timing roller with a key for 17 and remove the timing belt 20. We unscrew the pulley (with a 17 key) and remove the pulley, the main thing is not to lose the veneer (in the form of a semicircle):
Full size This is how we unscrew pulley 21. We unscrew the nut on the protection with a 10mm wrench (in the previous photo where the wrench is placed to secure the pulley from turning) and bend the protection22. We unscrew the two fuel hoses (be sure to remember where one is so as not to get confused during assembly)23. Unscrew the 2 pipes near the oil filler neck.
24. Remove the valve cover with a 10 wrench and two nuts:
Full sizeValve cover removed25. We mark the explosive wires and remove them. Continued in the second part;), because photos don't fit
Causes of wear of valve stem seals.
While the engine is running, the crankshaft rotates at 700-800 rpm at idle, and up to 4500 rpm when driving. In a minute, the valves can move in the range of 150 - 1200 strokes. A large load falls on the seals. In addition, the cap itself is affected by an aggressive chemical environment. In this case, the oil seal material is exposed to exhaust gases and oil. As a result of such loads, the material of the seals becomes hard. After this, the working edges of the part are erased. Wear can be seen by the bluish smoke that comes out of the exhaust pipe. Smoke may appear when the engine is braking or when starting the engine. The second sign of wear is an increased “appetite” for oil. In this case, no lubricant leaks may be observed. Consumption can increase to approximately one liter of oil per 1000 kilometers.
If the replacement of the caps is not done on time, then a major engine overhaul will soon await you.
Tools for repair.
To replace the valves, the following tools are required:
- special device for compressing the valve spring,
- pliers,
- tweezers,
- frame,
- tin solder rod
- hammer.
The rod should be no more than 8 centimeters in diameter.