How to correctly and accurately set the timing marks of a VAZ 2114 with an eight-valve engine will be discussed in this article. In fact, the engines on the 14th Lada model are installed the same as on the eights, nines, and tens. There are minor differences. Therefore, this guide will also be useful to owners of these models. Let's look at the most important questions that a motorist asks himself.
VAZ 2114 timing marks: do-it-yourself installation
How to correctly and accurately set the timing marks of a VAZ 2114 with an eight-valve engine will be discussed in this article. In fact, the engines on the 14th Lada model are installed the same as on the eights, nines, and tens. There are minor differences. Therefore, this guide will also be useful to owners of these models. Let's look at the most important questions that a motorist asks himself.
Causes of timing belt failure
There are several reasons for such a breakdown on the VAZ-2115:
- natural wear and tear;
- pollution;
- oil and foreign objects;
- pump failure;
- change the position of the tension roller;
- The camshaft or crankshaft is jammed.
The role of the timing belt installed on the injector of a VAZ-2115 car is to open the engine valves at the right time. It synchronizes the timing pulley with the crankshaft. Therefore, it is important to replace it on time when it is worn out so that there are no problems with the engine.
How often to change the timing belt and pulley?
There is no clear answer here. The fact is that all car mechanisms constantly wear out and are subjected to excessive loads. Therefore, you can pay attention to the recommendations of the manufacturer only if the car is new - up to 5-7 years. In this case, replacement is carried out every 55-60 thousand km. If the car is old, then reduce it by 15 thousand km. this figure is bold. The fact is that only engines with a volume of 1.5 liters will survive the break calmly and without consequences. But on eights, for example, they installed 1.3 engines, in which the valves bend.
Very often the timing belt on the VAZ 2114 and similar models wears out. This happens due to severe wear of the liquid pump. Its resource is no more than 90 thousand km. And then only if it is of high quality. What if you come across a defect or an obvious fake? Then it can break down even after half an hour of driving.
When the pump wears out, the roller eats rubber from the outside. And the more wear on the pump, the more visible the damage to the belt. So, the conclusion is this: change the timing kit (roller and belt) every 40-45 thousand km, install a new pump every second.
Causes of toothed belt wear on VAZ 8 valve engines
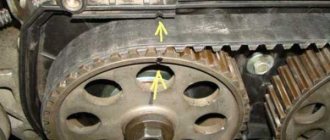
- Wear of the timing belt on the front side is the main cause of a worn pump, but sometimes it can also be the tension roller stud and, in very rare cases, the camshaft sprocket. To eliminate this problem, replace the worn part.
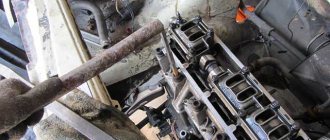
- Wear on the rear side is much less common. The main reason is the bolt on the oil pump. Over time, the belt tension weakens a little and, vibrating, it begins to reach this bolt. It’s very easy to fix this problem; we replace the Torx sprocket bolt with a regular 10mm socket, its head is smaller and the timing belt is no longer missing. The photo shows wear from the belt.
Timing marks VAZ 2114: install correctly
There is nothing difficult in the work - there are only three marks that you need to focus on. The preparation stage for replacement is as follows:
- Place the car on a flat surface and place chocks under the left rear wheel.
- Loosen the front right wheel bolts.
- Raise the right side with a jack.
- Completely unscrew the bolts and remove the wheel.
- If present, remove the protection.
- Remove the timing belt compartment protection cover - three bolts with a “10” socket head.
“If you do all the work carefully and fix the shafts, then there is no need to set marks” is a standard misconception, but it does exist if certain conditions are met. In most cases, this “trick” does not work; the shafts still need to be installed. Further work takes place in several stages:
- Remove the generator belt.
- Turn on the fifth gear and have an assistant sit behind the wheel and hold the brake pedal.
- Using a 19mm wrench, unscrew the crankshaft pulley bolt.
- Using a key set to “17”, loosen the tension roller.
- Remove the VAZ 2114 timing belt.
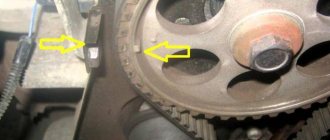
That's all, now you need to turn the crankshaft until the mark on the flywheel matches the slot in the bar. You observe this through a special window located in the clutch housing. If you make the adjustment yourself, first rotate the crankshaft and watch when the notch on the pulley points up. After this, make an accurate installation through the viewing window. And don’t forget about the camshaft - there is a mark on its pulley that aligns with the bar located on the cylinder head.
Having set the VAZ 2114 timing marks, you can install the belt. And don't forget to change the video! The old one will quickly become unusable and, at best, will begin to make unpleasant sounds. At worst, the belt will jam and break. Installation is carried out in reverse order. After tightening, it is extremely important to make sure that all marks match - turn the crankshaft several turns. Check the marks on the flywheel and camshaft. If they match, then you can put the wheel and casing in place.
Lada 2115 › Logbook › The timing belt broke. Replacing the VAZ 2115 timing belt.
The timing belt broke. The engine stalled while driving. An error appeared on the on-board computer - phase sensor error. On a rope to the house. Well not far. It's good that it has an 8 valve engine. I bought a timing belt for 310 rubles PowerGrip 5521-98111*19mm Made in EU www.gates.ru Number of teeth: 111 Width (mm): 19 mm Replace 1) Remove the plastic casing Unscrew three bolts Nut M10. And we see the belt is torn.
In principle, the belt is not in very bad condition. But on the right side it is a little erased. A few months ago I changed the pump (it leaked, the bearings fell apart). And when the pump died, it rubbed the belt. It was necessary to change the timing belt along with the pump. But my hands did not reach the belt. But in vain. I changed it on August 25, 2013. The mileage on this old belt is 32,000 km.
2) Loosen the generator belt (nut M 10). Loosen the generator (M13 nut) I only loosened it from the top. Didn't loosen it from below. Removing the belt
3) Remove the generator belt pulley on the crankshaft. But we still have to get to it. Turned the steering wheel all the way to the right. I jacked up the right front wheel. I took off the wheel. In principle, specialists do this without removing the wheels. Next, you need to unscrew the casing fastening that covers the pulley. To do this, the protection (fender liners) is usually removed. I managed to tighten this protection with a screwdriver and unscrew the fastening screw.
How to set the ignition on a VAZ using marks
Almost all modifications of the VAZ-2114 and 2115 are equipped with engines with BSZ (non-contact electronic ignition). To make the setup, you need to:
- Unscrew the timing case fasteners and remove it.
Removing the timing case
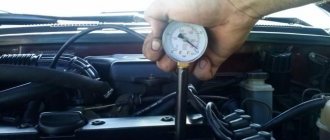
- Adjust the gap from the crankshaft sensor (located near the generator pulley) to the gear disk. The permissible value is up to 0.7 mm.
Adjusting the gap from the crankshaft sensor to the gear disk
- If the distance is normal, check that the crankshaft pulley is not misaligned.
- To ensure that the marks on the flywheel align with those on the gearbox housing (can be seen on the hatch), the crankshaft must be rotated. It is convenient to do this by grasping the pulley mounting bolt.
Note! It is prohibited to turn the camshaft pulley itself.
Rotating the crankshaft pulley
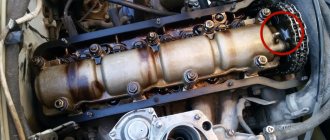
- The mark on the cylinder block must align with that on the oil pump pulley. They should be adjusted.
- The last mark (on the camshaft pulley) should coincide with the other mark on the cylinder head.
Checking the marks on the camshaft and block
Having placed the marks on the VAZ model, you can see that the pistons of cylinders 1 and 4 are located at the dead center at the top, if everything is done correctly. In this case, the power unit operates correctly because the crankshaft sensor sends correct data to the ECU.
Setting valve timing by marks on VAZ 2113, VAZ 2114, VAZ 2115
Welcome! Valve timing - thanks to these phases, the engine operates synchronously and there are no malfunctions in its operation, but if the valve timing is disrupted, then either the piston will reach the top point at the wrong time when it should, or the valve will lag, and therefore it will be very pronounced engine operation with interruptions at idle, well, the engine will not really run, so to prevent this from happening, the valve timing should always be set according to the marks and the engine will thus work correctly and synchronously, by the way, when everything is set according to the marks (Camshaft , crankshaft), then you automatically have all the parts of the Gas Distribution Mechanism set to “TDC is the Top Dead Center” and to “BDC is the Bottom Dead Center”, for example, you set the crankshaft according to the marks, then the pistons of the first and fourth your cylinder will automatically rise to the very end and will be at TDC, and the pistons of the third and second cylinder will lower and will be at BDC, so that you can clearly see what it looks like from the side, look at the photo just below, in which those same pistons are located like we said it in this article (That is, some are in the NMT, while others occupy the top point).
Note! To make this installation, you don’t need a lot of tools, of course, if everything is set up correctly, if your phases are all out of order (that is, the marks are not evenly aligned, for example, the mark on the camshaft matches, but not on the crankshaft), then you will need more tools, because the timing belt will have to be removed, in general, to carry out all the work, stock up on: Spanners, spanners, screwdrivers, as well as small screws, or instead of screws, you can take thin drills, you can also stock up on a wrench with spanner heads, Well, that’s all, if you just need to set everything according to the marks, then you won’t even need screwdrivers with drills (This is if you remove the timing belt), ring wrenches and wrenches will be enough, by the way, you completely forgot, also stock up on sockets if you have them (You can use them instead of a socket wrench)!
Summary:
When do you need to set valve timing by marks? If you think about the question, then the valve timing must be installed and all this is installed from the factory (And you can install them yourself), as we said earlier, if the phases are not set according to the marks (For example, the camshaft pulley is set, but the the crankshaft is deviated from the mark) then the car will start to drive poorly (it will accelerate somehow, but it all depends on how much the phases are violated, for example, if the marks are very strongly deviated from each other, then you will not start the car at all) and it will appear unstable idling, the phases from the marks go astray only in some cases, namely due to incorrect installation of the timing belt, they can go astray (Therefore, if you changed the timing belt and you have problems with idling and driving, or if the car does not start at all , then most likely it’s all about disturbed valve timing and they will need to be set again and correctly), and also if the belt is very weak (Over time it weakens), then when driving at high speeds, it can jump from tooth to another tooth, in connection with which the phases will again be disrupted and the car will not work as it should.
Note! By the way, in some cases, the valve timing is set according to the marks in connection with repair work, for example, you remove the timing belt and in order to put it back correctly, you need to put everything according to the marks and when you put the belt on, you will not make a mistake in setting the phases valve timing, according to the marks, then everything is set and you will also put on the belt without losing the phases, and if you do not pay attention to this and the valve timing before removing the timing belt will not be set according to the marks, then when installing a new belt there will be a high probability that that the phases will still be slightly out of whack!
Checking the set ignition
To check the ignition on an 8-valve engine, an injector, you should prepare:
- Multimeter.
- Set of keys and screwdrivers.
- Pliers (necessarily with insulated handles).
Attention! Due to the lack of special equipment, the described method can only test the operation of the circuits. Diagnostics of the microprocessor part will not be available.
The process is:
- When the ignition is turned off, check how tightly the high voltage wires are seated and what contact is in the module.
- Remove the connector from the module, connect a multimeter (monitoring mode should be low AC) to pins C and B, make sure there is voltage. Check the coil (2nd and 4th contacts).
Checking the presence of power on the ignition module
- Check the functionality of high-voltage wires. Install a working spark plug in each cap in turn, attach one end to the block and crank the engine with the starter. The presence of a spark signals that everything is normal. Its absence on each wire means the module is faulty.
Checking high voltage wires
If you managed to set the ignition correctly on the VAZ model and this was confirmed by the test, but problems are still observed, you need to check the power system.
How to change it yourself?
You can replace the belt on an 8-valve VAZ 2114 with an injector engine yourself or by ordering the appropriate service at a service station. During the shift process, there are nuances that must be taken into account when performing the task. If you make mistakes and do not change the strap correctly, this can lead to rapid wear and breakage. Below are instructions for replacing the belt in a VAZ 2114 8 valve.
Tools
If you change the belt yourself, prepare the following:
- a set of open-end wrenches, you will need tools for 13 and 17;
- long flat blade screwdriver;
- 10mm ring wrench, you can use a ratchet head;
- key for installing the tension roller;
- wheel wrench;
- jack.
User Pro Remont shared a video that describes in detail the procedure for replacing the timing belt pulley and timing belt in a VAZ 2114 car.
Algorithm of actions
How to change a belt correctly:
- Drive the car into a garage with a pit. The surface on which work is performed must be level. Switch the gear selector to neutral position.
- Loosen the bolts on the front right wheel. Place this part of the car on a jack so that the wheel can be rotated.
- Open the hood of the car. Using a 10mm wrench, remove the three screws that secure the plastic strap protector.
- Using a 13mm wrench, you need to loosen the bolt that secures the tension roller. Remove the device.
- You can see a mark on the camshaft gear; it is made in the form of a rectangular protrusion on the edge. When performing work, it is necessary that this mark coincides with the protrusion located on the fastening of the strap casing. If these marks do not match, you need to turn the wheel until they match.
- Then find the rubberized plug installed on the top of the clutch housing; it is located to the right of the power unit’s BC. The part is carefully pryed off with a screwdriver and removed from the seat. Under the plug you can see the flywheel crown; there is a mark on this device. It should be opposite the triangular protrusion located on the left. If the marks do not match, then take a 17mm wrench and loosen the tensioner. Using a pulley removal wrench, turn the device counterclockwise to loosen the timing belt.
- When the upper part of the belt is removed from the gear assembly, take a 17mm wrench and turn the crankshaft until the flywheel marks are opposite each other. The flywheel itself must be secured in this position; to secure it, use a screwdriver and install it between the teeth. If you have an assistant, ask him to hold the tool to prevent it from turning.
- Now you can remove the right wheel. Unscrew the screws that secure the arch protection and dismantle it.
- Using a 17 mm wrench, unscrew the nut securing the generator set pulley. When unscrewing, make sure that the flywheel does not turn.
- Dismantle the generator pulley and remove it from its seat.
- Remove the timing belt from the crankshaft disc.
- Using a 17mm wrench, completely unscrew the tensioner pulley lock and remove it from its seat. If you loosen the fastening, the belt can be removed.
- Install the new product onto the crankshaft disc. When installing, make sure that the marks are not broken. Install the generator set drive pulley by first placing a strap on it.
- Place the product on the gear of the mechanism. Install the tension roller.
- The strap is being installed. During installation, the tension roller must be turned with a special tool purchased in advance at the store. If you don't have one, you can use two self-tapping screws and a screwdriver. Self-tapping screws are installed in the grooves, and a screwdriver secures them. Turning is done counterclockwise. Tension the belt using the tension roller and tighten the screw that secures the roller.
- It is necessary to set marks if they are lost during the work process. The installation procedure for all components is performed in reverse order.
Photo gallery
Photos of belt replacement are shown below.
Remove the screws securing the timing belt guard.
The mark on the camshaft gear must coincide with the mark on the housing mount
Loosen the strap tension roller by turning it counterclockwise
Remove the belt from the pulleys and install a new product
Unscrew the nut securing the generator shaft
Put on the new belt and tighten the roller
Consequences of incorrectly setting timing marks
If the ignition is set incorrectly, the following negative aspects are possible:
- If the engine has 16 valves, then they become deformed or bent during operation, accumulating damage.
- The previous problem causes damage to the cylinder head.
- The guide bushings may also become unusable.
- Cracks may appear in other engine components.
Crack in the cylinder block
- The motor overheats.
- The engine piston mechanism can burn out.
- Oil residue may appear on the spark plugs.
Oil deposits on spark plugs
- The fuel mixture loses its ignition moment.
Note! If the engine has 8 valves, then the consequences are not so critical - traction disappears, the belt quickly wears out and breaks.
After repairs, the following factors most often indicate an incorrectly set ignition:
- The car accelerates worse.
- Frequent overheating of the motor.
- The craving became much worse.
How to determine when it's time to change the timing belt
The smartest thing to do would be to install a new spare part on the VAZ-2115 before the belt breaks. The following signs may indicate the need for urgent replacement:
- hum and extraneous noise during operation of the power unit;
- mileage on one belt is more than 60 thousand kilometers;
- oil gets into the timing belt.
In the case of a belt, it is better to spend money on a new spare part and replace it several times than to later pay for a major engine overhaul. Manufacturers often claim that one belt on a VAZ-2115 can travel up to 100 thousand kilometers; in fact, it is better to change it every 60 or a little earlier.
Check the belt tension regularly; if it sags or distributes the load unevenly, the component may need to be replaced soon. Remember that in this part of synchronization there is no such thing as self-regulation during operation. Its uneven tension will inevitably lead to breakdown. This part of the gas distribution mechanism must be replaced immediately after the first instance of tightening it.
READ How to Tension a Chain on a Ford Focus 2
Be sure to monitor the battery and ignition system of your VAZ- 2115 , since starting the engine with a pushrod has a negative impact on the condition of the timing belt. The fact is that with such a start, the shafts begin to move with a strong jerk, which stretches the belt and shortens its service life.
How to replace the timing belt of a VAZ 2114, price solution to the issue
1. A few tips before you start replacing the timing belt
2. The first phase of work on replacing the timing belt 3. The second phase of work on replacing the timing belt
The timing belt stands for timing belt. It is a closed-type rubber product that has notches on the internal contour. It is used to synchronize the crankshaft and camshaft of a car. Experienced car owners believe that it is necessary to change the timing belt every 40-50 thousand kilometers. Otherwise, failure of this element of the car can have very serious consequences. In the best case, the car will stall in the middle of the road and will not move until the timing belt is replaced, and on the VAZ 2114 this is a fairly common problem, since it does not manifest itself in any way until the final problem occurs. And the price for restoring the consequences of a failure can be much higher than for timely replacement of the timing belt.
Which timing belt to choose
To make it easier for you to find the answer to your questions about which belt to choose or which belt is suitable, we have prepared a table for selecting timing belts for different brands and models of cars:
| Brand, model | Original code | Code analogue |
| Renault timing belt | ||
| Timing belt Logan | 7701477024 130C17480R 130C10178R | K015662XS 130C17529R |
| Timing belt Logan 2 | 130C17480R 130C10178R | K015662XS 130C17529R |
| Timing belt Largus | 130C17480R 130C10178R | K015662XS 130C17529R |
| Timing belt Duster | 130C11551R 7701477028 130C13130R 130C10178R | 130C17529R |
| Timing belt Renault Clio | 7701469776 7701472726 130C10178R | 130C17529R |
| Timing belt Sandero | 130C17480R 130C10178R | K015662XS 130C17529R |
| Timing belt Sandero 2 | 130C17480R | K015662XS |
| Timing belt Sandero Stepway | 130C10178R | 130C17529R |
| Timing belt Sandero Stepway 2 | 130C10178R | 130C17529R |
| Timing belt Symbol | 7701477024 | |
| Timing belt Megan | 7701469776 7701472726 130C10178R | 130C17529R |
| Timing belt Megan 2 | 130284231R 7701063999 130C13130R 130C13191R | CT977 |
| Timing belt Megan 3 | 130C13191R 7701477028 | |
| Ford timing belt | ||
| Timing belt Focus 2 | 1672144 | VKMA04226 |
| Timing belt Focus 3 | 2045356 | KTB764 CT881K5 VKMA04226 530049510 KD452.24 |
| Fusion Timing Belt | 1672144 1672143 | |
| Daewoo timing belt | ||
| Timing belt Nexia | 1987948226 530 0332 10 5900270 | |
| Timing belt Opel | ||
| Timing belt Opel | 95516740 | |
| Chevrolet timing belt | ||
| Timing belt Lacetti | 93185845 93746917 | |
| Timing belt Cruz | 95516740 | |
| Hyundai timing belt | ||
| Timing belt Accent | 24312-26001 | |
| Solaris timing belt | 24321-2B200 | |
| Timing belt Elantra | 24321-2B200 | |
| Timing belt Skoda | ||
| Timing belt Octavia | 06A198119D | |
| Timing belt Fabia | K035565XS | |
| Kia timing belt | ||
| Rio timing belt | 24321-2B200 | |
| Timing belt Soul | 24321-2B200 | |
| Timing belt LED | 24321-2B200 |
Timing belt options for VAZ
- Timing belt VAZ-2110, VAZ-2112
- Priora timing belt
- Granta timing belt
- Timing belt VAZ-2108, VAZ-2109
- Timing belt VAZ-2105, VAZ-2106, VAZ-2107
If you can’t decide where to buy a timing belt in Volgograd, Volzhsky or another city in the region, contact us, you can’t go wrong.
Pay special attention to how to set the timing marks
. We suggest taking a little more time to watch the video of replacing the timing belt on a VAZ with a 16-valve engine.
Replacement frequency
Natural wear, improper operation or other reasons lead to failure of the timing belt and the need to replace it. At the same time, there is no need to take the situation to the extreme: it is enough to carry out regular diagnostics and visual assessment of the part. Such a check will help to avoid a break at the wrong moment.
Abrasions indicate obvious wear on the timing belt.
The frequency of replacing the timing belt depends on the specific brand of car and is indicated in the vehicle’s operating manual. Despite the standards established by automakers, many experts advise changing the spare part every 50 thousand kilometers.
When buying a used car, you will have to check the condition of the timing belt yourself - a visual inspection of it for wear is enough. Clear signs of wear are abrasions or cracks on the surface of the belt. However, the presence of such defects does not mean that the belt will immediately fail, since inside it there is a base consisting of metal rods. Thanks to them, the part can withstand shock loads and maintain its working condition throughout its entire service life.
A cracking timing belt is another clear sign of wear.
Some cars are equipped with timing belts with reinforced metal cord, which affects their service life, increasing it by an average of 30%. Modern car models are equipped with belts made of rubber and metal, which have a limited shelf life.
Such parts cannot be repaired; if they fail, they are simply replaced. The decision to replace the belt is made not only if it breaks, but also if it sag, stretches or reduces the tightness of the fit, which negatively affects the synchronous operation of the valves. As a result, this can lead to malfunctions in the functioning of the entire car, the main symptom of which is engine malfunction.
Visible traces of belt stretching, as well as abrasion along with cracks, indicate that it has worn out
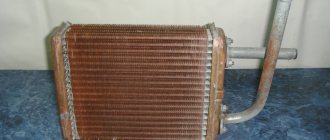
Almost always, the water pump or water pump is replaced along with the timing belt. On most cars, this device copes with its duties perfectly until the car dies, however, in some situations it needs to be changed ahead of schedule. For this reason, experts advise changing the pump at the same time as the timing belt.
The water pump is a part that is replaced along with the belt
A few tips before you start replacing the timing belt
Firstly, it is recommended to immediately change the tension roller along with replacing the timing belt. Secondly, before installing a new timing belt, you need to check whether there is grease on the roller and whether there is any play in the pump. Thirdly, if after replacing the timing belt you hear a characteristic whistle, then its tension needs to be slightly loosened. It is worth noting that the operation of replacing the timing belt is not complicated and therefore you don’t have to pay the technicians at a car service center, but carry out all the work yourself. The timing belt replacement process is divided into two phases, which we will discuss below.
What is timing belt?
The timing belt, also known as the gas distribution mechanism, is a part responsible for synchronizing the injection and gas distribution phases in the power unit of the machine. In order for the entire system to work as a single whole, it is necessary to align special marks, which are the point of manual synchronization of the gas distribution.
Most often they go astray when the timing belt is replaced or it breaks while the engine is running. If you do not double-check that the marks match, the engine will not operate correctly, which means you will have to remove the belt again and set everything up.
Timing diagram
TAKE INTO ACCOUNT! The timing belt has two pairs of marks, one of which is located on the pulleys, and the second near the block. They must coincide at the highest position of the first or fourth cylinder.
The first phase of work to replace the timing belt
1. Place the car on a flat surface and raise the handbrake handle
2. The gear lever must be moved to the fourth or fifth gear position 3. Now you need to remove the front timing cover. To do this, using a 10mm wrench, you need to unscrew two bolts on the side and one in the center 4. Next, turn the crankshaft counterclockwise until the mark located on the camshaft moves from the antenna located on the rear cover to a couple of teeth . 5. Remove the generator drive belt 6. Put the mounting bolt in place to remove the generator drive pulley, which is located on the crankshaft 7. Move the gearbox knob to the neutral speed position 8. Now we begin to turn the crankshaft. This must be done until a mark appears on the flywheel. As soon as the mark reaches the center, the rotation must be stopped 9. The mark related to the camshaft pulley should be located just opposite the installation mark, which, in turn, is located on the protective cover 10. Next, loosen the tension roller mounting nut 11. Remove the timing belt 12 Now you need to put the new timing belt on the camshaft pulley and tighten it 13. We hook the left side of the belt to the roller and put it on the pump pulley, and then on the crankshaft pulley. 14. Next, we tighten the belt by rotating the roller clockwise, while making sure that the belt does not bend or break. 15. Turns the crankshaft a couple of revolutions. The goal is to restore the original position of the marks
TDC marks VAZ 2110 2114 8 valves
The TDC marks are located on the camshaft timing belt pulley (lug) and on the rear camshaft drive belt cover (tendril).
In addition, the marks are located on the flywheel (risk) and on the scale of the rear shield of the clutch housing (triangular cutout). For clarity, the gearbox has been removed.
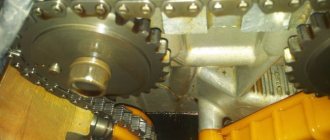
Additionally, marks are located on the crankshaft timing pulley (dot) and the oil pump cover (triangular cutout). These marks are visible only when the generator drive pulley is removed.
You will need: a socket wrench “17”, a socket wrench “10”. 1. Disconnect the wire from the “–” terminal of the battery.
2. Set the gear shift lever to neutral and place chocks under the car wheels.
3. Remove the right front wheel and the right mudguard of the engine compartment.
4. Open the hood and remove the three screws securing the front camshaft drive belt cover. Please note: the screws on the side fastening of the cover also secure the wire holders. Remove the front cover.
5. Rotate the crankshaft by the bolt securing the generator drive pulley to it until the marks on the camshaft pulley and the rear cover coincide.
6. Remove the plug from the hole in the clutch housing and check the alignment of the marks on the flywheel.
The second phase of work to replace the timing belt
1. Unscrew the bolt that secures the crankshaft and secure the generator pulley 2. Using a roller adjustment, tighten the timing belt 3. Start the engine and check how it works. If necessary, we make a final adjustment of the tension force of the timing belt 4. We secure the front timing cover As we can see from the instructions presented above, there is nothing complicated in replacing the timing belt, and in a car service for such a procedure for replacing the timing belt on the “fourteenth”, they will ask from four hundred to eight hundred rubles , depending on the region.
Sources
- zen.yandex.ru
- vaz-2114-lada.ru/2020/10/metki-grm-na-vaz/
- vaz-remzona.ru/metki-grm-vaz-2114/
- drive2.ru/b/454449322432398280/
Installation process
The timing belt itself is a rubber product closed with teeth inward, which synchronizes the torque between the camshaft and crankshaft. Ignoring its wear will not lead to anything good, because in the best case, your engine will stall while driving, and in the worst case, the entire wheelbase will jam, which can lead to the most unpredictable incidents on the road.
The replacement and debugging itself is carried out in two stages, in the first stage the main repair and debugging work is carried out, and the second stage carries the function of monitoring the work done.
First stage
- The assistant gets into the car and puts 5th gear in the gearbox, and at this time you remove the front belt protection.
- Insert the ratchet into the place allocated for it and begin to turn the crankshaft, you need to do this until you see that the mark located on the camshaft has not moved to remove several teeth from the control antenna of the rear cover. (this action is necessary to reduce the degree of belt tension).
- We dismantle the drive pulley on the crankshaft and return the mounting bolt to its place.
- The assistant switches the gearbox to “neutral”.
- Again, we begin to carefully turn the crankshaft until the mark on the VAZ 2114 flywheel is in the central position.
Coincidence of the mark on the flywheel with the slot in the bar
- We check that the installation mark of the rear cover matches the mark located on the camshaft pulley; if they match, then you can unscrew the roller nut, then remove the belt itself.
- We install a new belt - we start with the roller, then we put it on the pump pulley and lastly on the crankshaft pulley.
- We adjust the tension by turning the adjusting roller counterclockwise.
- Carefully turn the crankshaft again so that the marks are in their previous position (they will 100% go astray when putting on a new belt and adjusting the tension).
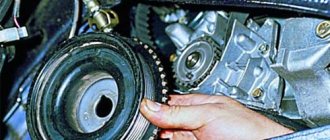
Mark on the crankshaft pulley
Second stage (control-final)
- Before checking the timing marks on the VAZ 2114, you need to fix the pulley on the generator and tension the belt with a roller to the maximum.
- Now we check all the matches, if nothing is wrong anywhere, then we install the protection back and clean the workplace.
Looking under the hood of your car, with knowledge of this information, you will understand that there is nothing difficult in this procedure, but its success is quite dependent on the skill of the performer. Therefore, if something doesn’t work out the first time, just repeat the operation, you may even need to do it twice. Don’t be discouraged, because after the difficult first time it will only take you a few minutes, like a seasoned professional.
Setting the timing marks on the 8-valve VAZ-2114: a complete guide on how to check the marks
Marking the gas distribution mechanism on the 8-valve VAZ-2114 is an important part of repair operations. So, this process will be needed directly when adjusting the valve mechanism or replacing the timing belt. Incorrectly placed TMV tags can lead to catastrophic consequences.
Video of replacing the timing belt on a VAZ-2114 (+tags)
What is timing belt?
Timing mechanism diagram
The gas distribution mechanism is a mechanism in which the valve timing of the power unit is controlled. For normal engine performance, there are special marks by which the timing belt must be set.
Some are on the block, while others are on the pulleys. When the cylinder is in the first upper position, all these marks must coincide.
The timing marks are misaligned if the drive toothed belt is broken or if it is replaced incorrectly. So, in these cases, the engine will not work correctly and the marks will need to be re-set. Doing this is quite problematic and not everyone can do it.
Setting the tags: step-by-step instructions
Tools for working with timing marks
In order to correctly set the timing marks, you will need the necessary tools. So, what is directly required in order to perform this operation:
- Key for 10.
- Thin flathead screwdriver.
- Jack.
The process itself
Now that everything is assembled, you can proceed directly to the work process itself:
- Jack up the right side of the car.
Setting up the car on a jack
We set marks on the camshaft and block
Remove the crankcase plug, where the mark on the flywheel should coincide with the block
Consequences of incorrectly setting timing marks
The consequences of incorrect placement of the timing marks on the car can be both minor and very severe.
A torn timing belt on an 8-valve valve does not threaten to bend the valves, but the 16-valve version of the VAZ-2114 is already deprived of this advantage.
Let's consider the main options for the development of events:
- Misaligned timing will cause the valves to burn out .
- Bent valves (bent valves) are also an unpleasant option. The 8-valve version of the VAZ-2114 does not bend the valve.
- As a result of the above actions, the cylinder head may become deformed , guide bushings may fail, and cracks may form inside the main power elements.
- Burnout of the piston mechanism also becomes a consequence of incorrect placement of the gas distribution mechanism marks.
- Oil residue on the spark plugs , as well as poor ignition timing of the fuel mixture.
- Other consequences.
conclusions
As practice shows, setting the ignition on a VAZ-2114 is quite simple, but not every motorist can do it. So, it is necessary to have knowledge of the operation of the engine and its design. Therefore, if a motorist is not able to do this type of repair on his own, he must contact a car service center.