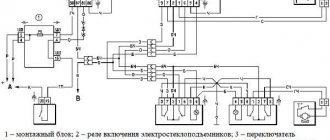
How to replace lamps in headlights and lanterns of Lada Niva (Chevrolet)
During operation, the lamps in the headlights or rear lights may burn out.
You can replace them yourself. To avoid breaking anything, it is recommended that you read the instructions contained in the vehicle's owner's manual. Attention!
Wear gloves when installing a halogen lamp to avoid leaving marks on the lamp bulb.
Replacing a light bulb in a low beam headlight
The manufacturer recommends regularly checking the condition of the low beam headlights . At the first signs, you should take action and replace the lamps in the headlights.
Symptoms of a problem:
- burnout of the device when the lamp needs to be turned on before a trip;
- turning on the device every other time;
- deterioration in power, brightness and luminous flux;
- constant flickering;
- burnout of one or several lamps at once.
The first sign that indicates a malfunction of the device is a deterioration in brightness.
Note! LED elements can last a long time, but their quality deteriorates during use. Over time they lose brightness. It is not recommended to wait until the light goes out completely. At the first symptoms, it is advisable to replace it.
Even though halogen lamps last a long time, they also fail . Identifying the first signs of a malfunction is not easy. You can find out about the inoperability of the device only after it burns out. After the end of their service life, it is better to immediately replace the halogen lamps with new ones. You can purchase halogen lamps in specialized stores at competitive prices.
Rear marker lights of "Chevrolet Niva"
Read:
Chevrolet taillight
Niva" has a non-separable design similar to a headlight, which allows only lamp replacement work to be carried out.
Replacing the marker lamp in the headlight unit / Chevrolet. The lamp combines lamps signaling braking, making a turn, signaling that reverse gear is engaged and the dimensions of the Chevrolet
Niva itself.
The most common malfunction of Chevrolet
Niva" is a burnout of lamps or fuses. The parking lamps on the left and right sides of the car have separate fuses (standard rating 5 Amperes). The following lamps are installed in the headlight:
- lamp AKG 12-55 with H1 socket;
- bulb
H7; - lamp PY21;
- lamp size A12-5-2 (W5W).
Replacement
Chevrolet dimensions in the headlight unit do not require removing the headlight itself from the car. Before changing lamps, it is necessary to de-energize the machine's electrical systems by disconnecting the battery. Chevrolet Niva - replacing lamps in a headlight - magazine. Rubber boots are installed on the back of the headlight housing. The anthers are attached tightly to ensure the tightness of the headlight. Replacing the timing chain on a Chevrolet Niva is difficult to start; Chevrolet Niva description of detonation Niva. To replace, you need to turn the boot to the left and remove the faulty lamp. After replacing the lamp, the boot should be returned to its place.
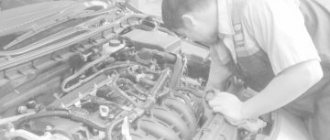
Replacing a headlight bulb on a Chevrolet Niva
The other day the front light bulb burned out, I decided to replace it, but that was not the case... I began to remove the holder, the holder came out, but the lamp, fused to the headlight, remained.
The holder also melted and lost some of its legs.
To prevent the process from progressing, I decided to replace it with diodes and bought a beacon for 150 rubles.
While I was plugging in the diode, it fell into the headlight. This meant one thing - I would have to remove the headlight.
Removing it is simple, you need to unscrew 5 bolts plus 4 self-tapping screws of the front fender liner. It took a couple of hours until I figured out what was what and unscrewed the rusted bolts :) I shook out the fallen diode + pieces from the old light bulb and put everything back together.
Dimensions " Chevrolet"
Niva": a short description of the design
The main purpose of side lights
in transport - this is a visual designation of dimensions.
Replacing the marker lamp in the headlight unit. Chevrolet-niva forum. Opinions of car enthusiasts and experts. They can also be used as parking lighting. Replacing the timing chain of a Chevrolet Niva with your own hands, video. Currently, there are several designations for front side lights: actually side lights , parking lamps (on the US and Canadian market), sidelights, or simply front lights (on the English market).
In accordance with the legislation of North American countries, side lights may have lenses or lamps of snow-white or amber-orange color. In the rest of the world, only snow-white diffusers and lamps are allowed. The luminous intensity of side light is also specified by regulations and should range from 4 to 125 cd. It's not just the timing chain that needs to be replaced. Since the timing mechanism on a Chevrolet Niva often takes on heavy loads, which cannot be said about cars with a belt, it wears out. There are several designs of side lights
– as part of a non-separable block headlamp, also in the form of a separately mounted flashlight with a personal lens.
Taillight _
may only have a reddish diffuser.
According to the traffic rules of the Russian Federation, drivers must use traffic lights in the evening or at night when driving on poorly lit sections of roads. Replacing chevrolet niva lamps » chevrolet niva blog. In addition, if you stop or park your car on such roads, you should also turn on the side lights
.
In conditions of poor or insufficient visibility, side lights
should be used in conjunction with low beam headlights (or, if equipped, with fog lights).
Read:
Lenses for front and rear lamps must be installed in pairs on the same line. Replacing the Chevrolet Aveo low beam lamp is done from the back of the headlight with the battery disconnected. installation of timing marks on a VAZ (lada) 21214 Niva. Niva Chevrolet Niva 214 chain replacement. Viewing angles of side lights
and the sides of the review are regulated by law.
For vehicles with significant height dimensions (for example, a bus), it is mandatory to have additional side lights as close to the top edges as possible.
Lamps in the front lighting of the Chevrolet Niva
The most common malfunction of Chevrolet
Niva" is a burnout of lamps or fuses. The parking lamps on the left and right sides of the car have separate fuses (standard rating 5 Amperes). The following lamps are installed in the headlight:
- lamp AKG 12-55 with H1 socket;
- bulb
H7; - lamp PY21;
- lamp size A12-5-2 (W5W).
Replacing Chevrolet Niva headlight bulbs - low and high beam, dimensions and direction indicators
Replacing Chevrolet Niva headlight bulbs can be caused not only by burnout, but also by replacing serviceable bulbs with new ones with different characteristics.
Naturally, few people want to send their car for service, waste time and pay specialists to perform this operation, just as in the case of fog lights.
That’s why it’s worth figuring out how to do everything yourself. In this case, the work is demonstrated using the example of the right headlight. As for the left, everything is done the same way.
Main conclusions
On a Chevrolet Niva car, the low beam headlights use a standard H7 12V/55W lamp. It has one filament and is installed in the corresponding block. When choosing a new copy to replace a burnt-out one, you need to pay attention first of all to its type and lighting characteristics. Based on the type of light source, they are divided into the following modifications:
- Incandescent light bulbs.
- Standard halogens.
- Halogen with quartz bulb.
- Xenon.
- Light-emitting diode.
- Gas discharge on sodium.
It is better to give preference to halogen ones, since they have a minimal price, good luminosity and flux density and do not require the installation of additional equipment when replacing. In addition to the burnt-out lamp itself, the reason why the low beam on a Chevrolet Niva stopped working could be a fuse and problems with the on-board wiring.
If you have additional information about choosing and replacing low beam lamps on a Chevy or simply want to share useful knowledge, be sure to write in the comments.
Car lightFeatures and instructions for replacing low beam lamps on Renault Megane 2
Car light How to select and change a low beam lamp on a Renault Logan
Step-by-step instructions for DIY replacement
Car owners who follow all the steps according to the instructions know that replacing low beam lamps does not cause difficulties . Even people who have never changed parts on a car can cope with this process.
The whole job consists of removing the old light bulb and installing a new one . Sometimes light adjustments are required.
Preparatory process
First, choose a site for the correct location of the car . Next, the car is put on the handbrake. Then de-energize the on-board network by turning off the ignition and disconnecting the negative contact wire on the battery.
Removing old light bulbs
specific recommendations for replacing low beam lamps in the headlights of any vehicle.
Carrying out the procedure you only need:
When installing a new lamp, it is important to consider the basic rules:
Tail lights
Light tuning must be done very carefully so as not to be prohibited and not to violate traffic rules. When purchasing sidelights, you can also switch to new samples; they can be a more uniform color, yellow or white. The sidelights (headlights) on the Niva 21214 are also easy to change yourself. It is better to install sidelights on the Niva in a single color. Niva sidelights last quite a long time. Tail lights when driving a Niva are also subject to less damage and have a long wear life.
Work progress
High beam
To replace the headlight bulbs on a Niva Chevrolet, you need to open the hood and remove the rubber cover from the headlight unit, which performs a protective function.
Then you need to disconnect the wire plug from the headlight.
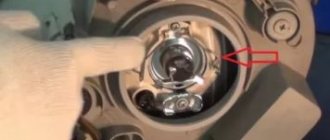
Next, by squeezing the spring clamp, you need to remove its ends from engagement with the hooks of the reflector, and then remove the clamp itself from the lamp.
This gives access to the high beam lamp - you should remove it and install a new H1 bulb, reassembling everything in the reverse order.
Low beam
Replacing the low beam lamp in a Chevrolet Niva headlight also begins with dismantling the protective cover, which covers the seats for the side lights and low beam. And after that, the wire tips are disconnected from the lamp terminals.
By pressing on the upper edge of the spring clamp, it must be disengaged from the hooks of the reflector, and then the clamp must be moved away from the lamp.
This provides access to the low beam bulb - it must be replaced with a new H7 bulb, reassembling everything in reverse order.
parking lights
To replace them, you must first pull the light bulb socket itself and remove it along with the lamp from the headlight housing.
Next, the lamp is removed from the socket, and a new W5W light bulb is installed in its place.
1.9. Replacing light bulbs
| GENERAL INFORMATION |
Low and high beam bulbs
Low and high beam bulbs, as well as side lights, are accessible from the engine compartment.
| EXECUTION ORDER |
| 1. Remove the housing from the rear of the headlight by turning it counterclockwise. |
| 2. Disconnect the electrical connector (B). |
| 3. Remove the light bulb mounting spring (A). |
| 4. Turn the bulb holder counterclockwise and remove it from the headlight. |
| 5. Replace the light bulb. |
| 6. Insert the light bulb holder into the headlight socket and secure it by turning it all the way to the right. |
| 7. Install the mounting spring and wire connector. |
| 8. Check that the light bulb is functioning correctly. |
| 9. Attach the housing to the back of the headlight. |
| Warning Do not touch the glass part of light bulbs, especially halogen ones, with your fingers. Otherwise, before installing the light bulb in the socket, it should be washed with an alcohol solution. |
parking lights
| EXECUTION ORDER |
| 1. Remove the housing from the rear of the headlight. |
| 2. Remove the bulb holder (under the low and high beam bulb holder). |
| 3. Replace the light bulb. |
| 4. Insert the holder into the slot. |
| 5. Make sure the light bulb socket is securely seated. |
| 6. Check the installation and operation of the light bulb. |
| 7. Attach the housing to the back of the headlight. |
High beam headlight bulbs
Some vehicle versions are equipped with high beam headlights with halogen bulbs.
| EXECUTION ORDER |
| 1. Remove the cover mounting bracket (A) and remove the headlight cover. |
| 2. Compress the spring (B) securing the light bulb and move it away. Remove the bulb (C). |
| 3. Disconnect the wire connector. |
| 4. Connect the new bulb to the electrical connector and insert it into the headlight. |
| 5. Install the light bulb mounting spring. |
| 6. Install the cover and mounting bracket. |
Front direction indicators
| EXECUTION ORDER |
| 1. From the rear side of the bumper, move the fastening clip outwards. |
| 2. Remove the front turn signal bulb from the bumper; on the Ghia version, the front turn signal bulb is held by a lever located under the upper bumper mount, which must be pushed outward to remove the bulb. |
| 3. Turn the front turn signal bulb holder to the left and remove it. |
| 4. Press the light bulb, turn it to the left and remove it. |
| 5. Install the new bulb in the holder by turning it to the right, and then secure the turn signal, performing the above steps in reverse order. |
Back light
The tail light bulbs are located in a holder assembly accessible from inside the trunk.
| EXECUTION ORDER |
| CARS WITH BERLIN AND SEDAN BODIES |
| 1. Remove the holder assembly by moving the fastening stopper located at the end of this assembly. |
| 2. Each holder assembly contains four light bulbs: brake light (1), reverse light (2), parking light and rear fog light (3), and rear turn signal light (4). |
| 3. Press the bulb to be replaced, rotate it and remove it from the holder assembly. |
| 4. Install the new bulb into the holder assembly, rotate it, and then press the holder assembly until the mount lock locks. |
| CARS WITH COMBI BODY |
| 1. After opening the trunk, use a screwdriver to turn the fastening stopper and remove the rear light housing. |
| 2. Push back the mounting plates of the holder assembly (A) and remove it. Each holder assembly contains five light bulbs: reverse light bulb (1), tail light bulb (2), rear turn signal light bulb (3), rear fog light bulb (4), brake warning light bulb (5). |
| 3. Press the bulb to be replaced, rotate it and remove it from the holder assembly. |
| 4. Install the new bulb into the holder assembly, rotate it, and then secure the holder assembly. |
License plate light
EXECUTION ORDER
1
Using a thin screwdriver, carefully remove the license plate light assembly from its socket in the rear bumper. 2. Turn to the left and remove the bulb holder. 3
Replace the light bulb that is pressed into the holder.
4. Install the holder and secure the license plate lamp assembly in the rear bumper.
Trunk lighting
In some versions of the Berlin and Sedan body types, there is a trunk light bulb.
EXECUTION ORDER
1
Using a screwdriver, carefully remove the light bulb cover. 2. Turn the socket counterclockwise to remove it from the lamp shade, and then remove the light bulb from it.
Interior lamps
| EXECUTION ORDER |
| 1. By setting the switch to the middle position (lamp off). |
| 2. Using a screwdriver, remove the light bulb socket and then remove the light bulb. |