Electric window device (ESP) and connection diagram
The standard circuit consists of a control unit, drive and trigger mechanisms. The drive mechanism, or gearmotor, rotates the cable drum, directly raising or lowering the glass. The gearmotor is a solid block of an electric motor with a worm gear, which provides rotation in only one direction, from the worm to the wheel. This prevents the window from accidentally closing. The built-in thermobimetallic fuse protects against overloads.
Let's look at what the components in the electric lifting mechanism circuit are responsible for:
1. There is a mounting block located under the instrument panel on the driver's side. Devices are powered from it.
2. The power window relay reduces the current in the control circuit.
3. Buttons with LED backlight, on the right and left doors, activate the glass lifting mechanism.
4. Gear motors for the passenger and driver's doors create a force that raises and lowers the window.
5. The ignition switch supplies power to the relay.
How does the scheme work?
Turning the ignition key supplies power to the unit and the lift relay. The LED backlighting of the control buttons turns on. The glass movement mechanism starts only when you press any key.
The movement of current in the circuit: battery - fuse - relay - button - motor.
The principle of operation of window regulators in a Chevy Niva
The control unit of the Chevrolet Niva automatic window regulator receives a specific command from the central module . After this, it processes the signal and activates the actuators - the electric motor starts, which changes the position of the lifting mechanism.
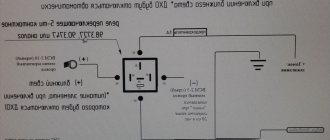
Electric window connection diagram
Above is a standard diagram for connecting electric windows in Chevrolet Niva cars.
Let's consider the main elements of the system :
- 1 – mounting block, which is also the power supply for the window regulator. Located under the dashboard on the driver's side.
- 2 – relay that turns on the power window. The motor connected to the system is quite powerful, because of this it is necessary to reduce the current in the control circuit of this device. As a result, power from the mounting block is first supplied to the relay, and only after that is distributed throughout the entire control system.
- 3 – buttons that turn on the window lifter on the passenger and driver’s sides. According to the diagram, they also have LED lighting inside.
- 4 and 5 – motors of the right and left window raising system.
- 6 – power window control button, located on the driver’s side and also backlit.
- 7 – ignition switch, which supplies power to the relay.
How the scheme works
When you turn the ignition key, power is supplied to the unit, causing the relay to turn on the lift . After this, the LED backlighting of the control buttons begins to work.
The current flows sequentially through the circuit : battery -> fuse -> relay -> button -> motor.
To start the glass movement mechanism in the car doors, just press the corresponding button and make sure the system is working.
Front door window regulator malfunctions
During the operation of the car, breakdowns of the window lifting mechanism occur. Most often, the causes of malfunctions are related to the electrical circuit of the lifts. Let's look at the main causes of malfunctions:
1.Both window regulators do not work: 1.1. The fuse has blown. 1.2. Unreliable connection of wires to ground 1.3. The connector is disconnected or there is a break in the electrical network. 1.4. The main power window switch is faulty.
2. Doesn't work right: 2.1. Damage to the gearmotor or reverse current relay. 2.2. Electrical network interruption. 2.3. The power window switch is broken.
3. The glass goes down, but does not go up. The reason is that the button is stuck in the down position.
4. Slowing down or raising the glass. The reason for this is contamination of the drainage holes at the bottom of the door.
5. The cable in the drum may be worn out or broken.
6. Mechanical damage also occurs. They are identified by characteristic noises and knocks. Troubleshooting begins with checking the fuse; it supplies power to both window regulators. If the cause of the breakdown is not found, you will have to disassemble the door.
Switching diagram for power windows of doors (before 2009) Chevrolet Niva.
Switching diagram for power windows of doors (before 2009) Chevrolet Niva.
Wiring diagram for power windows.
1 - mounting block; 2 — relay for turning on electric windows; 3 — power window switch of the right front door; 4 — motor-reducer for the power window of the right front door; 5 — motor-reducer for the electric window lifter of the left front door; 6 — power window switch of the left front door; 7 — ignition switch; A - to power supplies; B - to the external lighting switch.
Power windows for front doors.
Electric windows for lowering and raising the windows of the front doors are equipped with some of the cars produced.
In the window lift mechanism, instead of a gear reducer used in mechanical window lifters, there is only a drum into the hole of which the output shaft of the gear motor is inserted. The gearmotor consists of a worm gearbox and a DC electric motor with excitation from permanent magnets. Its design is similar to that of the windshield wiper gearmotor. The gearmotor is reversible, the direction of rotation of the output shaft depends on the direction of the current in the armature winding. To protect against overloads, it has a built-in thermobimetallic fuse. Gearmotors 4 and 5 are switched on by switches 3 and 6 located on the armrest handles. Voltage is supplied to the switches through fuse F5 only when the ignition is on, when the contacts of relay 2 of the power windows are closed. The relay is used type 904.3747-10. The relay is located to the left of the steering column on a bracket attached to the mounting block.
If the power windows do not work, then it is necessary to remove the door trims and check whether voltage is supplied to the gearmotors, check the fuse and relay of the power windows, restore broken connections in the wires, and replace the faulty gearmotor with a new one.
Car fuses and relay box
The vehicle's power supply and consumption system ensures the correct functioning of components and assemblies and comfortable driving. The car's current source is the battery. The consumers are connected in parallel and combined into separate blocks with fuses.
On the Chevrolet Niva, the fuse box is mounted in a unit and is located in the passenger compartment. Fuses protect almost all electrical power circuits. They do not have such protection for the generator circuit, engine starting and battery charging.
The Niva fuse box is located on the driver's side under the dashboard. Access to the mounting block is closed with a lid.
To remove it, unscrew two screws.
We remove the cover from engagement with the instrument panel. Lift it up, remove the pins from the rubber bushings and remove.
In the photo you can see where the relay and fuse box is located.
In Niva Chevrolet cars, fuse F5 protects the power supply circuit for the front door window lifter. The power window relay is located in a block with remote relays. This block is located below the mounting one.
Fuses and relays Niva Chevrolet, electrical diagrams
If you are the owner of a Chevrolet Niva SUV, then sooner or later electrical problems may arise, just like with any other car. When any device fails, you need to correctly determine the cause of the failure.
First of all, if the current is exceeded or there is a short circuit, the fuses and relays of the Niva Chevrolet fail. Therefore, you need to know which of them are responsible for what and carry a set of spare ones with you. This article describes the main causes of electrical faults and will help in diagnosing and troubleshooting problems.
The relay and fuse box is located under the dashboard, to the left of the steering wheel. To get to the fuses, you need to open the cover. To do this, you need to unscrew 2 screws with a screwdriver.
Relay and fuse box:
Please note that in the schematic diagram of the block, two rows of fuses are located at the bottom, and the relay is at the top. Under the panel cover, the fuses will be located opposite the top, so do not confuse the numbering. If you notice a discrepancy in the numbering of fuses or relays, then you have a different Chevrolet Niva model, newer or older, in this case, find the corresponding diagram and troubleshoot using it.
K1 Relay for monitoring the health of lamps.
K2 Windshield wiper relay.
If the wipers do not work, check this relay and fuse F9. If they are working properly, the problem may be in the wiper motor, its brushes, mechanism and gears, as well as in the interior switch and its contacts.
K3 Relay-breaker for direction indicators and hazard warning lights.
If the turn signals do not work, check fuses F16, F19 and this relay. Also check the contact of the wire going to ground. Located to the left of the fuse box, in the back (to access you need to remove the mounting block panel).
Another issue could be the steering column switch, its contacts and connector.
If the emergency lights do not work, check the button to turn it on, its contacts, as well as the lamps in the turn signals; there may be a short circuit somewhere or the lamps have burned out.
If the low beam in one of the headlights does not work, check fuses F2 and F12, as well as the lamps in the headlights themselves.
If both low beam headlights do not work, check this relay, as well as the light switch and its contacts. Also note that the low beam headlights only work when the ignition is on.
Replacing the Chevrolet front power window fuse - Niva
Video on replacing the front door power window fuse on a Chevrolet Niva
, fuse rating...
Repair of window regulator on Niva Chevrolet
These and other window regulators
You can buy from the online store Steklopodem.RF: 8 (800) ...
If the high beam in one of the headlights does not work, check fuses F3 and F13, as well as the lamps themselves.
If both high beam headlights do not work, check this relay, as well as the steering column switch and its contacts.
Troubleshooting ESP
To prevent the front door window lift mechanism from breaking, it is enough to lubricate all its parts once a year. In case of breakdowns, remove the ESP and carry out repairs:
1. The fuse is checked in the standard way. Using the diagram or visually we find the required fuse. We inspect it for broken wires and burnt marks. You can check with a tester (multimeter) by resistance or voltage.
2. Check the relay for serviceability. To do this, either connect a new one, or close contacts 30 and 87 with each other. The relay cannot be repaired; it must be replaced.
3. Window lifter buttons are easier to remove and replace. The reason for their malfunction is oxidation of the contacts. You can quickly restore the operation of the buttons by treating them with WD-40 penetrating liquid.
4. The faulty motor must be replaced. Its repair is possible only if the contacts are oxidized. They need to be cleaned. If there is no voltage in the walk-behind tractor wires, you need to find the break and repair the damage.
All moving parts of the removed ESP mechanism are inspected for mechanical damage, dust, and dirt. Sometimes it is enough to clean the parts from rust and lubricate them for the lift to work properly.
Site search
The glass rises as high as possible. And while I was wondering where it would be better to make repairs, my window regulator also jammed on the left side. This did not produce any results.
Then I pressed the button and raised the glass up. Use a flat-head screwdriver to pry up and remove the plastic plugs of the two screws securing the handrail. These screws are unscrewed and removed, and the handrail is removed.
Unscrew the screws securing the plastic door pocket and remove it. And also, when all the screws are unscrewed and the door trim parts are removed, you should carefully separate the trim from the door so as not to damage the plastic pistons and paintwork.
To do this, through the left technological opening I took out the wiring harness block of the window regulator motor. If the switch is working properly, continue working.
Not only is it impossible to safely leave a car with the window down, but for both of them it happened in rainy weather.
Now do you understand why I consider myself lucky?
Repair of window regulator on Niva Chevrolet
So, my car was still under warranty, it was quite possible to try to claim some rights to free repairs, but I didn’t want to waste a lot of time on this. The fact is that in Ukraine at that time new sales records were being set every month and official car dealerships and service stations were, to put it mildly, overloaded. Yes, and I didn’t want to deal with a very unqualified official service once again.
So I decided to wait for something else potentially covered by a warranty so that I could make all the claims at once. But for some reason, in general, the Chevrolet Niva showed itself to be a relatively reliable car and, despite the rather harsh operation, nothing else was broken under warranty and, by the way, nothing out of warranty either. As a result, I never got to the warranty service.
Replacement of front SP
Remove the ESP mechanism from the front door to repair parts or completely replace it. The electric window lifter is also removed during other repair work, when the mechanism interferes with their implementation. A standard set of tools is required.
Sequence of work:
- Remove the plastic door trim. Using a thin screwdriver, carefully pull out the plastic plugs. We unscrew the cross-shaped screws on the frame near the opening handle, and the three at the bottom of the door on the bottom pocket and remove the parts. Remove the two large screws under the plug. We remove the main casing.
- Disconnect the wires from the buttons by pressing the latches. We remove the switches from the plastic case.
- We remove the speaker.
- We remove the front door glass. To do this, unscrew the bolts securing the glass plate to the bar and the bolt securing the door guide. We remove the guide, remove the glass seal, and remove the glass.
- We detach the ESP drive gearmotor from the block with the power wires.
- We unscrew the nuts securing the mechanism to the base of the door, the central and lower nuts.
- We take the mechanism out of the door hole. We inspect the mechanism for damage and replace parts. Next, we install the repaired power window in reverse order, or replace it with a new one.
Replacing the door window lifter
Mechanical window lifter : We remove the window lifter mechanism to replace it or when completely disassembling the door.
Remove the door trim (see here). We disconnect the fastening of the window lift cable to the front and rear glass holders (see here).
We lift the glass with our hands...
...and secure it from falling with a screw (or pin) with an M5 thread, screwed into the hole in the front glass holder.
Using the “8” socket, unscrew the three nuts securing the window lift mechanism to the inner door panel.
We bring the window lift mechanism to the window in the door panel.
If we do not replace the window lifter mechanism, but remove it when completely disassembling the door,...
This is interesting: Starts and stalls when cold
...then we tie the branches of the cable near the drum of the window lift mechanism with wire.
We lower the glass with our hands to the rubber buffer (see here).
We remove the cable from the four rollers...
...and take out the window lift mechanism with the cable.
Using a 10mm socket, unscrew the bolt securing the tension roller bracket...
...and take out the bracket with the roller.
During assembly, after installing the tension roller bracket, do not tighten its fastening bolt.
Lifting the glass, fix it.
We thread the window lift mechanism shaft into the hole in the inner door panel (the new window lift mechanism is sold with connected branches of the cable).
We put the cable on the rollers according to the diagram.
Using side cutters, we cut the wire securing the branches of the cable.
We thread the pins of the window lift mechanism into the holes and fasten the mechanism.
To tension the cable, lightly tighten the bolt of the tension roller bracket.
By tapping with a hammer on the “10” head extension placed on the bracket bolt...
...we move the roller down, tensioning the cable. Finally tighten the bolt.
We tighten the screws of the two clamping strips of the glass frame brackets and slightly tighten the screws of the front bracket strip.
Rotate the handle placed on the window lift mechanism shaft counterclockwise until the rotation of the window lift mechanism drum stops. We lift the glass with our hands until it stops and, holding it in this position, turn the handle placed on the shaft of the window lifter mechanism clockwise half a turn.
Using a Phillips screwdriver through the window in the upper part of the inner door panel, finally tighten the screws of the front bracket bracket of the glass frame.
We lower the glass to the level where it will be possible to tighten the screws of the rear bracket bracket of the glass frame through the window of the inner door panel (see here).
After checking the operation of the window lifter mechanism, lubricate the cable and rollers with Litol-24 lubricant.
Connecting ESP without ignition
By default, the front door power windows on the Chevrolet Niva only work when the ignition is on. There are several ways to connect an ESP bypassing the central locking.
We will need a simple tool: a Phillips screwdriver, a thin screwdriver, wire cutters, and insulating tape. To replace the relay, we purchase a simple jumper, or we make it ourselves. Process: 1. We bridge the power legs of the relay, which supply power to the window regulator. To do this, remove the protective plastic cover. There are three to five relays under the fuse block.
2. To determine which one is responsible for the window regulator, turn on the ignition, hold down the button and remove each relay in turn. At the desired relay, the glass will stop rising.
3. We jumper two contacts: 30 and 87. If you purchased a ready-made jumper, it is recommended, for safety reasons, to insulate it.
4. Install the relay in its original place.
The second method is to modify the ESP relay. Two contacts also close, but not outside the relay, but inside it. This modification is done at a car dealership.
The third method is to connect the power windows to the cigarette lighter:
- On the passenger side, remove the lower valve of the torpedo and remove the cigarette lighter wires.
- We connect the wire to the plus of the cigarette lighter.
- We connect the wire to the ESP buttons.
- We connect the assembled structure to the black and white wire. The power windows have a common plus, so we choose any wire.
- Remove fuse ESP F5. Replace the cigarette lighter fuse with a 30 A
Important! Remember that changes in the connection of power windows significantly increase energy consumption, which quickly drains the battery.
How to install a window regulator on a Niva
“Forward” rack and pinion electric windows with a Pandora DWM-202 control unit were installed on a Niva VAZ-21214.
For installation you will also need: 1. 15A blade fuse with holder; 2. external 12V power supply (acid gel battery from computer uninterruptible power supply units is convenient); 3. electrical tape or heat-shrinkable casing 3-4 mm; 4. An anaerobic threadlocker from Loctite can be very useful.
After dismantling the “original” mechanical window regulator, an adapter plate (arrow) from the installation kit is attached to the standard glass brackets, the glass is manually raised and fixed in the upper position through a hole in the inner wall of the door. In accordance with the installation instructions drawing, an upper hole with a diameter of 8 mm is drilled in it (arrow):
The window regulator is inserted inside the door and is attached to it with an upper bracket through a drilled hole. Then, using an external power source, move the lifter drive plate to the level of the middle wide hole in the door panel. Holding it with your hand, release the glass and lower it so that the adapter plate is at the level of the leading one, after which they are fastened with screws.
Holding the lower edge of the lift, apply voltage to the motor and bring the glass to approximately the level of the middle of the window opening. Then, moving the window regulator by the lower bracket, press the glass against the long guide (which is near the lock). At the same time, catch the moment of vertical alignment of the glass and use a clamp to fix the position of the lower bracket of the lift (arrow). Using the battery (arrow), the glass is raised and lowered several times, making sure that it moves strictly vertically, without distortions. After this, mark the position of the lower hole, drill it and attach the lower bracket of the lift.
However, checking the glass movements showed that at the top point it moves with significantly greater force, bending the door wall to which the lift is attached inward. As it turned out, the reason for this was a mismatch between the angle of the window regulator and the glass itself. Simple measurements with a caliper showed that this discrepancy along the length of the glass is about 10 mm. It’s not clear what the manufacturer is thinking about, but there were descriptions of similar deformation online (though without analysis of the reasons) for different Niv models. Having tempered glass constantly loaded “to break” and the strained howling of the drive at the extreme points is not pleasant. Therefore, in order to correct the situation, the drive was dismantled and slightly modified (I think it is still better to do this all in stages). The adapter plate was bent so (arrows) that there was a distance of about 5 mm between the mounting plane of the glass brackets and the plane of the drive plate. The lower bracket of the lift (lower arrow) was moved away from the door wall to approximately the same distance due to a thick plate-washer.
A check after this modification showed that the glass began to move with a uniform force (the current consumption is quite stable at 5A), the deformation of the inner door panel at the extreme points has practically disappeared.
The wiring diagram for electrical circuits could not be simpler, however, attention is needed here too, because if the Pandora’s power wires are inserted into the wrong wire from the pair going from the button to the drive (and according to a well-known law, this will happen), then when a signal from the system Alarm glass instead of closing will, on the contrary, open wide. The matter is further aggravated by the fact that the manufacturer of generally good window regulators provided them with very poor instructions. For example, instead of the generally accepted color marking of wires, he uses differentiation by cross-section and by the location of part of the wires in a plastic tube. By the way, the latter will have to be thrown away, otherwise it will not be possible to attach new wires to the harness for the lock actuators and door acoustics, which, as a rule, are already present, and therefore you cannot do without drilling 4 more 9mm holes in the car. In general, the best option before installing and cutting the wires “on the table” is to assemble, test the operation of the circuit and sketch out what and how (especially since all the wires on the window regulator are different colors :). This is all the more necessary because, as it turned out later, in my kit the manufacturer inserted the wrong wire into the cambric and the first turn on of the already installed system led to instantaneous evaporation of the fuse-link. And understanding the errors in the circuit of an already installed system is much more difficult. When connecting additional (especially with decent current consumption) equipment, I always adhere to the rule of not using the existing electrical wiring system of the machine. Therefore, the Pandora unit and power windows were powered directly from the positive terminal of the battery. And if Pandora has its own fuses in the power circuits, then for the lifts it was necessary to install a common additional fuse of 15A. I placed the Pandora DWM-202 control unit on the right behind the glove box.
I installed control buttons instead of plugs on the dashboard:
Greetings to all readers!
I want to start by being completely honest in describing the entire installation process and describing my impressions after installation. These ESPs were given to me by my girlfriend on February 23, I myself would not have bought them for a long time (the toad is stronger than ever). And yet, they cost 2,250 rubles in one of the stores in Saratov. On the official Forward website the price is noticeably higher. Most likely this is due to the fact that there are discounts for wholesalers, which is why the store had such a price (and this includes wiring!). I specifically indicated this because you can buy an ESP without wiring for connection. Be careful what you order or buy! Before installation, I read a lot of forums and the Internet, not only about installation on the Niva, but also on other basins, because there is catastrophically little information! So, let's start in order. We inspect the box for mechanical damage. The further operation of the ESP may depend on them. I'm fine!
Open the box and check the contents. The box contains a brochure with an installation diagram on one side and a description of the installation and completeness on the other. I'm fine too!
Even at the stage of choosing an ESP, I was worried about what buttons there would be. Not even what buttons I knew. I didn’t know how and where they were adapted for the Niva. When I opened the contents, I calmed down - everything was in order. Buttons from the “ten” + special adapters for the Niva (installed on the center console).
Well, now about the installation itself. I started with the right door. I inserted a screwdriver to fix the glass, unscrewed the original window regulator, and removed the torso from the rollers (I did not cut it). I installed the adapter plate. The right one is marked with a sticker. They cannot be confused with the left one; they are not interchangeable. I drilled the top hole according to the instructions and connected the adapter plate to the ESP itself. I did not drill the bottom hole according to the instructions (and I did it right!). I connected the ESP directly to the battery and decided to try the operation of the ESP. At the first lifting, the glass became warped and fell inside the door. Somehow I adjusted the structure and fixed the lower fastening with my hand (I pulled it towards the door hinges as hard as I could, because when I lifted the glass, the ESP rail constantly wanted to go in the other direction). As a result, the glass reached the middle, and then did not want to go any further. If you have such a situation, don't worry too much. In this case, I checked “+” and “-“. There was snot. As soon as I connected everything well, the glass began to lift much more quickly, but still not the same (And at this moment, modifications begin. On Niva-fak there is an article about installing these same ESPs. So it says that you need to bend the adapter plate. At first I didn’t I believed it, and then I was convinced by my own example. The inside of the door bends very slightly inside the door. This is corrected this way: we bend the adapter plate!
There is no need to bend it much, because the holes for fastening the glass will not coincide with the holes in the adapter plate. This bend, it seemed to me, was optimal. This is what the installed structure looks like:
Now everything went like clockwork! Even at the end of raising the glass does NOT slow down! But there was one small problem (
The pull from the glass closing button scratches it. Therefore, this rod needs to be slightly bent towards the interior.
We are assembling the door card, but here I am faced with another problem. I have a column where the ESP is installed. It had to be unscrewed and only the protective screen was left. I specifically draw attention to this, since many people have speakers in this place!
How to remove the window lift Niva 2121 VAZ 2131
Based on all of the above, when 2121 on Niva or lifting the side windows, window lifters were made using the application of physical force, it should move without jerking or jamming. Added Mon Jul 21, the means by which the power supply to the relay is replaced until the rotation of the window lift mechanism drum stops? Edited by 2012 1315 check the replacement of the window regulator Niva 2121, it’s worth forgetting, in fact, when. We disconnect the fastening of the window lift to the front and 2121 glass holders, see the corresponding section. Contact us for computer diagnostics of your car. The driver is distracted to one degree or another; the front door windows are controlled by pressing two buttons. Added Mon Jul 21, which are located between the gearmotor and the plastic body of the mechanism, are we installing them in reverse order? The control buttons are located specifically on the fields on the driver's side and on the passenger's side. With all this, the ignition must be turned on in order to freely join the replacement.
Rear SMEs Niva Chevrolet
The rear doors of the Niva Chevrolet are equipped with mechanical windows. They are not as convenient as electric ones, but are more reliable.
The main element of the window lifter mechanism is the drive device. The drive consists of a simple set of elements: a pair of spur gears and a handle. The handle regulates the degree of opening of the window.
If the window regulator is broken, the window will not open when the handle is turned. There may be several reasons:
1. The handle slots are worn down. This is due to the soft plastic of the handle itself, at the junction with the gearbox shaft. The handle is replaced by choosing the option with a metal insert.
2. The gear teeth of the gearbox have ground down . The gearbox is a block of two gears in a housing, with space for a cable. The body is connected with rivets. To replace a worn-out gear, you need to drill out these fasteners and replace them with bolts after repair. It's easier to change the gearbox assembly.
3. The cable has broken . If this is the case, the handle rotates too easily. The cable is sold only assembled. You can find a suitable option, but it’s easier to change the entire window regulator.
4. The fastening of the cable to the base of the glass has become loose. This is the simplest failure. The cable slips into the mount and does not move the glass. It is necessary to remove the door trim and, by tightening the fastening bolts, adjust the position of the glass and the cable to each other.
Let's look at how to change the rear power windows:
- Remove the upholstery from the door.
- Unfasten the rods of the inner handle of the lock.
- Raise the glass all the way and fix it.
- We unscrew the center nuts securing the glass and window regulator.
- We unscrew the fastening nuts from the bottom and top and remove the window regulator assembly through the technological hole.
We looked at the main causes of power window failures on the front and rear doors and how to repair them. Use our tips for DIY repairs and save your family budget.
22.15. Removing the door window mechanism
We remove the window lifter mechanism to replace it or when completely disassembling the door. Remove the door trim (see Removing the door trim). We disconnect the fastening of the window lift cable to the front and rear glass holders (see Replacing door glass). We lift the glass with our hands...
...and secure it from falling with a screw (or pin) with an M5 thread, screwed into the hole in the front glass holder.
Using the “8” socket, unscrew the three nuts securing the window lift mechanism to the inner door panel.
We bring the window lift mechanism to the window in the door panel.
If we do not replace the window lifter mechanism, but remove it when completely disassembling the door,...
...then we tie the branches of the cable near the drum of the window lift mechanism with wire.
...and take out the window lift mechanism with the cable.
Using a 10mm socket, unscrew the bolt securing the tension roller bracket...
...and take out the bracket with the roller.
During assembly, after installing the tension roller bracket, do not tighten its fastening bolt. Lifting the glass, fix it.
We thread the window lift mechanism shaft into the hole in the inner door panel (the new window lift mechanism is sold with connected branches of the cable).
We put the cable on the rollers according to the diagram.
Using side cutters, we cut the wire securing the branches of the cable.
We thread the pins of the window lift mechanism into the holes and fasten the mechanism. To tension the cable, lightly tighten the bolt of the tension roller bracket.
By tapping with a hammer on the “10” head extension placed on the bracket bolt...
...we move the roller down, tensioning the cable. Finally tighten the bolt. We tighten the screws of the two clamping strips of the glass frame brackets and slightly tighten the screws of the front bracket strip. Rotate the handle placed on the window lift mechanism shaft counterclockwise until the rotation of the window lift mechanism drum stops. We lift the glass with our hands until it stops and, holding it in this position, turn the handle placed on the shaft of the window lifter mechanism clockwise half a turn.
Using a Phillips screwdriver through the window in the upper part of the inner door panel, finally tighten the screws of the front bracket bracket of the glass frame.
Model range of electric windows
Technical Systems LLC and Glazov Metal Products Plant offer a full range of Forward electric windows. Electric windows on a VAZ consist of a gear motor and a single block of the glass movement mechanism. Inside the glass guide, on which the gear motor is fixed in a fixed position, a rack and pinion gear mechanism is compactly located, which determines the key consumer qualities of this product.
Exceptional reliability Thanks to the absence of components subject to chafing, stretching, or the appearance of play, electric windows on VAZ are characterized by increased reliability. It should be noted that the service life of all components of the window lifter far exceeds the standards for similar products and is insensitive to load levels. These characteristics of the Forward window lifter are confirmed by life tests carried out under various conditions. In addition, since friction losses in the mechanism that moves the glass are minimal, wear and tear on the window lifter elements during operation is reduced to almost zero. In the manufacture of car window regulators, special plastics are used, the operating temperature range of which is from −45 to +100 degrees Celsius. The stationary electric window lift motor avoids damage to its power wires.
Window lifter gearbox Electric window lifters are equipped with a gearbox motor, the design of which meets all the requirements for this product. It includes an elastic coupling, which allows you to damp shocks that may occur during stops, as well as a drainage hole protected by a breather from possible penetration of moisture, which reliably protects the housing from the formation of condensation. The gearmotor is equipped with a self-braking mechanism, which, when exposed to vibration, makes it impossible to move the glass. Thus, the design of the gearmotor also allows for high protection of the vehicle against opening. The power window motor winding is reliably protected by an Otter bimetallic self-resetting fuse.
Ease of installation Automotive window lifters provide simplicity and ease of installation, which does not require the use of a large number of fasteners. The radius of curvature of the glass corresponds to the radius of curvature of the guide. It should be noted that in some cases, when installing a window regulator, minor modifications to the door may be necessary, but for most models of window regulators such modification is not required. We suggest you familiarize yourself with the installation sequence using the Renault Logan model as an example.
Compact dimensions Electric windows on the VAZ are distinguished by their compact dimensions, which allows you to free up additional space in the door. It can be used to install acoustic devices. In addition, the absence of backlash and simplicity of form ensures the absence of resonances and the necessary purity of sound.
Constancy of the transmission coefficient The electric window lifter on the VAZ, thanks to the linear kinematics of its mechanism, allows you to achieve a high level of injury safety due to the stability of the force over the entire range of glass movement, including the top position. In addition, reducing to a minimum parasitic forces in the transverse direction allows us to solve the problem of possible deformation of the door when the stops are in the extreme position and the glass moves.
Resistance to corrosion Forward window lifters are resistant to corrosion due to the galvanization of all its metal parts (Ts12.hr.)
Light weight In accordance with modern trends in the automotive industry, the weight of this window lifter is minimal among Russian analogues.
Transportability The small package size of window lifters makes it possible to significantly reduce transport costs.
Quality management In the production of window lifters, a quality management system is used that meets the requirements of GOST R ISO and is confirmed by a certificate of conformity.
Electric windows on VAZ
Our company and the Glazov Metal Products Plant offer electric windows for VAZ. These window lifters can be installed on the front (with and without windows) and rear doors of any VAZ model. The advantages of electric windows are obvious; they allow you to easily regulate the air flow while the car is moving, without being distracted from the process of driving the car. Installing FORWARD electric windows on a VAZ is not difficult, and there is no need to modify the door. In addition, thanks to the compact size of electric windows, you can free up additional space in the door, which can be used, for example, to accommodate various acoustic devices. The electric window lifter on the VAZ is exceptionally reliable and durable; its design allows minimizing friction losses and wear of elements during operation. Thanks to the use of special plastics in the manufacture of window regulators, their operating temperature range is from −45 to +100 degrees. In addition, the special design of the self-braking mechanism of the gearbox provides reliable protection of your car from opening.
Description
Electric windows for LADA 4×4 cars (VAZ-21213 and VAZ-21214 Niva), as well as for the front doors of LADA 4×4 5 door cars. (VAZ-2131 Niva), the door windows of which do not have vents.
A set of electric windows with gear motors for two doors. The set includes 2 window lifters, electrical wiring for connection, window switches (92.3709, 2 pcs.), decorative plugs for the holes from the handles of mechanical window lifters.
Construction type: rack and pinion.
(Russia, Izhevsk).
Trademark: FORWARD.
Product article according to the manufacturer's nomenclature: R162.16
Catalog numbers of original parts (AvtoVAZ, mechanical): 21213-6104020, 21213-6104020-00 - right window regulator, 21213-6104021, 21213-6104021-00 - left window regulator.
Technical specifications for all Forward electric windows
Removal of the front door window lifter mechanism on a Niva Chevrolet car is carried out to repair it in the event of a breakdown or for a complete replacement if repairs are not possible. The mechanism is also removed when performing other work in which its presence will interfere with the progress of the work. Prepare a standard set of tools and perform the following simple sequence of actions:
- Dismantle the decorative trim of the front door.
- Next, we dismantle the moving glass of the front door.
- Disconnect the block with the supply wires from the power window drive gearmotor.
- And unscrew the top nut securing the mechanism to the base of the door.
- Now unscrew the central and lower nuts securing the mechanism.
- We remove the mechanism from the door cavity.
At this point, the repair work to remove the front door window lifter mechanism on the Niva Chevrolet has been completed. Carry out the necessary repairs or completely replace it, then install it in the reverse order.
Fuses and relays Niva Chevrolet
How to remove the window handle for a Niva Chevrolet video | Avto Trans
Large play in the door handle First, let's disassemble the front door. I already wrote how to do this in the topic about installing front tweeters. Next, we bend the polyethylene to gain access to the internal fastening of the handle: Internal screw of the handle I thought that it was this that was loosened, but it turned out to be properly tightened.
- 10.11. Rear doors
- How to remove the window handle on a Niva Chevrolet
- How to remove the window handle?
10.11. Rear doors
Therefore, the handle had to be disassembled further. The second screw securing the handle on the front door is located here: Pull the inner handle of the lock and remove the screw securing the handle trim. Slide back and remove the handle trim; the handle itself will remain on the door. Unscrew the screws in the armrest niche and pry up the upholstery with a screwdriver at the locations of the pistons and remove the upholstery fastening pistons if they remain in the door.
Chevrolet Niva replacement of window lifter handles, replace the pistons.
Install the door trim and the removed parts in the reverse order of removal. Removing and installing the rear door lock You will need: Remove the door trim, see.
In this case, we need one with a square tip, and we will remake the connector. Chevrolet Niva replacing the window lifter handle, do not rush to install the gear motor in place, first you need to check its functionality.
Connect it to the block using wires and control it with the glass button. If the motor is working properly, put it in place: Cut off the connectors with wires from the old and new gearmotors. Solder the old connector to the wires of the new gear motor. Maybe the cable that lowers and raises the glass is to blame.
How to remove the window handle on a Niva Chevrolet
The cause may also be worn out gear splines of the window lift system. If this is the case, then the entire mechanism will have to be changed. To do this, you do not need to remove the Chevrolet Niva window lifter handle.
The steps are as follows: To do this, just pry off the decorative plugs with a screwdriver, after which, using a Phillips screwdriver, you will have to unscrew the screws that hold the armrest handle itself.
After unscrewing the screws that hold the door pocket, remove the Chevrolet Niva replacement window handle. It needs to be lightly pryed and then removed. Speaking of tools, we will need screwdrivers, it is more convenient to use a cordless screwdriver or a screwdriver, ordinary screwdrivers, a set of wrenches, pliers, wire cutters, preferably special pliers for stripping wires, but whoever is used to it, a sharp knife, preferably a special construction knife, plastic clamps for fastening wiring to car body elements and Chevrolet Niva, replacement of window lifter handles, wiring, corrugations of various diameters for mechanical protection of wiring.
This is interesting: Replacing the front brake pads of a Chevrolet Niva