Selecting a 2 DIN radio
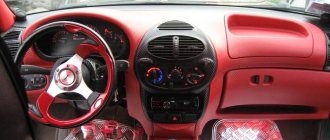
The Lada Granta can be equipped with a 1 or 2 DIN device. These radios have 2 types of display: standard and touch. When choosing other equipment, you will need to purchase or make a frame to frame the device body. The rule applies to miniature 2 DIN speaker systems. They have a standard frame. She approaches Granta's radio panel. However, the final decision remains with the car owner.
Among AvtoVAZ products there is a device with a touch screen. The advantage of the radio is the same backlighting of the control keys and other buttons. To install a standard device, you need to buy an original panel on the main console. The standard mounting socket is not intended for such devices.
Installing a radio
As you know, the standard version of the car does not have a car radio, so the question immediately arises of how to install a radio on the Lada Granta. In fact, this is very simple to do, since the place for the device was provided during the manufacture of the car itself.
In Grant, the niche for the radio is made in such a way that there is no need to run additional wires. First, take a flathead screwdriver and remove the plastic pocket that is located in the place where you will install your radio. Behind this pocket you will see several connectors where, in fact, you need to connect your device. Connect these two connectors and place the device itself in the place intended for it. Installing a standard Lada Granta radio will take very little time, so you can do it yourself. But if necessary, you can contact a specialist.
How to install in Granta
To install the radio, you will need to perform several sequential steps. They are presented in the form of step-by-step instructions:
- Use a pry bar to remove the climate control knobs.
- Pry and pull out the cover of the middle of the panel. When dismantling, you will need to remove the wiring sockets to the equipment control keys.
- Use a hacksaw to cut out the main jumper in the dashboard. You can use a construction knife. Reduce the channel for the central ventilation deflectors by 5 mm.
- Install the car radio into the installation shaft using ready-made brackets. Fix the device at special points located in the panel.
- Mount the frame for framing. It is necessary to rearrange the deflectors on it in advance.
It’s easy to find many videos on the Internet with the title “installing a 2 din device in a Lada Granta.” Detailed descriptions will help you complete the task faster.
If the 2 DIN radio supports a subwoofer, it is advisable to run the wiring under the door sill trims. If an active subwoofer is used together with a bass reflex, you need to route the power cables into the trunk. They must have a special fuse.
A double-din speaker system differs from a stamped one not only in size. The DIN radio has advanced functionality, which explains its popularity among motorists.
Connected amplifiers greatly increase signal reception. Simplification of radio search occurs due to accessible viewing of system files. The storage devices are connected using a USB connector.
Music zone allows you to switch the frequencies you listen to. There is access to various radio programs in the AM and FM bands.
The combined navigator has a calculated router map.
Impact protection extends service life.
The development of digital technologies has not spared modern cars. Installing a 2 DIN device does present some challenges, but these are outweighed by the excellent functionality.
How does the flashing process work?
A review of the standard Lada Granta radio is discussed in this article. Now you need to figure out how to properly flash its firmware. To do this, you will have to use an SD card with FAT formatting capability. Download the firmware for it.
The easiest way to find it is on various car enthusiast forums. Now insert the card into the special hole for it on the radio and reboot the music device itself.
Useful tips
The dimensions of the double-din system are 178x100 mm. Installing a radio will require modifications to the interior space. If you purchase a device 178x120x100 mm, this can be avoided.
To install a simple car radio, the size should not exceed 178x50 mm. To install, use a plastic spatula or screwdriver. The kit includes adapters.
To install 2 DIN, you need to take another console trim and pliers. Additionally, you will need a frame for the head unit and a metal blade. The latter will be required to finalize the installation site.
The replacement of standard acoustics with analogue ones deserves special attention. Even if the device has identical dimensions, a new frame will be required. Otherwise there will be gaps in the panel.
Let's start installation
To install the radio, you need to remove the center console. It can be removed easily, just pry it from below and apply a little pressure. Then you should disconnect all wires connected to additional equipment. To ensure that the new audio device is recessed into the panel during installation, you need to remove the partition with a hacksaw. After all, the standard seat sizes in Granta are usually designed for 1 DIN size. Sometimes it is also necessary to slightly shorten the adapter flange leading to the central nozzles of the ventilation system. It won't harm her work in any way.
Center console disassembled
When installing, you should follow the recommendations from the instructions and use the wires and adapters supplied with the gadget. Sometimes it may be necessary to purchase additional items. This will be clear from the radio connection diagram. Usually the connection takes very little time.
After connecting and checking the functionality of the device, you should assemble the central console. To do this, install all the buttons and nozzles of the ventilation system, as well as the heater control unit from the old console. The nozzles and buttons must be secured with latches until they click, and the unit must be secured with two screws.
The console is secured to the dashboard with four clamping clips. They can be included in the kit or purchased separately. During installation, the frame is fixed from the inside with latches.
The console must be locked until it clicks. You should also secure it with screws. After this, the decorative frame snaps onto it. The radio is installed!
Installation completed
How to install
Installation of the radio on the Grant is carried out in a standard socket located above the climate control controls. Thanks to the use of a factory wiring harness, accelerated connection of acoustic equipment is ensured. Laying additional lines is required when using a low-frequency loudspeaker in the luggage compartment or high-frequency tweeters mounted on the front roof pillars.
All installation work is carried out indoors with artificial lighting; in clear weather, installation in open space is allowed. For safety reasons, it is necessary to disconnect the standard battery from the vehicle's on-board network.
Car radio
Step-by-step instructions for installing a radio in a Lada Granta of the “standard” or “norm” modifications:
- Hook the central pocket-plug by the edges to remove the latches from engagement with the front frame.
- After removing the element from the socket, it is necessary to disconnect the plugs of the factory wiring harness, located in special sockets on the rear part. The car has 2 8-pin connectors for connecting power and speakers.
- Fold the glove box housing down; there are travel stops on the upper part of the rear wall that need to be disengaged from the dashboard frame.
- To expand the working area, it is recommended to remove the cover by pulling it towards you.
- Raise the decorative floor covering of the car along with the soundproofing mat near the passenger seat. Pull out the factory antenna cable equipped with a plug that needs to be extended to the installation location of the player.
- Place standard slides for attaching the radio using special bendable elements.
- Further installation of the radio in Grantu is carried out after switching the loudspeakers.
Installing the stock radio is slightly different from the procedure described above:
- Since the standard frame is designed for 1DIN size equipment, a replacement unit is required. To do this, you will need to carefully pry and remove the plastic climate control controls. The frame itself is fixed with latches, which are removed one by one from the mounting sockets using a plastic spatula.
- For final dismantling, it is necessary to disconnect the connectors connected to the control buttons for the air conditioning, hazard warning lights and heated rear window. It is necessary to make notes that will allow you to correctly connect the plugs on the new panel.
- Remove the keys, climate control parts and ventilation deflectors from the center console, which are transferred to the new unit.
- The “luxury” version of the cladding, designed for mounting a 2DIN radio, consists of 2 sections. The lower part is equipped with additional fastenings with screws, under which it is necessary to install counter elements. The parts are placed in standard places around the perimeter of the instrument panel in the upper and lower parts of the landing window.
- Place a separate adapter frame, which is supplied with the head unit, in the mounting socket of the radio.
- Place the cladding in place, securing the part with latches and screws. The switching cables for acoustic equipment and control buttons are routed through the corresponding holes into the car interior.
- Install a standard player into the guide slides, having previously connected it to the on-board network and antenna. The assembly is secured with side latches; if dismantling is required, the clamps are bent with a screwdriver.
- Install a horseshoe-shaped decorative cladding located around the perimeter of the central part of the decorative panel. Reinstall the plugs for the hazard warning, air conditioning and heated glass buttons, and then place the keys in the standard sockets.
When installing non-original equipment of 2DIN size, the owner is faced with the impossibility of placing the radio in depth. To ensure the fit, trimming of the plastic elements located in the instrument panel is required. The player is fixed in the mounting shaft located in the window of the central cladding; the display is framed from the outside by a transition frame.
Acoustics
Basic versions of cars have standard acoustic wiring installed inside the doors and interior. The plastic door trims do not have holes for speaker diffusers; the owner needs to cut the channels himself. For marking, the standard decorative frame of the speaker is used; you need to cut a hole corresponding to the inner circle. The channel must coincide with the surface of the diffuser; the speaker moving beyond the door panel material leads to a deterioration in the sound picture.
The standard speaker ring is attached to the plastic casing with screws and is covered with a decorative mesh on top. The speaker mounts directly to the factory holes on the inside metal door panel. If the diameter of the column is smaller than the size of the hole, then fastening is carried out through a wooden podium.
The connection point between the cables of the loudspeaker and the on-board network is protected by a special insulator.
The rear speakers are installed through special plastic adapters. On the Lada Granta liftback it is possible to use oversized speakers that cut into the luggage compartment shelf. To protect diffusers, it is possible to use original meshes produced by .
To install the elements, it is necessary to completely cut out the plugged hole in the door panel.
In this case, it is necessary to form grooves intended for installing latches; the contours of the channels are outlined on the rear part of the part.
How to connect to the mains
The radio is connected to the standard connector directly or through an intermediate element equipped with appropriate plugs. The type of switching depends on the head unit model. The design of the electrical circuit has a standard blade fuse located in the relay block. Switching is done through the ignition switch, so turning on the equipment is possible only if there is a key in the cylinder.
The user can install additional plugs to the radio that transmit a signal from an external rear view camera. Automatic image transmission is activated after the reversing lamps are turned on.
conclusions
The Lada Grants radio tape recorder is a good quality product from a domestic manufacturer. Many car enthusiasts are happy with this device, but they don’t mind “correcting” it a little using firmware.
Since the beginning of 2011, all Lada Granta models have been manufactured with audio preparation: factory radios and receivers. The quality of reception and sound is not always at the highest level due to its cheapness and simplicity. When purchasing a Lada Grant from the showroom, the owner receives audio preparation, acoustic wires, and installed electrical wiring.
The door panels have already prepared openings for installing speakers. True, few people use the standard seat, as they prefer the rear shelf to improve the sound.
How to connect a radio to a Lada Granta: course of action
The very first manipulation that needs to be performed in order for the installation of the radio on the Granta to be successful with your own hands will be the dismantling of the plastic pocket installed in the place of the future audio system. This procedure is easy to perform by using a screwdriver that has a flat blade.
When removing the pocket, the driver will find that on the reverse side there are slots where ISO connectors are inserted - connectors for connecting a car radio. These connectors are held quite tightly in your pockets, which means you don’t have to look for them on the panel for a long time to connect all the connections.
Next, we remove the metal frame from the car radio and install it in the place where until recently there was a plastic pocket. Reliable fixation can be achieved by unbending the frame antennae.
The next step will be to connect the connectors to the car radio and install it in the frame already installed in the niche. When performing the installation, the installer will only need tools to change the shape of the holes (this could be a saw or a file). It should be taken into account that all sizes are already made in accordance with the housing standards for 1 DIN car radios.
Characteristics of the standard radio "Lada Grants Liftback"
The radio for the Lada Granta liftback is supplied as standard equipment. Product in 2-DIM format (100 x 180 mm).
In addition to the classic radio, there is a built-in card reader, Bluetooth, and a USB output for connecting flash drives. The only disadvantage of the audio module is that it is a push-button type. Which is not to the liking of many car enthusiasts, which is why they install more modern modifications.