Installing an antenna on a radio
The question “how to install and connect a car antenna” is asked by everyone who bought it or is planning to do so. We'll tell you how to install a car active antenna and how to do it correctly.
It often happens that the antennas installed on the radio in the car do not pick up the desired radio frequency well or cause interference. At first the driver thinks: “okay, I’ll listen to music on flash drives or disks.” But music downloaded or recorded on discs begins to get boring over time. Or another problem - you need a larger signal to watch car television. Then a car active antenna will come to the rescue.
Choosing a place to install a car antenna
Initially, you need to determine where you want to attach the antenna. Typically, an active antenna is placed either in the upper right corner of the windshield if its reception arrows diverge in the horizontal and vertical planes. If its antennae diverge only horizontally, then it is worth placing the antenna in the center of the car window, behind the rearview mirror.
Installing a car antenna
Once you have decided on the location of the antenna, you can begin installing it. The antenna and its waste antennae must be glued to a glass surface that is clean from dust and dirt. Some manufacturers include a special cleaner included. The antenna is attached with double-sided tape - you need to peel off its protective layer and press as hard as possible for 10-20 seconds.
When you have glued the antenna, you should start laying wires to the radio. It is recommended to lay the wires under the roof trim, and then lower them down along the windshield pillar.
Connecting a car antenna
Typically, a car antenna includes 3 wires. 1 wire, responsible for grounding, must be connected to the ground of the car. Any metal mount to the car body is suitable as a mass. Without this wire, the antenna has much less sensitivity than with it.
The second wire is for power; this wire is connected to the wire from the radio. The last, third wire - the contact wire - is connected to a special connector for the antenna in the car radio. As a rule, the contacts and the power wire are combined into one, when when you turn on the radio, the antenna also turns on. And in this case, the cassette player serves as an additional “mass”.
Everything is ready, all that remains is to check the performance of the antenna and enjoy the wonderful sound of the radio stations. And it should be said that you should not chase foreign antennas from Bosch and others, because domestic Triad antennas have proven themselves well among car enthusiasts.
After installing an audio system with a radio, the question arises about choosing an antenna. Indeed, what’s the use if you have an optional radio with radio, but don’t have a good antenna for it!? It is precisely this situation that our article is intended to correct. In this article we will talk about the types and installation of active and non-active antennas. First, I wanted to take the reader on a tour of the need to install one or another antenna on a car. There's no way to tell exactly what you need based on whether you drive in or out of town, but the quality of your audio system will be a more decisive factor.
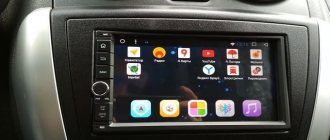
Installation of 1 din radio in Grantu standard and norm
What is needed to install a radio in a VAZ 2190:
- The radio itself is also the head unit;
- flat screwdriver;
- Straight arms.
Abbreviations and symbols in the text:
- GU – head unit;
- MMS – multimedia system;
- DIN (din) – installation size for acoustics in a car.
Step-by-step instructions for installing the head unit
- a narrow flat screwdriver or plastic spatula for installing acoustics;
- 1-din radio with frame.
The seat in Grant is designed for 1 din. To work with large 2-din sizes, you will need to cut out the partition and install a decorative frame.
How long should the connected antenna be for reliable reception?
When I talk about quality, I mean the sensitivity of the radio receiver. What is sensitivity? Sensitivity is actually the minimum signal measured in volts that is induced from the transmitter on the antenna. A signal at which the receiver is capable of producing high-quality signal reproduction with nominal characteristics. The longer the antenna, the higher the emf. on the antenna, the correspondingly lower the sensitivity of the receiver should be. But even here there is a reasonable limit when, as the length of the antenna increases, the signal will no longer be reproduced with better quality. There is also the matter of what kind of waves you are going to catch.
The antenna must be a multiple of the wave amplitude. This is especially true for walkie-talkies, since the amplitude there is large, which means the antennas will be large.
So, the first condition is when everything is reproduced with nominal characteristics, as they say - it’s better and not necessary. The second factor is when the interference induced on the antenna will be amplified equally with the useful signal. In this case, it does not matter what length your antenna is, along with an increase in the length of the antenna and an increase in the useful signal, the E.M.F. will also increase proportionally. and unwanted signal - interference. It is important here that the receiver is selective, that is, it catches the “useful” signal.
As a rule, the sensitivity and selectivity of the receiver depends on the manufacturer; branded high-quality receivers have sufficient sensitivity of about 5 microvolts to ensure reliable reception with a standard antenna of about 0.5 m. This is quite enough for use in the city and outside the city up to 40-50 km from the transmitter. But even here, an unequivocal statement of high sensitivity and selectivity is not always a panacea. So, in a city saturated with interference, adjacent radio stations, every few tenths of MHz, the receiver may produce unwanted interference and noise. Of course, the quality of transmitting equipment is currently quite high and this outcome is unlikely, but still. Also, the distance of reliable reception depends on the landscape of the area. In open areas, reception will be reliable over a considerable distance; in a city where there are often metal structures, the signal may suddenly disappear. Resonance phenomena occur when waves are either amplified or significantly weakened as a result of shielding and their propagation characteristics. Now just a little about the principle of propagation of long and short waves. The principle is similar to the propagation of light waves. Longer waves are more amenable, so to speak, to diffraction, bending around surfaces, as a result of which they propagate much further with less loss. Short waves, when meeting an obstacle, actually change the angle of propagation. One or two obstacles and they have already lost their way.
Active antenna in a car
An active antenna is actually a regular passive antenna with an additional amplifier. Often amplifiers are made with sensitivity control, which we discussed in the previous paragraph. The adjustment is actually carried out by a highway - city switch or similar. By changing the sensitivity of the antenna receiver and adjusting to optimal reception conditions. So in the city the antenna will work without an amplifier or with minimal gain. In order not to provoke increased noise, since the useful signal is so easy to catch. But outside the city, you will have to strengthen everything that comes your way. And here the quality depends to a greater extent on the selectivity of the receiver. In order to protect yourself from low selectivity, it is better to purchase branded products.
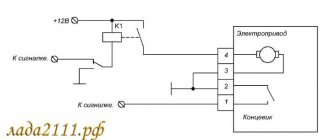
Connecting an active antenna to a car radio
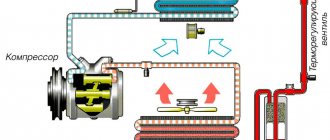
First, you need to decide on the location of the antenna. Typically this is the front windshield on the passenger side. The antenna is installed using double-sided mounting tape. The antenna has two wires for connecting power and one lead for connecting to the antenna socket of the radio receiver. The black (as a variation, not insulated) antenna wire is connected to the car body in any convenient place, preferably immediately and close to the immediate installation location of the antenna. In fact, this is a negative contact. The second, red (as a variation of blue) wire, stretches to the radio, where, according to the ISO standard, see the article “Connecting a car radio in a car with your own hands,” it is connected to the contact already provided for it from the radio. A more visual schematic diagram of connecting the active antenna to the radio is shown in the figure.
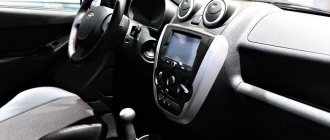
Removing the standard radio in Grant Lux
The difference between grants of the luxury configuration: the MMS (multimedia system) installed from the factory. This is a 2 din device.
To remove standard acoustic grants :
- take a knife or plastic spatula to dismantle the acoustics and disconnect the decorative trims to the right and left of the radio. It is not necessary to take pictures;
- in the gap between the cover and the panel we find the head unit lock. There are two of them on both sides. Press it out with a screwdriver;
- we take out the GU on ourselves.
Everything is described in detail in the video:
Replacing the standard MMC in Grant
The process - after removing the acoustics, we install a new system.
Connecting an active antenna to the radio via an adapter
Here, it seems, we could finish our conversation about connecting the antenna to the radio, if all its variations only ended with the same standard, the so-called DIN type. However, modern radios sometimes cannot afford such great luxury. There is so much in them that using a more compact plug can change the situation radically. This means that manufacturers are looking for opportunities to use their own plugs, but at the same time provide the ability to connect them with generally accepted ones. Here are some examples. The first example is when an ISO type antenna is connected to the radio via an adapter to a DIN socket. The second is when we have a Toyota radio and use an adapter to switch to a standard socket.
In fact, it is clear that when connecting an antenna, cases may arise that will require you to purchase additional adapters. And if you can’t find any, you may have to use a soldering iron.
Now we can certainly summarize that connecting an antenna is not only electrical switching, ensuring correct connection and reliable contacts of the antenna and radio, but also the selection of adapters that match each other. After all, simply by buying an antenna and trying to connect it to the radio, you do not at all guarantee that you will not need an adapter. Although the one who is aware is armed. And now we are confident that you will cope with the task!
When you have to spend a lot of time behind the wheel, you can’t do without music in the cabin. So you can find out the weather, news from the radio, and not get bored listening to the selected music. Other car antennas allow you to watch TV even in digital quality. Similar equipment is installed in minibuses and taxis to control and adjust the operation of this transport from the control room. The antenna can be attached to the glass using a suction cup or Velcro. There are good magnetic latches that can withstand outdoor installation, but require constant removal when leaving the car. Others cut into the body and are secured on the reverse side with a nut, becoming integral with the body. To figure out which antenna is better to buy in each specific case, below is a review of them and recommendations for selection. This will help you choose the right option and avoid overpaying for unused features.
Lada Granta liftback norm
The situation repeats itself, we have the option “Audio preparation (cable, external antenna)”. There are wires, and an audio system without TouchScreen is installed only in configuration 21917-710-41. All the necessary wires are already there, all that remains is to connect them.
Now you should understand what is included in Granta's audio training. If you have to connect the radio yourself, then we recommend that you read the instructions on how to install music.
Keywords: front speakers Lada Granta | rear speakers Lada Granta | cassette player Lada Granta | torpedo Lada Granta | Lada Granta doors | Lada Kalina doors
+8
Share on social networks:
Found an error? Select it and press Ctrl+Enter..
Which brand of car antenna should I choose?
The electronics market is filled with many products that operate with radio waves. Its manufacturers are well-known companies, among which a number of leaders can be identified:
The Italian brand Calearo is distinguished by a large range of similar products that have proven themselves to be of impeccable quality and reliability. There are both very economical models on sale, as well as multifunctional and expensive ones.
"Triad" is a domestic company that has been operating since 1998 and has more than 700 types of products sold, including: car chargers, converters, signal amplifiers, antennas of all ranges and shapes, including decorative ones. The company has a good reputation in Russia and abroad and has affordable prices.
Phantom, although it has a name in English, represents a Russian brand that is part of the international holding Stopol Gruop. The concern has existed since 1994 and specializes in car TVs, players, and various car accessories. American engineers regularly supply their colleagues with new developments in order to cover the needs of the majority of drivers with their equipment.
Lemm was founded in Italy and has been a world leader for over 30 years. Its products are used by many truckers, travelers and taxi drivers. Technology development is focused on improving performance.
Best Interior Car Antennas
For those drivers who do not want to make holes in the car body, internal antennas that can be mounted on the windshield or rear window are suitable. For fixation, use a suction cup or adhesive tape supplied in the kit.
Some models have a magnet, which allows you to attach it to a metal stand inside the cabin. The signal reception capabilities of each antenna are different, so below is the best equipment according to user reviews, with a description of its performance.
Triad 55 Turbo - Radio Only
This Russian model operates in the VHF and FM bands. The device is suitable for any radio and is designed to detect and retain radio waves at a distance of 150 km from the repeater. The antenna is equipped with a 30 dB signal amplifier and has a built-in filter, activated in urban mode, which filters out the inclusion of associated frequencies from mobile operator towers, electric vehicles and other radio signal sources.
The device is made in the form of a small rectangle with two antennae, and is attached with Velcro under the rearview mirror. The second installation option is on the right side of the windshield, where fixing the equipment will minimally block the driver’s view. The kit includes a cable and a power connection in a single winding. The wire length is 2.5 meters, which is convenient for powering and neatly masking the cable under the casing.
Advantages:
Flaws:
Automania Digital TV/FM – you can also watch TV
With this compact antenna model that is mounted on the windshield, you can not only listen to radio stations, but even watch TV in the car. This will be convenient for drivers of minibuses and intracity buses. The device has a small oval body and two “wings” with coil-shaped wire laying to increase reception. The design has a built-in 20 dB amplifier, which improves the quality of a weak signal.
Advantages:
Flaws:
Bosch Autofun - everything a radio amateur needs
This compact model will appeal to any driver who is used to traveling with music. German developers have provided it with minimal dimensions so that it does not block the driver’s view. The round case made of durable plastic is equipped with a red activity diode and an input plug through which 12 V power is supplied. Two antennae extend from the block - steel signal capture cables, which must be separated at 90 degrees.
The optimal position for the antenna will be the top corner of the glass on the right, and the antennae will stretch along the counter and the top edge of the window. The case thickness is only 15 mm. The antenna works in active mode, seeks and maintains a clear signal, thanks to compensation and distribution of the received data.
Advantages:
Flaws:
Phantom TV Impulse – discreet and functional
Such an antenna is capable of capturing radio waves and television signals, including digital ones. The device has a triangular body with a status indicator and the company logo. All wires are concentrated on one side. The antenna antennae stretch along the glass and have a built-in mount with double-sided tape at the tips and in the middle. This allows you to catch VHF-L CH 1-5, UHF 13-69, VHF-H 6-12.
How to install 2 din in grant norm or standard
Everything is more complicated here. Need to:
- dismantle the center console trim - unclip the fastenings, move it forward and disconnect the buttons and heater handles;
- cut out a vertical plastic partition that will not allow you to install a 2 din device;
- cut down the plastic casing of the central air duct;
- try on a new acoustic unit, adjust the fastenings if necessary;
- install adapters from the delivery kit on the wiring (if required);
- install the device;
- if we leave the old center console trim: we cut out the partition, try it on, put it in place with the buttons and handles connected, adjust the decorative frame of the control unit, install it;
- if we install a new trim on the console under a 2 din device: we transfer the heater control unit and buttons from the old trim, install them in place, and put a decorative frame on the control unit.
Best Outdoor Car Antennas
Such radio devices are usually more sensitive and allow you to receive signals from longer-distance repeaters. But their installation involves either constantly removing the magnet and transferring it to the interior, or cutting through the body and securely fixing it. Here are the best models according to reviews from drivers who use them.
Triad VA Euro 65 - instead of a standard antenna for any car
This model is the simplest and most accessible in the mortise models section. The body has a cone shape with a single rigid tendril located at 60 degrees relative to the plane. Such a device is located on the roof. To do this, a hole is drilled in the upper part of the body into which a cylindrical protrusion of the antenna is inserted, and a clamp on the thread secures it from below.
The wide edges of the outer part reliably isolate the interior from moisture. A power cable extends from the inner casing and is hidden under the casing. The reception range reaches 90 km. The roof bar does not exceed 200 mm in length and its thickness is 15 mm. It is compact and difficult to break. An internal spring returns it to the correct position when deflected by a branch or other obstacle. The antenna is a passive device and only picks up radio.
Advantages:
Flaws:
Lemm Turbo AT-2001 - the best for taxis
This Italian product is perfect for transmitting a radio signal to maintain communications. The antenna is made of stainless steel (body) and silumin (rod). The central part has an extension for fasteners and a rubber seal. To fix it to the body, you need to drill a 4 mm hole. The height of the rod is 200 cm, which provides good reception, but will touch the crossbars in the garage or branches.
The device is capable of capturing and transmitting at a frequency of 26-28.5 MHz. The device has an impressive power of 2000W. Characteristic impedance within 50 Ohms. The kit comes with a 4 m long cable. The weight of all assembled elements is 800 g, which requires careful fastening. An alternative to mortise mounting is to mount it on a drain or on a trunk. There is an adapter for a magnet. The gain of the device is 6.5 dB.
Advantages:
Flaws:
FM Calearo ANT 77 27 085 – feature-rich and stylish
Italian developers have created a compact device that combines three functions: receiving radio, capturing television signals, and capturing GPS from satellites.
This is one of the most expensive antennas. The body is molded from hard plastic in the shape of a shark fin. Mortise installation is carried out on the roof. Small dimensions do not cause problems when driving under low gate frames or automatic barriers.
The kit comes with two cables, 5 meters each, for connecting TV and GPS. The device picks up signals from both analogue and digital broadcasts. The model has stable reception. There are three color options: black, red and white. The antenna will look beautiful on all types of cars.
Advantages:
Flaws:
Instead of a total
- If we install a simple radio, the size should be no more than 178 * 50 mm. Installation requires plastic spatulas or a screwdriver. Adapters and slides are included .
- To install 2 din, you need a new overlay on the console, a decorative frame on the GU itself, wire cutters and a metal blade to adjust the installation location.
- Are we replacing the standard speakers with another of the same size? Still need a new decorative frame . Otherwise, gaps in the panel will be visible.
More articles about Granta here.
Product code: IC-LAGA
Shipping and payment
We will ship in three days
receive 28. 28 Aug, price from 365 rub.
- Bank transfer or cash on delivery.
- Visa
- MasterCard
- PayPal
Pay by bank transfer, card, PayPal or upon receipt by courier or post office.
- Adapter for connecting a standard Lada Granta, Vesta video camera to a new radio
- 26 Jun
- 141
experts
Call6
Tell us about the product
Tell us about the product, it will help other buyers.
Subscribe to our channel
Which car antenna to buy
To select the appropriate car antenna option, you need to take into account the operating conditions (only in the city or often outside it), the expected functionality and the preferred type of mounting. Therefore, the choice can be made like this:
1. If you need the minimum from an antenna - listen to radio and news on the road, then simple and affordable models Triad 55 Turbo or Bosch Autofun are suitable. The first will be effective outside the city.
2. Drivers of city buses and minibuses, as well as those who spend time waiting in the car, will benefit from a TV-compatible antenna, such as Phantom TV Impulse or Automania Digital TV/FM.
3. If you need to replace the “native” mortise model, which has become unusable, then Triad VA Euro 65 will be universal.
4. Taxi drivers will find the Lemm Turbo AT-2001 useful, which not only reliably picks up the radio even outside the city, but also transmits the signal well over the radio.
5. If you need a super functional antenna that combines a number of capabilities, including GPS, then the best option would be FM Calearo ANT 77 27 085.
Friends will also be interested in this
Do you want to receive up-to-date ratings and selection tips? Subscribe to our Telegram.
Source
How to install 2 din in grant norm or standard
Everything is more complicated here. Need to:
- dismantle the center console trim - unclip the fastenings, move it forward and disconnect the buttons and heater handles;
- cut out a vertical plastic partition that will not allow you to install a 2 din device;
- cut down the plastic casing of the central air duct;
- try on a new acoustic unit, adjust the fastenings if necessary;
- install adapters from the delivery kit on the wiring (if required);
- install the device;
- if we leave the old center console trim: we cut out the partition, try it on, put it in place with the buttons and handles connected, adjust the decorative frame of the control unit, install it;
- if we install a new trim on the console under a 2 din device: we transfer the heater control unit and buttons from the old trim, install them in place, and put a decorative frame on the control unit.
Lada Granta “Firefly” › Logbook › Installation of a Ci-Bi radio station on a Lada Granta.
I decided to write a short report about installing a radiator on my car. It all started when my friend equipped his car with a CB radio station. At first I didn’t even think about buying a CB. Since I am a bit of a radio amateur, I wanted to purchase a radio for the 144 and 433 mHz radio zones. But after talking with a friend and reading the forums, I changed my mind. The car was still brand new, but that didn’t bother me at all. I bought it to drive, not to blow away dust. In general, I purchased a CB kit for the car, namely: MegaJet MJ-850 radio station and Lemm 2001 Turbo antenna. The antenna was immediately disassembled and modified. Somehow I don’t want to change it after a year. First, I removed the casing and soldered the “hot” coil. Since condensation forms inside during operation, the coil begins to gradually oxidize.
After that, I liberally coated the coil with lithol. I do not recommend using sealants. Since almost all sealants polymerize over time and release acids and alkalis, which destroys both the paint and contacts inside the antenna.
Then I put the antenna housing back together.
I also re-soldered and sealed the cable connection to the antenna.
I stripped the cable, tinned it well and soldered it. Then I tightly wrapped the cable attachment area with thread and applied some glue. Then I left it to dry for 24 hours. Then he began to install the radio in the car. I installed it below the radio.
I took the power supply for the radio separately. I took the plus directly from the car battery through a separate fuse and a filter made of ferrite rings, the minus from the car body, trying to use the minimum cable length.
The antenna housing is annoying, for greater reliability it was covered with heat shrink.
Next, I took a drill and drilled a hole in the roof, in the place where the standard antenna should have been.
To strengthen the roof, a plate made of high-strength aluminum D-16T was installed in this place.
Naturally, I first cleaned everything for better contact with the mass and coated everything with the same lithol. Next, I set about installing the already dry antenna.
I measured the SWR (standing wave ratio), it turned out to be around 1.5 on channel 15.
I played with the length of the pin, it turned out that it needed to be shortened, but I did not do this. The antenna works great as it is. It’s just that it most likely doesn’t work better in combination with my body.
Lada Granta 2012, 87 l. With. - other
Cars for sale
Lada Granta, 2020
Lada Granta, 2018
Lada Granta, 2018
Lada Granta, 2018
Comments 65
It’s rare to see a good installation) a magnet is molded and you’re done.
Hello author. Thank you for your detailed answers in the comments. I see that the post is old, but let me ask a question: can this (or any other) CB radio switch to another band in order to communicate with conventional walkie-talkies of the same type as in the attached picture? Precisely in a different range, so as not to shit on the air with empty chatter. If so, what parameters should you pay attention to when choosing a radio station and walkie-talkies?
Good day. I didn't see your post. If it is still relevant, I will answer. Pure CB radios like mine and similar ones work only in the civilian CB band. Within 27 mHz/ Unfortunately, they cannot be adjusted to other ranges. There are, of course, multi-band stations, such as Yaesu FT 857D and the like. But their cost is of course several times higher than the cost of ordinary Sibishki. In addition, each band requires an additional antenna, as well as permission and an amateur radio call sign.
Thanks for the answer. But I’m confused (There are many frequencies in the CB range. Is it possible to use a radio station on the road on one CB frequency (the one used by truck drivers), and on another CB frequency to communicate with portable radios?
It is possible if the portable radio also operates in the CB range. The ones in your photo operate at completely different frequencies. 130-174mHz and 430 - 470 mHz. Accordingly, the range does not overlap with these CB radios.
antenna like a saddle on a cow
everything is done correctly! Great!
But if you connect the radio to the standard AvtoVAZ antenna, will it lose a lot in reception?
The standard VAZ antenna is purely for radio. Now I’ll try to explain it clearly. The antenna must be in resonance with the radio transmitter. The wavelength on the CB band is 11 meters, therefore the ideal antenna is a quarter of the wavelength, that is, 2.75 meters. This is the ideal. Many fans install such fishing rods for themselves. In amateur jargon it is called a “quarter”. If the length of the antenna is reduced, then it is necessary to compensate for the disresonance with a coil of thick copper wire connected between the central core of the cable and the antenna pin. The shorter the antenna, the more turns there are on this matching coil. Otherwise, the radio station's transmitter will simply burn out. But short antennas are not very effective because the pin area is smaller. In addition, a lot of energy is lost on the matching coil, which “heats” the coil and is dissipated in the atmosphere. Conventional radio antennas are not equipped with matching coils, much less they are designed for a different frequency range. In addition, the antenna for the walkie-talkie must have a good mass - a counterweight. Well, in short, something like this... But there are Sirio brand antennas that are installed in a standard hole in the roof. They work with radio and CB radio
Thank you! Really affordable) I have a magnet and I found an old MegaJet radio to replace the one that burned out. The old radio caught well with it, but this one produces only interference. I don't understand what the problem is.
If you don’t want to make holes in the roof, and a range of 3-4 km on the highway is enough for you, then as an option Sirio Triflex I installed it for a friend. He's happy. But each antenna also needs to be configured.
luckily I have a hole from the factory =) I bought a headset for the mafon from it
I drilled at my place, but I did it deliberately under the CB antenna. You can install Sirio Triflex. In terms of radio reception, it is quite a bit inferior to the standard one, but it will have everything in one.
ahh, one antenna for a mafon and a walkie-talkie?
Yes. There are multiple antennas in this antenna. 3 in one. All cables included.
yes, the antenna is good, and it almost looks like a stock one, but it’s also valuable accordingly)
Source
Removing the standard radio in Grant Lux
The difference between grants of the luxury configuration: the MMS (multimedia system) installed from the factory. This is a 2 din device.
To remove standard acoustic grants :
- take a knife or plastic spatula to dismantle the acoustics and disconnect the decorative trims to the right and left of the radio. It is not necessary to take pictures;
- in the gap between the cover and the panel we find the head unit lock. There are two of them on both sides. Press it out with a screwdriver;
- we take out the GU on ourselves.
Everything is described in detail in the video:
Replacing the standard MMC in Grant
The process - after removing the acoustics, we install a new system.
Difficulties : you may have to finish the fastenings of the new system for VAZ ones. Plus you need the right frame. The factory MMC frame may not fit.
Have you bought a new 2 din radio, but there is no frame for sale? You can do it yourself . Example at the link.