In some cases, when starting the engine, smoke and a gas smell may appear from under the hood. Most often, this indicates that the exhaust manifold may have burned out, and on the VAZ 2110 it needs to be replaced, since the metal has burned out. And here you should not delay replacement or repair, since all these problems can adversely affect the operation of the engine as a whole. You can replace the part yourself; there is nothing difficult here.
Usually the burnout site is practically invisible, but with the engine running you need to open the hood of the car. And then consider where the exhaust gases come from; if they pass with a whistle, then they go past the exhaust pipe, and go through the burnt-out place.
Self-replacement
- the car must be driven into the garage;
- hang a lamp with a safety light under the hood;
- Before repairs are carried out, antifreeze must be drained from the tank;
- disconnect the battery terminals;
- pull it out;
- put on a rack;
- disconnect the vacuum booster hose from the receiver;
- also disconnect the hoses of the electric pneumatic valve cover and the ramp pressure regulator;
- disconnect the chips of the throttle sensor, idle air control;
- disconnect the throttle valve cable;
- loosen the clamp on the air supply hose to the air flow sensor housing;
- disconnect it;
- loosen the clamps for attaching the hoses to the throttle pipe and ventilation of crankcase gases on the cylinder head cover;
- remove the hoses in pairs;
- loosen the crankcase ventilation hose clamp;
- remove it from the throttle assembly;
- carry out subsequent work with the cooling water inlet and outlet hoses in the same way.
Note. Use a 13mm socket to make the work easier, unscrew the 2 nuts from the throttle assembly from the studs. The throttle assembly is attached to the receiver.
Note: these nuts must be unscrewed using wrench 3.
The receiver must be removed together with the throttle assembly. In addition, you need to disconnect all inlet and outlet hoses and idle speed sensor chips from the unit. Carefully check to make sure that all fastenings are completely loosened.
Note: it is recommended to understand all the fastening points; you can use threads of different colors. To prevent incorrect connections during assembly.
Note: place the parts in a container so that during assembly you do not find missing spare parts.
Unscrew the 2 nuts for attaching the bracket for the fuel supply and discharge pipes to the receiver. The same - 1 nut for fastening the receiver to the bracket, 5 pieces for fastening to the intake manifold. Remove the receiver, remove the gasket.
Replacing the collector on a VAZ 2110 with your own hands
To replace the device yourself, you need to:
- Place the car in the garage.
- Open the hood and hang a special lamp with lantern protection.
- Before carrying out all work, be sure to drain all the antifreeze from the tank.
- Remove the battery.
- Remove the pipe from the vacuum booster.
- Disconnect all hoses from the ramp pressure regulator cover.
- Disconnect the throttle sensor and its cable.
- Unscrew the clamp on the air supply pipe a little, then disconnect it completely.
- Then you need to remove the fastening from the throttle pipe and ventilation of gases from the crankcase.
- All hoses are removed in pairs.
- The clamp on the crankcase ventilation should be loosened.
- Then it is removed altogether.
- Do the same with all other hoses to make further work easier.
It is worth remembering here that the receiver can only be removed together with the throttle assembly. You should also disconnect all adjacent hoses and chips from it, and of course loosen the fastenings. Do not forget about the places where the device is attached; if the replacement is being carried out for the first time, it is better to notice these places so as not to confuse anything. This is all necessary to correctly install the new part. All small fastening elements should be placed in one place so as not to be lost.
After all this, unscrew several nuts securing the receiver and the supply tube bracket. The receiver can then be removed and the gasket removed from it.
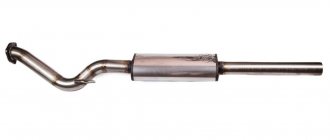
Exhaust manifold VAZ 2110 8 valves injector
Exhaust system. Spider 4-2-1 VAZ 2110-2111-2112 16V “STINGER” for a 16-valve engine with a nut for 1 oxygen sensor for VAZ 2110-12 cars After installing the spider, you will need to change the standard program and extend the sensor.
Exhaust system, Spider 4-2-1.8V VAZ 2108-2109-21113-2114-2115, 2110-2111-2112 “STINGER” for 8-valve engine with nut for 1 oxygen sensor for VAZ 2108-15, 2110- 12.
Exhaust system. Spider 4-2-1.8V for carburetor engine 2108-2109-2113-2114-2115, 2110-2111-2112 “STINGER”.
Exhaust system. Spider 4-1 16V “SPORT” VAZ 2110-2111-2112 “STINGER” for the 16-valve engine of VAZ 2110-12 cars. After installing the spider, you will need to change the standard program and an oxygen sensor extension.
The exhaust manifold is used on VAZ 2113-2115 with an engine capacity of 1.6L 8V, VAZ 2110-15 with an engine capacity of 1.6L-8V, 1117-1119 (LADA-Kalina) with an engine capacity of 1.4 / 1.6L-8V, for 1 oxygen sensor. or for 2 sensors.
Exhaust manifold / spider 4-2-1 (SPORT) 16 V “Stinger” on a triangular flange. Suitable for installation on Russian-made cars LADA VAZ 21103, VAZ 2112.
Exhaust system. Spider 4-2-1 stainless steel VAZ 2110-11-12 (16V) “STINGER” for a 16-valve engine, with a nut for 1 oxygen sensor.
Exhaust system. Spider 4-2-1 for VAZ 2110-11-12 (8V) “STINGER” cars for an 8-valve engine, with a nut for 1 oxygen sensor.
Spider 4.2.1 STT. Installed on 8-valve, fuel-injected LADA cars of the VAZ 2110 family. Provides an increase in power.
Installed on 16-valve LADA engines of the tenth family, with a displacement of 1.6 liters. Provides an increase in engine power. Made from quality steel.
The 4-2-1 sports spider is installed on 8-valve LADA engines of the 2110 family and provides an increase in engine power. Made from special steel 0.8 PS cold rolled. Standard installation with a STT resonator, or any other using welding.
This manifold is installed on 8-valve VAZ cars with an engine capacity of 1.6 liters. Advantages: will give your car the famous Subaru sound. There is no increase in power. Production material: Steel 08 PS. This type of steel is used for the production of high-quality exhaust systems. Dimensions: Diameter of primary pipes 38 mm. The diameter of the secondary pipes is 43 mm.
Most of the power loss at the exhaust occurs in the exhaust manifold. In sports and tuning, the stock (standard) manifold is replaced with the so-called spider, which differs in the shape and order of connection of the exhaust pipes with the exhaust windows. Installing a sports exhaust manifold (spider 4-2-1 or spider 4-1) for VAZ cars gives an increase in engine power of about 5-9 hp by increasing the diameter of the inlet and outlet pipes, and due to this reducing exhaust resistance exhaust gases.
When the car engine is running, smoke and the smell of gas may appear under the hood of the car. The reason may be that the exhaust manifold has burned out. On a VAZ 2110, replacing the exhaust manifold is associated with metal burning. In this case, it is not recommended to delay its replacement. Because during the upcoming operation of the machine, enormous difficulties may arise. Replacing the exhaust manifold of a VAZ 2110 can be done with your own hands. It is virtually impossible to visually see burnt holes. When the engine is running, the hood should be open. Exhaust gases will escape, not into the exhaust pipe, but will whistle through these burnt holes. The release of gases can occur under the bottom of the machine, because the material burns out mainly in those places where the pipes are twisted.
Replacement of intake manifold gaskets VAZ 2114 8 cl (Kalina, 2110)
It is recommended to replace the gaskets on the VAZ intake manifold after each removal. But I had to do this prematurely, as I discovered a significant air leak, which mainly manifested itself on a cold engine. Every cold start was accompanied by a terrible tripping.
In addition to the tripping when cold, there was a slight drop in speed when sharply pressing the gas pedal. This applies to both a cold and a hot engine.
A homemade smoke generator made from a cigarette helped me detect the air leak. A very simple and primitive contraption that has helped me out more than once.
My car (Kalina 1.6 8 valves) has a plastic intake manifold (receiver). The same will be installed on all VAZ family cars with an 8-valve 1.6-liter engine (2114, 2110, etc.). 4 rubber rings act as gaskets. According to reviews, black rings last much longer than white ones. And I was convinced of this personally - these gaskets lasted for about six months and began to let air through. They felt like plastic to the touch. Unfortunately, I didn’t find black ones, so I’ll install white ones again. I hope these last longer.
To remove the intake manifold (receiver), you must first unscrew the corrugation from the air filter, the throttle cable, and the small crankcase ventilation hoses. I will not remove the throttle and its heating.
The intake manifold is attached to 5 studs - one in the center, two on the sides. To unscrew them you will need a 13mm socket. After unscrewing the nuts, you need to remove the receiver itself from the studs and move it to the side. Remove the old gaskets and wipe the seats from oil and dirt. You also need to wipe the seat on the engine.
The manifold has special grooves for guides on the gaskets. The gaskets must be installed with the higher side in the plastic manifold. It is the guide that will prevent you from making mistakes.
I additionally coated the areas near the guides with sealant on the outside of the gasket. Because it felt like that was where the ring entered the groove the deepest. In addition, there was a place for air leaks on the old gaskets.
After all procedures, the intake manifold can be installed back. I couldn't find any information on how tightly to tighten the mounting nuts. I delayed it at my own peril and risk. The main thing is not to overtighten, as the manifold is plastic and can crack.
This is how I replaced the old intake manifold gaskets on my Kalina with new ones. There is no more air leakage, the engine stopped stalling when cold and began to behave much better when warm.
Ramp
The ramp is removed assembled with the fuel pressure regulator:
- You need to disconnect the vacuum hose from the regulator.
- Using 2 open-end wrenches 17, unscrew the fittings securing the gasoline supply and pressure reduction pipes.
- Disconnect the ramp voltage connector.
- Using a screwdriver, unscrew the screw of the bracket for fastening the gasoline supply and outlet pipes and disconnect it.
- Using a hexagon, unscrew the 2 screws for fastening the ramp.
- Pull the ramp in the axial direction of the injector from the landing site, remove the ramp towards the left side of the hood.
Note: follow the direction of travel of the vehicle.
- Unscrew the nut from the left intake manifold bracket and loosen the lower bolt.
- Remove the bracket from it.
- Do the same operation with the right bracket and remove it.
- Unscrew the 2 nuts from the eye stud.
Removing the eye
- Unscrew the 3 nuts from the receiver bracket and remove it.
- Carefully remove the bushing from the intake manifold stud.
- Disconnect the exhaust air intake pipe and remove it from the lower intake air studs.
- Unscrew the top nut and slightly loosen the bottom nut on the bar.
Note. She holds the antifreeze pump pipes for cooling. The bar at the bottom has a through slot; carefully remove it.
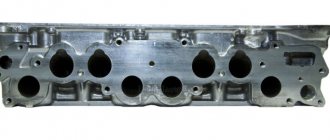
- The intake manifold is mounted on studs, so you need to unscrew one nut from the top and 2 from the side. To remove the exhaust manifold you need to unscrew an additional 2 nuts. You need to carefully examine the connection point, because there are 2 gaskets installed between the manifold and the block head.
Note. When dismantling the intake manifold to the gaskets. If the gasket burns out, antifreeze can get into the cylinder block. There may be holes drilled with antifreeze on the head of the blocks, and there may also be holes in the gasket.
- Antifreeze may leak into valves and cylinders. In this case, you need to remove it from there using a syringe. Unscrew the spark plugs (see Replacing spark plugs on a VAZ 2110 on your own), turn them with the starter to remove any antifreeze that has got there. If grooves are found on the surface, the collector needs to be replaced.
- At the bottom, the exhaust manifold is attached to the exhaust pipe. It is then connected to the exhaust pipe. Unscrew the three bolts and disconnect the pipe. Remove the collector. You need to unscrew them from the inspection hole and tap the heads first. Use a metal brush to clean the nuts and threads.
- During assembly, replace all gaskets with new ones one by one. It is better to tighten the nuts during assembly using a special wrench. Also replace the injector O-rings with new ones.
READ Replacement Bearing Axle Shaft Niva 21213
Gaskets are sold in sets, plus the price of a set of gaskets and a manifold. When doing independent repairs to replace the exhaust manifold, you need to carefully and scrupulously read the instructions. Also view video clips and photos.
Note: photos must be arranged in order of work. As repair processes are completed, put them in the reverse order. Having finished disassembling, turn the stack of photos over. Assembly is carried out in reverse order. Before assembly, the nuts must be lubricated with graphite thread lubricant, and the threads of all bushings must also be lubricated. Places where gaskets are installed must be thoroughly cleaned of inclusions and foreign contents.
By doing the work yourself, you can save a lot, because the cost of repairs in special workshops is very high and not everyone can afford to pay the price.
View analogues and other offers View analogues
Replacing the ramp on a VAZ 2110
The ramp is always removed together with the fuel pressure regulator:
- Disconnect the vacuum hose from the regulator.
- When unscrewing the fitting on the fuel supply pipe, use an open-end wrench size 17.
- Remove the ramp voltage connector.
- Also unscrew the screw securing the gasoline supply pipes and then disconnect it.
- Then, using a hexagon, unscrew several screws from the ramp mounting.
- The ramp is removed along the direction axis of the nozzle and removed from its usual place.
- Then the substitute is removed, you need to unscrew the fastening on the left side of the intake manifold and slightly loosen the lower bolt.
- Remove the bracket itself.
- Now you should remove the right bracket in the same way.
- Unscrew several eye nuts from the stud.
Exhaust manifold VAZ 2110 8 valves injector
Exhaust system. Spider 4-2-1 VAZ 2110-2111-2112 16V “STINGER” for a 16-valve engine with a nut for 1 oxygen sensor for VAZ 2110-12 cars After installing the spider, you will need to change the standard program and extend the sensor.
Exhaust system, Spider 4-2-1.8V VAZ 2108-2109-21113-2114-2115, 2110-2111-2112 “STINGER” for 8-valve engine with nut for 1 oxygen sensor for VAZ 2108-15, 2110- 12.
Exhaust system. Spider 4-2-1.8V for carburetor engine 2108-2109-2113-2114-2115, 2110-2111-2112 “STINGER”.
Exhaust system. Spider 4-1 16V “SPORT” VAZ 2110-2111-2112 “STINGER” for the 16-valve engine of VAZ 2110-12 cars. After installing the spider, you will need to change the standard program and an oxygen sensor extension.
The exhaust manifold is used on VAZ 2113-2115 with an engine capacity of 1.6L 8V, VAZ 2110-15 with an engine capacity of 1.6L-8V, 1117-1119 (LADA-Kalina) with an engine capacity of 1.4 / 1.6L-8V, for 1 oxygen sensor. or for 2 sensors.
Exhaust manifold / spider 4-2-1 (SPORT) 16 V “Stinger” on a triangular flange. Suitable for installation on Russian-made cars LADA VAZ 21103, VAZ 2112.
Exhaust system. Spider 4-2-1 stainless steel VAZ 2110-11-12 (16V) “STINGER” for a 16-valve engine, with a nut for 1 oxygen sensor.
Exhaust system. Spider 4-2-1 for VAZ 2110-11-12 (8V) “STINGER” cars for an 8-valve engine, with a nut for 1 oxygen sensor.
Spider 4.2.1 STT. Installed on 8-valve, fuel-injected LADA cars of the VAZ 2110 family. Provides an increase in power.
Installed on 16-valve LADA engines of the tenth family, with a displacement of 1.6 liters. Provides an increase in engine power. Made from quality steel.
The 4-2-1 sports spider is installed on 8-valve LADA engines of the 2110 and provides an increase in engine power. Made from special steel 0.8 PS cold rolled. Standard installation with a STT resonator, or any other using welding.
This manifold is installed on 8-valve VAZ cars with an engine capacity of 1.6 liters. Advantages: will give your car the famous Subaru sound. There is no increase in power. Production material: Steel 08 PS. This type of steel is used for the production of high-quality exhaust systems. Dimensions: Diameter of primary pipes 38 mm. The diameter of the secondary pipes is 43 mm.
Most of the power loss at the exhaust occurs in the exhaust manifold. In sports and tuning, the stock (standard) manifold is replaced with the so-called spider, which differs in the shape and order of connection of the exhaust pipes with the exhaust windows. Installing a sports exhaust manifold (spider 4-2-1 or spider 4-1) for VAZ cars gives an increase in engine power of about 5-9 hp, by increasing the diameter of the inlet and outlet pipes, and due to this, reducing exhaust resistance exhaust gases.
When the car engine is running, smoke and the smell of gas may appear under the hood of the car. The reason may be that the exhaust manifold has burned out. On a VAZ 2110, replacing the exhaust manifold is associated with metal burning. In this case, it is not recommended to delay its replacement. Because during the upcoming operation of the machine, huge obstacles may arise. Replacing the exhaust manifold of a VAZ 2110 can be done quietly with your own hands. It is virtually impossible to visually see burnt holes. When the engine is running, the hood should be open. Exhaust gases will escape, not into the exhaust pipe, but will whistle through these burnt holes. The release of gases can occur under the bottom of the machine, because the material burns out mainly in those places where the pipes are twisted.
Exhaust manifold (spider) 4-1 VAZ 2110, 2111, 2112 16cl Stinger
By installing a tuning exhaust, an increase in car power is achieved.
Characteristics:
- Diameter 51mm
- Barrel diameter 120mm
- Barrel length 480mm
Applicability:
- VAZ 2110
- VAZ 2111
- VAZ 2112
It's easy to place an order on our website. Simply add the selected items to your cart, then go to the Cart page, check that the items you ordered are correct, and click the “Checkout” or “Quick Order” button.
The “Quick Order” function allows the buyer not to go through the entire ordering procedure on their own. You fill out the form, and after a short time the store manager will call you back. He will clarify all the conditions of the order, answer questions regarding the quality of the product and its features. It will also tell you about payment and delivery options.
Self-replacement
- the car must be driven into the garage;
- hang a lamp with a safety light under the hood;
- Before repairs are carried out, antifreeze must be drained from the tank;
- disconnect the battery terminals;
- pull it out;
- put on a rack;
- disconnect the vacuum booster hose from the receiver;
- also disconnect the hoses of the electric pneumatic valve cover and the ramp pressure regulator;
- disconnect the chips of the throttle sensor, idle air control;
- disconnect the throttle valve cable;
- loosen the clamp on the air supply hose to the air flow sensor housing;
- disconnect it;
- loosen the clamps for attaching the hoses to the throttle pipe and ventilation of crankcase gases on the cylinder head cover;
- remove the hoses in pairs;
- loosen the crankcase ventilation hose clamp;
- remove it from the throttle assembly;
- carry out subsequent work with the cooling water inlet and outlet hoses in the same way.
Note. Use a 13mm socket to make the work easier, unscrew the 2 nuts from the throttle assembly from the studs. The throttle assembly is attached to the receiver.
Note: these nuts must be unscrewed using wrench 3.
The receiver must be removed together with the throttle assembly. In addition, you need to disconnect all inlet and outlet hoses and idle speed sensor chips from the unit. Carefully check to make sure that all fastenings are completely loosened.
Note: it is recommended to understand all the fastening points; you can use threads of different colors. To prevent incorrect connections during assembly.
Note: place the parts in a container so that during assembly you do not find missing spare parts.
Unscrew the 2 nuts for attaching the bracket for the fuel supply and discharge pipes to the receiver. The same - 1 nut for fastening the receiver to the bracket, 5 pieces for fastening to the intake manifold. Remove the receiver, remove the gasket.
Ramp
The ramp is removed as an assembly with the fuel pressure regulator:
- It is necessary to disconnect the vacuum hose from the regulator.
- Using 2 open-end wrenches 17, unscrew the fittings securing the gasoline supply pipes to reduce pressure.
- Disconnect the ramp voltage connector.
- Using a screwdriver, unscrew the screw of the bracket for fastening the gasoline supply and outlet pipes and disconnect it.
- Using a hexagon, unscrew the 2 screws for fastening the ramp.
- Pull the ramp in the axial direction of the injector from the seat, remove the ramp towards the left side of the hood.
Note: follow the direction of travel of the vehicle.
- Unscrew the nut from the left intake manifold bracket and loosen the lower bolt.
- Remove the bracket from it.
- Perform the same operation with the right bracket and remove it.
- Unscrew the 2 nuts from the eye stud.
Removing the eye
- Unscrew the 3 nuts from the receiver bracket and remove it.
- Carefully remove the bushing from the intake manifold stud.
- Disconnect the exhaust air intake pipe and remove it from the lower intake air studs.
- Unscrew the top nut and loosen the bottom nut a little on the bar.
Note. It holds the antifreeze pump tubes for cooling. The bar at the bottom has a through slot; carefully remove it.
- The intake manifold is mounted on studs, so you need to unscrew one nut on top and 2 on the side. To remove the exhaust manifold, you need to unscrew an additional 2 nuts. You need to carefully inspect the connection point, since 2 gaskets are installed between the manifold and the block head.
Note. manifold pay attention to the gaskets. If the gasket burns out, antifreeze can get into the cylinder block. There may be holes drilled by antifreeze on the head of the blocks, and there may also be holes in the gasket.
- Antifreeze may leak into valves and cylinders. In this case, you need to remove it from there using a syringe. Unscrew the spark plugs (see Replacing spark plugs on a VAZ 2110 on your own) and crank them with the starter to remove any antifreeze that gets there. If grooves are found on the surface, the collector must be replaced.
- At the bottom, the exhaust manifold is attached to the exhaust pipe. Then it is connected to the exhaust pipe. Unscrew the three bolts and disconnect the pipe. Remove the collector. You need to unscrew them from the inspection hole and first tap the heads. Use a metal brush to clean the nuts and threads.
- During assembly, replace all gaskets with new ones one by one. It is advisable to tighten the nuts during assembly using a special wrench. Also replace the injector O-rings with new ones.
READ How to Change the Glass on a VAZ 2110 Headlight
Gaskets are sold in sets, plus the cost of a set of gaskets and a manifold. When doing your own repairs to replace the exhaust manifold, you must carefully and scrupulously read the instructions. Also view video clips and photos.
Note: photographs must be arranged in order of work. As repair processes are completed, fold them in reverse order. Once you've finished disassembling, turn the stack of photos over. Reassemble in reverse order. Before assembly, the nuts must be lubricated with graphite thread lubricant, and the threads of all bushings must also be lubricated. Thoroughly clean the installation areas of the gaskets from inclusions and foreign contents.
By doing the work yourself, you can save a lot of money, because the price of repairs in special workshops and service stations is very high and not everyone can afford to pay the cost.
View analogues and other offers View analogues
Step by Step Actions
The process of replacing a seal when it fails is simple, but has nuances for different engines. In general terms, the algorithm for dismantling and subsequent installation of the VK gasket looks like this:
- Open the hood and remove the air intake with the carburetor, under which there is a manifold.
- Remove the thermal screen covering the VC (some older models do not have a screen).
- Unscrew the bolts that attach the spider to the exhaust pipe, and then the bolts connecting it to the engine block.
- Proceed to removing the exhaust manifold itself, on which sits a burnt-out gasket, which often “sticks” to the VC.
- Carefully clean the area between the cylinder head and the manifold with a spatula, removing carbon deposits and fragments of worn gasket from the second.
- Once the area is shiny, coat it with graphite lubricant and install a new gasket.
- Treat the fasteners with the same lubricant (to prevent corrosion).
return all dismantled parts to their rightful places.
Gasket replacement process
In order to make the replacement faster and more convenient, you will need a pit, overpass or lift. As practice shows, such conveniences are not always at hand and you have to suffer in the garage. Let's consider the step-by-step process of replacing the cylinder head gasket:
- We remove the “minus terminal” from the battery.
Removing the battery terminal for repair
- To replace the gasket, it is necessary to clear the head channels of coolant, so we drain it into a previously prepared container.
- Relieve pressure in the fuel system.
We relieve pressure in the fuel system through a special valve.
- Approaching the engine from below, it is necessary to dismantle the exhaust pipe.
After unscrewing the mounting bolts, disconnect the exhaust manifold and exhaust pipe
- The next step is to dismantle the thermostat.
- Since it is necessary to replace the gasket itself, we will not disassemble the head and dismantle it together with the camshafts.
When everything is disconnected, we dismantle the cylinder head
- The cylinder head is removed together with the fuel rail.
- Disconnect the camshaft and engine oil sensors.
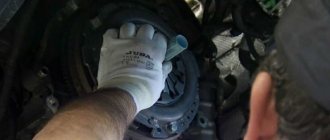
- We are dismantling the timing belt.
Removing the timing belt
- Now, you need to fix the camshafts, and then remove the pulleys so that they do not interfere.
Fixing the camshafts from turning so as not to disturb the valve timing
- We dismantle the cooling sensor.
- Remove the valve cover. To do this, you need to unscrew the mounting bolts. During assembly, the bolts must be tightened in a certain order and with a certain torque.
- Now you can lift the cylinder head.
- We remove the remaining gasket material from the surface of the block and cylinder head.
- Install a new gasket on the head surface. If the gasket material has a red edge, then there is no need to use sealant, but if it is not there, then the gasket must be lubricated with graphite grease and sealant must be applied along the contour.
- We put the block head in place and tighten the screws in the sequence following the diagram.
- The rest of the assembly is carried out in reverse order.
Now the gasket has been replaced and you can continue to use the car.
Selecting a cylinder head gasket
Before you start choosing a head gasket based on the catalog number, you need to consider what types of gasket materials there are. Let's look at the main types of cylinder head gaskets:
- Asbestos . The main advantage: minimal shrinkage and excellent recoverability.
- Metal . These are some of the most reliable and high-quality consumables.
- Non-asbestos . Used as repair kits. Main advantages: elasticity, heat resistance, elasticity.
Metal cylinder head gasket
So, now you can consider the original gasket, as well as the substitutes that are used. Basically, all manufacturers label gaskets according to the original.
2112-1003020 is the original and analogue catalog number of the cylinder head gasket for the VAZ-2112. Also, the manufacturer Ajusa (10144200) produces a range of gaskets for the 2112 model.
Reasons for failure
There are not many reasons why the cylinder head gasket failed, but every car owner must know them. So, let's look at the main ones:
- Wear . Each element of the car has its own service life, and therefore wear of the part is simply inevitable.
- Deflection or deformation of the cylinder head can lead to gasket breakdown or hot antifreeze getting onto its surface.
- Boiling your car can cause the gasket to fail.
Signs of replacement
To correctly diagnose and identify faults, it is necessary to diagnose correctly.
White steam from the exhaust is a reason to think!
Let's consider the main direct and indirect signs that the cylinder head gasket has worn out and requires replacement:
- White steam starts coming out of the exhaust;
- Traces of coolant or engine oil leakage appear at the cylinder head joints;
- Traces of oil appear in the coolant;
- An impressive amount of lubricant accumulates in the pan;
- Foam forms around the filler cap.
Now all the issues have been considered, the reasons, signs and method of replacing the cylinder head gasket have been established.
Replacement of exhaust manifold VAZ 2110 8 valves
We carry out the work when replacing manifold gaskets or when it is necessary to drill out broken exhaust manifold studs (the latter are often destroyed when the exhaust pipe is removed).
Drain the coolant (see Replacing the coolant).
Remove the carburetor (see Disassembling the carburetor).
Disconnect the coolant supply hose to the carburetor starter from the fitting located on the intake manifold.
We disconnect the exhaust pipe from the exhaust manifold of the VAZ 2112 and from the mounting bracket to the block (see Removing the exhaust pipe of VAZ-2110.2111 engines).
Using a 22mm wrench, unscrew the nut securing the heat shield.
We remove the bracket for the VAZ 2111 throttle valve drive cable.
Using a 10mm wrench, unscrew the two nuts securing the VAZ 2112 heat shield.
and remove it.
Remove the wire from the oil pressure warning lamp sensor.
Using a 13mm wrench, unscrew the two nuts securing the hot air intake pipe and the eye.
Remove the hot air intake pipe.
and eye VAZ 2110.
Using a “13” wrench, unscrew the six nuts securing the VAZ 2110 intake manifold.
Having disconnected the hose of the vacuum brake booster and the hose of the electro-pneumatic heater valve, remove the intake manifold of the VAZ 2111.
Unscrew three more nuts.
and remove the exhaust manifold of the VAZ 2112.
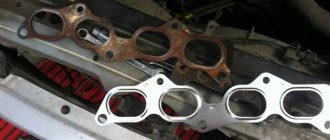
The joint is sealed with two gaskets.
We perform assembly in reverse order.
We clean the mating surfaces of the VAZ 2110 and heads and install new gaskets.
Tighten the manifold fastening nuts evenly.
Intake manifold removal process
General view of the intake manifold
Dismantling the intake manifold is carried out with the car cooled down for safety reasons. So, this operation can take about an hour and will require some knowledge of the car’s design, namely the injection system. So, let's consider the sequence of actions for dismantling the unit:
- We dismantle the throttle. To do this, it is not necessary to disconnect all the pipes and pipes; it is enough to disconnect the unit from the manifold and move it to the side. Of course, at the same time, it is still recommended to remove the throttle valve completely for cleaning.
Location of the throttle valve on a VAZ-2112 - photo of an editorial car
Removed the wires and coil
Unscrew the clamp and disconnect the vacuum brake booster tube
Using a Phillips screwdriver, unscrew the oil level indicator guide tube
Unscrew the ignition coils and receiver
Unscrew the bolts securing the manifold to the block head
Pull the collector towards you and dismantle it
It is worth noting that installation of the intake manifold is carried out in the reverse order and does not require any additions or changes.
Video
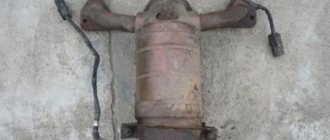
Exhaust manifold functions
It consists of several pipes that merge into one, but has different mountings and configurations for different engines. To produce VC, high-carbon cast iron, stainless steel and titanium are used, sometimes coated with ceramic/chrome.
The task of the “spider” (as the exhaust manifold in the Russian Federation) is to transfer combustion products collected from all cylinders to the exhaust pipe.
Gases from the AC enter the catalyst or directly into the exhaust pipe and then to the muffler. The exhaust manifold is attached to the engine, or more precisely to the cylinder head (cylinder head), sealing the joint using a special element.
How to remove the exhaust manifold
Many VAZ car owners repair and maintain their vehicles themselves. One of the most common problems when operating a car in heavy conditions is burnout of the gasket between the exhaust manifold and the cylinder head, clogging of the catalyst, and deposition of combustion products on the walls of the exhaust system. All these problems negatively affect the removal of exhaust gases from the combustion chamber. The removal of gases from the combustion chamber is an important point; their return into the chamber reduces the quality of the fuel-air mixture, which means a decrease in vehicle power will be observed. In addition, if the gasket burns out, burning gases will escape into the engine compartment, which can cause a fire in the engine compartment. The sound during such work will be quite loud and annoying to others.
Elimination of all of the above malfunctions will involve disassembling the exhaust gas removal system. How to remove the exhaust manifold and whether it is possible to do this in a garage without contacting a service center is of interest to many VAZ Priora owners who have not encountered such work.
Replacing the exhaust manifold with your own hands will require work to remove additional elements, after which it will be possible to get to the fastening elements of the exhaust system. If the repair work is not related to the burnout of the gasket, then it still needs to be replaced with a new one.
Tools
For work you will need the following tool:
- open-end or socket wrench for 8, 10, 13.
- the head is 13 deep.
- cardan and extension for the head.
- ratchet.
- slotted screwdriver.
- WD liquid.
Removal of the exhaust manifold should be carried out with the engine cool to avoid burns. The car must be placed above the pit so that there is free access to the engine compartment from below. For safe work, remove the battery terminal.
Disconnect the air pipe
It is more convenient to remove the exhaust manifold from above. To do this, it is necessary to remove the components and parts that prevent free access to it:
- The engine is protected from above by the screen. To remove it, you must first release the clamp of the wire block, which secures them to the canister purge valve. Using a screwdriver, pry up the valve along with the hoses and move it to the side. The oil cap is unscrewed. The protective cover is removed by moving upwards from the clamps.
- Disconnect the air pipe. It can be easily removed after loosening the clamps and disconnecting the crankcase ventilation hose.
- Disconnect the additional muffler pipe from the catalytic collector. This work must be carried out under the car. Use a screwdriver to bend the edges of the plates to gain access to the pipe fastening nuts. Using a 13mm socket with an extension, unscrew the three nuts. The collector thermal shield is removed. The lower nut of the clamp connecting the main and additional muffler pipes is loosened, and the upper one is completely unscrewed. The clamp is completely removed and the additional and main mufflers are separated. Don't forget to remove the rubber seal. The pipe flange of the additional muffler and the sealing gasket are pulled off the studs of the catenary collector.
- Disconnect the ignition module. Use a wrench to unscrew the module mounting nuts. Before removing the module, it is necessary to disconnect the high-voltage wires and wire blocks.
- Disconnect the wire connectors from the oxygen concentration sensor and the control sensor. We press out the antennae of the wire holders for the sensors and disconnect the wires from the heat shield of the steering mechanism.
- Remove the throttle assembly. To do this, you will need plugs to plug the hoses from which coolant may leak. We release the clamps of the throttle position sensor and idle air control. Loosen the clamps on the hoses going to the throttle assembly and remove them. Disconnect the throttle valve drive cable and unscrew the two bolts securing the assembly to the intake manifold studs.
- Remove the intake manifold. To do this, disconnect the wiring harnesses of the ignition coil and injectors. Unscrew the front and rear brackets. Loosen the clamps of the crankcase ventilation system pipes and disconnect the hoses. Unscrew the fastening of the oil indicator guide bracket and remove it. Unscrew the nuts and bolts securing the inlet manifold and remove it.
- Remove the heat-insulating shield of the steering mechanism by first unscrewing the three nuts. Only on the official website 1xbet promo code for each player.
- Remove the exhaust manifold. First, disconnect the bracket for the water pump supply pipe by unscrewing the two fastening nuts. We unscrew the bolts securing the catalytic collector to its mounting bracket. Unscrew the eight nuts securing the manifold to the cylinder head. The collector is removed by pulling it off the studs.
READ Timing Belt Replacement Passat B5 1.6
Then you should disconnect the additional muffler from the catalytic collector.
Now oxygen concentration sensors
Removing the exhaust manifold bracket
Removing the collector
Dismantling the exhaust manifold
Is it possible to install a 2.0 engine on a Ford Focus 2 1.6
Signs of a burnt-out VK gasket
Signs of a burnt gasket may include:
- change in the sound of a running engine;
- the appearance of a characteristic smell of exhaust gases in the vehicle interior;
- violation of engine stability, CHECK lamp on the dashboard is on.
As for the sound of the power unit, when the gasket burns out, a characteristic “chirping” is usually heard. In such cases, they say that the engine is “cutting.” This sound is created by exhaust gases escaping where the seal is damaged. Naturally, exhaust from under the hood enters the cabin through the heating and ventilation system. This creates additional inconvenience for the driver and passengers, and also poses a certain threat to their health, so in any case, replacing the exhaust manifold gasket if it is damaged is a necessary necessity.
In cars with injection engines, the operation of which is controlled by an electronic control unit (ECU), if the integrity of the gasket is damaged, the CHECK lamp on the dashboard may light up. This is due to the fact that the lambda probe, installed on the manifold itself or the exhaust pipe, detects changes in the amount of oxygen in the exhaust and transmits a signal to the ECU. Until the fault is eliminated, the controller forces the engine to operate in emergency mode.
Disassembling the VAZ 2111 engine
Place the washed and cleaned engine on a disassembly stand and drain the oil from the crankcase. Disassembly is carried out in the following order
4- sealing gasket; 5 - receiver; 6 — exhaust pipe of the engine cooling system; 7 — hose clamps; 8 — supply pipe of the coolant pump; 9 — throttle pipe heating hoses; 10 — inlet pipe hose
Disconnect from the throttle pipe (see Fig. 1.) hoses 9 for inlet and outlet of coolant, as well as the crankcase ventilation hose at idle. Remove the throttle pipe with the gasket by unscrewing the nuts securing it to the receiver.
Remove the fuel supply and drain pipes by disconnecting them from the injector rail, the fuel pressure regulator and from the bracket on the receiver. Remove the vacuum hose by disconnecting it from the connections on the receiver and fuel pressure regulator.
Remove the receiver 4 (Fig. 2.) with the gasket 3 and the fuel line bracket by unscrewing the nut securing the bracket 6 to the receiver and the nuts securing it to the inlet pipe 2.
Disconnect the wiring harness from the injectors and remove the injector ramp 1 (Fig. 3.) with pressure regulator 2 by unscrewing the two bolts securing it to the intake pipe.
Having unscrewed the nuts and bolts, remove the support 1 (see Fig. 2.) and support 8 brackets, and then the inlet pipe with bracket 6 and screen 7.
On the left side of the engine, remove the high voltage wires, ignition module and knock sensor. Using wrench 67.7812.9514, remove the spark plugs, coolant temperature sensor and oil pressure sensor from the cylinder head. Unscrew the temperature sensor, which is part of the engine management system, from the outlet pipe of the cooling jacket.
tension bar; 5 - generator; 6 — generator mounting bracket; 7 — generator drive belt
Remove the tension bar 4 (Fig. 4.) and the generator drive belt 7. Remove the generator 5 and its mounting bracket 6. Lock the flywheel with clamp 67.7820.9526 (see Fig. 5), unscrew the bolt securing the generator drive pulley and remove the pulley.
1 — front protective cover; 2 — rubber seal; 3 — toothed belt; 4 — camshaft pulley; 5 — crankshaft toothed pulley; 6 — spacer washer; 7 - tension roller
Remove the front cover 1 (Fig. 6.) of the timing belt. Unscrew the nut securing the tension mechanism. Loosen and remove toothed belt 3. Remove tension roller 7 with spacer washer 6.
Holding the camshaft pulley 4 from turning with tool 67.7811.9509, unscrew the pulley mounting bolt, remove the pulley and key. Remove toothed pulley 5 from the crankshaft.
Remove the coolant pump mounting bolts. Unscrew the bolt and nut securing the rear toothed belt cover and remove it. Remove the coolant pump with the gasket from the socket in the cylinder block.
Remove the exhaust manifold with gaskets.
Disconnect the hoses from the thermostat and remove it. Remove the coolant pump inlet pipe and the coolant jacket outlet pipe with gasket.
Using tool A. 60312 (Fig. 7.), remove the oil filter with gasket. Disconnect the crankcase exhaust ventilation hose from the pipes on the cylinder head cover and on the cylinder block. Remove the oil level indicator.
Remove the cylinder head cover. Unscrew the cylinder head bolts and remove it complete with the camshaft. If necessary, disassemble the cylinder head.
Turn the engine over with the crankcase up and remove the oil sump 5 with gasket 4. Remove the receiver 3 and the oil pump 1.
Unscrew the nuts of the connecting rod bolts, remove the connecting rod caps and carefully remove the pistons with connecting rods through the cylinders.
Lock the flywheel with clamp 67.7820.9526 (Fig. 5), unscrew the flywheel mounting bolts, remove the bolt washer and the flywheel from the crankshaft. Remove the crankshaft rear oil seal holder with gasket.
Remove the main bearing caps along with the lower bearings. Remove the crankshaft from the bearing housings, and then the upper bearings and thrust half-rings from the middle support.
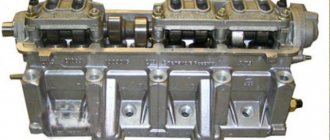
Injection engine VAZ 2110 8 valves, timing device, technical characteristics
The VAZ 2110 engine, an 8-valve injector, replaced the carburetor engine, which was originally installed on the first VAZ-2110. At the same time, an 8-valve injection engine with a displacement of 1.5 liters first appeared, but then the engine displacement was increased to 1.6 liters.
An injector with 8 valves with a volume of 1.5 liters received the engine index VAZ-2111, a more powerful unit with a volume of 1.6 liters (8-liter) received the index VAZ-21114. Recently, modifications of the 21114 engine have been produced; they are installed on almost all today’s Lada models, albeit under a different index.
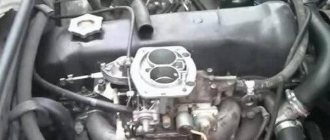
Today we will talk about the design of the 8-valve injector of the VAZ-2110 as well as the characteristics of this power unit. In our photo at the beginning of the article you can see how the “ten” injection engine looks under the hood of the car.
So, how does the VAZ 2110 8-valve injector work? Firstly, the main difference between the carburetor version of the engine and the injector is the supply of fuel to the combustion chamber. If in a carburetor engine the combustible mixture is sucked into the cylinders under the influence of vacuum created by the pistons, then in an injection unit the fuel is injected under pressure. It is because of this that the entire design of the injector and carburetor “ten” fuel systems is different.
It all starts in the gas tank, where an electric fuel pump is installed, whose task is to create the necessary pressure in the rail. From the ramp, fuel under pressure is injected into the combustion chamber through nozzles. The entire injection process is controlled electronically, which opens and closes (via a return spring) the injector solenoid valves, injecting fuel into the engine. But the electronics in the VAZ 2110 8-valve injector do not work on their own, but are guided by signals from pressure sensors in the fuel system, air sensors and throttle position. There is none of this in the carburetor “ten”.
In this regard, let's talk about the pros and cons of the VAZ 2110 8-valve injector. On the positive side, it can be noted that the operation of the injector is more stable, the engine produces more power and torque, while fuel consumption is less than in the carburetor version. But if a carburetor VAZ 2110 can be repaired with almost bare hands, then the injection version requires diagnostic equipment, without which it can be extremely difficult to identify the problem. After all, if one of the sensors turns out to be faulty, then your injection engine may not start or work intermittently.
Below are detailed characteristics of the VAZ 2110 injector 8 valves with a working volume of 1.5 and 1.6 liters.
Engine VAZ 21114 1.6 l. 8-valve injector
There is no need to purchase replacement parts in advance. First of all, the engine is disassembled and the condition of its elements is checked. In the absence of equipment, the condition of the parts is checked at a service station. Experts indicate which parts to change during a major overhaul and what can be restored.
Sources:
https://nadouchest.ru/vypusknoj-kollektor-vaz-2110-8-klapanov-inzhektor/ https://zapchastimag.ru/remont/zamena-vypusknogo-kollektora-vaz-2110.html https://avto-mpad .ru/klapana/remont-dvigatelya-vaz-2111-8-klapanov-inzhektor.html