When is it necessary to replace and remove the intake manifold on a VAZ-2114
Huge temperature changes are the main problem faced by the exhaust manifold and the gasket, for which it is removed. The collector itself is made of a special grade of cast iron; it can withstand high temperatures (up to 800-900 degrees) , however, these are critical values, after which the collector may warp or crack.
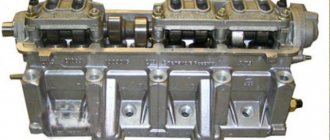
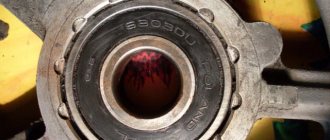
Exhaust manifold VAZ-2114
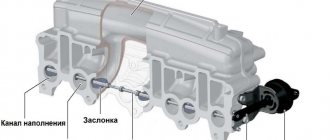
Its main task is to collect exhaust gases and distribute them into the exhaust pipe of the muffler.
Replacing or dismantling the VAZ-2114 exhaust manifold is necessary in the following cases:
- Mechanical damage to the collector.
- Warping and loss of tightness at the junction with the cylinder head.
- Burnout of the gasket between the head and the manifold.
- The appearance of cracks as a result of engine overheating.
- Replacing the collector with a device of a different configuration, adapted to a more severe operating mode.
In the event that we are not going to participate in high-speed races for the prize of the head of the regional traffic police, replacing or dismantling the collector may be necessary in a number of cases.
Causes of malfunctions
The key factor that causes 90% of exhaust manifold malfunctions on VAZ 2114 cars is high temperature and poor quality materials from which the parts are made. During operation, the steel repeatedly heats up and cools down, which leads to the appearance of cracks in the body. This is a common occurrence for VAZ cars older than 7-8 years.
Auto repair shops offer crack welding services using argon welding. However, for a number of reasons, this activity is useless for cars older than 7 years.
1) Just removing and installing the exhaust manifold will cost about 2.5 thousand rubles. Taking into account the work of the welder and other actions, the cost of repairs can be 4-5 thousand rubles. If you do the work yourself, buying a new part will cost less.
2) Welding, even argon welding, disrupts the structure of “tired” metal. A boiled part rarely lasts longer than a year, after which new holes appear. The older the car, the faster the problem returns, and the collector has to be removed again. If the car is older than 8 years and there are problems with cracks in the manifold, it is better to remove the part and replace it with a new one.
- Wear . During operation, the car emits hot gases that destroy the surface of the gasket, as a result of which it can tear or delaminate.
- Since there is only one gasket for the intake and exhaust manifolds, gasoline entering through the first channel can get on the gasket, which also affects the integrity and structure of the material from which it is made.
- Part quality, not always high, even original, so when choosing, you should pay special attention to this.
Bent valves due to irregular valve timing do not threaten the 8-valve valve
Signs of trouble
Exhaust manifold gasket One of the main signs of a leak in the system is a “sporty” growling sound when the engine speed increases. This may be a symptom of various exhaust system problems. To check, it is better to take an assistant and go to a garage with a pit or to an overpass. Most often, you can determine by eye whether the problem lies in the muffler, resonator or exhaust.
Gasket wear may become apparent during planting. Open the hood and start the car - white or grayish smoke rising from the manifold during warm-up indicates a leak for this reason. VAZ car owners usually encounter this problem once every 3-4 years. When using low-quality spare parts and before. The solution may be to manufacture a custom-made steel gasket. It can last as long as the entire collector.
Service specialists, when attracting clients, like to tell scary stories about the explosion of the exhaust manifold on VAZ 2114 cars due to cracks. In reality this is nothing more than a myth. But the real problems are no less serious, so there is no point in putting off repairs.
A cracked exhaust manifold or worn gasket can cause your engine to run rough.
1) A lambda probe is installed in the exhaust manifold, which affects the operation of the injection system. Strong air suction disrupts the oxygen mass content in the exhaust; the lambda incorrectly adjusts the quality of the mixture, causing tripping, uneven idling, loss of power, and “black” spark plugs.
This is interesting: How to check air leaks in the intake manifold: symptoms
2) Another function is crankcase ventilation. Impaired air circulation causes disturbances in the operation of the gas distribution mechanism, increased wear of valves, the formation of carbon deposits on the pistons and other “joys”. If increased noise and unpleasant odors during engine operation are combined with dirty work, the car needs urgent repairs.
Places of possible suction
There are quite a few places through which air can get inside the fuel system, and during the test you will have to examine them all (we’ll talk about how to detect them a little lower).
For now, let's say that you have to check:
- The intake manifold gasket (its destruction or burnout in the vast majority of cases is the cause of suction).
- Hoses and pipes suitable for the manifold.
- Injector seals.
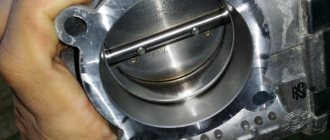
- Throttle gaskets.
- Plugs placed on the manifold.
- Bushings.
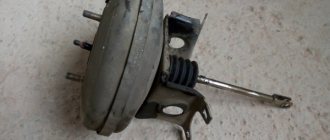
- Vacuum brake boosters.
If symptoms of air leaks appear in the VAZ 2114 injector, all these elements will have to be checked.
You should also check and, if necessary, replace the idle speed sensor. Very often they are of poor workmanship and are not sealed, leading to air entering the manifold.
How to find the leak location
There are 3 main methods by which you can find a leaky area:
- by monitoring the rarefaction of air in the line;
- using a smoke generator;
- using a volatile flammable liquid.
We will omit the first method, since it requires special equipment, which is not available at all service stations. But the second method deserves a lot of attention, since it is quite simple to implement and at the same time very accurate. It will require a compressor, a blow gun and cigarettes (the latter will serve as a source of smoke).
Before checking the air intake of the VAZ 2114, you will need to assemble the entire installation, namely, connect the gun to the compressor receiver, and insert a cigarette into the nozzle of the gun. After this, a pressure of about 0.8 atmospheres is built up and the smoke is directed into the collector using a gun.
The smoke itself created by such an installation is quite thick and quickly fills the entire system. All that remains for the motorist is to carefully monitor the place where the smoke is coming out, and after detecting it, carry out repair work.
In some cases, the leak can be found without additional means - the damaged area can be easily detected by the characteristic whistle or hiss that is produced by the intake air when the engine is running. True, this only happens if there are serious cracks and breaks.
If the proposed method using a smoke generator is not suitable (for example, there is no compressor available), then the test can also be performed using volatile flammable liquids packaged in pressurized cans. As such, you can use ethyl ether (although it is almost impossible to get it in its pure form now), a means for winter starting diesel engines (the main component of which is the same ether), as well as special cleaning products based on hydrocarbons.
In order to find the location of the leak, you need to start the car engine and, while idling, begin to spray all possible components, joints, plugs and hoses that relate to the manifold and may cause air penetration.
This should be done with pauses - after spraying one place, you should wait a few seconds. If you notice that the engine speed has increased sharply after the procedure, then the detected area should be thickly sprayed again. If after this the revolutions quickly go up again, then the leak point has been successfully found.
What does a faulty collector affect?
There are many stories about the rupture (and even explosion) of a cracked manifold while the car is moving.
Of course, none of them are true, but nevertheless, a leaky manifold is a very serious problem that requires an immediate solution, and here’s why: through burnouts and cracks, air can enter the exhaust system, diluting the exhaust gases.
As a result of this, the lambda sensor will incorrectly determine their composition and incorrectly adjust the composition of the fuel-air mixture injected into the engine, which will lead to tripping, a drop in speed and carbon deposits on the spark plugs.
Bent valves due to incorrect valve timing
These same cracks will affect the crankcase ventilation, disrupting it. This will lead to timing problems and increased valve wear. And finally, exhaust gases escaping through the burnouts will enter the engine compartment and, partially, into the interior, causing unpleasant odors and discomfort during trips.
A severely burnt manifold gasket can lead to exactly the same consequences as cracks on the part itself.
Air leaks and its symptoms
The phenomenon of suction is associated with the penetration of air into the fuel tract of the machine. It leads to a lean mixture and, as a result, greatly affects the operation of the engine, reducing its power and causing interruptions in operation.
If air leaks occur in the intake manifold, the symptoms of the VAZ 2114 may be as follows:
- unstable idle speed;
- engine tripping;
- “sagging” during acceleration;
- increased gasoline consumption;
- difficult starting even at high air temperatures;
- a sharp drop in power (especially at speeds below 3,000 min-1).
If the engine stalls very often, this may also indicate that there is an air leak in the VAZ 2114. You can additionally verify the presence of this problem by using a car scanner. The presence of suction may be indicated by errors P0171 (very lean mixture) and P300 (misfire observed).
Stable engine operation at high speeds does not at all indicate the absence of suction, since it is most clearly manifested at low speeds. It is worth remembering this so as not to be misled and start looking for other causes of problems.
As soon as you notice that there are signs of air leaks, you should immediately begin searching for a possible place where it has entered the system.
Preparation stages
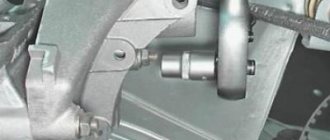
To replace the manifold or its gasket, in any case you will have to dismantle the VK. But before you get to the element you are looking for, you will first need to go through some preparatory steps. Namely, tighten the fasteners, and then remove the air filter and carburetor if the first stage does not help.
This is interesting: How to change the fuel filter on a Chevrolet Aveo: photos and videos
| Stage of work | Your actions |
| Tightening the fastenings | Often, loose manifold fastenings caused the entry of contaminants, which disrupted the performance of the exhaust system. If the tightening did not give any result, then the gasket is definitely burned out or the collector itself is damaged, which is less likely |
| Removing the air filter |
|
| Removing the carburetor | Removing the carburetor is carried out in the following sequence:
|
Dismantling the unit
All dismantling work must be carried out only on a cold engine. To make it easy to unscrew all fasteners, you can pre-treat them with WD40, several hours or even a day before the repair begins.
Part selection
21083-1008081 – original catalog number of the gasket for the intake and exhaust manifold. It consists of two parts or, on newer models, one. This part is produced at the AvtoVAZ plant. The average cost is 250 rubles per piece (if there are two of them) or 450 rubles (for a whole one).
One-piece manifold gasket A gasket that consists of two parts A one-piece gasket and one that consists of two parts together
In addition to the fact that there is an original part, you can also find a number of analogues that are recommended for installation. Let's consider which gaskets can be installed under the VAZ-2114 manifolds:
- Trialli GZ 102 0013 is a well-known Russian manufacturer that produces a wide range of analog parts for domestically produced cars. The cost of the gasket is 200 rubles per piece.
- AJUSA 13065200 is another domestic manufacturer that has won consumers over the quality of its products. The cost of the product is 450 rubles.
- Ukrainian also produces and supplies this gasket. But, if you look at it, the quality of the product leaves much to be desired, since the resource is designed for only 20,000 km.
Required tool for replacement
Before you begin the process itself, you need to decide on the necessary tools. To remove the exhaust manifold on a VAZ 2114 in order to replace the gasket or entire part, you will need the following tool:
- open-end and ring wrenches for 8, 10, 13, 17;
- wrench with heads 17, 19;
- screwdrivers, pliers.
It is also a good idea to have tools such as a Dremel, nut saw or nut pick on hand. As a rule, the fasteners on the exhaust system parts stick tightly.
A few days before your planned repair, begin treating accessible nuts with WD-40 or another penetrating lubricant. Repeat the operation 2-3 times. This will make the task of removing the manifold a little easier .
The question often arises: is it worth using a sealant after removing and replacing the gasket? Experts believe that if you apply sealant to the gasket, it should only be high-quality silicone. A bad sealant can bring a lot of trouble to a VAZ 2114 engine: when it burns out, it turns into “pellets” that are pulled into the crankcase. And this is unnecessary contamination of the piston system.
Now that everything is prepared, you can start working directly. In order for the manifold to be removed without any problems and rusted bolts not to create trouble, everything must be lubricated with WD-40 before performing the operation. It is advisable to do this several times. Before performing the operation, you need to think again, weigh everything and calculate your strength.
How to make a replacement
In order to replace the exhaust manifold yourself, you will need the following tools:
- slotted screwdriver;
- open-end wrenches for 17, 13, 10 and 8;
- pliers (pliers);
- socket heads for 19 and 17;
- head knob.
A few days before the expected replacement of the exhaust manifold, all fasteners should be treated with VD-40 or its analogues 2-3 times a day.
Having selected the necessary tool, you should figure out how to remove the VAZ 2114 manifold. The first thing you will need to do is to process all the bolts and nuts with VeDeshka again (before the replacement itself), after which you can begin dismantling, which is performed as follows:
- Remove the negative terminal from the battery.
- Disconnect the cable from the throttle valve.
- Disconnect all fuel line connections.
- Disconnect the throttle position sensor.
- Disconnect the idle speed sensor.
- Remove the brake booster pipes and crankcase ventilation pipes.
- Remove the receiver.
- Disconnect injection control wires.
- Remove the fuel rail (there is no need to remove the injectors themselves).
- Remove the thermal shield protecting the collector.
- Remove the exhaust pipe.
- Disconnect the intake manifold and remove it.
- Unscrew the exhaust manifold fasteners.
- Remove the exhaust manifold.
- Remove the exhaust manifold gasket.
Installation of a new gasket and a new manifold, as well as reassembly, should be done in exactly the same order, but in reverse order.
It is imperative to replace the gasket when replacing the exhaust manifold - even if it does not look very worn.
In conclusion, it is worth saying a few words about which gasket is better to install instead of a burnt one, because their choice in car dealerships is quite wide. In addition to the original manifold gasket (catalog number 21083-1008081), Trialli GZ 102 0013 and AJUSA 13065200 gaskets have proven themselves to be good.
All of them are produced in Russia and have an extended service life. In turn, the manifold gaskets from the Bogdan company that are often found on sale have an affordable price, but are designed for only 20,000 km.
That is why they are not the best option - it is better to purchase more expensive gaskets, but they require replacement much less often.
conclusions
Replacing the intake manifold gasket on a VAZ-2114 engine is a rather complex and time-consuming process. So, not every motorist can handle it on his own, and therefore he has to contact a car service, where he will need to pay 4-5 thousand rubles for the process, plus the cost of the part and consumables.
Sources
- https://scart-avto.ru/avtogarazh/vypusknoy-kollektor-na-karbyuratornom-vaz-2114-remont-i/
- https://carfrance.ru/zamena-i-snyatie-vypusknogo-kollektora-vaz-2114-inzhektor/
- https://bolt-taxi.com/zamena-prokladki-vpusknogo-kollektora-vaz-2114-inzhektor/
- https://mastershuma.ru/vpusknoj-kollektor-vaz-2114-inzhektor-8-klapanov/
- https://remontvazov.com/vypusknoj-kollektor-vaz-2114
- https://carfrance.ru/zamena-prokladki-vpusknogo-kollektora-vaz-2114-inzhektor/
[collapse]