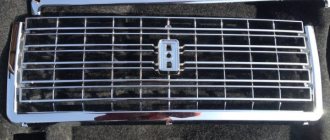
Muffler for VAZ 2107 and exhaust system device
Suddenly, out of the blue, while driving your favorite “Seven” in complete comfort, an incomprehensible “roar” appears at the throttle.
The driver turns off the radio and listens. After every press on the gas pedal, the car growls and roars like a tank. After climbing under the bottom, it is discovered that the VAZ 2107 muffler is completely unsoldered, the pipe has moved away from the resonator, and the fastening is broken. If the inside of the exhaust pipe is “jammed” and the removal of exhaust gases is impaired due to a decrease in diameter, then the engine “chokes” and a loss of power occurs. What to do? The muffler is hot, and it is impossible to simply connect and “wrap it” with something, since any winding will burn out. The main problem becomes somehow establishing a temporary fastening so that the muffler does not stick into a bump when you have to drive onto the country road. As a result, the driver trudges along at a speed of 45-50 km/h, stunning oncoming people, and thinks with longing about how he will drive into a sleeping holiday village on a diesel tank. So, part of the exhaust system needs to be replaced.
The above describes a common situation: many car enthusiasts do not think about the vulnerability of the exhaust system,
Few people pay attention to a serviceable muffler in a car, until a routine inspection of the chassis or rear axle reveals a hole, or a split at the seam, or a more serious breakdown.
Purpose and design of the resonator
Self-diagnosis of VAZ 2107 clutch faults
The structure of the resonator is similar to a direct-flow muffler - a perforated pipe is laid inside the cylindrical body without any partitions. The difference lies in the jumper that divides the jar into 2 resonator chambers. The element performs 3 functions:
- perceives and pre-damps sound waves;
- dissipates part of the heat coming from combustion products;
- Extends the service life of the main muffler.
Unlike direct flow, the resonator does not absorb, but repeatedly reflects sound vibrations
When operating, a two-chamber tank uses the principle of resonance - sound vibrations are repeatedly reflected from the walls, collide with oncoming waves and cancel each other out. The VAZ 2104 was equipped with 3 types of sections:
- Cars with a carburetor power system were equipped with a long resonator for 2 tanks. For the modification with a 1.3 liter VAZ 2105 engine, an element with 1 can was installed.
- Models with an injector, produced under Euro 2 environmental standards, were equipped with a shorter resonator with 1 tank. The inlet pipe began with a flange, which was fastened with two bolts to the mating part of the neutralizer.
- On modifications of VAZ 21043 and 21041, “tailored” to Euro 3 requirements, the shortest resonator was used, equipped with a mounting flange for 3 studs.
Damage and malfunction of the resonator cans are similar to the main muffler section. During operation, housings and pipes burn out, rust or break due to external influences. The repair methods are identical - welding, temporary bandage or complete replacement of the part.
Video: how to replace the resonator on classic VAZ models
Over the years, it has become more difficult to find high-quality spare parts for domestic cars that have long been out of production. Practice shows that it is better to repeatedly repair the original factory muffler than to buy a part of unknown origin that will literally fall apart after 10 thousand km. The second reliable option is to incur financial costs, but install a durable stainless steel exhaust pipe.
What is a muffler for?
Naturally, making the car sound quieter. Physically, the combustion of a mixture of air and gasoline produces vibrations of different frequencies, from low to high. The sound from the exhaust manifold carries all the energy of sound vibrations into the muffler, which is equipped with several special chambers. Like any wave, the sound from a motor has energy, or amplitude. The higher it is, the noisier the motor is. When it enters the chambers, the sound “gets entangled” and gives up its energy, turning into heat. This is why the muffler parts are so hot, although they are far from the engine, and the exhaust itself from the exhaust pipe is slightly warm. So, the first function is to make the engine quieter.
The second important function is the removal of combustion products, otherwise the mixture will not ignite in the zone of high carbon dioxide content.
The third function is keeping the cylinders clean and ventilating them.
It must be remembered that the exhaust system takes on very large thermal and chemical loads, and parts can “burn out”, since toxic exhaust gases, mixing with condensate, form complex acids, which are very aggressive at high temperatures.
On the outside, moisture, impacts from gravel, salt in winter and other causes also contribute to wear. Those who use their car in winter need to replace the muffler much more often.
What is the design of the VAZ 2107 muffler
The muffler is only part of the exhaust system. Its structure is as follows:
- Exhaust gases penetrate through the exhaust manifold into the so-called “pants” 12, which are called the exhaust pipe. The “pants” are separated from the exhaust manifold by a special gasket 11, which is designed to seal their fastening.
- The pipe is attached to the gearbox using bracket 15.
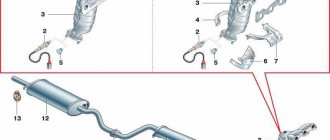
- Then there is a series of additional resonators, or mufflers, front and rear, which are attached using clamps 7 to the “pants” and 6 to the main muffler. These mufflers cut off certain sounds from high engine frequencies. Together they are called "additional muffler" 13.
- The main muffler (main) 3 is movably fixed to the bottom so that its frequency is not transmitted to the body. This mount can additionally dampen vibrations due to the “sway” of the muffler itself. It is produced using parts 1-4.
- Next comes the exhaust pipe.
Here it should be said that by the color of the exhaust and the condition of the pipe, one can draw certain conclusions about the operation of the engine, just as doctors draw conclusions about the work of the intestines by analyzing stool. For example, if you run your finger inside the pipe and a greasy, oily residue remains, then the oil scraper rings have become unusable and the engine “eats” oil, which is indicated by the black color of the exhaust. Normally, the inside surface of the exhaust pipe is dry.
The exhaust system assembly is shown below:
The main muffler contains numerous chambers consisting of perforated pipes.
The figure also shows the mounting pad and extensions of the main muffler. An important feature of the VAZ 2107 muffler is its complete “interchangeability” with the rest of the classics. If you purchase parts from a VAZ 2101, or any other modification, you will not go wrong.
If your muffler needs replacement, it is better to do this at a service center, and purchase spare parts there so that there is a guarantee for the installation. Simply replacing a muffler is a messy business, especially if you have to start from the “pants.” It is possible that you will need to cut off the stuck joints with a grinder.
A few words about sports modifications of the VAZ 2107 muffler
A conventional muffler is indirect, this increases the pressure in the exhaust manifold and can reduce engine power. At that time, a direct-flow, sports muffler filled with ceramic fiber is able to increase engine power by faster cleaning of the cylinders from exhaust gases. It should be said that the sports muffler of the direct-flow system will never “scream”, and the engine operating volume will be quite acceptable.
Main muffler - device and types
The factory-made element is made of refractory “black” steel and coated with a layer of anti-corrosion paint. The part consists of 3 parts:
- front pipe, curved to bypass the rear axle;
- three-chamber muffler tank with a system of partitions and pipes inside;
- outlet pipe with a bracket for mounting a rubber cushion.
The original Zhiguli mufflers are made of refractory steel with anti-corrosion protection
The mufflers for “classics” sold today are not reliable - spare parts are often made from second-rate metal and burn out after 15-25 thousand kilometers. It is quite difficult to identify a low-quality part when purchasing; the only way is to visually check the quality of the welds.
In addition to the factory version, other types of mufflers can be installed on the VAZ 2104:
- element completely welded from stainless steel;
- sports (direct-flow) option;
- a homemade section with a round cistern made from a thin-walled iron pipe.
Factory forward flow is externally distinguished by the shape of the body, heat-resistant black coating and a decorative nozzle instead of a regular pipe
A stainless steel exhaust element will cost 2-3 times more than a factory part, but can last up to 100 thousand km. I was convinced of this personally when I bought and installed a stainless exhaust system on my VAZ 2106 - the design is identical to the exhaust tract of the V4. I happily forgot about the pipe burnouts for several years.
The direct-flow type of muffler differs from the standard part in its operating principle. Gases pass through the perforated pipe and do not change the direction of movement, the resistance of the section is zero. Result: it is easier for the engine to “breathe”, but the noise is suppressed less well - the operation of the motor is accompanied by a rumbling sound.
The main difference between forward flow is the minimal resistance to the passage of gases, which gives an increase of 3-5 liters. With. to engine power
If you are “friendly” with a welding machine, the factory version of the muffler can be modified or the element can be made from scratch. In home-made products, the principle of direct flow is implemented, since welding a flat tank with partitions is much more difficult - it is easier to buy a ready-made part. How to make a main muffler with your own hands:
- Select pipes for the outer casing and direct-flow channel. As a tank, you can use a round muffler from a Tavria, or take a curved front pipe from an old section from a Zhiguli.
- Make an internal perforated pipe by drilling holes Ø5-6 mm and making through slots with a thin circle on the metal.
Perforation in the form of holes and slits is performed to allow the passage and further absorption of sound vibrations - Insert the pipe into the casing, weld the end caps and external connecting pipes.
- Fill the cavity between the tank body and the direct-flow channel with non-flammable kaolin wool or basalt fiber.
It is better to use non-flammable kaolin wool or basalt fiber as a noise absorber - Seal the casing cover by welding and install 3 eyes for rubber hangers.
The final stage of manufacturing is painting the part with a heat-resistant composition. After installing any muffler - factory or homemade - the protruding end of the pipe can be refined using a decorative nozzle, fixed from the outside with a locking screw.
Muffler VAZ 2107 - how to replace it yourself
A clear understanding of the algorithm of actions when carrying out such an event as replacing a VAZ 2107 muffler will help every car enthusiast carry out his plans quickly and without errors. On the one hand, removing the old muffler and installing a new one seems simple, but on the other hand, you need to be prepared for some difficulties.
Why and how often is it necessary to change the VAZ 2107 muffler?
The exhaust system of a car, despite its relatively simple design, performs many functions. The main ones are:
- removal of fuel combustion products;
- significant reduction in exhaust sound level;
- maintaining air balance with the intake system;
- ensuring effective cleaning and ventilation of cylinders.
The VAZ 2107 muffler experiences enormous loads like no other part of the car. First of all, constant temperature changes have a destructive effect on the metal, which actively destroys not only the protective paint and varnish coatings, but also the structure of the metal itself.
Gases heated to a high temperature literally “eat up” the internal filling of the muffler, mixing with water condensate and oils, dissolving the metal walls, forming through corrosion. Externally, the muffler elements are also adversely affected by moisture, road sand and gravel; salt solutions in winter intensify the decomposition process.
As a result, after some time the driver can observe under the bottom of the car the pitiful remains of what was once called a muffler. Whether we like it or not, the muffler of a VAZ 21074 or any other model will have to be changed periodically. To the question of how often you should change the muffler, every car enthusiast must find the answer himself.
The service life of an exhaust system, like many others, depends on factors such as:
- activity of vehicle operation;
- quality of fuel used;
- the car owner’s attitude towards the condition of the car;
- frequency of use of the machine in adverse weather conditions;
- quality of previously installed exhaust system parts.
Having come to terms with the fact that the VAZ 2107 muffler will not last forever, you need to buy a new one and start replacing it.
Replacing the VAZ 2107 muffler - procedure
An inherently simple procedure can take a lot of effort and time. Before installing a new muffler, you must remove the old one. To do this you should:
- install the car on an overpass or above an inspection hole;
- prepare a set of tools, ensure good lighting under the machine;
- The muffler is connected by a pipe to the resonator pipe in front of the rear axle. The ends of pipes with a slot and a male-female connection are tightened from the outside with a coupling;
- Corrosion under the influence of lubricant and temperature can solder the joints so much that it becomes very difficult to remove them. It is better to moisten the pipes at the junction and the coupling in advance with a solution that corrodes corrosion. For this purpose, as a last resort, brake fluid or used oil is suitable.
VAZ 2107 replacement of mufflers yourself
Exhaust system VAZ 2107 (carburetor)
Let's figure out what the muffler consists of. In the photo above:
- pillow bolt (1)
- cushion securing the muffler (2)
- main muffler (3)
- belt on which the muffler is suspended (4)
- clamp bolt (5)
- clamp securing the main muffler (muffler) to the resonator (6)
- bolt of the second clamp (7)
- clamp securing the resonator to the “pants” (8)
- nut securing the exhaust pipe to the exhaust manifold (9)
- locking plate (10)
- “pants” gasket (11)
- exhaust pipe (pants)(12)
- resonator (13)
- bolt of the clamp securing the exhaust pipe (14)
- clamp securing the exhaust pipe (15)
Each owner of a VAZ 2107 car has to replace one or more parts of the exhaust system over time. The cost of replacing one spare part is not high, but you can save money by doing the job yourself. Repairs do not require special tools or special skills; an angle grinder and a “liquid wrench” (WD-40 or its equivalent) will come in handy . The figure above shows how the VAZ 2107 muffler works; replacement is the next step. For your information:
- The exhaust system of the VAZ 2107 with a carburetor consists of a downpipe (pants), main and additional mufflers;
- The flange of the pants on the VAZ 2107 is attached to the exhaust manifold using four studs. They are screwed with brass or copper-plated steel nuts. They are unscrewed in pairs and secured with special locking plates;
- The junction of the collector with the receiving pipe is sealed with a reinforced gasket made of metal asbestos. The pants are additionally attached using a clamp to the gearbox bracket;
- The VAZ 2107 resonator consists of front and rear mufflers. The front muffler pipe is put on the trousers, and the rear muffler is inserted into the main muffler pipe. At the joints they are fixed with clamps;
- The main muffler is suspended from brackets on the underbody by two rubber straps and a cushion.
It is not difficult to understand which part has failed - we drive onto an overpass or inspection hole and start the engine. Usually, the muffler itself most often burns out, because it is inside it that moisture accumulates and it rots. The resonator breaks down less often because water condensation does not occur in it, since the vapors are blown into the main muffler. The service life of the exhaust pipe exceeds the service life of other parts of the exhaust system by several times.
Attention: Any work related to the replacement or repair of the exhaust system must be carried out only after waiting for all its parts to cool completely.
- Key 13 (rozhkovo - cap);
- Driver or ratchet;
- Heads for 10 and 13 (deep);
- Wide flathead screwdriver or chisel;
- Hammer;
- Pliers.
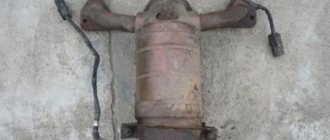
Lada 2107, 241 thousand without capital › Logbook › Replacing the VAZ-2107i injector resonator
Hello everyone, back in the winter on New Year’s Eve the resonator burned out, it was 4 years old, it was inherited from the previous owner, I changed the main muffler about a year and a half ago. I decided to wrap it with asbestos cord until spring, but after a month it burned out, so I wound it again.
Recently it became warmer, and the whipping started again - I decided to replace it.
I bought a resonator made in Tolyatti in advance; the main muffler was from the Seversky Pipe Plant, near St. Petersburg.
It turns out that there are 2 types of injector: Euro-2 and Euro-3. It differs in the bend of the flange and, it seems, in length. Before purchasing, I had to look under the car to make sure I have Euro-2, so the pipe with the flange has a bend, while for Euro-3 it is straight.
For some reason I bought a metal-graphite ring with bolts, which is used to connect the exhaust pipe and the catalyst, in my case they are not needed - the resonator with the catalytic converter has a rigid flange connection. But I think sooner or later they will also come in handy.
I prepared the tools, lubricant and sealant, there was an extra clamp left over from the last time.
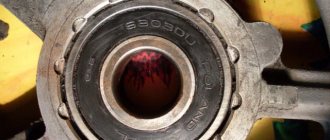
With sin, I unscrewed two stuck bolts from the flanges; the clamp on the muffler came off easily, since it lubricated the threads even when replacing the muffler. During removal, the resonator flange completely came off - it was already held on by snot.
I had to unhook the muffler to disconnect the pipelines; the fastening belt broke, but fortunately I have a spare repair kit, also from last time.
The catalyst honeycomb is visible.
Just for fun, I decided to measure the thickness of the metal pipe of the new resonator - it is about 1.5 mm.
It looks well made, the seams are from an automatic machine, for some reason the article number comes from the “six”, although it seems that no injectors were installed on them.
Before reassembling, I lubricated the joints with a thin layer of graphite paste.
During installation, a problem immediately arose - the bend of the muffler began to rest against the bottom of the car - this is the geometry.
I tried this way and that, but still something stuck somewhere - either in the handbrake cable bracket, then in the cable itself, or in the shock absorber.
There was no autogen, to heat it up and bend it, I had to cut off a couple of centimeters from the tip of the resonator pipe with a grinder.
Somehow we managed to move it a couple of centimeters away from the bottom. Before the final tightening, I also lubricated all the bolts with copper grease, and on top of that with graphite grease, and installed new engravers.
I also lubricated the wire securing the muffler belt with pushsal, since everything there also rusts and you have to tear the belt with a mounting tool or saw it.
Upon inspection, it turned out that siphonage was coming from the new resonator at the place where the 2 halves were welded from a small hole of half a millimeter. It was discovered by the condensate coming out - such is the quality of production, they don’t even check the tightness of the seams.
I didn’t have time to drip it with electric welding or cover it with epoxy, I’ll fix it next time.
Subscribe! Good luck on the roads!
Price: 730 ₽ Mileage: 226,000 km
VAZ 2107 muffler replacement
The muffler must be changed in a certain sequence. And you need to know this. So:
- The muffler of the VAZ 2107 is replaced in an inspection hole or overpass.
- It is attached to the resonator in front of its rear axle. The connection is crimped with a metal clamp, which ensures its complete tightness.
Tip: It is recommended to tap the clamp itself and the pipe connection with a hammer, this will make it easier to separate them.
- First we remove the clamp
- Then we try to pull the muffler flare from the resonator flare with our hands; this does not always work. It is recommended to use a chisel or a wide flat screwdriver.
- Using a screwdriver, bend the flaring petals, then remove the muffler. If this doesn’t work, use a “liquid key”.
- We cut off the “petals” using a grinder, if the “liquid key” did not help. When cutting the petals, it is important to be careful not to catch the resonator pipe, in order to avoid cutting through exhaust gas damage.
- After disconnecting the muffler, remove it from the suspension straps and cushion, install a new one in the reverse order.
Remove it from the suspension straps and pillow
- We attach the new muffler to the resonator so that the resonator pipe goes into the flaring of the muffler until it stops completely.
- Then we crimp the connection using a clamp.
- Replacement of the rear muffler of the VAZ 2107 is completed.
Instructions for replacing the resonator
Since the resonator on the VAZ 2107 is not attached to the body, it is necessary to hold it when replacing so as not to deform the exhaust pipe.
Resonator VAZ 2107
- Tap the pipe connections and clamps with a hammer, as in the previous case.
- First of all, we disconnect the resonator from the muffler, then from the “pants”. When connecting the resonator and the receiving pipe, we proceed according to the same scheme, bend the petals, use a “liquid key” or a grinder in the most extreme case, and very carefully.
- At the point where the resonator meets the muffler, the situation is more complicated. When the pipes have become stuck, we cut off a piece of pipe coming from the resonator, then remove the remaining part from the flare using a gas wrench or pliers. Usually in this place the pipes are stuck tightly, when it is impossible to separate them, we also change the muffler
- We install a new resonator, observing its original position. If the resonator is installed incorrectly, it will start knocking on the underbody or hitting uneven roads. It is desirable that the resonator pipe running from the receiving tube to the tank be parallel to the ground
- In the same way, we align the connection of the resonator with the silencer so that the tank is parallel to the ground and does not knock on the body
Changing the “pants” (reception pipe)
When replacing VAZ 2107 pants, be sure to stock up on a new gasket between the pants and the manifold, because it is destroyed when removed. It is also recommended to replace the nuts securing the pants to the manifold. So:
- First, disconnect the pants from the resonator. If problems arise, as in the case of the resonator, given the fact that the pants are replaced less often than other parts of the muffler, and the heating temperature of the connection during engine operation is quite high, we use an angle grinder.
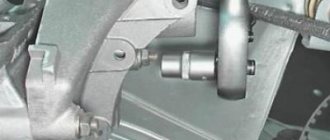
Mounting for a carburetor engine. Nearby is the injector pants mount
- After removing the resonator, unscrew the four nuts securing the exhaust pipe to the manifold.
Unscrew the nuts securing the pants to the manifold, take out the gasket
- Be careful not to strip the studs to avoid unnecessary work replacing them. It is recommended to immediately treat them with a “liquid wrench”, otherwise we cut off the nuts using a grinder
- Working with a grinder, we cut the nut diagonally so as not to damage the thread of the stud. Then we simply knock it down using a chisel or flat screwdriver
- When installing the pants, replace the old gasket, then screw them to the exhaust manifold
- We connect the pants with the resonator and compress the flaring using a clamp.
Replacing the muffler on a VAZ 2107 injector
Differences between the exhaust system of VAZ 2107 cars with injection engines:
- The exhaust pipe of the muffler already has a flange attaching it to the converter.
- The presence of a welded sleeve in the pants into which a lambda probe (oxygen concentration sensor) is installed.
- A catalytic converter with an iron carrier is installed in place of the additional front muffler.
- An additional muffler is installed, with a flange at the end of the front pipe.
- To compensate for bending loads when the engine oscillates, the converter flange is attached to the trouser flange pivotally, through a toroidal metal-graphite ring and spring-loaded bolts.
- The converter becomes very hot during engine operation; to protect the body from overheating and fire of the upholstery, a heat shield is located above the converter.
Replacing a VAZ 2107 muffler on an injection engine is not much different from replacing a muffler on a carburetor engine; if anything remains unclear to you, we recommend watching the video.
Replacing the muffler on a VAZ 2101-VAZ 2107
Welcome! Car muffler - did you know that the exhaust system of a car usually consists of not one pipe, but several? Now let’s explain in more detail! Many people have recently become accustomed to calling the exhaust system simply a car muffler, in fact this is not correct, although in part it can be said that it is correct, but the point is that the exhaust system is divided into several parts, namely the exhaust manifold, after which comes the exhaust pipe, after this pipe there is a resonator and at the very end there is a rear muffler, which you see all the time when, for example, standing in traffic jams behind any car, today we will discuss with you how to replace all these parts (Except for the exhaust manifold) in detail.
Note! To replace all three pipes of the exhaust system, you will need to stock up on: A beard, and you may also need a special sealant for exhaust systems (This is so that the connection of all pipes is tighter and thus the seal in the system is no longer broken) and you also need will take with you a set of wrenches, if possible, stock up on an extension with a socket head, as well as a universal joint and a wrench, because in the exhaust system there are nuts that are very difficult to get to, for example, nuts that secure the exhaust pipe to the exhaust manifold, so that You will have to work hard to unscrew them since they are not located in the most convenient way!
Summary:
Where are all three parts of the muffler located?
In a car, in general, to see the exhaust system, you either need to crawl under the bottom of the car, or open the hood and find all three parts of the muffler in the engine compartment, namely the first part is the exhaust pipe (Red arrow), then the resonator follows it (Blue arrows) and only at the very end there is the rear part (Green arrow), by the way, it can be easily seen in any car by looking at it from behind.
Note! Basically, all these three parts are connected using clamps, which tighten all the joints in the pipes to a very strong state, but there is one more part of the muffler that we did not indicate, namely, it only applies to new cars that, upon release, were subject to environmental standards such as called “Euro” cars, for example, Priora, Grant, etc. In all these cars, a so-called catalyst is additionally installed in the exhaust system, thanks to which the car emits much less harmful substances into the atmosphere. If you are interested in what this catalyst looks like, then look at the photo below in which it is depicted:
When should muffler parts be replaced? We are sometimes asked such questions from time to time, but the whole point is that it is better not to change the parts of the muffler separately, but it is best to move on to replacing the entire exhaust system consisting of three parts at the same time, we will explain why! The thing is that a certain pipe has a certain service life, so if all the pipes were purchased from the same manufacturer and they consist of the same metal, then they will begin to deform, so to speak, after 30,000-50,000 thousand km at the same time.
But if you hit a bump somewhere on the road, then it is not necessary to change all the pipes, provided that they are in good condition, in this case you can simply take and replace only the deformed pipe and drive with a new one all the time.
Note! But still, the exhaust system of a car is not a cheap pleasure, so as they say, calculate your budget and monitor the condition of all the pipes, and if they need to be changed and there is not enough money, then in this case replace the worn pipe itself with a new one You’ll find others when the money appears!
Installing an additional resonator
The resonator must dissipate low-frequency sounds. In case of dull noise, this action will once again dampen the sounds, which makes the machine operate quite quietly.
Another resonator is mounted between the base resonator and the muffler. It is installed in the area where the base resonator was located. This new resonator must have sound-absorbing material. It should fill its internal space.
The sound of a running machine can be reduced as much as possible by installing an additional final muffler. This type of noise reduction device is a specific can, which is crossed by a pipe with holes, and the rest of the sound reduction mechanism is saturated with heat-stable soundproof fiber, which is fixed with a fine mesh. This system for reducing the intensity of a sound wave is called an absorber .
The area for mounting another muffler should be the area between the catalyst and the standard muffler. To attach another sound reduction device, cut a piece of pipe of the required size between the base muffler and the catalyst. Fit the muffler to the resonator using strong clamps in combination with asbestos sheets to create gas-tight joint walls. The sealing must be done very carefully - a missed gap will lead to a lot of noise.
As a result of these actions, when sound waves move through the installed muffler, it is absorbed by the porous substance, which will help reduce the noise from the operating machine. A sound wave, reaching a porous substance, provokes vibrations between different fibers and, appearing during this friction, is transformed into thermal energy. Consequently, sound vibrations are converted into heat. A significant advantage of such a noise reduction device is that there is no need to increase the length of the exhaust system.
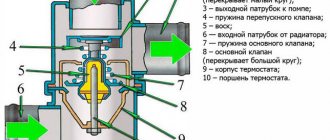
Exhaust system design
Technology for creating and mounting an additional resonator:
Upon completion of all production operations, the welds must be cleaned, and the part that was made must be painted. It must be chosen very carefully. It must be very resistant to temperature fluctuations.
After installing the additional resonator, the ignition system and fuel supply should be tested. You need to realize that all changes to the exhaust system will affect the engine. It will be very annoying if, by reducing the volume of the running engine, you are forced to increase fuel consumption or reduce the power of the car. When choosing a method by which you will create a silent muffler, take into account the difficulties associated with it. It is especially necessary to know that absolutely all methods of producing a silent exhaust system increase the severity of the mechanism.
How to replace the muffler on a VAZ 2101-VAZ 2107?
Note! Before we begin, we will immediately warn you that detailed removal of this or that muffler will not be in this article, because it is built only on the principle of links, so you can see how to remove this or that pipe by clicking on the links that lead to other articles dedicated separately to each part of the muffler on our website!
One more thing, when you remove any pipe, be extremely careful, haste and brute force will not lead you to anything good, but you will only aggravate the situation and you can even damage the bottom of the car by hitting it, for example, with something pipe!
Removal: 1) At the very beginning of the operation, you will first need to remove the rear part of the muffler from the car. (For information on how to remove the rear, see the article entitled: “Replacing the Rear”)
2) Once the rear part is removed, then after all this, proceed to removing the additional pipe from the car, some also call it the resonator. (For information on how to remove the resonator, see the article “Replacing the resonator on a VAZ”)
Purpose and design of the muffler for VAZ 2104–2107 cars
Exhaust gases escape from the engine cylinders under high pressure and with loud noise. The muffler receives and slows down gases, converts their kinetic energy into thermal energy, smoothes out pulsations and muffles the sound, then releases the weakened exhaust into the atmosphere.
Thus, among the main functions of the muffler:
- reduction of engine noise;
- conversion of exhaust gas energy;
- safe release of gases into the atmosphere.
In everyday life, a muffler is called an exhaust tract or exhaust system. In fact, it is only one, albeit the most important, element of the fuel system. For VAZ cars with a classic layout, it consists of a reception pipe connected to the engine exhaust manifold, an additional (resonator) and a main muffler.
For VAZ cars with a classic layout, the exhaust gas system consists of a reception pipe connected to the engine exhaust manifold, an additional and main muffler
All of the above is located under the bottom of the car. The system elements - pipe, resonator and muffler - are attached to each other with clamps. The exhaust pipe is rigidly screwed to the manifold and the gearbox cover, the main muffler body is suspended from the body by rubber straps, and the exhaust pipe is suspended by a rubber cushion.
At the Politburo, the Minister of Automotive Industry Alexander Mikhailovich Tarasov made a report in which he spoke about the state of affairs in the automobile industry and spoke about the need to build a new plant using foreign experience, and Dmitry Fedorovich Ustinov, the former head of the Ministry of Defense, who oversaw issues of the military-industrial complex, objected, that having such a “defense industry”, it costs nothing to build a new plant on our own. And then Kosygin proposed building two factories - one using Soviet “patterns”, and the second - with foreigners. The idea was accepted, and as a result, two with a capacity of 220,000 cars per year and a VAZ with an annual capacity of 660,000 cars appeared.
Innokenty Kishkurno
Wheels
Upgrading the exhaust system
How to make the exhaust quieter? First of all, you need to know that the exhaust gas removal system is structurally equipped with a muffler and resonators, which are designed to reduce the speed of the exhaust being removed. It almost completely loses its energy and dissipates when it enters the muffler chambers.
Therefore, in order to upgrade the exhaust gas removal system, it is necessary to install an additional resonator. This must be done between the muffler and the main resonator of the system. You can make it yourself or purchase a new one. Then you should cut out a section of the exhaust pipe and weld an additional device there.
The resonator is made as follows
. Its body is made from sheet steel, from separately assembled halves, which are welded in advance. You can replace the steel sheet with a metal pipe of the appropriate diameter. For more details, see the article “What is a muffler resonator.”
Holes are made in the section of the exhaust pipe located behind the main resonator. After that, at this interval, the two halves of the prepared “barrel” are scalded, and basalt wool must be placed in the resulting new resonator body. At the end of the work, the welds are cleaned, and the resulting part is painted with paint that is resistant to temperature changes.
What else do you need to know?
Have you ever compared the elements of exhaust systems of domestic cars and foreign cars? Almost all foreign cars are equipped with massive components of exhaust gas removal systems. This is due to the fact that thicker metal helps reduce engine vibration and also makes the exhaust system virtually silent.
If you disassemble the muffler of a foreign car
, then in addition to the thick metal walls of the structure, you can see many chambers and labyrinths designed to disperse the exhaust. In domestic cars, everything is much simpler in terms of design, so they do not have a high level of comfort.
You should also know that any modernization of the engine exhaust gas removal system will inevitably lead to an increase in the weight of the structure of pipes, resonators and muffler. In this regard, it is necessary to take measures to strengthen the supporting brackets of the system, as well as replace the shock absorbers with more powerful ones. You already know how to make the exhaust quieter, now the only thing left to do is test the operation of the engine at idle, as well as under load, and see how the engine behaves.
Replacement and repair of muffler for VAZ 2104–2107 cars
To replace the muffler you will need:
- inspection hole or lift;
- screwdriver;
- a set of car keys;
- hammer.
Removing and installing the muffler
To dismantle the “glushak”, repair it, and then return it to its place, follow this sequence of actions:
- Drive the car into the inspection hole. Stop the engine and turn off the ignition. Wait until the exhaust manifold cools down.
- Unbend the hooks of the rubber suspension straps of the muffler.
Using a screwdriver, straighten the hooks of the rubber straps on which the muffler is suspended
Unscrew the exhaust pipe fastening to the rubber cushion with a wrench
Loosen the clamp between the pipes of the main and additional muffler
Carefully knock the resonator out of the mount by hitting it with a hammer through a wooden spacer
Unscrew the exhaust pipe from the gearbox bracket
Carefully bend the stoppers and unscrew the exhaust pipe from the manifold
Install the new muffler in the opposite order of removal. However, do not use a used gasket. Before assembly, treat the pipes at the places where they are connected with clamps with graphite lubricant.
Video: replacing a VAZ 2107 muffler in a garage
In 1979, at VAZ, a car was built especially for “dear Leonid Ilyich,” which received the common name “half past six.” This happened after the presentation of the VAZ-2105 and 2107 models to the country's leadership, the serial production of which was still quite far away, and Brezhnev wished to give such a car to one of his family members. The result was a unique car, the body and interior of which was a hybrid of a “six” and a “seven” - hence the name.
Innokenty Kishkurno
Wheels
Functions of the VAZ 2104 exhaust system
VAZ 2107 timing chain: self-replacement
To get maximum energy from the engine, you need to burn the fuel under optimal conditions. The required volume of air is added to the gasoline, then the mixture is sent through the inlet manifold into the cylinders, where it is compressed by pistons 8-9 times. The result is that after the flash, the fuel burns at a certain speed and pushes the pistons in the opposite direction, the motor performs mechanical work.
In addition to the energy that rotates the engine crankshaft, by-products are released when the air-fuel mixture is burned:
- exhaust harmful gases - carbon dioxide CO2, nitrogen oxide NO, carbon monoxide CO and other chemical compounds in smaller volumes;
- a large amount of heat;
- a loud sound similar to a rumble that is formed with each flash of fuel in the cylinders of the power unit.
A significant portion of the released thermal energy is dissipated into the environment thanks to the water cooling system. The rest of the heat is taken up by combustion products that escape through the exhaust manifold and exhaust pipe.
The exhaust pipe of the “four” is located closer to the right side of the car - as on all classic Zhiguli models.
What problems does the VAZ 2104 exhaust system solve:
- Removal of flue gases from the cylinders during the exhaust stroke - combustion products are pushed out of the chambers by pistons.
- Cooling of gases by heat exchange with ambient air.
- Suppression of sound vibrations and reduction of noise levels from engine operation.
How are knocking and muffler position related?
If the muffler suddenly starts knocking on some parts of the car, find the source of the extraneous sounds. Usually the reason lies in stretched rubber fasteners. After replacing them, the knocking will stop.
Sometimes a knock appears after work related to removing the muffler. In this case, extraneous sounds are a consequence of installation errors. Round pipes at the joints with clamps can be slightly rotated relative to the correct position: more or less than required, pushed into each other.
To eliminate knocking, restore the optimal position of the exhaust system elements.
Sagging mufflers can be “treated” using similar methods—by replacing rubber bands and correcting the position of joints.
Video: repairing a sagging VAZ 2106 muffler
The nuances of muffler repair
The muffler of “classic” VAZ cars, according to the manufacturer’s recommendations, cannot be repaired. If a malfunction occurs in any element of the exhaust tract, the part must be replaced with a new one.
In fact, motorists often prefer to repair holes burned in the muffler - the most common defect - by welding.
The occurrence of “fistulas” is indicated by a change in the sound of the engine and the appearance of smoke from under the car. To troubleshoot, place the machine on a platform and inspect the elements of the exhaust system.
If the cause is a burnt gasket, remove the muffler and replace it. When you have an assistant, you can do without removing all elements of the system. Proceed in the following order:
- Unscrew the pipe fastening to the gearbox.
- Unscrew the nuts securing the exhaust pipe to the manifold.
- Together with an assistant, pull the “pants” off the pins while simultaneously rotating the bend of the resonator pipe.
- Replace the gasket, install the pipe in place, tighten the fasteners.
Replacing a burnt muffler gasket eliminates extraneous sounds from the engine
A welded muffler usually lasts less than a new one. But welding is also cheaper than buying. Usually, if it is necessary to repair a muffler by welding, they turn to professionals. If you have the equipment, you can do the work yourself. For this you will need:
- welding machine;
- blanks for patches made of sheet metal 1–2 mm thick;
- a piece of pipe of the same diameter as the failed one;
- grinder with cutting disc for metal;
- metal brush;
- sandpaper;
- heat-resistant paint for metal.
To repair the muffler, follow this sequence:
- Remove the muffler from the vehicle.
- Using an external inspection, determine the location of the malfunction and the extent of the damage.
- If there is a large hole in the muffler body, evaluate the condition of the internal parts. It is possible that repairing the external surface will not bring the desired restoration of the functions of the muffler without replacing the internals. In this case, it is advisable to contact professionals or simply replace the faulty part with a new one.
- Cut out the burnt area. From the blank, make a patch larger than the damage. Weld the patch over the hole with a continuous seam.
- If there is damage at the junction of the pipe and the muffler body, cut out the defective area, replace the damaged part of the pipe, and weld the repaired pipe to the muffler with a continuous seam.
- Clean the repaired muffler from dirt and rust, paint the part with two layers of heat-resistant paint.
Photo gallery: muffler welding
Resonator malfunctions and repairs
Resonator malfunctions include:
- pipe beating on protruding parts of the body and other elements;
- burnout of the end part of the tank at the welding site of the body and pipe;
- burnout of the housing or internal perforated channel;
- exhaust gases exit through the mounting joints.
An annoying knock coming from under the car's bottom is usually the result of a loose exhaust pipe beating against the body and other components. The reason for this is the rubber fasteners, which wear out and stretch over time and cannot provide rigid fixation of the exhaust tract when moving. The problem is solved by replacing these fasteners.
Other problems can be resolved in the following ways:
- The burnout on the side of the resonator can be welded. There is no need to remove the pipe to do this. An experienced welder will do the work on site, covering the body with a sheet of asbestos.
- If exhaust gases are observed escaping through the joints of the exhaust system, the mounting clamp or flange should be tightened further. You can also loosen the fastening, fit the parts closer together and re-tighten the clamp.
- If the housing or internal channel burns out, the resonator is usually replaced with a new one. If the fistula is small, you can try to weld it without removing it from the car.
Car enthusiasts with experience in welding can make a resonator tank with their own hands. To do this you should:
- Remove the resonator from the car.
- Carefully cut the body with a grinder.
- Take all dimensions (channel and hole diameters, body dimensions).
- Make a new tank according to the measurements taken.
- Weld old pipes to the new tank.
- Install a new resonator on the car.