Step-by-step instructions for dismantling
Before starting work, we prepare the necessary tools. To remove the seats we will need:
- flat and Phillips screwdrivers;
- key to 10;
- pliers;
- repair kit (depending on the situation).
The procedure is as follows:
- Unfasten the rear seat upholstery buttons on the trunk side.
- Pull back the loop and remove the latch near the headrest.
To get to the latch, you need to pull the loop near the headrest
Remove the hooks that hold the seats to the body
Use a 10mm wrench to remove the armrest fastening nut.
To remove the mounting pad, press the two latches
After unscrewing the mounting bolt, the lock can be easily removed
Installation
1. Remove the rear headrests
2. Pull the right hinge of the rear seat cushion lock drive and fold back the right cushion. Pull the left hinge of the rear seat cushion lock drive and fold back the left cushion.
3. Press the lock drive handle of the right backrest of the rear seat and tilt the backrest.
4. Unscrew the four nuts of the hinges securing the right backrest of the rear seat, remove the right backrest (socket wrench 10). Repeat steps 3 and 4 with the left back. Remove the trunk shelf and trunk mat.
5. Unscrew the eight screws securing the trunk trim on the right and left (a Phillips screwdriver).
6. For VAZ-2112: unscrew the shelf lock.
7. For VAZ-2112: unscrew the lower screw securing the shelf.
8. Release the rear suspension spring support cups and rear seat backrest mounting brackets from the trunk lining.
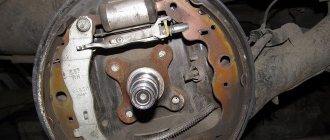
Bleeding the clutch on a VAZ 2106
Due to the fact that the VAZ 2106 is equipped with a clutch, which has hydraulics in its design, from time to time it is necessary to carry out not only routine maintenance and repairs, but also bleeding of the clutch hydraulic drive. This is due to the fact that air may enter the system during operation. The air, of course, depressurizes the entire system, which leads to adverse consequences, be it an accident or even an accident.
Among other things, air can enter the system during repair work, after replacing brake fluid, etc. That is why it is imperative to take measures to eliminate defects. After all, defects in this system that are not eliminated can contribute to the breakdown of interfaces, components and parts of the transmission.
Don’t know how to properly bleed the clutch on a VAZ 2106 with your own hands? Fortunately, there is a way out! To do this, you just need to use a practical guide, taking into account some recommendations. Naturally, to perform this operation you will need to have the necessary set of plumbing tools, hollow clean containers, an auxiliary hose, rags
If it is necessary to bleed the clutch hydraulic drive after replacing the used brake fluid with a new one, then, alas, it is impossible to do without cleaning the main fluid drain fitting. Therefore, you will definitely need a special brush with a steel working surface in the form of wire.
The first thing you need to do is put a rubber hose of the appropriate diameter onto the fitting inlet. Before performing this operation, it is recommended to clean the inlet from dust and dirt deposits. The second end of the hose is directed into the tank to receive brake fluid (used). It should be remembered that the connecting hose must be placed on the fitting with some tension.
Unfortunately, it is impossible to do without outside help when bleeding the hydraulic clutch.
Why is it this way? The answer lies on the surface! Help will be required during subsequent operations directly inside the vehicle. Your partner will have to depress the clutch pedal about five times.
In this case, the interval between pumping should not be less than 35 seconds. If the pedal does not return to its original position, it should be returned to this position independently.
After the clutch pedal is recessed once again, the one who works with the hydraulic drive must unscrew the drain fitting using an open-end wrench. However, remember that the fitting should not be completely unscrewed. This operation is necessary to ensure that the air leaves the system (when unscrewing the fitting, the user will hear the movement of air masses coming out of the hose).
As soon as the force becomes required, you can stop performing the operation.
As a rule, the brake fluid level, when performing the above steps, does not decrease too much in the standard clutch reservoir. However, despite this, careful monitoring of the brake fluid level should be carried out. A reduction of up to 10 mm from the bottom edge of the drive capacity should not be allowed.
The next step will be to increase the tightening torque of the fitting device to the maximum and dismantle the auxiliary rubber hose
Many car enthusiasts who bleed the VAZ 2106 clutch for the first time do not take into account the fact that liquid remains inside the auxiliary hose after its removal. That is why it is best to drain this liquid back into the tank
Several ways to bleed the clutch.
The last step will be to check the quality of the work. The test will consist of measuring the stroke of the piston pusher when pressing the clutch. When bleeding the clutch correctly, the stroke should be about 2628 mm. What to do if the actual parameters do not meet the requirements? You should not make unreasonable decisions. It is enough just to carry out an additional adjustment operation.
How do they work
Before starting repairs, it is important to understand exactly how seat belts work, what are their features, and what devices generally take part in protecting the driver and passengers.
- The coil lock is made on the basis of a ratchet mechanism, which is locked by a sensitive element. Its role is played by a pendulum with a semi-spherical support. In some cases, this is a ball of metal placed in a sphere with a large diameter.
- The pendulum or ball moves, while the ratcheting gear of the reel is fixed to the body through a system of levers.
- A flywheel disc is located on the gear axis on screw splines.
- When the straps are slowly tightened, the disc rotates with the shaft due to friction, but does not lock the reel.
- If you make a jerk, the disk will put more pressure on the screw surface, acting by inertia, overcome the friction force and block the ratchet, moving along the screw splines.
Article on the topic: Replacing the VAZ 2114 gearbox oil seal
Checking status
When driving, the driver and his passengers must wear seat belts.
This node will only provide security if it is used. The problem for many of our citizens is that they wear seat belts not for the sake of safety, but to avoid fines for violating traffic rules. That’s why many people simply throw on the tape without putting it into the lock, creating an imitation of a fastened belt for the traffic police.
You should always be sure that your seat belts are functioning properly. Therefore, it is recommended to check them periodically.
New belts
There are several useful recommendations for this.
- Check whether the belts are twisted due to improper use.
- If the tapes are twisted, they may jam and retract incorrectly.
- Pull the belt out to its full length, straighten it and return it to its original position.
- Remove the tape completely and let it come together on its own.
- If the device jams when pulling in and out, check the condition of the tape, dirt, grease and other defects.
- Washing can only be done with a mild soap solution. If it is impossible to rinse with a weak solution, the belt must be replaced.
- Make sure the belt attachment points are secure and in good condition. All bolts must be tightened tightly.
- Check the condition of the device's fastenings to the body. Sometimes on a VAZ 2110, traces of corrosion appear in that area. All corroded elements must be replaced.
When replacement is required
There are several situations in which it may be necessary to replace just the tape or the entire device assembly.
We invite you to familiarize yourself with these situations in a special table.
| What to change | Reasons for replacement |
| Belt replacement | — The threads on the ribbon are torn or frayed — The loops broke on the edges of the belt — The braid bent — There are cuts or tears in the tape |
| Replacing the complete device | — The belt buckle is fixed rather weakly, there are suspicions of unreliability — The unlock button does not work or does not perform its functions well — The buckle cannot release the belt — Cracks appeared on the surface of the buckle - You have to apply more force to release the belt |
The condition of the device should be checked periodically. Only there can you be sure that your safety is under reliable protection.
Features of replacing thresholds on Daewoo Matiz with your own hands
The Chevrolet subcompact city car was developed by General Motors and has been produced since 1997 by the South Korean division of the concern under the name Daewoo Matiz for the CIS market and Chevrolet Spark for the European Union. The concept uses thin metal for body elements, so replacing Daewoo Matiz sills is the first type of repair that drivers have to master two to three years after purchasing a new car.
The minimum cost of original replacements for Matiz for the Russian market is from 2,500 rubles. per set without installation. Manufacturers use stainless steel for the external part of the replica and profiled steel for the amplifier. Structurally, the thresholds consist of four parts:
- outer cover;
- internal amplifier;
- two connector elements.
If you install custom-made replicas, you can choose a part consisting of one part, where the connector and the outer panel are profiled to fit the dimensions of the kit. Manufacturers of custom thresholds use 1 mm steel. The cost of the set is from 3400 rubles.
On the used parts market you can purchase the sills together with the B-pillar elements. The cost of a part for one side of the body starts from 2000 rubles. When replacing elements, it is not recommended to install used parts, since the factory metal on the Matiz has not been treated with zinc and begins to rust after two years of operation.
Replacing thresholds on a Matiz is a complex repair. The simplicity of the actions is only visible in the video. Those craftsmen who are professionally involved in body conversion and repair note that the overall geometry of the car and the quality of further operation depend on the correct welding of the load-bearing elements. In addition, in order to replace the thresholds on a Matiz, it is necessary to dismantle the doors and fenders.
The Matiz body has high interchangeability. The size and characteristics of the thresholds are suitable for more than 70 car trim levels, for example:
- BYD F3;
- VAZ 2101-07;
- Chery Amulet A15;
- Citroen Saxo, S0;
- Daewoo Lacetti, KLAN, J300, J200;
- Suzuki Escudo, etc.
Homemade thresholds
To further strengthen the body structure and avoid buying expensive parts, drivers make the elements themselves or have them made to order. The material used is profiled steel or a finished profile. The square pipe has a thickness of up to 1.5 mm, 80% of which undergoes industrial galvanization. This allows the body part to be highly resistant to corrosion and mechanical damage.
The repair also includes the re-equipment of the bottom; thick metal additionally strengthens the side members and jacks. Most of the work involves the use of welding. For self-repair, it is recommended to use semi-automatic welding. Gas welding requires experience; the presence of an electrode does not allow high-quality welding of metal at the junction of the threshold and the bottom.
SEAT BELTS
Seat belts need to be replaced if they are torn, frayed, or have been subjected to critical stress in a crash.
When installing seat belts, use only standard bolts (A-bolt of the upper fastening, B-bolt of the lower fastening, B-bolt of the reel fastening) with the fastening parts attached to the flints. Any other bolts may not withstand the critical load.
Replacing the front seat belt
You will need: a screwdriver, a 17mm wrench.
1. Remove the cover from the head of the belt buckle bolt.
2. Remove the bolt...
3. ...and remove the seat belt buckle assembly with bushing and bolt.
4. Remove the decorative trim of the upper belt fastening bolt.
5. Holding the belt, remove the bolt...
6. ...and remove the upper belt bracket with bolt and bushing.
7. Remove the four screws securing the middle pillar trim and remove it.
8. Remove the bolt securing the inertial belt reel...
9. ...and remove the spool from the middle pillar box.
10. Install the seat belt in the reverse order of removal.
Replacing the rear seat belt of hatchback cars
You will need: a screwdriver, a 17mm socket, and a wrench.
1. Fold the rear seat cushion forward (see “Removing and installing the rear seat” in the “Seats” subsection).
2. Remove the belt buckle bolt...
3. ...and remove the lock.
4. Remove the cover on the head of the lap belt bracket mounting bolt...
5. ...unscrew the bolt...
6. ...and remove the bracket along with the bolt and bushing.
7. Remove the decorative cover of the upper belt bracket mounting bolt...
8. ...unscrew the bolt...
9. ...and, holding the belt, remove the bracket.
10. Remove the rear parcel shelf and remove the bolt securing the seat belt inertia reel.
11. Pull the belt down through the rear parcel shelf support and remove it from the vehicle.
12. Install the rear seat belt in the reverse order of removal.
Replacing the rear seat belt of sedan cars
You will need: a screwdriver, a 17mm socket, and a wrench.
1. Fold the rear seat cushion forward and remove the cover from the head of the lap belt fastening bolt.
2. . and remove the bolt.
Belt bolts of different lengths. The shortest bolt secures the inertial reel, the longest (bottom) is the waist branch of the belt.
3. Remove the decorative cover of the upper belt bracket mounting bolt.
4. Remove the bolt while holding the belt.
5. From the trunk side, push up the belt trim from the rear parcel shelf.
6. Remove the bolt securing the inertia belt reel.
7. Pull the belt with facing into the trunk through the hole in the rear parcel shelf and remove the belt from the vehicle.
8. Unscrew the fastening bolt and remove the belt lock.
9. Install the new belt in the reverse order of removal.
How to replace the seat belt VAZ 2106-2103
Replacing seat belts is one of the most important operations in car repair. New, working seat belts could one day save your life. That is why you should be especially careful about the condition of the seat belts in your car.
Seat belts should be replaced as soon as you notice that they have become frayed or that the locking devices are faulty.
Also, seat belts must be replaced if they have already suffered a serious load once, for example, due to an accident.
To carry out this simple operation you will need a 17mm wrench, a screwdriver and, in fact, a new belt.
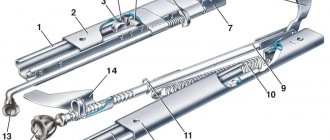
The belts are attached to the B-pillars on both sides. Essentially, a belt is a simple mechanism that consists of:
Now let's start removing the seat belts from the car.
- Use a screwdriver to pry off the decorative trim on the bolt securing the top hinge. Unscrew the bolt and remove the hinge. With it we remove both the wavy washer and the spacer sleeve;
- We repeat the operation with the lower decorative cover of the inertial coil and unscrew the bolt securing it. Again, we remove the spacer sleeve and the wavy washer together with a bolt;
- Remove the coil;
Take a new belt, replace the old one with it and install the entire mechanism back into the car, repeating the dismantling steps in reverse order. The new reel must be installed so that its slot, which releases the belt from the reel, is positioned strictly horizontally. If you break this rule, the belt will seriously jam. After installation, perform test runs. Pull the belt evenly and not too much towards you, out of the reel. During this action, it should smoothly come out of the slot and not stop. Now pull the belt sharply and forcefully. In this case, the coil should work and stop releasing the belt outward, that is, sharply brake it.
This is changing the belt itself. But, the concept of replacing seat belts often means changing the belt buckle. This is the same lock that is located between the front seats and where the belt clip is inserted.
We begin to remove the lock. For this:
- Using a screwdriver, remove the decorative cover of the bolt;
- Unscrew the bolt, remove the spacer sleeve and wavy washer. We dismantle the lock itself;
A new lock is installed by repeating the previously performed steps in reverse order.
This stage of repair is now complete. Remember, a faulty seat belt is a threat to your life. Therefore, when installing new seat belts on your car yourself, use only specialized bolts for seat belts.
How to remove rear seat belts on VAZ 2114 and 2115
Before you begin this procedure, you must recline the rear seatback, as in some cases it may get in the way. Then you can start doing the work.
- First, you can remove the seat belt buckles, which are in most cases located on the floor, under the backrest of the rear passengers' seats.
2. After this, in close proximity to the threshold, pry up the plastic cap with a screwdriver and remove it.
3. Now unscrew the bolt using a 17mm wrench or a socket with a knob, as shown in the photo below.
4. Then we move up. There is another mounting point on the side roof pillar:
We unscrew the fastening bolt in this place in the same way.
5. And the last fastening is already in the trunk, namely, at the place where the reel itself with the inertial mechanism is fixed to the body. To reach the bolt in this place, it is better to use an extension cord.
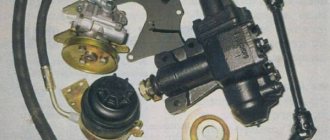
Replacing a water pump on a VAZ 21124 engine, replacing a UAZ 3151 stove fan
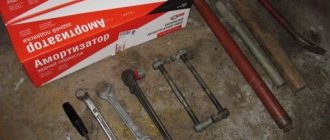
Socket and open-end wrenches for 8 and 10
Double-sided screwdriver
The front wing on the VAZ 2110 and 2112 is attached to 8 turnkey screws for 8. This particular car did not have wing fenders. If your car has them, then you will have to remove it, and preferably remove it completely - it will be more convenient.
Front left fender VAZ 2110
Let's start from the bottom. As you can see in the photo below, a plastic threshold is attached to the fender with a self-tapping screw; we can remove it completely, or we can only unscrew it from the front fender and lower it down (it is quite elastic).
On most front-wheel drive cars of the VAZ family, the front fenders are attached to the body not by welding, but by bolts, and this also applies to our VAZ 2110-2112 cars. So, if replacement is necessary, everything is done quite simply and without unnecessary problems. To do this, you just need to have at hand the minimum tool that will be given below:
- Flathead and Phillips screwdrivers
- Screwdriver shortened
- Head for 8
- Ratchet with extension
After that, using a long screwdriver, unscrew the end screws securing the fender liner, and using a short screwdriver, unscrew the internal screws in the arch. Then remove the fender liner.
Next, open the hood of the car and unscrew the 4 bolts securing the front fender from above, as shown in the photo below more clearly:
Another bolt is located in the front part of the wing, but it becomes accessible only after removing the bumper or moving its edge to the side:
So, two more bolts are located on the inside of the wing:
The last place where you still need to disconnect this body part is the lower rear part, which is located at the very beginning of the threshold:
When all this has been dealt with, it is necessary to carefully remove the wing from the VAZ 2110-2112 without any extra effort, since nothing else prevents its dismantling.
If replacement is necessary, we send the new wing for painting and ultimately install everything in the reverse order. The price of a new such part produced by VAZ is about 1,400 rubles.
As you know, on the VAZ 2110 the right front fender not only performs an aesthetic function, but also serves as protection. Often this part of the car body is subjected to mechanical or other impacts that negatively affect the surface or the wing as a whole. In such cases, the front right wing of the VAZ 2110 is subject to replacement or repair, which can be easily carried out on your own.
Repair manual for VAZ 2110, 2112, 2111 (Lada 110)
You will need: flat-blade and Phillips-blade screwdrivers, 17mm wrench.
1. Fold down the rear seatbacks.
2. Remove the rear seat back retainer O-ring.
3. Remove the front screw securing the side panel trim and the four screws securing the side panel trim.
4. Fold down the side trim.
5. Remove the two screws that secure the cover on the side.
6. . one top mounting screw.
7. . and disconnect the trim from the body.
8. Remove the lower seat belt mounting bolt.
9. . Using a screwdriver, pry the decorative frame of the belt outward and remove it.
10. . insert the frame inside the lining and remove the belt from the lining.
11. Remove the bolt securing the seat belt reel bracket to the body.
12. . and remove the seat belt assembly with the bracket.
13. Remove the bolt securing the coil to the bracket.
14. . and disconnect the bracket.
15. Install the parts in the reverse order of removal.
Reference manual for servicing VAZ, LADA 110 cars.
Ignition adjustment 2110. Engine compression for VAZ 2112, immobilizer for VAZ 2111. Valve cover for VAZ 2112, cylinder block gasket for VAZ video. The cost of a generator for a VAZ. replacement of fuses for VAZ 2112, design of the oil receiver for VAZ 2112. oil recommended by the factory for the box of VAZ 2112. replacement of the water pump (pump) for VAZ 2112. Replacement of valve stem seals for VAZ 2110.
How to change the tension roller of the alternator belt with your own hands
At the initial stage, you will need to remove the alternator belt. Next, you can begin to diagnose the condition of the bearing.
Please note that the working bearing should not have any play when rotated by hand. Rotation should be free, without any extraneous noise or squeaks. You should also inspect the tensioner bracket and assess the degree of wear on the roller bolt.
You should also inspect the tensioner bracket and assess the degree of wear on the roller bolt.
During operation, the brackets may become bent, resulting in the tension roller shifting relative to the plane of the generator belt. If the bracket is bent, then the load on the belt becomes uneven, one side of the generator belt stretches more than the other. For this reason, the alternator belt can quickly become unusable, make noise, whistle, slip, and even fly off.
Curvature of the alternator belt tensioner bracket can occur both on machines that have been in operation for a long time, and on vehicles with minimal mileage. In the first case, significant wear and tear occurs; in the second, a manufacturing defect or defect is quite possible.
If a bearing malfunction or other problems with the tensioner elements are detected, they will need to be replaced. In order to change the tensioner or generator belt pulley, you will need:
- Ensure that the crankshaft is stationary. To do this, insert a thick screwdriver or a small pry bar between the teeth of the clutch disc ring.
- Then you will need to loosen the bolt securing the roller or bracket (depending on the installed structure). After this, the belt tension should loosen.
- Now you can begin to completely unscrew the axle bolt, after which the roller is removed.
- If necessary, replace the bracket or install only a new generator belt tensioner pulley.
After reassembling the tensioner, replacing the roller and installing the belt, you will need to adjust the tension level of the generator belt. To correctly adjust the tension of the alternator belt, you must separately study the corresponding section of the accompanying documentation for the operation and repair of a specific car model.
It is imperative to take into account that too much tension significantly reduces the service life of the alternator belt roller. Weak belt tension can lead to slippage and squeaks in the pulley area, as well as malfunctions of the car generator itself.
Finally, we add that after replacing the tension roller, replacing all the elements and adjusting the tension of the generator belt, it is necessary to re-check the serviceability of the tensioner. Also, after a few kilometers, it is advisable to inspect the surface of the belt (both in the case of a new and used generator belt) for the possible appearance of delaminations, cracks and other defects.
Replacing rear seat belts.
2. Use a screwdriver to pry...
3. ...and remove the plug from the lower belt fastening bolt.
4. Remove the lower seat belt mounting bolt.
5. Use a screwdriver to pry...
6. ...and remove the decorative trim of the top fastening hinge.
7. Unscrew the hinge fastening bolt and remove the hinge along with the bolt and spacer washers.
8. Remove the bolt securing the belt reel.
9. Pry up the belt guide.
10. Pass the belt with the guide and the top loop through the hole in the C-pillar trim...
11. ...and remove the rear side seat belt.
This is what the rear side seat belt looks like.
Remove the rear seat belt buckles and the rear middle seat belt in the following order.
13. Remove the mounting bolts...
14. ...and remove the rear seat belt buckles and the rear middle seat belt.
15. Install the seat belts in the reverse order of removal.
Repair and diagnostics of VAZ cars.
replacing the Kalina camshaft position sensor, adjusting the Kalina clutch, removing the bumper of the VAZ Kalina, the electric motor of the cooling system fan. Kalina, remove and install the rear bumper of the VAZ 2112, Lada key does not learn, Lada Kalina heater, Kalina controls, Kalina gas exhaust system, VAZ 2112 malfunctions, diagnostics of Kalina steering tips, how to check the removed Lada Kalina controller, VAZ 2112 control panel
Contact site moderator nkvd#russia.ru
Buy, sell used VAZ, Lada cars. 2010 (C) LADAOMG
Repair of VAZ 2110 (Lada) Replacement of the rear seat belt
- Repair manuals
- Repair manual for VAZ 2110 (Lada) 1996+.
- Replacing the rear seat belt
8.13.2. Replacing the rear seat belt
When installing seat belts, use only standard bolts (1 – lower fastening bolt, 2 – reel fastening bolt, 3 – upper fastening bolt) with the fastening parts attached to the belts. Any other bolts may not withstand the critical load.
| EXECUTION ORDER | ||
| 2. Remove the rear shelf trim upwards by pressing it from below. | 3. Slide and remove the top decorative trim. Unscrew the upper belt fastening bolt. | 4. Remove the bolt with sleeve 1 and two plastic washers 2. |
| 5. Using a screwdriver, remove the plug from the lower belt fastening bolt. | 6. Unscrew and remove the lower belt fastening bolt with bushing 1 and spring washer 2. | 7. Unscrew the fastening bolt and remove the coil from the body. |
| 8. Pass the belt through the hole in the rear shelf towards the reel and remove the belt. | ||
9. To remove the rear belt buckles and the middle rear belt, unscrew the bolts securing them. Install the seat belts in the reverse order of removal.
Download information from the page
Removing and installing rear seat belts
The rear seat belts on VAZ 2110-2112 cars have to be removed quite rarely, since, frankly speaking, almost no one uses them at all. For example, in my car I only fasten the child seat with the rear seat belts. Under no circumstances can you force the rest of the passengers to buckle up in the back. But if you suddenly need to remove them, then below I will try to show clearly how this procedure is performed.
To do this job you will need the tool described below:
- Flat blade screwdriver
- 17 mm socket head
- Ratchet handle
- Extension
Now regarding the process itself. So, first of all, use a screwdriver to pry off the plug for the lower belt fastening bolt, which is located at the door threshold.
After which you can safely unscrew the bolt that is located under it: