Replacing rear struts on VAZ 2109 and 21099. The cans are falling apart
Work such as replacing rear struts on VAZ 2109 and 21099 is not too difficult, but at the same time, it may take some time. In the process, you will have to remove quite a large number of parts. Adding additional complexity is the tendency of threaded connections to stick. In this case, you will have to tinker a little. If you delay repairs, you will probably get problems with the body and other suspension elements. You don’t need any special tools to do the job; every garage has everything you need. Even a less experienced car enthusiast can easily cope with this task.
Shock-absorbing element design
The shock absorber strut for the VAZ 2109 structurally consists of a spring and a shock absorber placed inside it. The native version of the “nine” belongs to the category of so-called two-pipe. It is attached with the rod up to the body and the cylinder down to the wheel hub.
The shock absorber cylinder has double walls. They are hermetically connected to each other along the upper edge; along the lower edge, the outer cylinder has a bottom, but the inner one does not. In the inner cylinder, a piston moves on a rod and has bypass valves - fittings - for the flow of working fluid in both directions. A piston can move up and down in an incompressible fluid due to two factors:
- the flow of working fluid between the lower and upper parts of the inner cylinder, which occurs through the valves in the piston;
- partial flow between the lower part of the inner cylinder and the outer cylinder due to air compression in the sealed space between the upper parts of the outer and inner cylinder.
Such devices cannot be installed upside down; their design is complicated and heat removal is difficult. Under extreme operating conditions, the effect of cavitation aeration is observed - foaming of the working fluid, which worsens all the characteristics of the shock absorber.
More modern is the single-pipe shock absorber design, based on the idea of separating the gas volume from the working fluid using a special free piston. This allows the unit to be operated in any position, improves heat dissipation, and eliminates aeration.
Recently, single-pipe structures filled with nitrogen have gained popularity and are the best option for use on the VAZ 2109.
Diagnostics
The rear struts on VAZ 2109 and 21099 are replaced in case of their breakdown. The following signs indicate the need for work:
- Rocking the car while driving;
Moving a VAZ 2108, – 2109, -21099 car away from straight-line motion
17:1924
Frequent breakdowns of the rear suspension
- The rear suspension is knocking.
There is a popular method for checking the performance of a shock-absorbing strut. To do this, press the car fender to the ground with your hands and release it. A normal shock absorber will not allow the car to swing more than twice. If there are more than 2 movements up and down, then it is better to replace the stand.
How to remove and install the front ones on the “nine”
It is somewhat more difficult to remove the front strut from the car and change it, so when performing work it is important not to deviate from the prescribed instructions. To replace the front shock absorber, you must perform the following steps.
- Remove the protective cap of the desired pillar under the hood of the car. The cap, which prevents dirt from penetrating the rack, can be removed without additional tools - just grab it and apply a little force.
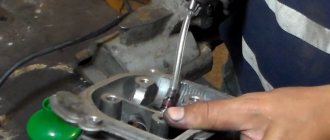
- After removing the cap, loosen the nut located inside the shock absorber rod. To do this, put the small part of the removable key on the rod and install the larger part on top.
- Raise the car with a jack and remove the wheel from the side where the faulty shock absorber strut is located. Then use pliers to remove the cotter pin.
- Unscrew the nut that secures the ball joint, and then remove it from the hole.
- Move the brake hose away from the bracket to avoid damaging it.
- Remove the front steering knuckle and all the components located on it. Next, unscrew the mounting nut on the top of the shock absorber and remove the strut.
- Following the reverse procedure, install the new shock absorber strut in place. Once the process is complete, perform a wheel alignment and camber check.
After replacing shock absorber struts, it is important to check the secure fit of all fasteners. In this case, even if all parts are secured, the check should be repeated after 100 kilometers of the vehicle.
Operating a vehicle with faulty shock absorber struts can significantly reduce the level of driving comfort and negatively affect vehicle control. Timely replacement of struts will ensure safety on the road and prevent breakdowns of other components. As practice shows, the financial costs of installing new shock absorbers VAZ 2108, 2109, 21099 are disproportionately small in comparison with the possible consequences of ignoring the malfunction.
If you find an error, please select a piece of text and press Ctrl+Enter.
Replacement
Before starting work, secure the vehicle by engaging second gear and placing chocks under the wheels. It is better to start by cleaning the threaded connections using a regular wire brush; they are also treated with liquid wrench (penetrating lubricant). After which, they begin to work:
- To begin, jack up the car and unscrew the wheel. It is recommended to place a support under the machine to ensure safety;
;
.
All that remains is to install the removed interior elements. The functionality of the rack is checked. Remember that this part is changed on both sides at once. After a run of 100 kilometers, tighten the connections again.
Which racks to choose?
Now, the choice of components for VAZ is quite large. Therefore, owners often have a reasonable question about what to buy. Standard oil struts. They are soft and cover up bumps quite well. But at high speed they rock the body, which can lead to loss of control.
For speed lovers and just people who often drive on the highway, gas shock absorbers are an ideal option. They are quite rigid, you are guaranteed to feel bumps and potholes, but the car will hold well on the track at high speeds. Gas-oil struts are a middle option between the types described above.
Conclusion
. The car suspension requires special attention. After all, it is she who takes on all the difficulties of domestic asphalt. Replacing rear struts on VAZ 2109 and 21099 may be required quite often. This work does not cause any particular problems. You just have to do everything as carefully as possible.
Kinds
Since a quick replacement cannot be avoided, you should think about choosing new racks for the future.
| Type | Advantages | Flaws |
| Oily | The hydraulic unit allows them to cope perfectly with driving on good roads in the city and on the highway. They are not expensive and have small dimensions | Heat dissipation is poor. Inside the compensation chamber there is an air mixture, an excess of which leads to a decrease in the reliability of the mechanism, and if there is a lack of mixture, they do not work at all. Plus, cavitation bubbles can cause the oil to foam. This happens when driving frequently on dirt roads. |
| Gas | Durable, more rigid at high speed, good comfort indicators | Quite expensive, have an increased shock load, which negatively affects the comfort of the driver and passengers |
| Double-pipe gas-filled | A type of gas struts that has been improved. A compromise between gas and oil shock absorbers, providing stability and smooth movement on any surface. The pressure is not high, so the oil cannot boil. All vibrations are effectively damped. Reliable and durable | They have no disadvantages as such |
When choosing between the three options presented, preference should be given to double-pipe gas-filled shock absorber struts. They are best suited for VAZ 2109.
Gas unit
Causes of failure
There are two main reasons why rear shock absorbers begin to misbehave:
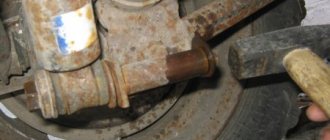
- When driving, the rear wheel can gradually wear out the locker, made of plastic. It serves to protect the rack. Over time, the wheel gets closer and closer to the stand;
- If the breakage occurs along the lower silent block, the culprit is the bolt holding it in place. It was simply not tightened to the required load.
Worn out old shock absorbers
the strut, pay special attention to this bolt. If you make the same mistake again, you will soon have to make repairs again.
Symptoms of a problem
Pay attention to the telltale signs that tell you that you need to take action to correct problems with your rear struts.
Sign
Peculiarities
Cracks, various kinds of defects, and flaws may appear on this element. This indicates wear, so the shock absorber should be replaced.
The gaskets and boot have lost their elasticity
While these elements are working, they are clearly limp in appearance. This is a serious signal that the rubber components will soon break and this will lead to sad, expensive consequences.
The compression buffer is damaged or deformed
Everything in the system operates under high pressure. And if the gasket doesn't do its job properly, pressure is applied to the buffer and it breaks.
The spring has cracks
Everything here is more than logical and understandable. If signs of spring deformation appear, it must be replaced. At the same time, you can check the condition of the remaining nodes
Silent block
Types of loads and specifics of work
All loads that shock absorber struts take on can be divided into two groups:
- dynamic (rapidly changing);
- conditionally constant (quasi-static).
Dynamic loads occur when a vehicle hits an obstacle. When hitting a bump, the shock absorber first compresses, then rebounds. When a wheel gets into a hole, on the contrary, first rebound, then compression. The task of the shock-absorbing element is to take the blow, dissipate its energy, and convert it into heat. This energy conversion is ensured in all three elements of the shock absorber strut: during spring deformation, gas compression under the piston and the rapid passage of oil through the shock absorber cylinder fitting.
Conditionally constant loads on the shock absorber struts occur when the car moves on a flat road surface when cornering. In this case, the geometric position of the wheel relative to the car body changes much more slowly than when hitting an obstacle.
When moving along an arc of constant curvature at a constant speed, the geometry does not change at all. This means that the task of the device is not to dissipate energy, but to ensure uniform distribution of wheel pressure on the road, prevent skidding, and ensure controllability. The flow of oil through the fittings occurs slowly and is of less importance than the reaction of the spring and gas pressure.
Replacement
To replace or partially repair you have to go through a rather labor-intensive path.
You will need the following set of tools and materials:
- Screwdriver Set;
- Set of wrenches;
- Jack;
- Partner.
Decide in advance whether you are going to change the entire assembly, or whether you want to change only the damaged elements of the rear pillar. The volume of your purchases depends on this.
You can start working. Based on our instructions and the video lessons provided, you will be able to replace the rear struts yourself.
- Turn the gearbox into first gear mode.
- Raise the rear wheels using a jack.
- Install supports, strengthening the reliability of fixing your car in a given position.
- Remove the racks. To do this, first go to the trunk, remove the decorative rubber plug, which is located on top of the rack mount. It is better to remove all unnecessary things from the trunk.
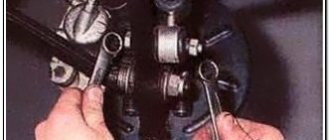
- Take a 17-size spanner and a 6-size open-end wrench. With their help, you can unscrew the nut with a spanner, and the open-end wrench will be useful for holding the shock-absorbing strut rod.
Removal process
- That's it, this allows you to remove the mounting nut, support washer, spring washer and top pad without any problems.
- Now we go under the car to finish what we started.
- Take a 19 mm wrench and remove the shock absorber mounting bolt to the rear beam. Remove it.
- In some cases, problems may arise with dismantling this bolt, since it simply sticks. To do this, pre-treat the bolt with the almighty WD40 and give it time to react.
- If even this method did not help, then you will have to take the guide and simply knock out the fastening element.
- Next, remove our shock absorber along with the spring.
- Do not forget that during such manipulations most often the spring gasket remains on the body. It sticks to the metal. Many people forget to take it out, which causes difficulties during reinstallation. Don't make this mistake.
- Clean all the seats to make it more convenient for you and make it all look more aesthetically pleasing. Plus, neatness never hurts to extend the service life of new spare parts.
- To make it more convenient for you, wrap the gasket on the new spring with electrical tape, or secure it with thin wire. This will prevent it from slipping when you begin installation.
- When putting the assembly back together with the new rear strut, be sure to make sure that the raised portion of the spring cup faces the direction of the wheel.
- Secure the lower end of the rack with a nut and bolt, but there is no need to tighten the fasteners just yet.
- Using the lever of your jack, raise and lower the rear of the car. This is necessary in order to eventually insert the shock absorber rod into the hole in the body of your nine.
- With the spring in place, pull the shock absorber rod out to its full length.
- Insert the rod into the lower ear and secure with a bolt.
- Place a jack under the beam and begin manipulating the lifting mechanism.
- At the same time, the spring will begin to compress, and the rod will move towards the glass.
- You or your assistant must be alert in the car in order to have time to pry the rod with a screwdriver and ensure it is directed in the right direction.
- Once the rod is in place, the work can be considered almost complete.
- Fix the rod, not forgetting to insert the cushion, washer and engraver. All this is securely fixed.
- Now you can lower the car onto its own wheels and fully tighten the bolt of the lower shock absorber mounting.
Re-assembly stage
Changing rear rack assemblies is easier and faster than dismantling, disassembling the old rack, looking for defects in it and replacing individual damaged components. But this requires less financial costs.
Changing racks is not that difficult, even if you have little experience in such matters. But if there are none, be sure to contact trusted car services. Do not risk your own car, otherwise subsequent repairs will be even more difficult and expensive.
Required Tools
You can remove faulty racks and install new ones in their place yourself. To do this you will need the following set of tools and accessories:
- Socket head for 17 and 19.
- Mount.
- Socket wrench.
- Jack.
- Pliers.
- Ratchet handle.
- Collar.
- Wrenches for 17 and 19.
- Penetrating lubricant.
- A key to keep the shock absorber rod from accidentally turning.