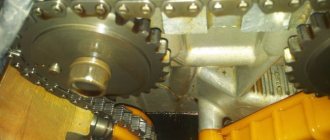
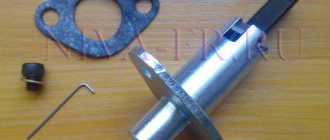
Today I was doing some minor engine repairs; it was necessary to align the TDC marks on the RV and KV. I decided to leave a note here so as not to forget)), and maybe it will be useful to someone else. There is a mark on the RV, there is only one of its kind.
There is also a mount for the phase sensor marker, we don’t need this.
On the HF damper it is a little more difficult, due to its inaccessibility (if the radiator is not removed). But looking at the removed pulley, everything becomes clear. You can find the missing tooth spot by touch, count 20 teeth counterclockwise, and look for the mark there.
And so in a real situation. Opposite the mark you can put a mark with a marker, it will be clearly visible.
To find it, you don’t need to remove anything additional, your hand can go through freely, turn the pulley to a position where you can comfortably draw a line. Well, in conclusion, it’s easier to first set a mark on the RV sprocket and then look for the mark on the damper, it will be somewhere near the crankshaft sensor (DPKV). Since the crankshaft makes two revolutions during one revolution of the RV, you need to look in the area of +- 5 teeth.
We independently set timing marks on Niva Gas Distribution
The Chevrolet system of any engine must work correctly. If problems occur in its operation, this leads to premature wear of the motor and numerous problems. In case of breakdowns of precise timing adjustment, special marks are used, according to which the shafts are set in the correct position. We and Niva will tell you about the engine marking on a Chevrolet car in this article.
Video on the topic:
On a VAZ 2114 car, the camshaft sensor is necessary for the normal functioning of the fuel injection system. It is also called a phase sensor. The reason is that it is he who shows the on-board computer what phase the gas distribution system is in (intake, exhaust). Thanks to this simple device, it is possible to achieve the most accurate supply of the air-fuel mixture into the combustion chambers. The optimal ratio of gasoline and air in the mixture, as well as the ignition timing, depends on how the sensor works. Let's take a closer look at the VAZ 2114 camshaft position sensor, learn about typical breakdowns and methods for correcting them.
Installation of shafts according to Niva Chevrolet marks
You will need: a screwdriver, keys “8”, “10”, “13”, a special key for turning the crankshaft.
Setting the piston of the fourth cylinder to the TDC position of the compression stroke
The piston of the 4th cylinder is set to the TDC (top dead center) position of the compression stroke so that when carrying out work related to removing the camshaft drive chain, the valve timing is not disrupted. If the valve timing is incorrect, the engine will not operate normally.
Set TDC according to the mark on the camshaft sprocket (when installing according to the marks on the crankshaft pulley and on the front cover of the camshaft drive chain, the piston of either the 1st or 4th cylinder may be in this position).
After this, make sure that the marks on the crankshaft pulley and the cover match. If the shaft marks do not coincide, it means that the valve timing is incorrect (the piston of the 4th cylinder is not installed at TDC). In this case, it is necessary to remove the camshaft drive chain from the camshaft sprocket and rotate the crankshaft until the marks align.
You can rotate the crankshaft in the following ways.
1. Purchase a special wrench for turning the crankshaft by the pulley nut. This wrench can also turn the crankshaft from above the engine compartment.
2. Engage 4th gear and slowly roll the car in the desired direction until the mark on the camshaft sprocket matches the mark on the camshaft bearing housing.
3. Engage 4th gear and lift one of the rear wheels.
Then turn the hanging wheel in the desired direction until the mark on the camshaft sprocket matches the mark on the camshaft bearing housing.
Location of TDC marks
The marks are located on the camshaft sprocket (hole “a”) and on the camshaft bearing housing (protrusion “b”).
In addition, marks are applied in the casting on the camshaft drive chain cover (protrusion “a”) and on the ring gear of the crankshaft pulley (hole “b” on the edge of the ring).
1. Remove the cylinder head cover (see “Replacing the cylinder head cover gasket”).
Rotate the crankshaft, align the marks on the camshaft sprocket and its bearing housing.
If the chain is installed correctly, the mark on the crankshaft pulley should align with the long mark on the camshaft chain cover.
3. If the marks do not match, straighten the tabs of the lock washer of the camshaft sprocket bolt.
4. Engage first gear to secure the crankshaft from turning, unscrew the bolt and.
5. . remove it along with the lock and thrust washers. The lock and thrust washers are not fixed to the bolt in any way and can be easily removed from it. Be careful not to drop them into the engine pan.
6. Remove the chain tensioner (see “Replacing the camshaft drive chain tensioner”). If you have the necessary skills, the hydraulic tensioner does not need to be removed. It is enough to press out the hydraulic tensioner plunger with a large screwdriver or mounting spatula.
7. Remove the sprocket along with the chain, remove the chain from the sprocket and then reinstall it on the sprocket, changing the position of the chain on the sprocket teeth in the desired direction. It is recommended to move the chain one tooth at a time.
8. Place the sprocket and chain on the camshaft flange, tensioning the drive chain. Since when the position of the chain on the sprocket changes, the hole in the sprocket no longer coincides with the alignment pin in the flange, turn the crankshaft slightly in the desired direction until the hole and pin coincide.
9. Install the sprocket mounting bolt along with the thrust and lock washers and tighten it until it stops, without completely tightening it.
10. After turning the crankshaft two turns, repeat checking the position of the marks as you did before.
11. If the marks match, tighten the bolt and bend the tab of the lock washer onto the edge of its head. If the marks do not match, repeat setting the valve timing.
12. Install all previously removed parts in reverse order. To prevent oil leakage, replace the cylinder head cover gasket.
Manufacturers
Engine diagnostics based on the condition of the spark plugs. Inspection of the spark plugs can help you identify some engine malfunctions without contacting a special service center.
Particular attention should be paid to the appearance and color of soot. The normal condition of a spark plug that does not require replacement is moderate burnout of the electrode, a complete absence of oil stains, as well as a minimal amount of soot and coffee-golden deposits on the insulator
In this case, the Chevrolet Niva does not require constant topping up of oil and does not frighten the owner with its brutal appetite.
If you find black carbon deposits and dry soot on the center electrode, most likely your car is consuming much more fuel than you would like. The reason may be a malfunction of the air damper drive mechanism or injector, or a clogged air filter.
In general, this indicates a failure in the engine management system. A light gray or white color of the electrode means it is overheated, which ultimately leads to burnout of the exhaust valves.
You may have selected the wrong spark plugs or are using fuel with too low an octane rating. The engine is healthy - so are the spark plugs. The red skirt of the central electrode is the result of using an excessively large volume of additives containing metal in gasoline.
Metal deposits during prolonged use of such fuel can form a conductive coating on the insulation, causing the spark plugs to fail. This means that it got from the engine into the cylinder.
The reasons are incorrect selection of spark plugs, wear of valve guides, valve stem seals or piston rings. As a result, the Chevrolet Niva consumes much more oil than usual.
Replacing spark plugs in Niva Chevrolet
https://youtube.com/watch?v=zIbel_Ki9is
If on the central electrode and its skirt you find a dense layer of oil with particles of cylinder destruction and drops of unburnt fuel, it means that one of the valves is damaged or the partition between the piston rings is broken. As a result, engine power weakens and fuel consumption doubles. In this case, a full-scale renovation is necessary.
A completely destroyed central electrode and its skirt are the result of using defective spark plugs, long-term engine operation with detonation, or the use of low-octane fuel.
The cylinder head will require major repairs. Ash deposits on the electrode indicate the wear and tear of the oil scraper piston rings, and the destruction of the ceramic insulator indicates a faulty spark plug or its mechanical damage.
Erosion of electrodes occurs when using leaded gasoline, and flooding of spark plugs with fuel occurs when the ignition system or injector is faulty.
Types of spark plugs for a Russian SUV Original Bosch spark plug So, you have carried out diagnostics and come to the conclusion that your car does not require repair. Which spark plugs to choose if you only need to replace them?
A spark plug with a central electrode coated with platinum. When you install ordinary spark plugs, through thousands. In this case, four-pin ones.
Spark plugs Denso Iridium Pack IW20 #4 5306 (4 pcs.) NIVA 21214; 2123
I will not repeat the nonsense that is said in stores and markets. It was a completely different SUV, but then this was confirmed in our cars. Their main advantage is starting the engine in the morning in very cold conditions.
In summer they are ordinary, in winter they are multi-contact. Candles are made in Germany. Spark plugs Niva Chevrolet and Niva.
The tightening torque must correspond to that specified by the manufacturer. This means that work can also be done in unfavorable environments where the temperature is elevated. If the heat value is low, this means that the SZ is hot and will often overheat.
What to look for when choosing candles
If it overheats, it will not last long. Size plays an important role, that much is clear.
If its size is small, the part simply will not screw into the socket and then the electrodes will be at a great distance from the combustion chamber. If the length is longer than necessary, then the electrodes will stick out, and this increases the risk of contact with the piston.
When choosing, it is best to use the instructions from the car, which will tell you which spark plugs to install in the Chevrolet Niva. In addition, knowing the exact size, you can choose the best heat rating (author of the video - VanLe9).
When is tensioner replacement required?
The timing chain tensioner is an auxiliary component of the gas distribution mechanism. It provides the required degree of tension along the entire length and does not depend on external factors: temperature, load on the car and wear.
The chain drive is reliable and resistant to extreme driving conditions. The only thing the part is susceptible to is wear due to expansion under the influence of high temperature. Over time, it stretches out and is no longer able to function normally. Uncharacteristic noise and vibration appear, links jump off the sprockets, which leads to the destruction of individual engine mechanisms. The tensioner prevents such problems from occurring. Its functions:
- maintaining chain tension at the required level;
- damping of link vibrations.
This detail eliminates the need to manually calibrate chain tension. In addition, the tensioner is a unit that removes additional load from other parts, thus reducing wear. If this part malfunctions, serious problems are likely to arise that will require lengthy repairs and financial investments.
The 1GR tensioner on the Prado 120 needs to be replaced along with the chain itself.
Features of replacing the ignition switch
Heading
The operation of the Niva 21213 system depends on the condition of its parts. High-voltage wires must have a distributed resistance, the value of which is in a certain range. Too much resistance will result in the ignition coil not having enough power to cause a breakdown. Low resistance increases interference.
The high temperature inside the cylinders greatly heats the spark plugs. Therefore, even when the ignition is turned off, ignition occurs from heated spark plugs.
It is important that all spark plugs have the correct gap between the electrodes. This will ensure high-quality ignition of the mixture. The distributor cover must be clean from dirt, since its presence can lead to current leakage.
The high temperature inside the cylinders greatly heats the spark plugs. Therefore, even when the ignition is turned off, ignition occurs from heated spark plugs.
First of all, the changes affected the engine management system and control instruments. In particular:
- The wiring diagram for Niva 21213 received an additional wiring harness in the engine compartment for connecting a microcontroller and sensors;
- On the Niva model of recent years of production, a more advanced power unit with the VAZ-21214 index is installed. Instead of a carburetor, it has a fuel frame with injectors from GM. The price of a car with injection has increased because of this;
- The instrument panel has changed - the design is borrowed from the VAZ 2108 model.
Top dead center (TDC) for piston No. 1 - installation
1 The movement of the piston from the lower to the upper position is called the stroke of the piston. Top dead center is the point of highest position occupied by the piston when the crankshaft rotates. Since the piston reaches its highest position twice during the working cycle (once at the end of the compression stroke and again at the end of the exhaust stroke), TDC is usually taken to be the highest position of the piston at the end of the compression stroke.
2 Setting the piston to TDC is the basic procedure for many operations, such as adjusting valve clearance, replacing the timing chain and replacing camshaft/crankshaft sprockets.
3 Before starting this procedure, set the gearshift lever (selector) to neutral and apply the parking brake (or chock the rear wheels). Disable the ignition system by disconnecting the primary circuit connectors from the ignition coil assembly/ignition module (see Chapter 5). Also relieve pressure in the fuel system (see Chapter 4A, paragraph 12).
4 To set any piston to TDC, the crankshaft should be turned clockwise only (as viewed from the timing chain side). This can be done in one of the following ways:
a) Preferred method. The crankshaft is turned with a head with a knob (“ratchet”) using the crankshaft pulley mounting bolt.
b) You can ask an assistant to crank the starter with short turns of the starter (the key is in the ignition switch). To accurately install the crankshaft, you will still need a socket with a crank. Make sure that the assistant has already left the car by this time, removing the ignition key from the lock.
5 Remove the spark plugs and install a compression gauge in the spark plug hole of the first cylinder (see Fig. 3.5)
Rice. 3.5. To determine the TDC of the piston of cylinder No. 1 of the compression stroke, install a compressor in the spark plug hole of cylinder No. 1
(it is preferable to use a device with a threaded tip and a flexible hose about fifteen centimeters long).
6 Rotate the crankshaft clockwise until the gauge needle begins to rise, indicating the compression stroke.
7 After the compression stroke has begun, the piston of cylinder No. 1 must be set to its highest position, which will correspond to its TDC.
8 Continue turning the crankshaft until the mark on the crankshaft damper matches the number “O” (TDC) on the timing cover (see Fig. 3.8).
Rice. 3.8. Align the mark on the crankshaft damper with the o on the scale on the timing chain cover
At this point, the piston of cylinder No. 1 is at TDC on the compression stroke. If the marks coincide, but there is no compression, then this means that the piston is at TDC on the exhaust stroke. Make another full (360°) revolution of the crankshaft.
Note. If a compression gauge is not available, you can insert a blunt object into the No. 1 spark plug hole and then, as the crankshaft rotates, determine the start of the compression stroke by the hissing of the escaping air. The remainder of the procedure is identical to that described above.
9 After piston No. 1 is installed at TDC on the compression stroke, the remaining pistons can be installed in the same position one by one, turning the crankshaft another 180° each time, in accordance with the firing order (see Specifications). For example, by turning the crankshaft 1 80° (from the TDC of the piston of cylinder No. 1), the TDC of the compression stroke will be occupied by the piston of cylinder No. 3.
Watch the video: TDC Top dead center and BDC in an internal combustion engine
Source
Ignition: late and early
Which ignition is better? An experienced motorist or expert will immediately say: optimal. And in itself, late or earlier ignition is already extreme, capable of giving the car owner a lot of headaches.
The stability of the operation of an injection engine directly depends on proper adjustment of the ignition system. This will help increase the power of the internal combustion engine, reduce fuel consumption, and improve efficiency.
Ideally, on a 4-stroke internal combustion engine, the fuel assembly should ignite at the end of the compression stroke. This means that the fuel must ignite at the very moment when the piston reaches TDC. This process is due to the nuance that the fuel assembly needs a specific time to burn, after which the resulting force will push the piston down.
So, late or early ignition implies a delay or advance in the operation of the above process. In other words, the ignition system is configured so that a spark is formed and ignites the fuel assembly not at the optimal moment for this. This happens sooner or later.
We independently set the timing marks on the Chevrolet Niva
The gas distribution system of any engine must work correctly. If problems occur in its operation, this leads to premature wear of the motor and numerous breakdowns. To accurately adjust the timing, special marks are used, according to which the shafts in the engine are aligned. We will tell you about the correct placement of marks on a Chevrolet Niva car in this article.
Why are timing chain marks set?
The engine of any passenger car has 2 shafts: camshaft and crankshaft. In most cars they are connected by a belt drive. On a Chevrolet Niva car this is a chain transmission, and a single-row chain is used there. The advantages of such a system are obvious: the chain, unlike a belt, never slips on the pulleys and lasts much longer. However, the chain can stretch over time, and the teeth on the shaft sprockets can wear out or even break. This will lead to desynchronization of the camshaft and crankshaft. Their work will not be coordinated, so the engine may fail
Therefore, when adjusting or replacing the timing chain, it is very important to align the engine shafts in accordance with the marks on the pulleys and timing case. This is not easy to do, since, firstly, the marks are located in hard-to-reach places, and secondly, they need to be set very accurately, since the chain, unlike a traditional belt, cannot be slightly tensioned if necessary
How to install an injector on a Chevrolet Niva (with photo)
- The car is installed on the inspection hole. Wheel chocks are placed under the rear wheels and the hand brake is applied.
- The car hood is opened, unscrewed and the fan is removed. The radiator is also unscrewed and carefully moved to the side (it is not necessary to drain the coolant from there).
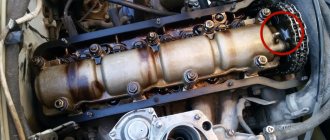
- Access to the engine valve cover is provided. Its fastenings are unscrewed with an open-end wrench, then it is carefully removed. There is access to the timing chain and the upper camshaft sprocket. The shaft pulley is rotated with a special wrench until the mark on the camshaft sprocket aligns with the protrusion on the timing case.
The mark on the timing case is aligned with the mark on the camshaft sprocket
The tension roller is removed, the chain can be removed
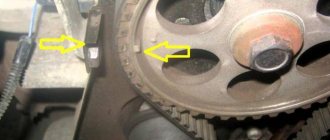
The mark on the crankshaft sprocket is precisely aligned with the DPKV core
Consequences of incorrect installation and adjustment
- Characteristic extraneous clicks appear in the engine, which become louder as the vehicle speed increases.
- The engine is unstable even at idle speed.
- The car's acceleration time increases significantly because the engine does not respond well to pressing the gas pedal.
- Acceleration occurs in jerks, during which clouds of black smoke may fly out of the exhaust pipe.
- Valve wear accelerates many times over, and if the shafts are out of synchronization too much, the valves become deformed and their seats break.
- Incorrect adjustment can also lead to a broken timing chain. This, in turn, can puncture the radiator, break the fan and other engine parts.
- The engine constantly overheats, and the consumption of engine oil and antifreeze can increase significantly.
As can be seen from this article, correctly set timing marks are the key to long and uninterrupted engine operation. There is nothing complicated about this; even a novice car enthusiast can do it.
It is important to take your time, follow the above sequence of actions, and also try not to drop the sprocket lock washers into the engine sump. Because it will be very difficult to get them from there
Replacing the chain tensioner
To carry out work on replacing the chain tensioner, you will need a small set of tools, including a screwdriver and a 10mm socket wrench.
Replacement is carried out in several stages:
The cover is removed from the cylinder head. Before doing this, it is better to carefully study the engine manual. Because during operation, the cylinder head cover gasket may be damaged and may need to be replaced. The next step is to remove the tensioner from the camshaft drive chain. then the sprocket is disconnected from the camshaft flange. In this case, you should not completely disconnect it from the chain. Unscrew the bolts securing the damper. You need to start working from the bottom. To make further work more convenient, you need to connect the gear together with the chain, as shown in the figure below. After this, you can unscrew the upper mounting bolt and completely remove the damper. Attention! When removing the damper, you must hold it firmly with your hand so that it does not fall into the oil pan.
Otherwise, its removal will become a big problem, since additional disassembly of the engine will be required. After the damper has been completely removed, it is necessary to inspect it. If its surface has strong signs of wear, chips have appeared on it, and cracks or other damage are noticeable on the body, a complete replacement of this component is necessary. It is important to remember that the damper on the Chevrolet Niva engine has a slightly different shape compared to the one previously used on VAZ engines. Therefore, it is worth purchasing a device designed for installation on this car model. After installation, you must reassemble all system components in the reverse order.
How to replace the chain tensioner on a VAZ 21213-VAZ 2131
Cars of the Niva family are very old models, in my opinion the very first cars went back to 1977 if memory serves, but these are new times and the car is still being produced and refined, so here are the chain tensioners that AvtoVAZ installed on its cars in Depending on the year of production, they may differ from each other, so for example, somewhere before 2000 or even higher, these cars of the Niva family came with the most common spring chain tensioners, these tensioners are very easy to remove, but one of their drawbacks (Or maybe an advantage) is the fact that they do not tension themselves, that is, from time to time you have to tighten them yourself, which is very inconvenient, but this is for someone, because it only takes 1-2 minutes to tighten the chain tensioner!
Now let’s look at a new type of tensioner that came on cars that were produced much later, so to speak, during Russia and not during the USSR, and so in new times, the so-called hydraulic chain tensioner was installed on this family of cars, its whole advantage is that you won’t need to constantly tighten it, that is, it was installed at the factory, and you, as they say, forgot about it, but it’s not so simple, if this tensioner suddenly jams or something else happens to it, then you will have to change it to a new one , and today you will learn how to replace this type of chain tensioner in this article. (By the way, you can see what a hydraulic chain tensioner looks like in the photo below)
By the way, if you have a regular tensioner of an old model, but it looks like it is shown in the photo, then read more about how to replace this unit in the article entitled
Removing the chain tensioner
1) At the very beginning of the operation, use a wrench to unscrew the tube that is connected to the hydraulic chain tensioner itself, and after this tube is unscrewed, disconnect it and move it aside.
2) Then, using a wrench or a socket with a universal joint (If it is difficult to get to), unscrew the two nuts that secure the hydraulic tensioner to the car engine (One of the nuts is not visible in the photo, but when you look at this tensioner on the car, then you will immediately understand where the second nut is, since it is located nearby) and then carefully remove it from the hole in which it is located.
Installing a new
Installing a new tensioner occurs in the reverse order of removal, and by the way, after installation, close the hood and sit behind the wheel of your car, then try to start the car and if that chain rattle disappears, then you did everything correctly and that’s why the chain rattled the tensioner itself.
Checking the tensioner for wear
- If you have removed your old tensioner and think that it is in working order and there is no point in changing it, then first rinse this tensioner in a container filled with gasoline (Rinse the tensioner at your discretion, just if all the dirt comes away from it, then it may even improve its performance like this how small particles of dirt will not interfere with the movement of the plunger itself, but more on that a little later), and after washing, thoroughly dry this tensioner or simply blow it out with compressed air.
- After washing and drying it, let's look at what it consists of, namely the plunger itself, which is also indicated under the number 1, and the tensioner housing, which is indicated under the number 2.
- Now, after studying this material, let's move on to checking, firstly, inspect the tensioner plunger itself; in no case should there be any kind of defects on its surface, such as, for example, scuffs, deep scratches, etc.
- Then inspect the body itself; there should also be no nicks, dents, etc. on its surface.
- And finally, perform another fairly simple check, namely, grab the tensioner plunger itself with your hand and then try to move it; if the plunger sticks in any place, then replace the tensioner with a new one.
FakeHeader
Comments 17
I've been riding red Teslas for 2 years now (
20000km) - no questions
Why did you change the wires? Having problems with the ignition?
yes, and the problems remained, but it was noticeably better; the wires were of some kind, I changed them “just in case, so that I know when and what I replaced them with” anyway, then I’ll replace them with an elephant or a blue silicone adze
why not a red Tesla?
I had a hard time finding the green one... and for me the red one is borscht, the blue one is the best for us)
I bought red tesla wires today. I'll install it tomorrow.
wow, “original” LADA spark plugs, despite the fact that they put Brisk on the assembly line. But the Tesla wires have become dirty, ELEPHANT is even better.
Yes, “Lada-Detal” is a strange office... and in Samara I could NOT find the “elephant” that my Niva needed!
and they are just packers, they don’t do anything themselves. although I can’t say anything, the CO pipes and radiator in their packaging turned out to be quite normal.
about the elephant - I don’t remember exactly, but I think I bought cables for a classic injector. and, here, 21073, they go like 21214.
Well, according to the “elephant” plate, these are different wires; quote from there: ===21214-3707080-10 “High-voltage wiring harness 21214-3707080-10” VAZ cars - 21214 (and their modifications) with an injection engine, with an ignition module, until 2006. V.
21214-3707080-20 “High-voltage wiring harness 21214-3707080-20” VAZ-21214, Chevrolet-Niva-2123 cars (and their modifications) with an ignition coil, power steering, since 2006.
21214-3707080-30 “High-voltage wiring harness 21214-3707080-30” VAZ cars – 2105, 2107===
I couldn’t find “21214-3707080-20” anywhere; everywhere either “21214-3707080-30” or even “2111-xxx”
For stable operation of the Niva 2121, 21213, 21214 injection and carburetor engines, it is necessary to change the spark plugs on time, since they are an integral important part of the engine that ignite the combustible mixture
- The engine starts with difficulty, the starter turns for a long time. Engine jerks and stalls Power decreases Engine speed fluctuates Fuel consumption increases
- Denso Ir > Bosh platinum BERU Ultra X BERU Ultra X Platin BERU UXT6 DENSO W20TT Finwhale 510 A17DVR analogue from NGK BPR6ES A 17 DVRM analogue from NGK BPR6ES-1
There are more positive reviews, of course, in the more expensive price category, as well as with platinum or iridium rods, which exceed the service life of simple ones by 70-80%, and need to be changed not after 20 but after 100 thousand km. which increases service life by 5 times.
- Brush Spark plug wrench 21 Gap feeler gauge Pliers or hammer
How to set the spark plug gap in the field:
For carburetor Niva 2121 this gap is - 0.9 mm For injector 21214 - 1.11 mm
Insert a feeler gauge of the required size into the spark plug and tap it with a hammer if the gap is large, or lift it with pliers if it is small.
- The next step is cleaning, clear the wells of debris so that nothing gets into the block. We unscrew the old spark plugs, counterclockwise; if they are stuck, use Wd40 and repeat after 15 minutes. We install new spark plugs with the correct gap in the engine.
If there is black soot deposits on the core, this means that the fuel you are using is of poor quality, or oil is getting into the combustion chamber, this may be due to worn piston rings, valve guides, oil seals. If soot covers the core together with the body, this indicates a disruption in the supply of the fuel-air mixture, we recommend checking the carburetor settings and changing the air filter. If the core is white, the ignition adjustment is incorrect.
A melted core is the reason for the overheating of the car, so if your Niva is boiling over a couple of times, we recommend checking the spark plugs and paying attention to whether the engine is behaving differently, this happens, of course, extremely rarely, but forewarned is forearmed.
Service
To keep the spark plugs in good working order for as long as possible, service them every 10,000 thousand km, clean them with a brush and adjust the gap if necessary.
Problems when paying with bank cards
Sometimes difficulties may arise when paying with Visa/MasterCard bank cards. The most common of them:
- There is a restriction on the card for paying for online purchases
- A plastic card is not intended for making payments online.
- The plastic card is not activated for making payments online.
- There are not enough funds on the plastic card.
In order to solve these problems, you need to call or write to the technical support of the bank where you are served. Bank specialists will help you resolve them and make payments.
That's basically it. The entire process of paying for a book in PDF format on car repair on our website takes 1-2 minutes.
If you still have any questions, you can ask them using the feedback form, or write us an email at
Evaluating the position of the marks and setting the valve timing
To start work, you will need the following tools: keys for “8”, “10” and “13”, installation and a special key for cranking the crankshaft.
It is possible to accurately determine the need to replace the timing chain only after the fact. You need to remove the valve cover, set the piston of the 4th cylinder to top dead center (TDC) and look at the marks.
Step-by-step instructions for diagnosing and setting valve timing:
- We remove the negative terminal from the battery, put the car on the handbrake and engage neutral gear.
- Preparation - unscrew the air duct from the mass air flow sensor to the throttle assembly, disconnect the accelerator cable, the hose of the vacuum brake booster and crankcase ventilation. Remove the valve cover along with the rubber band by unscrewing the fasteners.
- We set the 4th piston to TDC - use a wrench to turn the crankshaft so that the mark on its pulley coincides with the mark on the engine cover, and the mark on the camshaft sprocket matches the pointer on the valve cover. If the marks on both sprockets match, the valve timing is normal. If not, we continue working.
- To fix the crankshaft, put the car in first gear. Unbend the tabs of the camshaft pulley bolt lock washer.
camshaft pulley Unscrew the bolt and remove it along with the lock washer. Be careful not to drop them into the engine pan.
Press the tensioner plunger with a pry bar and loosen the chain. Then remove the pulley from the camshaft and carefully move the chain in the desired direction by 1 tooth. Place the sprocket on the camshaft and tension the chain. If the hole on the camshaft pulley no longer aligns with the locating pin in the flange, rotate the crankshaft slightly to the side until synchronized.
Screw the bolt and washer back, but do not tighten it. Rotate the crankshaft 2 turns and check the marks. If they do not match, repeat the procedure the required number of times.
When finished, tighten the camshaft bolt and bend the petals of the support washer, putting the car in first gear. Assembly is carried out in reverse order.
Ignition coil Niva 21214 injector
The four-terminal ignition coil is a unit of two coils.
The current in the primary windings of the coils is controlled by the controller depending on the operating mode of the engine.
Spark plug wires are connected to the terminals of the secondary (high-voltage) windings of the coils: to one winding - the 1st and 4th cylinders, to the other - the 2nd and 3rd.
Thus, a spark simultaneously jumps in two cylinders (1-4 or 2-3) in one during the compression stroke (working spark), in the other during the exhaust stroke (idle).
The ignition coil is non-removable; if it fails, it is replaced.
1. Disconnect the connector from the ignition module.
2. Disconnect the high-voltage wires.
3. Using a 10mm socket, unscrew the three nuts securing the ignition module to the bracket
4. Remove the ignition module from the bracket studs.
5. Cylinder numbers are cast on the module
Install the ignition module in reverse order
The VAZ 2114 ignition module is a more advanced solution than the classic “bobbin” coil that was installed on the “classic”. However, checking this element should not be difficult even for novice motorists.
Installing Niva Chevrolet timing marks: step-by-step instructions with photos
The purpose of the marks in the timing mechanism.
Now it is single-row, I won’t go into details - that’s what the designers decided.
We remove the old one and clear the space for the new one.
Unscrew the bolt on the camshaft gear, as well as the stop pin at the smaller sprocket. I removed the bypass roller by snapping off the cap with a screwdriver and unscrewing the bolt. This completes the analysis of the device.
Under the engine valve cover 6. Let's start setting the phases according to the marks. To do this, the crankshaft pulley rotates and the marks on the camshaft gear are aligned with the mark on the bearing structure. When the chain is correctly positioned, the marks on the Chevrolet Niva crankshaft gear coincide with the notch on the camshaft drive chain cover.
This notch has an oblong notch. In this case, there is no need to continue regulation and set the phases of the GR mechanism. When the marks do not match, you should continue installing the phases and adjusting them.
Chevrolet Niva 2005, 90 l. With. — self-repair
Of course, at the same time, change both the damper and the chain tensioner shoe. So, you need to buy before starting the repair: I’ll say right away about the hydraulic tensioner - on the Chevrolet Niva it is not very reliable, it may fail at some point, let’s say there is no oil pressure at startup for some time, which has already happened to some owners of these cars, the chain will sag and may jump a tooth or more, and this is the meeting of the valves with the pistons - accordingly, the valves are bent, etc.
People buy a mechanical tensioner and change it - to do this, you need to remove the oil supply pipe on the tee, where it comes from, and screw in a plug bolt. Removing the part Unscrew the ratchet nut, and then remove the crankshaft pulley. Remove the front engine cover, unscrew and remove the damper, bend the lock washer of the oil pump sprocket bolt and loosen the bolt. Remove the tensioner and shoe.
Unscrew the bolt on the camshaft gear, as well as the stop pin at the smaller sprocket. Remove the gear and pull it out, loosen the chain and remove the smaller gear. I bent the oil pump sprocket stopper, tore off the bolt with the head on the cover was removed. I dismantled the hydraulic tensioner, for which I first removed its oil line using a brake pipe wrench.
It is important to remember that after carrying out these steps, the bolt is not fixed in anything, so it may fall into the engine sump. When carrying out work, it is necessary to use a wrench with a deep head
The next step is to dismantle the tensioner. Then you need to slightly pull the chain towards you to remove it from the crankshaft sprocket. To adjust the chain and align it with the marks, it is necessary to move the chain by 1 tooth.
When the chain is correctly positioned, the marks on the Chevrolet Niva crankshaft gear coincide with the notch on the camshaft drive chain cover. This notch has an oblong notch. In this case, there is no need to continue regulation and set the phases of the GR mechanism.
When the marks do not match, you should continue installing the phases and adjusting them. To do this, we continue the work: The special wings of the lock washer are unbent. Now we set the car in first gear mode at the gearbox. This is necessary so that when unscrewing the crankshaft gear mounting bolt, it does not turn.
The used component must be removed, and the installation site must be cleaned of remnants of the old part. Take a new oil seal and lubricate it, motor fluid is suitable for this.
Preparatory work
Install it in place of the old one. Now take the timing chain and lubricate it as well.
The car's acceleration time increases significantly because the engine does not respond well to pressing the gas pedal. Acceleration occurs in jerks, during which clouds of black smoke may fly out of the exhaust pipe. Valve wear accelerates many times over, and if the shafts are out of synchronization too much, the valves become deformed and their seats break.
Part 2. Valve + piston = repair Niva Chevrolet NIVA Chevrolet 4+4
Incorrect adjustment can also lead to a broken timing chain. This, in turn, can puncture the radiator, break the fan and other engine parts.
Phase adjustment in case of mismatch
If the notches do not match, work continues:
- The “whiskers” of the lock washer are bent. The fixing bolt is unscrewed using a key set to “13”, and the position of the camshaft sprocket is loosened.
- The first gear on the gearbox is engaged, allowing you to avoid spinning when unscrewing the crankshaft gear bolt.
- The fastener is removed with a lock washer. To prevent the bolts from falling into the engine sump, use a deep-head wrench or unscrew the bolt by hand.
- Remove the chain tensioner using a screwdriver. It should be replaced if it is stretched or strained, during scheduled maintenance, after 60-80 thousand kilometers.
The camshaft sprocket is removed. If you pull it towards yourself (a distance of 5-10 cm), it will be removed along with the chain. Check for wear on the sprocket teeth, which form an inverted “V” shape. The part must be replaced if there are grooves on the leading part of the teeth.
On a working mechanism, the chain moves on the teeth. The scrolling step is one tooth.
The sprocket with chain is placed on the camshaft flange. When the chain moves on the sprocket, its holes will not align with the pin
The crankshaft should be rotated in the specified direction until the mark and pin match.
It is important to secure the part with a bolt and washer (without tightening it all the way). After turning the crankshaft twice with a special wrench, check the placement of marks on the camshaft gear and bearings.
If the marks correspond, their adjustment has been successfully completed
The fastenings of the crankshaft and camshaft sprockets are tightened tightly.
If there is a discrepancy, you must repeat the steps.
For clarity of the obtained result, it is suggested to look at the example in the photo.
In the upper corner is an overview of the notch placed against the DPKV core. Below is an asterisk on the flange. The dot is visible opposite the bed in the aluminum cylinder block.
Features of setting timing marks
Marks are marks and notches located on the gears of the gas distributor. For clarity, below is an example of installing a notch on a drive gear disk. It coincides with the center of the DPKV (crankshaft position sensor).
The marks on the camshaft pulley are fixed against the ebb on the bearing housing, which fixes the main shaft on the platform.