Adjusting the ignition is one of the most common tasks faced by our compatriots. This procedure allows you to get rid of improper operation of the engine, thereby preventing wear of its structural elements. Find out more about how to set the ignition yourself and what methods exist in this material.
Reasons for disappearing factory settings
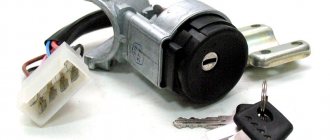
Even if your car has a button instead of a lock, sooner or later you will still have to adjust the ignition. Before you do everything yourself, let's look at the reasons why this need arises. First of all, the reason for this is the driver himself, who for various reasons could dismantle the ignition distributor. And with its further installation, the ignition timing (ignition timing) was not properly adjusted.
The reason why the ignition timing is set lies in the marks on the components. When dismantling the distributor, these marks are lost; accordingly, the car owner simply destroys the factory settings. So before carrying out any work related to the breaker, you need to note the location of all the marks.
Adjustment of the interrupter unit for setting the SOP
Distributor installation instructions
Setting the ignition angle is required for cars with a distributor; on other cars, the angle is set by the ECU.
If you set the ignition timing yourself, then, as stated above, you need to follow the special marks. Depending on the specific vehicle, adjusting the KSZ or BSZ on a diesel engine or gasoline unit may have its own nuances. For example, in domestically produced VAZ cars, the ignition timing is set according to the first cylinder. That is, to align the piston should be set to the TDC position, because this is where the compression moment occurs.
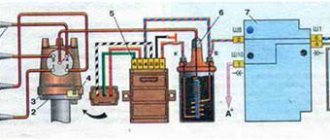
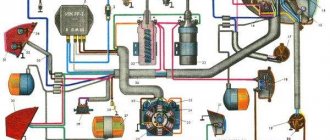
The ignition system is configured as follows:
- First of all, the spark plug of this cylinder is removed.
- Use a plug or finger to close the spark plug hole.
- The crankshaft must be rotated clockwise; you can use a socket wrench for this. This is done until the air pushes the plug or finger out of the spark plug hole.
- The flywheel rotates further until the marks on its shaft coincide with the middle mark located on the timing cover. In this case, the ignition adjustment will allow you to set the angle to 5 degrees, and this is normal for a car running on 92 or 95 fuel.
- After these steps, you can install the distributor. The body of this device should be positioned in such a position that an imaginary line runs parallel to the axis of the power unit. As for the runner rotor, it should point towards the contact of the first cylinder on the cover. If everything worked out for you, then the car should start, and then you will need to adjust the angle (the author of the video is the Lty D channel).
Instructions for setting the ignition of the VAZ 2106
Let's look at 3 known methods of adjusting the ignition angle on VAZ engines.
Using a strobe light (by marks)
This method allows you to very accurately set the ignition to the marks, and does not require removing the distributor and valve cover. The entire adjustment process takes 5 minutes. A strobe light can be found at any auto store. The procedure is as follows:
- With the car turned off, loosen the nut securing the distributor, having first made a mark of the initial position on its body;
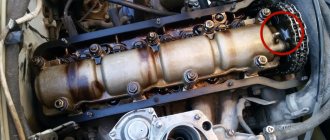
- On the front engine cover we find two short and one long marks, clean them of dirt and oil;
- We connect the negative wire of the strobe to the engine ground, the positive wire to the ignition coil, and a special clamp to the high-voltage wire of the first cylinder;
- We start the engine and turn on the strobe. The light from its lamp directed at the pulley will show the true position of the ignition timing;
- Slowly turning the distributor body, we achieve alignment of the mark on the crankshaft pulley and the bosses on the front cover;
- We check the engine speed using the tachometer and, if necessary, adjust the idle speed on the carburetor;
- Tighten the distributor fixing nut.
Setting the spark advance angle
How to set the ignition with your own hands? When installing electronic ignition in your car, you can use several methods, one of them is adjusting the angle by spark. To do this, using the crankshaft, the piston of cylinder 1 is set to a lower TDC. In this case, the distributor should be directed towards the cylinder wire contact. If it faces the other way, you need to turn the flywheel again.
Next, the central high-voltage cable should be removed from the distribution unit cover, the contact of which should be placed approximately 0.5 cm from the car body or cylinder head. The distributor fastening should be loosened, after which the ignition will be activated. The body of the interrupter assembly rotates, and by the movements of the slider you should find the desired position at which a spark will appear between the contact of the high-voltage cable and the ground of the car. Next, the breaker moves counterclockwise (very slowly), and you need to catch the moment when the spark no longer appears (the author of the video about setting up an RCD using a special strobe device is Vladislav Chikov).
How can you set the ignition timing?
Ignition timing adjustment is required for complete combustion of fuel in the chambers. Due to the fact that gasoline does not burn instantly, it must be ignited a little before the piston reaches TDC. Therefore, the moment of spark occurrence must be clearly regulated.
Video - problem of early ignition on VAZ 2106:
There are several ways to perform this procedure. Many craftsmen trust exclusively their ears and prefer to do everything by ear. Some auto mechanics use light bulbs or a strobe light to set ignition timing.
Adjusting the ignition by ear
The process occurs at idle speed of a running, warmed-up engine (if necessary, you can slightly tighten the choke to ensure stable operation).
- The nut securing the distributor body is loosened, after which it begins to slowly rotate in different directions.
- In the position where the engine speed is at its maximum, you need to try to “accelerate”. If, when you press the pedal sharply, no interruptions, pops or shots occur, and the acceleration of revolutions is rapid, then the required position has been found.
- From this point, turn the distributor body 1-2° clockwise, and then tighten its lock.
Completing the last point is necessary so that the ignition is not too “early”, which creates unnecessary resistance to the rotation of the crankshaft.
Note! Sometimes it is not possible to achieve ideal engine operation due to incorrect operation of the fuel system components or poor quality of the fuel mixture. In such cases, you need to be content with the most optimal solution, and after adjusting the carburetor, adjust the ignition again.
Setting the spark advance angle
The piston of the first cylinder must be set to the upper position by rotating the crankshaft until the pulley mark coincides with the first mark on the timing block.
In this case, the distributor should be directed towards the contact of the wire of the first cylinder. If it turns out to be in the other direction, you need to perform another full revolution of the flywheel. You can also look for the desired position by unscrewing the spark plug from the first cylinder.
The central high-voltage wire is removed from the distributor cover, and its contact is placed at a distance of 5 mm from the vehicle ground. After loosening the distributor lock, you need to turn on the ignition.
Slowly turning the distributor body, you need to move the slider left/right to find the position at which a spark will occur between the wire contact and the ground.
Next, moving the distributor a millimeter in a counterclockwise direction, you should catch the moment at which the spark stops appearing, and then tighten the latch.
Adjusting the ignition by light bulb
Initially, the piston of the first cylinder is installed in the position preceding the TTM (aligning with the middle mark) in the manner described above. Next, one wire of a regular car light bulb is connected to ground, and the other to the wire leading from the coil to the distributor.
Video - how to set the ignition by a light bulb:
When the ignition is turned on, the distributor housing rotates in different directions until the light comes on. Having stopped the distributor in this position, you need to fix it.
There are very rarely cases when a machine works great even with significant mismatches of marks. This may be caused by incorrect previous engine assembly or timing chain stretching.
Adjusting the ignition by light bulb
If you don’t know how to set the ignition correctly, and your car doesn’t use a spark amplifier, then there is another method - using a light bulb. To install the ignition in this way, it is necessary first of all to put the piston of cylinder 1 in the TDC position, we described this in detail above. Installing the ignition using a light bulb involves using any 12-volt lamp to the distributor and the car body.
When the ignition is turned on, the distributor body must be rotated in different directions until the lamp begins to light. At this moment you need to stop the distributor and secure it in this position. If the engine works well with large mismatches in the marks, this may be due to incorrect assembly of the power unit or stretching of the timing chain.
Basic aspects of different types of ignition, contact adjustment
Overall, installing an electronic ignition is not a particularly difficult task if you approach it wisely. If you have difficulty setting it up, you can use a device to set the ignition timing; you can find it for sale in any store. It should be noted that if your car is equipped with gas equipment, installing an ignition timing variator will help you.
You also need to take into account that regardless of the system - electronic or mechanical - the procedure for setting the angle looks identical. The only difference is that in the mechanical version, sparks appear as a result of opening the contacts.
So before adjusting, you should adjust the gap between the contacts:
- The crankshaft must be turned until the greatest distance appears between the contacts.
- Using a feeler gauge, you need to check the gap and compare it with the one prescribed by the car manufacturer.
- Using the plate, you need to set the appropriate gap and tighten all the screws.
Setting the ignition on a VAZ
Depending on what type of ignition is installed on your model, setting up the system has some features. At the same time, the principle of performing this operation is similar for all modifications. The ignition adjustment of the VAZ-2106 is carried out in 3 stages:
UZSK – calibration of the contact angle in the closed position.
UOZ – adjustment of the advance angle.
Monitoring performance while on the move.
Adjustment algorithm
ATTENTION! A completely simple way to reduce fuel consumption has been found! Don't believe me? An auto mechanic with 15 years of experience also didn’t believe it until he tried it. And now he saves 35,000 rubles a year on gasoline! Read more"
A 12-volt light bulb, a set of probes and a special wrench for rotating the crank shaft are all that is needed to ensure ideal ignition of the fuel mixture using this method.
Here's how to proceed:
- Remove the upper cap of the ignition switch;
- Use a fine file to process the contacts, trying to remove all metal oxides and bulges formed on the surface;
- Bring the contacts as close as possible to each other (they need to fit tightly, with their entire plane).
Advice. If the contacts do not sit on each other with their entire plane, then it is recommended to slightly bend the fixed contact. This is done only when absolutely necessary, after thoroughly cleaning the contacts from oxides and tubercles.
- Turn the crank shaft to a position where the maximum possible distance is formed between the distributor contacts;
- Loosen the screw that holds the entire contact system;
- Insert a 0.4 mm measuring rod between the contacts and secure the holder as before.
Attention. It is necessary to provide such a gap between the contactors so that the 0.4 mm probe moves in this place with some force.
The same is done with probes of 0.35 and 0.45 mm. The crank shaft rotates using a key, and if it is missing, then in no case through the starter. You can ask an assistant to slowly push the car in 4th or 5th gear.
UOZ and UZSK
As you know, the dynamics and fuel consumption of carburetor cars are completely dependent on the UOZ and UZSK. The first abbreviation means the initial advance angle, and the second - the angle of the closed state of the group of contacts.
You should know that each car model has its own individual characteristics and its own adjustment values. That is, knowing how to set the ignition using a light bulb is not enough. You also need to understand the individual values and settings of a particular car. You should always try to bring both angle values to the maximum acceptable level.
The spark charge must be created with a certain advance, since this or that time is needed for the combustion of the fuel mixture. The engine has different speeds, therefore the advance angles must change in accordance with the amplitude of rotation of the crank shaft.
Having learned how to set the ignition through a light bulb, you can independently establish clear ignition of the fuel mixture of your car.
Forget about fines from cameras! An absolutely legal new product - Traffic Police Camera Jammer, hides your license plates from the cameras that are installed in all cities. More details at the link.
- Absolutely legal (Article 12.2);
- Hides from photo and video recording;
- Suitable for all cars;
- Works through the cigarette lighter connector;
- Does not cause interference to radios and cell phones.
Setting the angle of the closed state of the breaker contacts
The angle of the closed state of the breaker contacts (UZSK) is, in fact, the gap between the contacts of the breaker. Due to constant loads, it gets knocked down over time, which leads to disruption of the spark formation process. The UZSK adjustment algorithm is as follows:
After setting up the UZSK, the ignition timing is always off, so it should be set before assembling the distributor.
Video: setting the gap between the breaker contacts
Step-by-step instruction
You can install the ignition on a VAZ 2106 in 13 simple steps:
- We remove the spark plug of cylinder No. 1, close the hole for the spark plug with a rubber plug and finger.
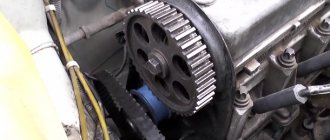
- Using a special wrench, turn the crankshaft. As you move, the compression stroke should begin in the first cylinder. At this moment, the piston will move upward, creating internal pressure. You will feel it when the rubber plug begins to squeeze out of the hole.
- At this moment we begin to monitor the progress of the mark on the pulley. It should ultimately align with the mark on the timing belt. If you are using fuel with an octane rating of 95 or 92, then you need to align it with the second mark (5 degrees). If the fuel used is 72 or lower (which happens very rarely today), then you need to strive for the third mark (0 degrees)
- Remove the cover from the distributor, having first unfastened the latches.
- Due to the movement of the crankshaft, the distributor rotor must face the first cylinder.
- Now it is important to ensure that the line of the distributor cover latches is parallel to the axis of the motor. If this condition is not met, the following procedures must be carried out.
- Remove the nut securing the distributor and turn it upward. Next, we twist the rotor axis and achieve its parallel position relative to the motor axis.
- We return the distributor to its place and screw the nut not all the way.
- Only now is the actual process beginning, thanks to which we will be able to correctly configure the contact ignition.
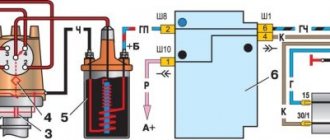
- We connect the volt-ohmmeter so that one end is connected to the coil terminal connected to the distributor cable with low voltage, and the other end is fixed to ground.
- Turn on the ignition. Carefully turn the distributor clockwise until the light switches off. If it doesn’t light up, then there’s no need to turn anything.
- Now we begin to turn the distributor in the opposite direction until the light bulb lights up. In this position, fix the distributor by tightening the nut tightly.
- The ignition adjustment is completed, you can turn off the ignition and return the distributor cap back.
Now we can verify whether the ignition was installed correctly. We start the engine and start driving. You need to accelerate to 45 kilometers per hour. Upon reaching the desired speed, engage fourth gear and sharply press the gas pedal. After a couple of seconds, the engine should begin to detonate (popping noises will be heard, “fingers” will begin to ring). As soon as the car reaches a speed suitable for the selected gear, the detonation will disappear.
If the detonation does not disappear, it means that you made the adjustment incorrectly and received the so-called “early” ignition. This means you need to slightly turn the distributor clockwise by half or one division. If detonation does not occur, then you have “late ignition” installed. In this case, turn the distributor counterclockwise by half or one division.
As soon as you were able to set the ignition on the VAZ 2106 correctly, make a reliable mark on the distributor body, which will serve as a good help for subsequent adjustments.