It is necessary to check the condition of the timing belt every 10,000 - 15,000 kilometers. Carefully inspect the belt for cracks.
Be sure to monitor the belt tension. If it breaks, repairs will not be cheap - the price ranges from replacing the valves to overhauling the engine. It is best to change it after every 50,000 - 60,000 kilometers.
For the VAZ 2110 there are 8- and 16-valve engines. The timing belt for an 8-valve engine is much easier to replace, but this does not mean that this part for a 16-valve engine cannot be replaced independently. In our instructions we will tell you about both options.
REPLACING THE VAZ 2110 TIMING BELT (8 VALVES WITHOUT POWER STEERING)
- We begin the replacement by unscrewing the two front protection bolts.
- We take out the protection casing.
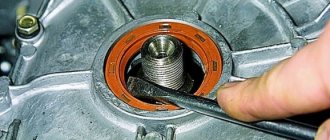
- We remove the right wheel, as well as the protection behind it. Then, using a 19mm head, we begin to turn the generator pulley, while rotating clockwise.
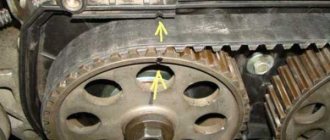
- The pulley must be turned until the marks on it and the cover match.
- Remove the plug that is located on top of the gearbox.
- We check that the marks in the hole coincide with each other.
- Insert a screwdriver into the hole to block the rotation of the flywheel.
- Then we unscrew the generator pulley itself with head 19.
- We take out the pulley and put it aside.
- Loosen the tensioner roller nut using a 17mm wrench.
- We take out the old timing belt.
- Remove the tensioner pulley and replace it with a new one.
- Don't forget to install a special washer under the roller.
- We put on the new timing belt and tighten it using a roller.
- We make sure to check that all the marks are in the right place. Then we begin assembly in reverse order.
- We check the belt tension by unscrewing it. It is important that it is not overtightened.
?
After this, the replacement can be considered complete. Start the engine and let it run for a while. Pay attention to how the replaced part performs.
If you did everything correctly, you can put on protection. The entire replacement procedure will take approximately 30 minutes.
When does the belt need to be tightened?
Having considered the previous paragraph of the article, it was probably not difficult to understand that monitoring the correct functioning of the timing belt is quite important. In particular, it is worth keeping the belt drive tension at the proper level.
By the way, stretching is carried out only in two main cases:
- During a routine check of the gas distribution mechanism and the tension does not comply with the norm. The normal tension of the timing belt is checked in a very simple way, for which you will need ordinary spring scales and a ruler or caliper. To check, the hook of the scale clings to the belt and pulls until the display shows a load of 10 kilograms. Without loosening your grip, all that remains is to measure the deviation of the drive from the normal position. If the belt has been pulled back by more than 5.5 millimeters, but its tension is inevitable. Otherwise, you can leave everything as is until the next timing check, which is recommended every 10-15,000 kilometers;
- When repairing the timing belt, when the belt was removed or its tension was weakened.
REPLACING THE VAZ 2110 TIMING BELT (16 VALVES)
Not every car enthusiast knows how to replace the timing belt on their own. For 16 valves this procedure is carried out slightly differently than for 8 valves.
- First of all, you need to remove the protection casing.
- Remove the “chip” from the crankshaft sensor and unscrew the bolt. After this, remove the sensor itself.
- The pulley is missing a tooth that allows the crankshaft sensor to find top dead center. In addition, the missing tooth is necessary to lock the crankshaft and tighten the pulley mounting bolt.
- The pulley must be aligned with the hole for the crankshaft sensor. A tube of suitable size or some other suitable object must be inserted into this hole. We block the pulley, unscrew it and remove it.
- We loosen the tension by unscrewing the tensioner nut and remove it.
- We insert a new belt. You can do this in two ways, depending on what is convenient for you. This is done by turning the right camshaft with a wrench or by removing the tensioner roller.
- We fasten the bolt that serves to secure the pulley, then align the marks of the belt drive gear. If there is no mark on the oil pump housing, you can use the flywheel marks as a guide. Afterwards, you can make a mark yourself to make it more convenient.
- We align the marks on the camshaft pulleys, paying attention to the fact that the drive gear marks must certainly match.
- We use a tensioner roller and a special key to tension the part. If you don't have such a key, you can use two nails and a screwdriver or pry bar that needs to be inserted between them. You can also use forks by first removing the two front teeth and shortening the two outer ones to half by bending them. Finally, be sure to tighten the tensioner nut.
- Check the tension by pressing your finger up and down.
- We turn the crankshaft exactly two turns, and then check each mark. If they all match, the pulley can be screwed on. Otherwise, repeat steps 6 – 9.
- After everything is done, we return everything to its place and start the engine.
Installing a new belt according to the marks
To install a new belt, you need to follow these steps:
- Install the camshaft pulley according to the mark. If the work is done on a 16-valve engine, then both pulleys are installed according to the marks, after which they are secured from turning.
- Install the crankshaft according to the mark; to do this, open the inspection window in the clutch housing.
Only if all marks match is the stable operation of the entire mechanism guaranteed. Further actions:
- A new timing belt pulley is installed.
- The belt is located on the crankshaft pulley.
- Threaded through the liquid pump, tensioner pulley, bypass (on 16-valve engines).
- Lastly, the belt is put on the camshaft pulley.
- Using a special wrench, the position of the tensioner roller is adjusted. This changes the tension of the timing belt.
If you don't have a special wrench for the rollers, you can use a screwdriver and two screws or nails. Install them in the holes of the roller, between them a screwdriver, which you use to rotate the eccentric. Use a nut to secure its position.
REPLACEMENT OF ALTERNATOR BELT FOR VAZ 2110 (8 VALVES WITHOUT POWER STEERING)
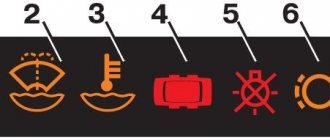
If you hear a whistle coming from under the hood of your car when you start to move away, this will be a signal of weak tension. It will need to be tightened, and if this is not possible, replaced with a new one. If the light on the dashboard changes when you press the gas pedal, the alternator belt should also be tightened.
CHECKING THE GENERATOR BELT Tightness
- The tension needs to be checked. To do this, you need to press on it with your thumb. If the deflection is more than 10-15 mm, the belt should be tightened or replaced if tension is impossible.
- After this, loosen the nut securing the generator to the mounting plate, using a 13mm wrench.
- We unscrew the adjusting flange using a 10mm wrench. This will loosen the tension.
- Pulls the generator to the engine block, then remove the belt, then install and tighten a new one with an adjusting nut.
REPLACING THE ALTERNATOR BELT FOR VAZ 2110 (8 VALVES WITH POWER STEERING)
- Remove the power steering fluid reservoir.
- Using a 13mm wrench, unscrew the generator mounting nut. Please note
that on the VAZ 2110 with power steering there is no adjusting bolt; its work here is performed by the tension roller.
- Clamp the tension roller in its extreme position and slide the part onto each of the pulleys, and then onto the tensioner roller. To do this you will have to make an effort.
- Tensioning should be done when the part is on all rollers and pulleys. Using the handle of a hammer, the tension roller should be pulled back and fixed in the desired direction.
Replacing the VAZ 2110 alternator belt (16 valves with power steering)
In the place where the generator is located in a car without power steering, on a car with power steering there is a special pump, while the generator itself is located slightly higher.
The alternator drive belt passes through the following parts: the crankshaft pulley, the tension roller, the power steering pump shaft and again onto the crankshaft pulley.
The replacement procedure is somewhat complicated by the fact that the belt rotates around the left engine mount.
- To replace a part, you must first unscrew the support, jack up the engine and only then remove it.
- The left engine mount needs to be unscrewed and then the tensioner lowered.
- The support bolt will not fall down because it rests on the power steering pulley.
- We use a ratchet and a screwdriver to loosen the pulley.
- We remove the pulley.
- Raise the engine with a bottle jack without removing the crankcase protection. We insert the jack through a special hole, which is designed to drain the oil in the protection. To prevent the edge of the crankcase from being damaged by the jack, you can substitute a piece of wood.
- If you lift the engine with a wheel jack, you will need to remove the protection from the crankcase. And before removing the part to be replaced, you must first remove the nut from the engine mount.
- Now we pull out the belt through the support.
Before purchasing an alternator belt for a VAZ 2110, you must make sure that there are 6 rivulets, the length of which is 1,115 millimeters. If you do not find this, as an alternative, you can purchase a similar part from a Lada Priora car.
- After this, install the new alternator belt in the reverse order.
Timing brands. installation of timing belt labels using the example of VAZ engines 2110
, 2111 and 2112
Dear friends, today we will tell you about the basics of installing timing marks using the example of a VAZ 16 valve engine. It is no secret that correctly installed timing marks
time are a guarantee of proper engine operation.
If the marks
are not displayed correctly, normal engine operation is prevented.
It is also important to tension the belt correctly, this greatly affects its durability. So, when do we have to deal with the procedure of timing marks? When we need to replace the timing belt for the next maintenance procedure according to the rules, in addition, the rollers will also necessarily change along with the belt in this case. Also, if we have a "covered" pump. The timing belt must be removed as it is what controls our "water pump". Well, if (worst case). we broke the belt. Then, if the engine is "sticky" then this is a huge problem, the piston is matching the valves, and at least removing the cylinder head and replacing the valves is guaranteed to us. So what are the timestamp and where do they apply. The first ones. marks
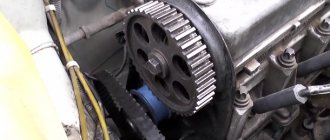
on the camshaft pulleys, both at the inlet and exhaust:
Belt life
The manufacturer promises us that we should start taking an interest in the condition of the belt drive after 50,000 km. Perhaps this is actually the case, but you still need to carry out diagnostic procedures on the belt from time to time, as it can slip. It may also receive the following defects:
- formation of cracks;
- the appearance of swelling on the surface;
- corrosion of the structure due to oil getting on the surface;
- fraying of the ends.
All these defects indicate that this consumable has already served its purpose, and it’s time to replace it with a new one. A broken belt can cause serious problems. Judge for yourself: a break will lead to a collision between the valves and the pistons. Both of them become deformed because of this, which means that serious repairs to the vehicle’s propulsion system will have to be made. Then you will need to fork out money and shell out a tidy sum not only to purchase consumables, but also to pay the labor of the craftsmen who will repair the car.
How to quickly set timing marks on a VAZ 8kl
timing belt replacement
on an 8 cl engine. The belt tension roller was not shown correctly! Everything in the opposite direction needs tension.
They must match the mark on the crankshaft, and there are several methods for calculating this mark
. It is quite difficult to remove the belt pulley alternator (it does not allow you to see the label) and the street to see the marks match.
With such a coincidence, the piston marks are at TDC (top dead center)
And finally, the third option for setting the crankshaft position on the flywheel, they can be seen if you remove the rubber plug on the gearbox:
Here are options for comparing time stamps, we offer you an example of 1.5 16V engines installed on a VAZ2110
, VAZ-2112 and VAZ-2111. If you still have any questions regarding time stamping on your engine. ask them on our forum in the appropriate section.
Every component and part in a car wears out, and the timing belt is no exception. In order for the replacement to be carried out correctly, the car manufacturer indicated in the passport the wear periods for all elements of the vehicle. VAZ timing belt replacement for 2110 and 2112 according to the passport must take place every 45 thousand km. Of course, the indicator is inaccurate, because everything depends on driving style, operating conditions and climate. Experts recommend checking the belt every 10 thousand km.
In this material we will consider the following questions:
- How the timing belt and its elements work;
- Signs of timing belt malfunction;
- Replacement for 8- and 16-valve engines.
Helpful advice! If after 45 thousand you have replaced the belt, but it remains in working condition, then you should not throw it away immediately. We recommend putting it in the trunk or in the passenger compartment, because no one knows what might happen to the car on the road.
How often to change the roller and belt
The recommended replacement rates for VAZ 2114 cars, determined by the manufacturer, define the replacement period as 60 thousand km, but this statement is only true for vehicles under five years old, otherwise this figure should be reduced by approximately 15 thousand km.
The replacement period is also affected by the performance of the liquid pump, with a maximum service life of 90 thousand km. You should not take the original pump under any circumstances, because it will quickly break on its own or “eat” the belt from the outside.
Also, do not forget about the need to replace the crankshaft seals, which also have similar wear measured at 40 thousand.
Broken timing belt
Therefore, taking into account the data described above, we can come to the conclusion that it is necessary to change the belt, adjustment roller and oil seal every 40 thousand km, and after one replacement, install a new pump along with them, if no unforeseen breakdowns have occurred.
Belt operating principle and location
This element is a rubber-metal belt or metal chain. The intake of a mixture of fuel and air, as well as the release of exhaust gases - this is the work of the timing belt. A broken element can lead to costly repair work, which may even require replacing the pistons. In other words, the timing belt is the link between the crankshaft and the camshaft.
When the timing belt of a VAZ 2110 or 2112 is to be replaced, the driver is primarily interested in the location of this element. When you open the hood, you will immediately find a belt with a toothed surface. Its main difference from other similar elements is that the belt covers several pulleys.
Tension adjustment
It is necessary to achieve such a tension at which, without applying much force, the part of the belt between the camshaft and crankshaft pulleys rotates 90 degrees. If this can be done without any effort at all, then you need to tighten the belt more. If you cannot turn the belt, then you need to loosen the tension. In the first case, the belt may slip and the valve timing may shift. In the second - destruction of the bearings, failure of the pump.
Before starting, be sure to check that all marks on the crankshaft and camshaft pulleys match. To do this, rotate the crankshaft 2-4 turns, then double-check that all marks match. If they do not match, then make an adjustment. At this point, the replacement of the VAZ-2114 timing belt is completed, you can begin assembling the unit.
Quite often, when faced with the problem of timing belt wear, drivers turn to service centers for help. But this problem can be solved with your own hands, without spending money or time. Here we will talk about how to replace the timing belt on an eight-valve VAZ 2114 yourself.
The belt rotates the camshaft and synchronizes the operation of the crankshaft and camshaft. Some other components of the mechanism also pass through this transmission. The belt is a closed hoop, on the inside of which there are teeth, with which it engages with the gears. Thanks to this, slippage is eliminated.
When to change the timing belt
First, it’s worth considering the signs that can be felt or visually determined:
- extraneous noises are coming from the engine compartment;
- the exhaust turned black;
- difficulty starting the engine;
- When the motor is running, noticeable vibrations appear.
These signs do not always indicate a malfunction or damage to the timing belt, but if they occur, you first need to pay attention to this element. To check the element, you need to dismantle it: disconnect the negative wire from the battery, remove the plug, then remove the generator belt and six bolts securing the protective cover. After this, you can evaluate the condition of the item.
Replacing the VAZ 2110 or 2112 timing belt is required if you find the following damage:
- rubber delamination;
- there are oil stains;
- the presence of abrasions, cracks and folds;
- bulges, cuts;
- presence of broken threads.
Replacement process - detailed instructions
We will look at options with 8- and 16-valve engines, which are present in the VAZ 2112 and 2110 models. Regardless of the number of valves, the same set of tools will be required for replacement. The list includes standard tools that can be found in almost every driver's garage.
In addition to the timing belt itself and the roller for the VAZ 2110 or 2112, you will need:
- a special key that regulates the degree of tension of the roller;
- spanner set to “17”;
- key to “15”;
- key to “10”;
- installation, as an alternative - a powerful screwdriver.
Replacement on an 8-valve engine
Replacing the VAZ 2110 8 valve timing belt is as follows:
- First of all, we de-energize the battery - for this you need to get the negative wire;
- We unscrew the bolts that hold the timing belt protective casing, and then remove the casing;
- On the passenger side, it is necessary to remove the engine compartment mudguard along with the protective element and the right wheel;
- Our task is to ensure that the marks on the cover and, accordingly, on the pulley match, as indicated in all the diagrams. To do this, you need to twist the part clockwise;
- We go to the gearbox and remove the plug from it;
- We need to check the alignment of the marks in this hole;
- We block the flywheel - for this you can use a mounting tool or a powerful screwdriver;
- Now you can remove the timing generator pulley;
- We got to the nut that holds the timing belt pulley - it needs to be loosened, but not unscrewed;
- Now we have reached the required element of the VAZ 2110 or 2112 timing belt. Now it can be removed. All parts that it covered must be cleaned with detergent. After removing dirt, the area should be wiped with a clean rag;
- Next, a new timing belt and tensioner roller are installed - follow the direction indicated on the arrow. Sometimes it happens that the manufacturer does not indicate the arrows, in which case, you need to place the element so that the inscription is read from left to right;
- To tension, you need to turn the roller counterclockwise.
- The next step is to test the timing belt and its tension. You need to check the element with a cold engine, and the temperature in the garage or box should be within +15-+30C. We start the engine and inspect the timing belt.
If there are no unnecessary sounds or vibrations, then all the elements can be installed back - these are the wheel, casing and mudguard.
Replacement on a 16-valve engine
Despite the fact that there are more valves, replacing the timing belt is no more difficult than on the version with 8 valves. So, replacing the VAZ 2110 16 valve timing belt is performed as follows:
- As in the case of the VAZ 2110 or 2112, where there are 8 valves, we need to dismantle the belt protection. It is held in place by 6 bolts.
- Next, you need to remove the chip from the crankshaft sensor - unscrew the mount and take out the sensor itself. For clarity, you can study the photo.
- If you dismantle the gas distribution mechanism yourself, then you probably noticed the absence of one tooth. This is done so that the sensor can independently find the dead center. This feature can also be used to lock the crankshaft.
- Blocking can be done when a tube of a suitable size is placed in the hole under the sensor. Now the pulley is blocked, as a result, it can be safely dismantled.
- Next, the work scheme is practically no different from removing the 8-valve timing mechanism with your own hands - loosen the roller fastening and remove the faulty or worn belt.
- There are two ways to install a new element: remove the tension roller and then install the belt along with it, or do it by turning the camshaft.
- When the new element is installed, you can return everything to its original position. You should start by fastening the pulley - tighten the bolt and align the gear - the marks on the oil pump will help with this. If they are missing, then you can make a mark yourself.
- The parts must be combined carefully, since the timing gear should not get knocked out.
- Using a special wrench, we must tighten the belt. Not everyone has such a wrench, but as an alternative you can always take a powerful screwdriver and two nails. It is also worth remembering the nut, which must be tightened tightly.
- We check the tension; the rubber should move away from the gears, but there should be no folds.
- All that remains is to turn the crankshaft 2 times and make sure that the marks remain in the same place - the work is completed
As you can see, replacing the VAZ 2112 timing belt is quite simple. The main thing is to allocate time for this. Check the gas distribution mechanism every 10 thousand kilometers, and then you will not have to spend money on expensive repairs.
Timely replacement of the timing belt will prevent its breakage and, consequently, the complex and expensive repairs that will certainly follow. For timely detection of malfunctions in the gas distribution mechanism system, a systematic check of its condition is necessary. For VAZ 2110, 2112, this check must be carried out every 15 thousand kilometers, and replacement of parts at 50 thousand kilometers. There is no need to be lazy and check the condition of the timing belt regularly, which will save you a significant amount on subsequent repairs after it breaks. We check the VAZ 2110, 2112 timing belt for possible defects as follows. We remove the protective cover, having previously unscrewed 6 bolts and inspect it. What should you look for? Signs of a malfunction are cracks, the appearance of protruding threads, wear of the toothed surface, severe abrasion, depressions or various kinds of bulges, as well as the presence of oil on the surface of the belt. If the above listed faults are detected, it must be replaced. Most car owners will prefer to go to a service station and make a replacement there, but if you are not afraid of difficulties, then let’s get started. We replace the VAZ 2110, 2112 8-valve timing belt as follows: 1. Remove the protective casing, the engine compartment mudguard, and the generator belt. 2. Jack up the right side, engage 4th or 5th gear, and rotating the wheel, set the piston of the first cylinder to TDC. To do this, the mark on the camshaft pulley must align with the mark on the engine body. 3. Check the coincidence of the flywheel marks. If the marks on the flywheel do not match, then make another turn until the marks on the camshaft pulley match and check again. 4. Loosen the nut securing the tension roller, and also, by turning the roller, loosen the tension of the timing belt. 5. Remove the belt from the camshaft pulley, roller, and water pump pulley. 6. Then remove the generator pulley. To unscrew the mounting bolt, you need to secure the crankshaft from turning. We remove the plug in the crankcase and, using a pry bar and a large screwdriver, an assistant holds the flywheel by the ring teeth. 7. Unscrew the bolt, remove it together with the washer and remove the generator drive pulley. 8. Remove the timing belt from the toothed pulley completely. 9. Before installing a new one, clean all pulleys, as well as the tension roller, from dirt and grease. If the replacement occurs at 50 thousand mileage, then we also change the roller itself. 10. Installation of all parts of the gas distribution mechanism drive is carried out in the reverse order of removal. The generator pulley is installed so that hole 1 fits onto installation sleeve 2. 11. When installing the timing belt, it is necessary to tension it correctly (see below). 12. Check the performance of the bearing. If, when turning it, you feel jamming, play, or traces of lubricant leakage are visible, then the tension roller must be replaced. 13. To change the roller, you need to unscrew the nut securing it, remove the washer and then the roller. 14. Install the new bearing in the reverse order, with the key holes facing outward.
Replacement
- keys for 10, 13, 17;
- key for rotating the roller;
- flat screwdriver;
- wheel wrench;
- jack;
- a little engine oil to lubricate the tension roller.
1. Place the car on level ground and put it in gear.
2.Using a 10mm wrench, unscrew the bolts securing the timing case.
3. Loosen the generator belt tensioner using a 13mm wrench. Remove the belt.
4. We check the marks on the camshaft gear and the protrusion on the rear cover of the belt housing.
5.If they do not match, you need to turn the crankshaft until they match. This can be done by rotating the front wheel, jacking it up first, or turning the crankshaft with a 17mm wrench using the crankshaft pulley bolt (the gear must be engaged).
6.Behind the 4th cylinder on the clutch housing there is a rubber plug. We open it by prying it off with a screwdriver. Below it you can see the flywheel crown, which also has a mark. It should coincide with the triangular cut located on the crankcase to the left of the flywheel.
7.If they do not match, you need to loosen the tension roller, turn it to the left, thus loosening the belt, and remove it from the camshaft gear.
8.Using a 17mm wrench, turn the crankshaft as described above until all the marks match.
9.We immobilize the flywheel by locking it with a screwdriver in the hole where the plug was located.
10.Using a 17mm wrench, unscrew the bolt securing the generator pulley.
11.Behind it there is a crankshaft pulley onto which the belt to be replaced is placed.
12.Remove the old one and put on the new timing belt, starting with the crankshaft gear.
13. We fasten the generator pulley by putting a belt on it. Let's pull it on.
14. We dismantle the old tension roller, install a new one, lubricating it with oil on both sides.
15. We tension the timing belt by turning the tensioner roller to the right (if there is no special key, you can insert two suitable pins into the holes and secure with a screwdriver or other similar object). The tension should be 1.5-2 kgf. If you don’t have a tool to measure the tension, we do it the old proven way. The optimal tension is when one plane of the belt can be rotated horizontally by 90 degrees by holding your fingers in the middle between the crankshaft and camshaft gears.
How to properly tension the timing belt VAZ 2110,2112
If the tension is too weak, it is possible for the teeth on the camshaft pulley to jump, which leads to a violation of the valve timing. Too much tension can result in rapid wear of the water pump bearings and tension roller. Also, a violation of the adjustment leads to rapid wear of the timing belt. Turn the camshaft pulley by two teeth, the crankshaft in the opposite direction (counterclockwise) to tighten the belt. Checking the tension. If everything is correct, then it should turn 90 degrees from the force of your fingers, between the pulleys, as in the figure: If the tension does not match, loosen the fastening nut and turn the roller counterclockwise about 10 degrees, to loosen it counterclockwise. You should turn it with a special key, and if you don’t have one, insert two drills into the holes and, using a screwdriver, turn it in the desired direction. Hold the roller and tighten the fastening nut. Turn the crankshaft two turns and check the tension, as in the figure above. If necessary, repeat the tension.
It is strictly prohibited to turn the crankshaft by the camshaft pulley.
Replacing the timing belt on a 16-valve engine is carried out in the same sequence as on an 8-valve engine.
- Replacing and tensioning the timing belt VAZ 2110 8 and 16 valves
https://site/wp-content/plugins/svensoft-social-share-buttons/images/placeholder.png
Self-replacement of the timing belt VAZ 2110, 2112 Timely replacement of the timing belt will prevent its breakage and, therefore, the complex and expensive repairs that will certainly follow. For timely detection of malfunctions in the gas distribution mechanism system, a systematic check of its condition is necessary. For VAZ 2110, 2112 this check must be carried out every 15 thousand.
Former flagship of the Russian automobile industry VAZ 2110 with a 1.5 16 valve engine. Scheduled replacement of the timing belt 30,000 km after the last replacement. The autopsy showed that if they had not changed it today, then tomorrow there would have been more work for our mechanic. In general, we recommend that all customers check the condition of the belt at least once every 5,000, or once a year. But knowing the quality of our spare parts, more often is better. On this engine, if the belt breaks, almost all the valves bend. The article is also relevant for VAZ 2112))
We look, remember and don’t let it get to that point.
The patient became five millimeters narrower and generally looked very bad. We send him to the honor board.
And here is the hero of the occasion himself.
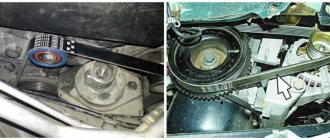
We remove the absorber and power steering reservoir so that they do not interfere in the future.
We loosen the bolt by seventeen, the tension roller of the service belt and remove the last one. It will not be possible to remove it completely because the engine mount is in the way. If the belt requires replacement, you will have to unscrew the engine mount.
Remove the tension roller. We unscrew the bolts securing the upper protective cover; they are hexagonal.
Let's take it off.
Remove the right wheel, plastic mudguard and drain the antifreeze.
We see the crankshaft pulley. Using its bolt, clockwise, rotate the crankshaft until the marks on the camshaft pulleys and the timing belt protective cover match.
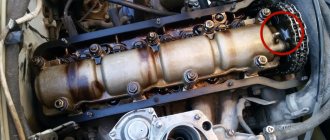
Markings on the left exhaust camshaft. The mark on the protective cover is highlighted in red.
Likewise for the intake camshaft. He's on the right. Its pulley has an inner ring for the phase sensor, so it is very difficult to mix up the pulleys.
Remove the crankshaft pulley. Let's lock the crankshaft with the help of a friend. We put him in the car and force him to turn on fifth gear and press the brake all the way. And at this time, with a slight movement of your hand, unscrew the crankshaft pulley bolt. Remove it and the lower protective cover.
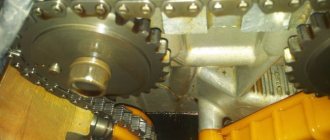
We see that the mark on the sprockets and the slot on the ebb of the crankshaft cover coincide.
Loosen the seventeen bolts of the tension and idler pulleys and remove the timing belt. Then the videos themselves. We change them anyway.
We lock and unscrew the camshaft pulleys and remove them. Remember that the right camshaft has a pulley with an inner ring for the phase sensor. The picture should look like this.
We unscrew everything that holds the protective plastic cover and remove the latter. Unscrew the three bolts holding the pump. They are hexagonal.
And we take it out.
The pump for a sixteen valve engine is slightly different from the usual for an eight valve engine. It has a small threaded ear for attaching the protective casing.
Lubricate the gasket with a thin layer of sealant and put the pump in place. Tighten the fastening bolts. We put the protective cover in place. We make sure that he sits in his place, otherwise he will rub the belt. If everything is in order, tighten everything that holds it and install the camshaft pulleys and new rollers.
We check that the marks on the camshafts and crankshaft match. We install a new timing belt. If there are no directional arrows, put it so that the inscription is read from left to right.
The right, or descending, branch of the belt should be tight. You can turn the right camshaft clockwise a few degrees, put on the belt and turn it back. In this way we will stretch the descending branch. The tension roller has two holes for a special key. You can find it in any auto store. The issue price is 60 rubles. To tighten the timing belt, insert a special key and counterclockwise
turn the roller.
Since there is a lot of controversy about tensioning the timing belt, we will write this: a tensioned belt should not have a sag between the camshafts of more than 5 mm when pressed and 7 mm on the longest branch (specially experimented). Remember: an overtightened belt reduces the service life of the pump, and an undertightened belt can lead to cylinder head repair.
(photo below)
We check all the marks. We turn the crankshaft two turns and check the marks again. If the pistons and valves do not meet and the marks coincide, then accept my congratulations. Then we put everything back in place in the reverse order of removal. Don't forget to tighten the bolts. We tighten the service belt roller with the same wrench as the timing belt tension roller. Fill with antifreeze and start the car. We wish the belt many years of service, but don’t forget to check it periodically; after all, it was made in Russia.
But what happens when the belt breaks on a 1.5 16 valve engine.
Now you can easily change the timing belt on a sixteen-valve engine, your favorite ten.