Replacing the front
To perform this procedure on your VAZ 2114 car, you will need a minimum set of tools, which includes:
- 10mm socket;
- 10mm wrench;
- Mandrel;
- Screwdriver.
We pry it off with a screwdriver.
The replacement work is performed in the following sequence.
- The oil pump is removed from the car. It is not difficult to do this, and it is quite possible to do it yourself.
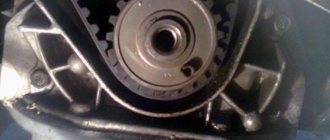
- Next, the oil seal is removed from the cover of this same oil pump. Here you will need a thin screwdriver, which can be used to pry the device and thereby remove it.
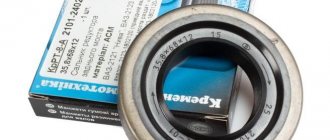
- The new element is pressed in using a mandrel, the outer diameter of which should be about 41 millimeters. In this case, the working edge should be directed inward.
- The oil pump is returned to its place.
Purpose and signs of wear of valve seals
Causes of wear
During the operation of the engine, its crankshaft makes up to 4500-5000 revolutions per minute. During the same period, the valves can perform up to 1200 strokes. All factors indicate a serious level of stress that the seals experience. Therefore, replacing valve stem seals on a VAZ 2114, as well as adjusting the clutch cable , must be done on time.
The first models were equipped with fluoroplastic caps without reinforcement. Later they were replaced with two-component products. This design consists of a steel bushing compressed by a rubber casing. The bushing is fastened with a metal cracker. Thanks to this, the service life of some units reaches 100,000 km.
Signs that repairs are needed
An aggressive chemical environment also has a destructive effect on the seal material. As a result, the rubber hardens and the working edges of the part wear out. Wear is determined by the following criteria:
- The appearance of bluish smoke in the exhaust.
- Increased consumption of lubricants.
- Reduced power and increased fuel consumption.
Replacing the rear
It should be noted that the clutch discs may become oily due to a leak through the gearbox input shaft oil seal, or due to the rear crankshaft oil seal.
The smells of oil from the engine and transmission are different, so many experienced specialists can use the smell to determine which element is causing problems.
Changing the rear oil seal is actually somewhat more difficult than changing the front oil seal. But this does not take away the fact that it is still more than possible to do the work with your own hands.
Disassembled
Following the instructions step by step, replacing the crankshaft oil seal on a VAZ 2114 will become a fairly simple task for you, which will add to your experience in repairing a car yourself.
- Disconnect the negative terminal from the battery of your VAZ 2114.
- Make notes on the location of the flywheel relative to the crankshaft, and then remove it.
- Next, the rear shield of the clutch housing is removed from the guide bushings.
- The next step is to remove the eight bolts that are responsible for securing the oil seal.
- This will allow you to remove the holder.
- The oil seal is pressed out of its holder.
- The new element is installed in place of the old one until it stops. Here you will need a mandrel again. Its outer diameter is 99 millimeters. Press in the element so that its working edge points inward.
- To make pressing easier, a chamfer is made on the seating edge of the element using a needle file. An alternative tool for bevelling is a small sanding wheel.
- Now we change the gasket, which is probably torn on the holder. Even if the old gasket looks fine, we strongly recommend replacing it with a new one.
- The gasket is glued with a special thick lubricant. This will ensure the strength of its retention, as well as additional tightness of the connection.
- The working edge of the pressed-in oil seal is treated with regular engine oil, as is the case with the front one.
- The crankshaft flange is subjected to similar processing.
- The fasteners of the engine oil sump to the cylinder block will need to be loosened slightly. To do this, it is enough to make 2-3 turns on each of the 14 bolts that hold the crankcase.
- When installing the holder, the working edge of the new oil seal is carefully tucked onto the crankshaft flange. Arm yourself with a wooden stick for this purpose, but do not use metal objects.
- Retighten the holder bolts.
- Screw back the engine crankcase mounting bolts.
- Place the clutch housing rear shield back onto the guide bushings.
- According to the previously marked places, mount the flywheel, gearbox and clutch in their place. To ensure that the flywheel mounting bolts have high quality adhesion and reliability, first apply sealant to their threaded part.
Obviously, it is quite possible to replace the crankshaft oil seals on a VAZ 2114 car with your own hands. The procedure requires accuracy and consistency of actions. Plus, do not forget to use new high-quality auto parts, so that after a short period of time you do not have to carry out the entire procedure again.
Source: luxvaz.ru
Replacing the front crankshaft oil seal. VAZ 2108, 2109, 21099, 2113, 2114, 2115
We hang up the right front wheel and remove it. Drain the oil from the engine crankcase.
| Using a 10mm wrench, unscrew the four bolts securing the front protective timing cover. | . and remove it. |
| Using an “8” wrench, unscrew the six bolts securing the right half of the lower engine protective casing and remove it. | Using a 17mm wrench, loosen the nut securing the generator to the tension bar and, moving the generator, remove the drive belt. |
| We engage first gear and use a 19mm wrench to unscrew the bolt securing the pulley to the crankshaft. | Remove the pulley from the crankshaft. |
| Before removing the timing belt, align the timing marks on the camshaft pulley and the rear protective cover by rotating one suspended front wheel with 5th gear engaged.
| Use a 17mm wrench to loosen the bolt securing the tension roller. |
| . and remove the timing belt. | Using a 10mm wrench, unscrew the four bolts securing the lower clutch housing cover and remove it. |
| Using a 10mm socket, unscrew the 16 bolts securing the oil pan to the cylinder block. | . and remove the crankcase along with the gasket. |
| Using a 10mm wrench, unscrew the bolts securing the oil receiver to the pump housing and the cover of the second main bearing; remove the oil receiver. | Use two screwdrivers to move and remove the toothed pulley from the crankshaft. |
| Use a screwdriver to pry up the key and remove it from the crankshaft groove. In this case, we act carefully, the key is small and quite insidious - it is easily lost. | Using a 10mm wrench, unscrew the six bolts securing the oil pump to the cylinder block. |
Replacing the front crankshaft oil seal VAZ 2113, 2114, 2115
The crankshaft oil seal is a sealing ring that is located at the junction of the crankshaft and the engine block. Over time, it dries out and begins to leak oil, which leads to increased consumption and leaks on the engine. The malfunction is not critical and requires immediate repair, but you should not delay replacing the oil seal on a VAZ-2114 with an 8-valve engine.
Reasons for replacing the crankshaft oil seal
The internal combustion engine design has 2 sealing rings on both sides of the crankshaft. They prevent oil leakage from the crankcase while the engine is running. Cars of the VAZ-2114 and 2115 family have the same VAZ-2111 engine. The seals themselves are located under the timing belt protective cover and in the clutch housing on the gearbox side.
The cause of leakage may be a malfunction of the crankcase ventilation system. This often happens due to clogged hoses. In this case, excess pressure causes engine oil to leak through the seal, especially if it is already old.
Common causes of wear are:
- low quality o-ring material;
- incorrect installation of the oil seal in the seat;
- damage to the rubbing surface due to mechanical scuffing of the shaft;
- natural aging and loss of elasticity due to long service life.
A strong leak from the rear oil seal is noticeable by the clutch slipping when starting to move and when changing gears.
Necessary tools for work
The VAZ-2114 crankshaft oil seal is replaced in a garage or car service center. You can change it yourself if you have minimal plumbing skills and the necessary tools:
- jack and reliable support for lifting the car and hanging the internal combustion engine;
- wheel anti-roll bars;
- set of socket heads from 10 to 27;
- open-end and ring wrenches;
- slotted screwdriver;
- hammer;
- container for draining used oil from the engine sump;
- special graphite lubricant;
- automotive sealant;
- rags or wipes.
Repairs are best done by changing the engine oil and cleaning the crankcase. In this case, you will need a can of fresh oil, an engine sump gasket, an oil pump cover gasket, and a new front oil seal.
Important! Carry out the work on a lift or in an inspection pit. If they are absent, it is enough to raise the front part of the car as high as possible and install it on reliable supports, for example, cuttings of sleepers or cinder blocks. It is strictly prohibited to stand under a machine mounted on a jack.
Step-by-step dismantling
Let's look at how to change the engine oil seal of a VAZ 2114 with an 8-valve engine.
The work order is as follows:
- Place the car on a level surface, support the rear wheel with stops. Set the gearshift lever to the neutral position, remove the front right wheel and engine protection. You can remove part of the fender liner for easy access to the front engine cover.
- Under the hood, unscrew the bolts securing the timing belt protective cover. Loosen the generator and remove the generator drive belt.
- Set the valve timing marks on the camshaft and crankshaft. To do this, rotate the crankshaft with a socket wrench until the arrows on the pulleys align with the special ebbs on the body. This corresponds to the position of the first piston at TDC.
- Before removing the timing belt, loosen the tension roller and unscrew the bolts securing the upper and lower sprocket. Inspect the belt for damage and traces of oil. Change if necessary.
- Drain the oil from the engine and unscrew the pan. It is secured with 16 10mm wrench bolts. Remove the clogged oil receiver and clean thoroughly.
- Using a 24mm socket, unscrew the pulley mounting nut, to do this, secure the crankshaft itself. Under the pulley there is an oil pump, into the cover of which the front engine oil seal is pressed. It is secured with six 10mm bolts.
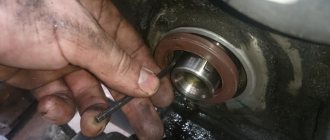
- Remove the oil seal from the seat using a flat screwdriver or carefully press it out with a socket of a suitable size.
Installing the crankshaft oil seal
Now you can replace the crankshaft oil seal on the VAZ-2114 with a new one:
- Wipe all seating surfaces on the removed parts with a rag and remove traces of old gaskets and sealant.
- Carefully press the new oil seal into the cover by lightly tapping it with a hammer, after lubricating the installation site with engine oil. A 32mm head or a bushing of similar diameter is suitable for installation.
- Install the front cover with the oil pump first, then the engine sump.
- Screw on the pulley, align the timing belt to the marks, and adjust the tension. After this, be sure to rotate the crankshaft 360 degrees to ensure that the marks are aligned correctly.
For an 8-valve engine, replacing the rear oil seal is more difficult: you need to disconnect the gearbox, left drive and remove the clutch assembly. The operation is labor-intensive, so it is better to combine it with replacing or repairing the clutch. As practice shows, the service life of the rear oil seal is longer than the front one, so there is no need for frequent replacement. Otherwise, the replacement procedure is similar to that described above.
Crankshaft oil seal
Today we will talk in more detail about the crankshaft oil seal, a spare part that is designed to seal (seal - approx.) connections in this moving part of the engine, as well as prevent engine oil from leaking . Below, we will describe in detail how to replace this element as quickly as possible.
Signs of crankshaft oil seal failure
The very first and main sign of failure of the crankshaft oil seal is considered to be the loss of its tightness.
Oil leak due to leaky crankshaft oil seal
And if in the case of oil seals on other engine elements it doesn’t look so bad, then if there is a malfunction on the crankshaft, oil can leak from the system in liters per 1000 kilometers.
Main causes of wear
- Wear and tear due to natural reasons due to expiration of service life.
- Incorrect installation of the oil seal in advance can cause cracks on its surface.
- Mechanical damage.
- The material is not original, made in violation of production technologies.
Please note that with an increase in oil consumption, due to leaks of the crankshaft oil seal, traces of oil will certainly be observed under the car; they are clearly visible and will not leave any owner unnoticed.
Also think about the presence of oil seal leaks and slight slipping of the clutch. This effect can be observed due to oil getting on the clutch disc and basket located near the gearbox.
Signs of a leaking crankshaft oil seal
The main sign by which ordinary VAZ 2114 owners and illiterate servicemen “sentence” oil seals is an oil leak. Indeed, an oily sump and block on the timing side are a sign of a front oil seal leak, and leaks in the flywheel area are a sign of a rear seal leak. But there are two “buts”.
Signs of oil leakage through the front oil seal
Firstly, oil leaks can be caused by other reasons, and, secondly, leaking oil seals can be a consequence of a more serious malfunction.
Common causes of oil leaks around the seals include:
- Oil pressure sensor or oil filter bracket: Oil may drip from them onto the drive and scatter around.
- Leaking from the oil channel plug under the cylinder head casing.
- Leaking from the camshaft seal.
- A special feature of the VAZ 2114 with an 8-valve engine: the hole of the first manifold stud on the front side of the engine passes through the oil channel. When replacing the gasket on the inlet, this pin must be lubricated with sealant, otherwise a leak will occur.
Often problems with seals are symptoms of other problems. If the leak appears again soon after replacement, it may be due to poor quality consumables, or may be the result of the following problems:
- The breather is clogged (important for VAZ 2114 engines with high mileage - more than 200 thousand kilometers), and the oil seal is squeezed out by crankcase gases. When replacing, it would be useful to remove the valve cover and clean the filter mesh.
- The rings are stuck. Another reason for oil squeezing out through the oil seal. In this case, additional signs will be uneven compression and oil leaks from the dipstick.
- If there is play in the camshaft, the oil seal can be squeezed out by the shaft itself when the clutch is pressed. One of the saddest cases: the solution is engine capital.
Another reason for a leak from the oil seal may be the filling of low-viscosity oil. Follow the manufacturer's recommendations for oils for the VAZ 2114.
In any case, along with replacing the seals, it is better to check the condition of the components that may be associated with their leakage.
Step-by-step process for removing the front oil seal
- Before starting work, you need to prepare a set of tools and wrenches.
- Make sure that the car is installed on a level surface and that wheel chocks are installed under the wheels.
- First of all, open the hood and remove the timing belt protection.
We remove the timing case
We combine according to the marks as in the picture
Here we also combine
Removing the timing belt
This work should be carried out very carefully.
Place the old oil seal aside.
Step-by-step installation process
- When installing a new spare part, first lubricate it with oil and, using an old ring or pipe of the same diameter, press it into place.
A socket head is suitable for fixing.
Expert advice
When replacing valve stem seals on a VAZ-2114 (8 valves), experts recommend paying attention to important nuances:
- Before installation, new seals should be fitted with guides on the bushings that are included with the valve stem seals;
- after installing new oil seals, be sure to remove the guide bushings;
- as soon as the oil seal is installed in its place, you need to put on the spring;
- the replacement procedure should begin with the second valve of the cylinder, then move on to the fourth, etc.;
- after replacing the oil seals, the crankshaft must be rotated 180 degrees;
- after installing the camshaft, the nuts are made from the middle to the edge;
- All actions when replacing oil seals must be carried out clearly and accurately.
If you yourself are not sure that you will be able to correctly replace the valve stem seals yourself, then you can always turn to the nearest car service center for help.
In order for the VAZ-2114 oil seals (8 valves) to have good performance, experts recommend using high-quality motor oil. Poor quality engine oil can cause carbon deposits to accumulate in the cylinders, which will lead to a drop in compression.
Step-by-step process for removing the rear oil seal
If no special experience is required when replacing the front oil seal, then to work with the rear oil seal, an assistant and a more thorough study of the technical component of the car may be required.
- When carrying out such work, it is necessary to do all the above points from 1-12.
- Next, you need to move on to dismantling the gearbox and clutch.
- When the clutch is removed, unscrew the four bolts that secure the flywheel, and then remove it.
- Then, when access to the oil seal is open, you can dismantle the housing in which it is located, or replace it directly in it.
- We remove the sealing ring from the place where it is fixed.
We install the new part and perform the entire assembly in the reverse order.
Upon completion of assembly, start the engine and pay attention to the presence of oil leaks at the places where they are installed.
What to do in such cases?
As mentioned above, one of the likely problems may be incorrect installation of the element. In particular, if the inner side of the rubber band is bent, then liquid can flow through it. Thus, the element only needs to be changed, despite the fact that it is relatively new.
Replacing the rear oil seal
- Dismantle the gearbox (use the operating manual for your vehicle to do this).
- Then take a screwdriver or any other object with a sharp tip, a regular knife will do. Remove the failed oil seal. Be careful with the work surface when doing this.
- Clean the surface of the crankshaft. Please note that this can only be done with a rag. Some “craftsmen” clean the crankshaft with sandpaper. Under no circumstances should this be done, as this will cause the crankshaft to fail faster.
- Install a new oil seal in place of the old one.
- Install the gearbox.
Replacing the front crankshaft oil seal on a VAZ 2113, VAZ 2114, VAZ 2115
The car has two crankshaft oil seals located at opposite ends. It's easier to remove the front oil seal, but with the rear one you'll have to tinker a little more - remove the flywheel, then the oil seal holder, and only then knock it out and replace it with a new one. Few people decide to replace the rear oil seal - the process is quite labor-intensive and requires certain skills. In our article today we will talk about the front, where there are no particular difficulties, the main thing is to remove the crankshaft pulley and remove the oil seal from the oil pump cover.
Video instructions for replacing the crankshaft oil seal on a VAZ-2114
What to do if you notice a lubricant leak from the crankcase of a VAZ-2114 engine?
First of all, we recommend opening the timing cover and making sure that the front crankshaft oil seal is intact, which is what causes this problem most often. To eliminate it, it will be enough to replace the worn or damaged part. How to perform the replacement procedure? You can do this in two different ways. You can simply remove the cuff using a screwdriver, without dismantling the oil pump, and install a new oil seal in the same way. This method does not take much time, but requires extreme care and at least minimal experience in auto repair.
If you are not sure that you can carefully remove the part without damaging the surrounding components, it is better to go the way that the manufacturer recommends. We will describe this in detail below.
Replacing the front oil seal on a VAZ 2113-VAZ 2115
Note! Before replacing the oil seal, make sure that the problem is there and not caused by the crankcase ventilation system. It’s just that this system becomes dirty over time and oil begins to be squeezed out through the seals. We recommend that you read more about this topic in the article: “Cleaning the crankcase gas system on a VAZ 2114.”
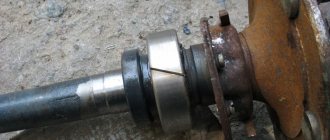
Removal
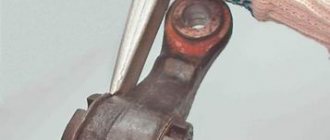
First, you need to remove the timing belt from the pulleys (for instructions, see the publication: “Replacing the timing belt on VAZ vehicles”). Then, using two small screwdrivers, carefully pry off the crankshaft toothed pulley (photo 1). Behind you will find an oil seal; just pry it out with a screwdriver and remove it from its seat (photo 3). However, there is a metal key on the crankshaft (photo 2, indicated by the arrow). It is advisable to carefully pry it with a screwdriver and remove it, or make sure that it does not fall and get lost. The key keeps the pulley from turning; the part is important, so if you lose it, go to the auto store for a new part.)
Installation
The main thing is to lubricate the oil seal with the engine oil currently poured into the car engine. It is not the entire oil seal that needs to be lubricated, but only the working edge - the place where the oil seal sits on the shaft. Then take a small piece of pipe or a union head of a suitable diameter and, with their help, the oil seal is pressed inside (photo 4). After installation, thread the oil seal with a thin, but not too sharp, pencil. Check whether the part is installed well.
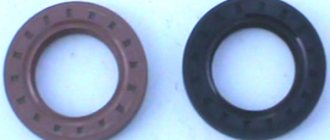
Note! During installation, do not make the wrong side, otherwise the seal will leak. The oil seal has a front one with a spring, indicated by the letter B, and a rear one. The front one should be tucked inward, and the rear one should be directed outward.
2. After the work has been done, put the pulleys in place, the keys, and also install the timing belt. Adjust the belt tension using the tension pulley and start the car. First of all, pay attention to the place where you installed the oil seal - there should be no leaks. Add oil to the car engine up to the MAX mark, drive for a while, and see if the oil goes away quite quickly. No? This means the oil seal is installed correctly and nothing is leaking through it.
Note! If after replacing the oil seal the leak does not stop, then either it was installed incorrectly or there is a problem in the lubrication system, because there is more pressure in it.
Additional video
We have attached video material on the topic of today's publication, we recommend that you read:
Source: vaz-russia.com
Auto repair school – DIY car repair
Jun 21, 2021 VAZ 2108, VAZ 2109, VAZ 2110, VAZ 1117 Kalina, VAZ 2170 Priora by admin
Is the front wheel drive seal leaking ? Thoughts like: How expensive is it to replace an oil seal? Is it possible to replace the oil seal with your own hands? And how difficult is it to replace it? Yes!? Then you have come to the right place... I can say for sure that it is not difficult, and you can easily carry out the work yourself. Of course, only if you have the desire, the necessary tools and precise instructions for correctly replacing the front wheel drive oil seal on VAZ-2108, VAZ-2109, VAZ-2110, VAZ-2115 from the Auto Repair School website! ))) Well, as they say, from words to deeds! Let's move on to the description of the main thing - a list of tools, purchasing spare parts and the process of replacing the drive seal with photographs