Every tire driver knows that the only sensor without which the car will not start is the DPKV.
Therefore, the specified item must be included in the spare parts and accessories.
Story one: shorty 3D, summer, heat, forest, 150 km to a spare parts store, there is nothing in the spare parts store except a knife, a screwdriver and a couple of keys, a sudden loss of power and a minute later the engine stalled... a check popped up... there is pressure in the ramp, the engine does not start, if you let it cool for about 10 minutes, it starts, does not develop power and stalls again... there seems to be a spark... they let the engine cool... they disconnected all the sensors one by one, but there were no changes in the behavior of the engine... I noticed a build-up of dirt on the DPKV, I cleaned it with a knife - the engine started and worked perfectly for the rest of the time, similar problems began in the city, but after replacing the DPKV with a new one, they did not recur.
Story two: another short 3D, a sudden loss of power and, as a result, the engine stalls, and so on many times, the engine works fine when it cools down, when it warms up, it can go for a month without problems, it can stall 10 times in one trip, there are no errors, diagnostics are powerless ... it was accidentally discovered that the DPKV connector was half dead...
In general, it is clear that the crankshaft position sensor is an extremely important and necessary element in the engine, and it is even better when there are two of them: one on the engine, and the second in the trunk))
I cleaned the DKPV on my shniva a year ago. The engine mileage is already more than 110,000 km, so I decided to install a new sensor and put the old one in the spare parts.
I bought a new DPKV and installed it.
The main thing is to replace the existing screwdriver bolt with a 10 mm wrench bolt.
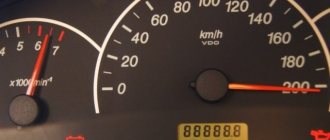
After the replacement, I didn’t drive the car for a week, but over the weekend I was able to evaluate the difference before and after replacing the DPKV. It would seem that a zero/one type sensor cannot lie, it either works or it doesn’t... But with the new DPKV, the car began to accelerate faster and fuel consumption dropped by 1.5-2 l/100 km. For comparison, when driving on a flat road with the old sensor, the instantaneous consumption was 11.5-12 l/100 km, and with the new sensor it became 9.5-10 l/100 km. I don’t know why there is such a big difference, maybe something else introduces an error in the comparison, but the car has become easier to move.
Some lyrics
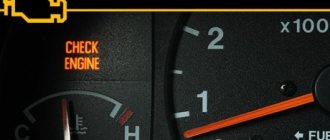
Cars with injection, which is the Lada 4*4 or Niva, have many different sensors that are responsible for the operation of the entire car. The failure of one of them seriously affects the operation of the entire power plant. As a rule, a breakdown of the sensor leads to the lighting of the lamp on the “CheckEngine” dashboard, but the sensors have one problem: they do not fail immediately, but gradually and can give incorrect readings to the engine control unit, which will certainly lead to unstable operation of the internal combustion engine.
As a rule, failure of the sensor does not stop the car completely, but only puts the internal combustion engine into emergency mode. In this mode, the car can safely drive to the nearest service station, where it will be put in order.
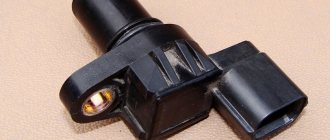
But, there is one sensor that is responsible for reading and the state of the crankshaft position (CPCP); a breakdown of this sensor completely stops the internal combustion engine and makes it impossible to start until the cause is eliminated.
It should be noted that checking the sensor and signs of malfunction are similar to the Chevrolet Niva.
In this article we will talk specifically about the DPKV, namely its location, signs of malfunction, methods of checking and replacing.
Recommendations for care and maintenance of the controller
- strictly comply with the car manufacturer's regulations;
- do not violate the terms of technical inspection, even when the factory warranty has expired;
- buy and install mainly original parts, the catalog numbers of which correspond to the factory markings;
- Carry out the installation work yourself if you have sufficient experience, otherwise use the services of professional workshops;
- Do not install parts or accessories from other technical equipment, even if they are similar in appearance. Full functionality is not always guaranteed.
The average service life of the DPKV is 80,000 km or more.
Examination
Checking the sensor is carried out in two stages: visual inspection and testing using a device. The check must begin with a visual inspection of the sensor and its power circuit.
Visual inspection
The sensor may stop transmitting readings due to contamination or an open circuit. Therefore, it is necessary to inspect the sensor for contamination and the power circuit for open circuits. The power circuit is also made of a special shielded wire, which helps protect signals from interference or current leakage. The slightest damage to the insulation can lead to unstable operation of the sensor.
The sensor also has a magnetic part, on which metal shavings often stick, which contributes to poor reading by the sensor.
Testing with the device
Checking the DPKV can be carried out using a special diagnostic tool or a Chinese ELM327 scanner, via ADC channels. These devices can also replace a regular household multimeter. Let's consider checking the sensor using a multimeter.
Although this test does not give a 100% result, it still makes sense to carry it out.
- We switch the multimeter switch to the resistance measurement parameter.
- We connect the probes of the device to the sensor and look at the readings
- The device should show a value from 500 to 700 Ohms
Such parameters are characteristic of a good, serviceable DPKV.
Symptoms of DPKV malfunction
- Difficulty starting the engine “hot” or “cold”;
- When moving downhill, detonation occurs;
- Idle speed is unstable;
- Motor power decreases periodically;
- Acceleration dynamics are passive;
- Sudden engine stop.
However, these symptoms are signs of a number of other breakdowns. It is extremely important to conduct comprehensive diagnostics using digital equipment.
| Name / catalog item | Price in rubles |
| VAZ 21214-2123 OMEGA 173882 | From 350 |
| 2112-3847010 | From 350 |
| 21120-384701004 | From 350 |
| 21120-384701036 | From 350 |
Replacement
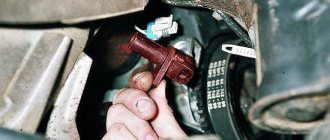
Replacement is quite simple and does not require any car repair skills.
- To replace it, you just need to remove the negative terminal from the battery;
- Remove the connector from the DPKV;
- Unscrew the sensor from the bracket;
- Pull out the sensor, install a new sensor in its place and reassemble in the reverse order.
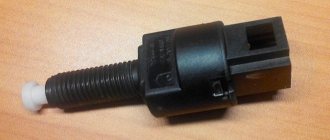
Crankshaft position sensor - DPKV
crankshaft position sensor
The task of this sensor is to read the revolutions of the engine crankshaft and whether it is spinning at all. Perhaps the only sensor that I recommend keeping in your car’s first aid kit (so as not to get lost) as a spare. This is the only sensor without which the injector will not start in principle. Without the rest, the engine will sneeze like a sick person, hiccup, fart, blink the check engine... but rattle. Which means it’s bad, but go. Without DC there will not even be signs of life. Therefore, we will consider it, in medical terms, as setting the heart rhythm. I’ll tell you a little secret, if you are leaving somewhere or leaving the car in a bad place, open the hood and slightly disconnect the DC connector. It is difficult to imagine a more effective anti-theft. The main thing is not to forget about it yourself))
Causes of premature wear
Possible causes of malfunction:
- The technical element was used for a long time and no preventive measures were taken.
- Manufacturing defects.
- Mechanical damage.
- Sand, chips, or dirt has gotten inside the sensor.
- There is a break between the crankshaft teeth.
- During the repair, the mechanism was damaged.
- A short circuit occurred in the on-board circuit, and the element burned out under the influence of high voltage.
Symptoms of malfunctions may appear as a result of other unfavorable situations , therefore, before starting various types of manipulations with the DPKV, it is recommended to eliminate possible problems. Operational failures may occur periodically. In this case, it becomes necessary to diagnose the car.
What is chip tuning for a Chevrolet Niva car and why is it needed?
Technological progress has not bypassed the domestic automaker; the presence of an electronic control unit (ECU), which processes information received from numerous sensors of the power unit at the software level, is now an indispensable attribute of any vehicle. For the first time, VAZ all-wheel drive cars received electronic filling in 2003.
- from 2003 to 2006 – Bosch MP 7.0 with 55-pin connector;
- from 2006 to the present - Bosch7.9.7 with an 81-pin connector;
- from 2012 on cars with an electronic accelerator - BoschME 17.9.7.
The last two hardware implementation blocks already comply with Euro 3-5 standards, but this is not the point - none of the controllers were developed specifically for Niva engines. The blocks were adapted to certain conditions by Bosch engineers, which indicates average operating parameters that are far from ideal. Therefore, some car enthusiasts decide to correct the ECU software to achieve the following goals:
- change in idle torque;
- modernization of internal combustion engine performance: fuel savings, increased power and dynamics;
- elimination of the catalyst while maintaining Euro 3 and Euro 4 standards;
- minimizing the influence of an operating air conditioner on the power parameters of the motor;
- getting rid of jerks associated with changing gears or sharp pedaling.
How to replace the crankshaft sensor with your own hands in a Niva Chevrolet
To replace a faulty sensor, you should first prepare the tools :
- Wrench number 10.
- Extension for the wrench.
- Collar and head.
- Dilapidated material.
- Local lighting (if necessary).
- New sensor.
- Phillips screwdriver.
Work algorithm:
- Place the car on the inspection hole.
- Secure wheel movement with wheel chocks.
- Apply the parking brake.
- Remove 6 bolts from the bottom of the car designed to secure the metal protection of the oil pan.
- Pry up the block with a screwdriver, remove it and move it to the sides.
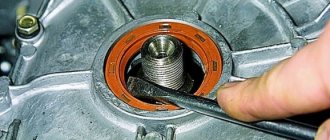
- Unscrew the fixing screw from the sensor.
- Remove the controller.
- Inspect the planting site, wipe it, clean it from dirt.
- Replace with a new controller.
- Assemble the structure.
Attention! When disassembling and assembling, follow safety requirements and ensure that the tool is in good condition: the metal should not be chipped, the handles should be tightly seated. Carry out work wearing safety glasses.
Lada 4×4 3D › Logbook › Injector part 4.0. Installation of sensors. First launch and first problems.
So, in the previous series the engine became fuel-injected and the work on the hardware was completed.
Now it's time for the sensors. All sensors were transferred from the donor six engine and installed in standard places without any fuss. If the standard places were missing, then they were also unscrewed from the donor and the sensor was transferred with the standard place. Thus, the crankshaft position sensor was moved along with the front engine cover. It was for the sake of such small conveniences that the donor engine was bought assembled. Otherwise, they wouldn’t even remember about such things as the distributor plug or the receiver holder piece and would be too lazy to go to the store to get it, and there they would spend a long time explaining what it’s called correctly. And just like it’s easy to assemble from the picture - I unscrewed it from one engine and screwed it onto the other with the same bolts.
Even when installing the snorkel, the intake was organized on the basis of an injection air filter and 214 pipes attached to the Moskvich turtle, which were put on the carburetor, so there was no need to finish anything. Previously, the housing of the non-working mass air flow sensor was used as an adapter to the air filter housing, but now the non-working one was thrown out and installed by Siemens.
A small jamb came out with the DPKV bracket. One night the alternator belt broke. I have the generator upstairs, so I loosened the mounting nuts, brought everything into the close position and put on the new belt. I was in a hurry, it was a 5-minute drive to the garage, so I didn’t really tighten or tighten anything - it didn’t whistle, I turned the pump and it was fine, then I tightened all the nuts.
It turned out that in such a loose state the belt rubs the DPKV bracket. And it turned out that the KAMAZ belt is stronger than the VAZ piece of iron.
The oxygen sensor is installed in the usual way - on a welded nut. The injection ignition module and corresponding spark plugs were installed earlier when installing the underwater ignition. The gas pedal with cable had also been in place for a long time, so no further modifications were needed.
In the meantime, they were transferring sensors to me, I had to go buy an ECU. I had to go to get him to the homeland of all Lada cars - Togliatti. The ad indicated the required January 7.2 21067-1411020-11 - no collective farm was planned, the scythe and sensors were 21067, which means the brains would be the same.
I come to Tlt to the seller, and he says those from the ad are not there, but there are others that will suit you. An ECU is pulled out of the heap, and the piece of paper with the markings on it is torn off. We'll check that they're working, look at the name on your computer and everything will be fine. Okay, I say, show me. He connected it to some box with light bulbs, he himself comments - the light came on, this is the ignition, here is the fuel pump, these are the fans, but everything went out - he turned off the ignition. It’s interesting, it’s clear, but I think it’s overpowering me.
I twirled the ECU in my hands - it seemed clean and not flooded. I say that I’m buying, but if it doesn’t work or doesn’t fit, then I remember the address, driving next to me is not buying from Avito by mail. I’ll tell you in advance - the ECU came up and the worker turned out to be, I would recommend the seller, but there were no contacts left.
The length of the braid was enough to hang the ECU in the glove compartment. Or behind him. But in the end they placed it behind the instrument panel. And it doesn’t take up the glove compartment, and it will be convenient to visually control the water level so that the unit doesn’t flood. The diagnostic connector is brought to the place of the leak.
I decided to save money on replacing the gas tank, especially since mine had recently been washed to remove sand and rust. Therefore, the fuel pump was installed externally, the most affordable one - Volgovsky gas 3110. I took it immediately assembled, on rubber feet, not so that I was afraid of vibration, but to make it easier to install. Installed under the hood, above the VUT bracket, i.e. above the level of the gas tank.
That's basically all the alterations. You can run it.
Whether it started up the first time or the tenth time, I don’t know, I wasn’t there. But the next day it started up the first time and worked normally - I remind you that the firmware was not changed, it is standard classic.