Probably every experienced owner of the fourteenth model has encountered a yellow icon in the form of a cup with a scale burning in the signal lamp block. This is the coolant light on the VAZ 2114. This article is dedicated to those who encountered this problem for the first time and those who have already solved it.
The on-board control system warning lamp unit is located to the driver's right above the central ventilation system nozzles.
It is a narrow plastic panel with seven indicators:
- - little oil;
- -insufficient level of windshield washer fluid;
- -low coolant level;
- -one of the doors is unlocked;
- - there is a malfunction of the brake lights and dimensions;
- - pad wear;
- -belts are not fastened.
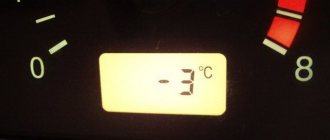
You saw the light on and, first of all, checked the fluid level in the expansion tank (usually it can be seen through it). On a cold engine, the antifreeze is located exactly between the minimum and maximum marks, and the light is still on. This indicates that the VAZ 2114 coolant level sensor is not working.
How to check the coolant level sensor on a VAZ 2114
- Disconnect the electrical connector (latch) from the sensor.
- Unscrew the sensor from the tank.
- Close both terminals of the sensor into an electrical circuit with a 12 V current source and a control light.
- When the float is lowered down, the light should be on, when raised up it should go out.
If the “control” showed that the reed switch sensor is faulty, then there are three possible options for resolving the situation.
BUTTONS ON THE INSTRUMENT PANEL
In the center of the dashboard there is a row of five buttons:
Buttons
The description of the VAZ 2114 instrument panel buttons is as follows:
- Turning on/off side lights. When the lights are on, the light turns green;
- Button to turn the headlights on and off;
- Turn on/off the front fog lights. In order to turn on the fog lights, you must first turn on the side lights;
- Turn on/off rear fog lights;
- Turning on/off the heated glass on the tailgate fourteenth.
Replacing the coolant level sensor
Unfortunately, plastic sensors often break, and it even happens that newly installed new elements fail. This is a sore spot of the VAZ 2114, so in subsequent models (such as Granta, Priora) they were completely removed. You can do the same.
To no longer deal with broken sensors, buy a new expansion tank with only a cap and install it in place of yours. And you either remove the wires from the mounting block chip, or simply insulate them and leave them as is.
- Go to the store and buy a VAZ 2114 coolant level sensor (90 rubles).
- Disconnect the terminal from the battery.
- Remove the block from the old sensor.
- Unscrew it from the tank.
- Screw in a new one.
- Connect the block and place the terminal on the battery.
Spark plugs, BB wires, coil
If a VAZ-2114 car stalls, the “check” is on, or the engine “troubles” at idle, you need to pay attention to the ignition system. The main elements are spark plugs and high-voltage wires
Often on domestic cars there is a breakdown of spark plugs or wires. It is necessary to check these elements for serviceability and replace if necessary. The best way to check is to install a pre-made set of spark plugs or wires.
This way we can narrow down our search. If even one spark plug is faulty, it is better to replace the entire set. Otherwise, there is a high probability that the breakdown will happen again, only on a different cylinder. It is also recommended to check the spark plug gap between the central and side electrodes. Over time, this gap increases. The normal value should not exceed 1.3 millimeters. If the gap is larger, it can be corrected by bending the side electrode closer to the central one. If the distance between the electrodes is too large, a spark is difficult to form. Part of the fuel mixture will simply go into the air. Typically, the service life of spark plugs is 20 thousand kilometers. Some people install iridium ones because they last longer. But as motorists say, there is no point in overpaying. The characteristics of the internal combustion engine will remain the same, and the cost of such spark plugs is equivalent to three or four sets of regular ones, which are no worse.
Less often on a VAZ, the ignition coil itself fails. At the same time, the “check engine” lamp lights up on the instrument panel. The engine may stall, start poorly, or stall. The coil cannot be repaired and must be replaced completely with a new one. As for the wires, you can check them by measuring the resistance.
Symptoms of a faulty coolant sensor
First of all, it must be said that checking the sensor always begins with some reason. Firstly, the temperature gauge needle shows an overestimated value, which indicates a malfunction of the cooling system. The second, subsequent reason is the engine cooling fan not working.
The fact is that the sensor analyzes the coolant temperature and sends a corresponding signal to the engine controller, which turns on the fan. If it doesn't work, it makes sense to check it first. To do this, its chip is disconnected and connected directly to the battery. If it works, then the sensor is faulty.
Another sign is the lack of temperature information on the on-board computer or a signal that the engine has overheated. After this, it 100% makes sense to check the coolant temperature sensor.
Many drivers confuse two sensors - the temperature gauge sensor and the fan switch sensor. In fact, they are completely different, but with the same principle of operation.
Causes of malfunction
Arrow stuck on dashboard
It’s probably no secret to anyone that the arrows hanging on the dashboard are inextricably linked with the electrical circuits in the car. To troubleshoot the problem, the car enthusiast will need some knowledge of auto electrics, as well as design knowledge of the VAZ-2114.
As practice shows, most motorists, when such a breakdown occurs, turn to a car service center, but this problem can be eliminated on their own. But, first of all, it is necessary to find the immediate cause of the effect.
What are the options?
So, let's look at the possible options for the engine temperature indicator arrow to hang on the dashboard:
- The magnetic motor of the pointer drive is broken.
- Breaks and disturbances in the operation of the electrical circuits of the dashboard.
- Short circuit in the circuit board of the device itself.
- Freeze related to temperature sensor.
- Problems with the ECU.
Elimination methods
Once the root causes have been identified, you can move directly to methods to resolve the problem.
So, now that the motorist is fully armed, you can proceed directly to the diagnostic and repair process.
The magnetic motor of the arrow drive is broken
The process of repairing and disassembling the dashboard
The most common problem with the arrow hanging or not responding on the instrument panel is a breakdown of the drive motor. To diagnose this device, you need to use a multimeter to close the winding contacts to an electrical circuit or resistance.
To troubleshoot the problem, of course, it is recommended to contact an auto electrician, who will do everything quickly and efficiently, but if the car enthusiast has the necessary skills and abilities in repairing such equipment, then he will be able to independently replace the motor and solder the necessary contacts.
Breaks and disturbances in the operation of the electrical circuits of the dashboard
Wiring related fault determination
Another common reason for a stuck sensor is a break in the electrical circuit from the coolant sensor to the dashboard. It is quite simple to identify this; you need to remove the ground wire from the sensor and connect it to any other “minus” so that the electrical circuit is closed.
If the wire is not broken, then the arrow will begin to move; if not, then according to the electrical diagram it is necessary to find the wire in which the break occurred and eliminate the fault. As practice shows, motorists do not change the wire, but simply connect and insulate the contacts at the break point.
Short circuit in the board of the device itself
Detection of short circuits on the instrument board
But, in this case, an indirect sign is that nearby signs also fail. So, the tachometer and other indicators may not show. Here, troubleshooting is to replace the instrument panel assembly.
Freeze due to temperature sensor
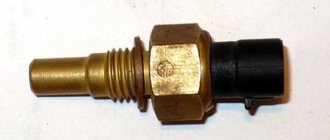
Temperature sensor location
A frozen temperature arrow on the instrument panel will be associated with a faulty temperature sensor. So, its diagnosis can be carried out by analogy with a wiring break, or checked using a tester. If, as a result of diagnostic operations, it turns out that the coolant sensor is faulty, it must be replaced.
Problems with the computer
The process of identifying ECU errors and eliminating them
In this case, using the appropriate cable, you need to connect to the “brains” of the car and see if there are any errors. If there are too many of them, then you need to reset them.
Of course, if this procedure does not help, then it is recommended to reset the software. It is recommended to trust this procedure to professionals who will not only fix the problem, but also set the motor to optimal operating mode.
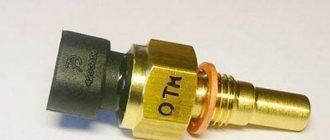
How to check the DTOZH on a VAZ 2114 with your own hands
First of all, you need to remove the sensor. It is located near the cooling jacket pipe. To make removal easier, first remove the air filter. Don't forget to disconnect the negative terminal of the battery and drain the antifreeze from the cooling system. Otherwise, antifreeze or antifreeze will flow in a stream directly from the hole in the cooling jacket. Before dismantling, disconnect the sensor chip.
Using a 19 or 21 key, unscrew the DTOZH from the jacket. Now comes the fun part. Fill a small container with some antifreeze, and attach an ohmmeter or multitester with resistance measurement mode to the ends of the sensor. Now place this container on the gas stove and begin to slowly heat the antifreeze. For accurate measurements, install a thermometer in the container.
So, a working sensor should give the following readings at certain temperatures:
- 3520 Ohms at 20 degrees Celsius
- 667 Ohms at 60 degrees Celsius
- 177 Ohms at 100 Degrees Celsius
If there are any inconsistencies or discrepancies in the obtained values, you can immediately draw conclusions that the sensor is not working and needs to be replaced. Otherwise, you risk stumbling upon a major engine overhaul, which will cost you much more than a new sensor. It is immediately worth noting that such a sensor is non-repairable. If the readings are correct and the problem remains, then look for it elsewhere, for example in the controller software or thermostat.
How to connect an air temperature sensor yourself
The mechanism itself has two contacts, one of which must be connected to the vehicle ground, and the second to the ECU. But, before starting all work, you need to make sure that the on-board computer supports collaboration with a specific type of sensor. Information can be found in the documentation.
As for the installation itself, there are no difficulties here. You just need to follow the instructions for connecting the DTNV. After connecting the sensor, make sure that the instrument panel display shows the correct temperature.
If the incorrect outside air temperature is still displayed, you should “restart” the on-board computer. You just need to remove the positive terminal for 5-10 minutes, and then reconnect it. After the operation has been completed, the DTNV should begin to display the actual ambient temperature.
Where is the device showing the antifreeze temperature in the VAZ 2114 located?
At the beginning, I would like to remind you of the following: the cooling system itself on cars comes in three types: mixed, air and liquid. In the machine we are interested in, the CO runs on antifreeze, that is, on a liquid product. The whole scheme includes several clearly important components:
- radiator fan;
- radiator for heating the interior;
- radiator for the cooling system;
- CO shirts;
- pump and expansion tank;
- pipes connecting the nodes;
- coolant temperature sensor.
The VAZ 2114 sensor, unlike other VAZ car models, is located on the engine block.
Factors and signals of malfunction
Service center specialists quite often encounter breakdowns of DTOZH. Many of them agree that most devices fail for natural reasons. For example, the internal contacts of the resistor break. Because of this, the ECU receives incorrect parameters, which leads to a system failure.
For example, the main controller considers a hot engine to be cold, so it sends a command to the flow meter (DMVR) to enrich the mixture, that is, reduce the air supply. As a result, the motor begins to “choke” and run rough. In addition to the natural breakdown of the DTOZh, other causes of malfunction may appear:
- The seal of the sensor housing is broken.
- There was a break in the electrical wires.
- The power supply has fallen off.
In these cases, the ECU will warn the owner by turning on the Check Engine signal on the dashboard (check engine). In addition, the driver may experience the following signs of sensor malfunction:
- difficult engine starting;
- floating speed;
- severe detonation;
- loss of power;
- the engine stalls.
The listed symptoms are accompanied by a fantastic increase in fuel consumption and the appearance of dark smoke from the exhaust pipe. So it's time to go to a car service for diagnostics. You can also check the ECU system yourself. To do this, install a special application on your smartphone and buy a Bluetooth adapter for the diagnostic block.
Possible breakdowns of DTOZH
We will name the most common malfunctions that are associated with malfunctions in the operation of the device: contact failures or breaks in which insulation is lost, the fan does not function as required.
Signs of failure include the following:
- When the engine is not warmed up, the fan starts to work;
- The engine is warm enough, but its performance can be considered unsatisfactory;
- Excessive fuel consumption is observed.
Among the common erroneous beliefs, there is one: young and inexperienced motorists do not see the difference between two concepts: DTOZH and coolant temperature indicator sensor.
How to fix the problem?
If the battery is low, it needs to be charged. This is done like this:
- Remove the battery and wipe it with a dry cloth.
- Connect the charger to the battery and charge it.
- You should usually charge for at least half a day or fifteen hours if fully discharged. In this case, you need to set the current on the charger to 2.5 Amps if it does not select the mode automatically.
- Before removing the device, make sure that the battery is fully charged.
After charging, you need to check the battery voltage using the above method. If it is within the normal range, install it on the car. Observe for several days to see if the battery is draining. If rapid discharge occurs for no apparent reason, the device is likely faulty. Therefore, you will have to buy a new battery.
If the generator is faulty, it is usually enough to replace its brushes to restore functionality. To do this you need:
- Remove the wiring harness.
- Remove the wires from the generator and remove the nut securing them. Separate the protective cap from the positive terminals of the wires for protection.
- Remove the plastic casing.
- Find the voltage regulator and unscrew it with a screwdriver.
- Disconnect the wires and pull out the part along with the brushes.
- Replace the brushes and install the element on the generator.
If this does not help or visible defects are found on the device, other parts will also need to be replaced. VAZ 2114 generators are repairable. You can repair them yourself. But in some cases, it is better to replace the electric generator or contact specialists to restore it.
If the low voltage is associated with other faults that you could not identify yourself, you need to visit an auto electrician.
How to check the device for serviceability
So, you have noticed that your motor often gets very hot, or you have discovered other negative signs associated with the cooling device. To begin with, you should check this device, and there are two ways, which we will take a closer look at.
The first option is to remove the device
- With the engine running, check the readings shown on the instruments. If the arrow is at the maximum height, then the engine is still in a cold state. Here you should break the contacts on the device and look: if the arrow points down, then it’s time to replace the coolant temperature sensor of your car.
- When the pointer remains in the same place, try to examine the system contacts; a short circuit often occurs in them. Then the problem can be fixed much faster.
- Another type of failure: the engine heats up evenly, and the instrument needle begins to jump in one direction or another. There is a high probability that the issue is with fuses that are inoperative.
- If the fuses are working, it is necessary to close the contact to ground, and again, if the arrow sharply goes up, you can safely state that there is a malfunction in the operation of the DTOZH.
Second option
- You need to take a multimeter and turn it on in resistance mode.
- Then arm yourself with a thermometer that has notches above one hundred degrees Celsius.
- Take a durable container that will not deform when the coolant is heated to a high temperature.
- After that, you need to connect the probes of the device to the sensor.
- Having made the necessary connections, the DTOZH is placed in a prepared heat-resistant container and heated.
- Here you should monitor the performance of two devices at once.
Sensor check
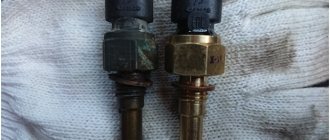
First, we advise you to check the sensor that you think is faulty. Even if it turns out that it doesn't really work, at least you'll have peace of mind.
Plus, be sure to check the new sensor before installing it. This will make sure it works. Today there are quite a lot of fakes on the market, so there is always a chance to purchase a low-quality fan sensor.
Searched object
To check you will need a certain set of tools and materials, which includes:
- Capacity;
- Water;
- Coolant;
- Thermometer;
- Multimeter.
Let's start checking.
- Pour water or regular coolant into the prepared container.
- Lower the sensor into it with the threaded part.
- Connect the multimeter terminal to the regulator contacts. The measuring device must be in resistance measurement mode. Although if the multimeter has a dialing function, then choose it.
- Place a thermometer into the liquid.
- Heat the water.
- When the liquid temperature reaches the regulator response temperature (92 degrees Celsius), the contacts should close and the multimeter will start beeping.
- If this does not happen, the sensor really does not work and needs a replacement.
If you purchased a regulator that is not working, be sure to go to the store and ask for a replacement or refund. But only if you have a receipt. It is better to purchase spare parts in specialized, good stores. There is less risk of getting caught by a fake.
Typical problems and their diagnosis
- Violation of the tightness of the tank: the tank begins to leak due to mechanical damage;
- Rupture of the container due to impact or technological defect.
- Problems with the reservoir cap.
Tank cap malfunctions need to be disassembled separately, as this is the most diverse and common group of breakdowns. A clogged cover valve most often causes inconvenience to owners of “fourteeners”. The valve “clogs” due to dirt and stops releasing hot air. This leads to multiple excesses of operating pressure and overheating of the motor.
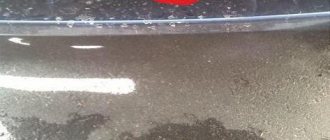
Also, coolant may leak through the cap, causing the working fluid level to gradually decrease. A leak can be identified by the presence of smudges in the expansion tank.
Common signs of a broken expansion tank:
- traces of leaks on the tank body;
- The engine overheating indicator light is on;
- smoke from under the hood, other signs of significant overheating;
- warm air does not come out of the heating deflectors, despite the fact that there are “symptoms” of a significant increase in the operating temperature of the engine.
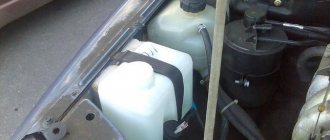
Expansion tank: general description
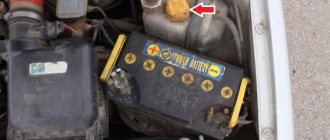
The expansion tank of the VAZ 2114 is a white plastic container with three fittings. The device helps remove engine heat into the cabin (for heating) and the environment. The operating pressure is adjusted using a lid equipped with a valve. The valve releases pressure when the liquid expands due to heat. The tank capacity is less than one and a half liters. The maximum operating temperature of the liquid is 90 degrees C.
A container with a valve helps maintain the operating pressure of the liquid, which, with a working cooling system, rarely exceeds one and a half atmospheres.
Expansion tank: VAZ 2114 which is better
Standard reservoirs made in Syzran are widely available for sale at a price of 500-600 rubles. When purchasing, you need to make sure that the catalog number and compatible model line are marked on the tank body. For the VAZ brand, it is recommended to purchase products made of light plastic, slightly transparent.
In this product segment there is a large number of counterfeit goods that do not meet the stated specifications.
Repair
If you find leaks at the inlet and outlet of the hoses into the tank, you just need to replace them and secure them with new clamps. In this case, it is advisable to place the new hoses on the sealant. If you notice leaks of fluid from under the reservoir cap, it needs to be replaced. But what to do if you find a malfunction on the road and there is no auto shop nearby? You need to try to temporarily fix the problem on your own and to do this:
- Wait until the coolant cools down and the pressure in the expansion tank drops.
- Unscrew the tank cap.
- Using a screwdriver or knife, remove the rubber and valve spring from the cover
- The spring needs to be shortened by several turns by biting them off with pliers or simply breaking them off.
This repair should last for some time, even if the rubber seal on the lid is worn out.
Buy a tank cap as soon as possible. As noted earlier on models of the VAZ 08 -15 family, this part is identical.
If the expansion tank has received mechanical damage: it has burst, worn out, then it can be repaired by sealing it. But such repairs are undesirable due to unreliability, and replacement will not cause big problems, neither technical nor financial.