Temperature sensors used
The Chevrolet Niva has three temperature sensors.
Each of them performs its own function. The most important is the coolant temperature sensor. It prevents the engine from overheating, is connected directly to the electronic control unit and controls the operation of the radiator fan. The operation of the coolant temperature indicator sensor is associated with informing the driver about the thermal state of the engine. The meter slightly duplicates the functions of the DTOZH.
The outside air temperature sensor monitors the state of the environment. It performs the function of a conventional thermometer, displaying data on the liquid crystal screen of the instrument panel.
Russia, Penza 2021
Lada Niva (aka Lada 4x4) traces its history back to its creation in the 1970s, having managed to gain authority all over the world. A vehicle with all-terrain capability and comfort comparable to a passenger car. The car is popular not only in Russia, but also in Germany, as well as other countries in Europe and the world.
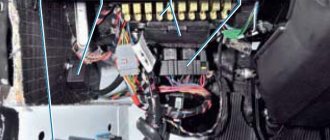
Fuse box - located to the left of the steering column under the instrument panel. Despite the fact that it’s 2021, and these cars have been fuel-injected for several years, they are nevertheless equipped with finger fuses.
Mounting block Lada 4×4
Location of standard wiring fuses
Fuses KSUD Lada NIVA
Operating principle and functions of the device
The design and operating principle of the temperature meter have changed little since its first use on a car. Due to modern materials used in the manufacture of the sensor, it has decreased in size, and the accuracy of the readings has increased. The device is a thermal variable resistor enclosed inside a metal case with a threaded tip.
The following functions depend on the operation of the temperature sensor:
- Traditionally, the coolant temperature indicator operates from meter signals.
- Timely activation of forced engine cooling fans when the antifreeze reaches the set temperature threshold (about 100 °C).
- Enriching the air-fuel mixture and increasing idle speed on a cold engine.
- While driving, the controller collects readings from all sensors and, on this basis, forms the ratio of fuel and air in the mixture. The temperature meter is also involved in this process.
The design of a modern car may provide for the installation of several heating meters responsible for certain functions. Their location varies:
- on the upper pipe leading from the cylinder block to the radiator;
- in the thermostat housing;
- in the cylinder head;
- directly into the radiator.
It is not difficult to distinguish thermocouples from other types of sensors. All devices built into the engine cooling system and connected by wires to the controller are designed for temperature measurements. The only point: when you start looking for the location of the temperature meter for the purpose of checking, do not confuse the device with the knock sensor built directly into the cylinder block. When a machine has several thermal elements, their functions are usually distributed as follows:
- a meter built into the pipe is involved in preparing the fuel mixture for the engine;
- a device located in the radiator ensures that a cooling fan (or two) is turned on;
- The sensor in the cylinder head is responsible for the coolant temperature gauge.
Most low- and mid-price cars use one temperature sensor that performs all functions simultaneously. It is usually located on the thermostat housing or on the upper radiator hose.
Also interesting: Niva Chevrolet speed sensor - Auto magazine MyDucato
Detonation
A knock sensor is used to detect vibrations or shocks present in the operation of a car engine. This device is mounted on the top of the block head, and the device is based on a special piezo plate used as a sensitive component. If the sensor detects detonation while the car’s engine is running, then special pulses begin to form at its output, which will increase with the increase in detonation. In accordance with these signals, the engine control unit automatically adjusts the ignition until the number of detonation flashes is reduced to a minimum.
If the controller breaks down, the engine will detonate, especially when the speed increases in a lower gear. If you check the ignition, you will find that everything is set correctly and there is no need to adjust the timing. Replacement is simple:
- The power cable is disconnected from the regulator in the engine compartment.
- The device is removed from the landing site.
- A new controller is being installed.
Location of temperature sensors
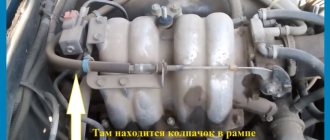
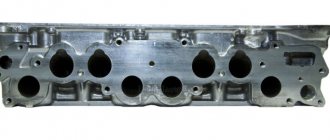
The coolant temperature indicator sensor is screwed directly into the hole in the cylinder head. It can be seen if you look at the power plant from the left side.
The DTOZH is located in the coolant outlet line. It is inserted into the front pipe of the water jacket.
To see where the outside air temperature sensor is located, you need to look under the front bumper. The meter is located behind the lower right corner of the license plate. Without removing the bumper, the sensor can be seen through the hole located near it.
DTOZH
The coolant temperature controller is also considered an engine temperature sensor. This device is a resistor whose resistance value changes in accordance with the temperature of the consumable. If you are wondering where the DTOZH is located, it is located on the coolant exhaust line, directly on the cylinder head.
If the air temperature outside is negative, the resistance of the sensor will be increased - at 40 degrees below zero this figure will be about 100 kOhm. When the motor warms up to operating temperature, the resistance will drop to 177 Ohms.
When the device fails, the dashboard will display incorrect readings regarding engine temperature. For example, the pointer needle may not rise at all, sometimes it stops in the middle of the scale. To diagnose and replace the DTOZh, follow these steps:
- To begin, prepare a thermometer that can operate at high temperatures, a multimeter for testing, and a container of liquid that you will heat on the stove.
- Remove the sensor itself from the socket, having first disconnected the connector and placed a container under the location, since some of the antifreeze may come out during removal. Disconnect the connector and unscrew the device; temporarily install a plug in its place.
- Place the sensor in a container with water prepared in advance, only lower the part of the controller that was screwed into the cylinder head into the liquid. Measure the resistance and turn on the kitchen burner to heat the water.
- As the temperature increases, the resistance will drop. Measure this parameter several times at different temperatures, then compare the obtained data with the normalized ones indicated in the table in the service book. If the data is very different, replace the device with a new one.
What symptoms indicate problems with the sensor?
During long-term operation of the car, obvious and indirect signs may be observed indicating problems with the temperature sensor or its electrical circuit. The first ones directly indicate the need to check the functionality of the device:
- The engine heating indicator on the dashboard stopped working;
- the cooling fan stopped turning on, although the engine water jacket had already warmed up to 100 °C;
- antifreeze leakage from under the part body;
- The fan starts at random, including when the engine is cold.
If your car exhibits the listed signs of a malfunction of the coolant temperature sensor, then feel free to proceed to diagnosing it and fixing the problem, which will be discussed below. Indirect symptoms may indicate a breakdown of the meter or other elements of the cooling system or power unit. Here are the most common ones:
- Cold starting of the engine is difficult. The car starts, but immediately stalls, you need to make several repeated attempts. The cause may be a thermocouple, throttle position sensor, insufficient compression or ignition problems.
- Unstable operation at idle. In addition to the temperature meter, it is affected by the serviceability of the spark plugs, mass flow sensor, injectors and many other factors.
- The temperature is within normal limits, but the coolant begins to boil. If the thermostat fails or the level of antifreeze in the jacket decreases, then the readings of the device may differ from the real state of affairs.
The serviceability of an electronic temperature meter can be checked at home. If indirect symptoms of a malfunction are observed, the test will help to identify them or exclude them from a number of parts that are “under suspicion.” If you successfully check the problem, you will have to look elsewhere or contact the nearest auto repair shop.
Errors
During operation, the machine gradually wears out. The owner notices various signs, but does not always determine the cause. Temperature sensor problems are usually caused by:
- breakdown of the engine temperature indicator on the dashboard;
- refrigerant leak from a part;
- inaccurate fan startup or failure to start for various reasons.
The appearance of these factors is a reason to check the DTOZH for performance.
Attention! If you ignore the malfunctions, the following problems may occur:
1. Failure of the internal combustion engine control unit due to an incorrect signal that the sensor transmits to the computer. In hot weather, the control system may not turn on the fan, which will lead to boiling. 2. The malfunction also disrupts engine performance and driving dynamics.
Cost of sensors
Chevrolet Niva temperature sensors, although they are not consumables that require periodic replacement, still have a very low price. This is due to the simplicity of the design and the absence of the use of expensive materials or technologies in manufacturing. More detailed prices for meters are given in the table below.
Table - Cost of Chevrolet Niva temperature sensors
Also interesting: Generator Niva 2121, 21213, 21214: which one is installed, replacement
| Sensor | Price |
| DUTOZH | 250-350 |
| DTOZH | 230-300 |
| Outdoor temperature sensor | 170-340 |
Oxygen
The Chevrolet Niva oxygen sensor is also called a lambda probe; it is located in the exhaust gas system on the receiving pipe. The oxygen contained in the exhaust gas interacts with it, thereby creating a potential difference at the outlet. It varies from approximately 0.1 to 0.9 V. For it to function normally, its temperature must be at least 360 degrees. For these purposes there is a built-in heating element. If the potential difference at the output is low, then the mixture begins to enrich, and if, on the contrary, it is high, then the mixture becomes depleted.
Performance test
The most effective way to check is diagnostics using diagnostic equipment, in common parlance – a “car scanner”. This is the most accurate way to identify any car malfunctions, and there are 2 options - go to a service center or purchase a scanner for personal needs. At the moment, the second option will be the most preferable, because... will save you a lot of money in a short period of time. There are a very large number of diagnostic devices on the market for every taste and color.
If your budget is limited or you simply do not want to spend large sums on purchasing a device, then we can recommend you an adapter from the Korean manufacturer Scan Tool Pro Black Edition.
The adapter is compatible with 99% of cars manufactured in 1993 and connects via Bluetooth or Wi-Fi to any device on Android, iOS and Windows. It is noteworthy that, despite its low cost in the region of 2 - 2.5 thousand rubles. the device sees not only the engine, like most budget adapters, but also other components and assemblies of the car. It also shows the operation of all available sensors in your car in real time.
If you do not have such devices, and the nearest service is very far away, then there is another way to check, at home.
To check the thermal sensor, it will have to be removed from the car. To do this, follow these steps:
- Allow the engine to cool to 40-50 °C to avoid burning your hands during operation. Partially or completely drain the antifreeze from the cooling system.
- Disconnect the battery from the on-board power supply by removing the negative cable.
- Disconnect the block with wires from the thermoelement.
- Unscrew the part using a wrench of the appropriate size.
If the device is installed at the top point of the system, then it is not necessary to empty it entirely; it is enough to drain a third of the liquid into the container. All antifreeze must be drained when the thermocouple is located at the bottom of the radiator.
To carry out the tests you will need:
- a multimeter or other device capable of measuring circuit resistance;
- a small container for water (you can use a regular glass);
- thermometer with a scale up to 100 °C.
A thermometer is essential if you want to make accurate resistance measurements by referring to the reference chart for your vehicle. When there is no table, the serviceability of the part is checked without a thermometer according to its operating principle: the hotter the water in the glass, the lower the resistance at the contacts should be.
If the multimeter shows a certain resistance, then immerse the thermocouple in a glass of cold water and record the readings. Then add hot water and watch the resistance change, it should decrease. If there are no changes, purchase and install a new temperature sensor.
Also interesting: Generator Niva Chevrolet - voltage, repair and maintenance
If the tests were successful and the device changes resistance when heating the water, then it is worth checking the connecting wires and cleaning the contacts. Little things like this often cause major problems.
Cooling system 2123 Chevy-Niva Niva-Chevrolet
I struggled with this gadget for a very long time. According to the docks the working temp. 92-96 My first one turned on at 110, the second one was on the border of the red zone. I cured the problem by replacing both sensors and the expansion tank with a GOOD CAP! (plugs need to be selected experimentally because...
every second one doesn’t work!), replacing thin hoses of the cooling system, replacing the relays of both fans.
As a result, everything works like clockwork: turning on the first one at 97 knocks it down to 90 and turns off, at high loads if the first one can’t cope, the temperature is 100-110, the second one starts working at full power, together with the first one, it drops to 97, then only the first one works until it drops to 90.
BUT! THIS ALL WILL NOT BE LONG FOR LONG, FOR A COUPLE OF YEARS AT MAX UNTIL THE TANK LEAKS OR THE PLUG STICKS BECAUSE. THE QUALITY OF SPARE PARTS AND SENSORS LEAVES THE BEST! AND A VERY IMPORTANT THING IS SURELY NECESSARY TO INSTALL A FORCED BREAK OFF THE FAN CHAIN FOR LOVERS OF DRIVING FORD OTHERWISE THE RADIATOR AND THE SCREWS THEMSELVES WILL BREAK TO THE F##NIM CHECKED))))!
On-board computer State X1-M, in it you can adjust the temperature at which the second fan turns on up to 90 degrees. It helped me.
Elm won’t work, the easiest way is to change it in the firmware, K-line or Vagcom are perfect for this; they cost pennies. The whole procedure won’t take more than 5-10 minutes, it will take longer to remove the brains from the car, you can watch a video on YouTube on how to connect it on the table and change the firmware everything is down to the smallest detail
You can press the button to force both fans to turn on at maximum speed.
102. Forget about Elm.
102 degrees. You can change it using BC or reflash the computer.
With the help of the bk, the inclusion of the first fan, and not the second, is changed. The second one is only in the firmware.
No, the second one is also controlled when the appropriate channel is selected. But there is a nuance: it turns on the second valve separately, and not together with the first, like standard brains.
102 degrees it seems
There, in fact, there is often not an integer value, such as 101.75
Fans of the Niva Chevrolet cooling system are used for forced ventilation of the radiator. They increase the intensity of heat dissipation while driving at low speeds and are the only way to cool the antifreeze in a plug or “toffee”.
Checking and removing fans
To understand whether they are working or not, you need to unplug the connector from your motors and connect the lamp to the wires through which the voltage is connected, as well as to the sensor, if both lamps light up, the problem is with the fans.
To remove them you need to do the following:
- Disconnect all wires
- Remove the top nozzle
- Remove the bumper
- If you have an air conditioner, bend the tubes (do this carefully, as they may burst) or drain the freon (pouring it back is not cheap), then remove the air conditioner radiator.
- Loosen the nuts on the radiator housing
- Tilt the radiator so that you can remove the fan
- Unscrew the bolts that attach the block and remove it
After removal, it is recommended to replace both with new ones, since there is a possibility that a little time will pass and the second element will fail, and all replacement work will need to be repeated. You can do this procedure from below, but you will need special equipment and you will need to move the motor ten centimeters back, which is very labor intensive.
To maintain the optimal temperature in the engine, a cooling system is installed in the car. One of the main elements in this system are fans, thanks to which the required amount of air is supplied to the engine through the radiator core.
If it stops working, the Niva Chevrolet cooling fan overheats as excess heat begins to accumulate. Unlike classic cars, it has two fans, making the functioning of the systems much more complicated.
If the arrow that shows the temperature is in the red area, and the cooling system refuses to work, and at the same time the cooling fan does not turn on, then the car should be taken to a car service center as quickly as possible, or you should try to find the cause of the malfunction yourself.
Self-replacement of the temperature indicator sensor
Replacing the coolant temperature gauge sensor on a Chevrolet Niva with your own hands is presented step by step below.
- Disconnect the on-board network.
- Remove the protective cover from the meter.
- Disconnect the terminal from which the sensor wire comes.
- Loosen the meter. To do this, you will need a key “21”.
- Unscrew the loose gauge by hand. Remove the sensor.
- Install the new meter in the reverse order of removal.
Do-it-yourself replacement of the coolant temperature sensor
To replace the coolant temperature sensor, tools are required, which are presented in the table below.
Table - Tools and materials required to replace the coolant temperature sensor
| Name | Note |
| open-end wrench | "on 10" |
| Wrench | "at 19" |
| Head | "at 13" |
| Vorotok | With extension and ratchet |
| Screwdriver | Medium size, flat blade |
| Rags | For cleaning dirt without leaving lint behind |
In order to replace the DTOZH on a Chevrolet Niva, it is recommended to use the step-by-step algorithm of the instructions below.
- Work should be carried out with a completely cold engine. Therefore, before proceeding with the replacement, if the vehicle is just after a trip, then it is necessary to wait a time interval sufficient for the power unit to cool down.
- Secure the vehicle using the parking brake.
- Open the hood.
- Disconnect the vehicle's power supply. To do this, you need to remove the negative terminal from the battery.
- For easy access to the temperature meter, it is recommended to remove the decorative protective casing of the power unit and the air filter housing.
- By pressing the clamps, remove the terminal from the coolant temperature sensor.
- Unscrew the meter.
- Remove the DTOZH.
- Install a new sensor.
- Reassemble everything in reverse order.
Replacing the outside air temperature sensor
The ambient temperature sensor is replaced according to the sequence presented below.
- Disconnect the negative terminal of the battery by de-energizing the network.
- Remove the front bumper for ease of work.
- Squeeze the three blades of the lock.
- By carefully pulling the meter, remove the sensor from the mounting hole of the bracket.
- Press the pad lock.
- Disconnect the meter terminal block.
Read news about the new Niva
- Chevrolet Niva temperature sensor: where is it located, replacement
- Chevrolet Niva temperature sensor: where is it located, replacement
- Removing the fuel tank. VAZ 21213, 21214 (Niva)
- Niva 21214 clutch malfunction
- Cooling system Niva Chevrolet: diagram, faults and their elimination | Niva Repair
- Removing the engine from the car. VAZ 21213, 21214 (Niva)
- How to connect a speed sensor in a field
- Phase sensor Niva Chevrolet symptoms of malfunction, DPRV high signal level